- Installing Ubuntu on BayTrail tablets (version 2)
- Requirements
- Current status on the Thinkpad Tablet 8
- A word about kernels
- Installation
- Disabling Secure Boot using Windows
- Disabling Secure Boot by directly booting into the UEFI menu
- Preparing the Ubuntu 14.10 installation medium
- Modifying the installation medium to boot on 32-bit UEFI
- Booting from the modified boot medium
- Backing up the Windows installation
- Installing Ubuntu 14.10 on the device
- Installing 32-bit GRUB
- Doing it the hard way
- The probably much better way (only available on Ubuntu 15.04)
- The end
- Linux для bay trail
Installing Ubuntu on BayTrail tablets (version 2)
This article is based on my previous version. I no longer use Ubuntu 15.04, but 14.10, because 15.04 switched to the 3.18 kernel which is incompatible with the eMMC flash in my tablet.
Requirements
- A BayTrail tablet, probably running Windows 8.1. I got a Lenovo ThinkPad Tablet 8 for the special price of 180 € from a local retailer.
- An USB-On-the-Go-Adapter. USB 2.0 will work, but you really want USB 3.0.
- A powered (!) USB hub. USB 2.0 will work, but you really want USB 3.0. If the hub is not powered, be prepared for USB resets or even a complete disconnect every time you connect a new device, because the tablet may not be able to supply enough power.
- An USB storage medium to boot from.
- An USB keyboard and USB Mouse.
- An USB network adapter, either Ethernet or WiFi, supported by Ubuntu 14.10, if the built-in WiFi of your device doesn’t work.
- Optional: A storage medium (USB, SD-Card etc.) big enough to back up the Windows installation. I used a 64 GB SD-Card.
Current status on the Thinkpad Tablet 8
- CPU initialisation and SMP (all four cores are working)
- GPU initialisation, accelerated 2D, 3D and video
- Touchscreen
- Backlight
- USB 3.0 On-the-go
What doesn’t work:
- ACPI battery detection: The battery is not detected.
- WiFi: The brcmfmac driver needs you to create a configuration file named /lib/firmware/brcm/brcmfmac43241b4-sdio.txt . The content of this file can be extracted from the UEFI vars, at least on my tablet the variable is called /sys/firmware/efi/efivars/nvram-74b00bd9-805a-4d61-b51f-43268123d113 . Everything is present, the brcmfmac driver is loaded and doesn’t complain, but at the end the kernel does not report any wireless devices.
- Bluetooth: Is bundled with the WiFi.
- Sound: Was not working and I didn’t try to fix it.
- The two cameras: Connected via some obscure bus (MIPI-CSI) which isn’t supported.
A word about kernels
I couldn’t get any of the stable kernels from kernel.org working because they have problems with the internal eMMC flash in my ThinkPad Tablet 8 (see this emailing list discussion). After at most 20 minutes the kernel freezes and the last message is «mmc0: Timeout waiting for hardware interrupt» .
Ubuntu 14.04 and 14.10 kernels work, obviously because they have been patched. At the moment I don’t know exactly what has to be patched. The Ubuntu 15.04 kernel does not work.
Installation
Disabling Secure Boot using Windows
- Boot into Windows.
- Go into “PC settings”.
- Select “General” (Windows 8) or “Update and recovery” (Windows 8.1).
- Under “Advanced startup”, click on “Restart now”.
- At this point I’m not completely sure how the story went, and I can no loner check, since the Windows installation on my tablet is already gone. You are looking for some way to get into the UEFI firmware settings, probably hidden behind Items like “Troubleshoot”, “Advanced options” etc.
- Once you are in the UEFI menu, disable Secure Boot.
- Set the Boot Order so that external USB drives are at the top and listed before the internal storage. Different manufacturers seem to use different UEFI firmwares with different menus, so you have to find the options yourself.
- Power off.
The tablet is now prepared.
Disabling Secure Boot by directly booting into the UEFI menu
At least the ThinkPad Tablet 8 can be directly booted into UEFI by powering off the device and then pressing the Volume-Up- and Power-button until the display turns on. If you press the buttons for too long, the tablet will turn off again!
Once you are in the UEFI menu, disable Secure Boot. Set the Boot Order so that external USB drives are at the top and listed before the internal storage. Different manufacturers seem to use different UEFI firmwares with different menus, so you have to find the options yourself.
The tablet is now prepared.
Preparing the Ubuntu 14.10 installation medium
*** NOTE: In my earlier version I suggested to download the latest version of
- Download the most recent 64-bit Ubuntu 14.10 (Utopic Unicorn) Desktop ISO.
- Create a bootable USB storage medium as usual, e.g. using usb-creator-gtk.
Modifying the installation medium to boot on 32-bit UEFI
Yes, some genius came up with the idea to put a 32-bit UEFI on a 64-bit device. The Linux kernel shipped with Ubuntu 14.10 supports mixed-mode, so kernel-wise it is no longer a problem. But the Ubuntu 14.10 (Vivid Vervid) ISO does not contain a 32-bit bootloader. Luckily this can be easily fixed.
- Get a bootia32.efi file, I used this one from John Wells.
- Copy the file into the EFI/BOOT/ folder on the boot medium.
Booting from the modified boot medium
- Power off the tablet, if necessary.
- Attach the USB-On-the-Go-Adapter to the tablet.
- Connect the USB hub to the adapter.
- Connect the boot medium to the USB hub.
- Connect the keyboard and mouse to the hub.
- Start the tablet.
- The device should boot from the boot medium.
If you can’t get the tablet to boot from the USB storage medium, try booting into the UEFI menu again and check if it is possible to enable a Boot Device selection screen. The Thinkpad Tablet 8 has an option to boot into such a screen if the F12 key is pressed after device power-on.
Backing up the Windows installation
I just started a terminal in the Live Session and used dd to backup all internal flash partitions to individual files on an SD-Card.
Installing Ubuntu 14.10 on the device
- Start a terminal session and switch do root (using sudo -i or something similar)
- Run parted
- Preserve the first two partitions (EFI and Windows Recovery) and delete all other partitions
- Create a large ext4 partition in the remaining space
- Create a small swap partition in the remaining space (e.g. 4 GB)
- Write to disk and exit
I don’t trust the flash storage, so I created the filesystem manually and told mkfs.ext4 to check for bad blocks:
mkfs.ext4 -v -c /dev/mmcblk0p3
After this I just used the Ubuntu Installer, chose “Partition manually” and configured as follows:
- The EFI partition (should be the first one) shall be used as EFI partition
- The just-created ext4 partition (should be the third one) shall be used as the root filesystem. Deactivate the “Format” checkbox if it is set.
- The swap partition shall be used as a swap partition.
Installing 32-bit GRUB
Ubuntu 15.04 comes with a 32-Bit GRUB package, but 14.10 does not, so we have to do it the hard way.
The following steps are common to both methods:
- Reboot the device, with the USB storage medium plugged in.
- Wait until the device has booted into GRUB from the USB storage medium.
- Hit “c” on the keyboard to drop to the GRUB shell.
- Input the following two lines, adapting all device and partition identifiers and kernel versions to your setup (GRUB has autocompletion!):
- Boot with the command “boot”.
- If the system doesn’t boot, go back to step 1.
- Log into the Ubuntu installation.
- Connect to the internet using the internal WiFi or your USB network adapter.
Doing it the hard way
Reboot and manually boot into your new installation:
- Open a terminal and install the dependencies:
- Open a terminal and check out the GRUB git repository:
- Build a 32-bit GRUB:
- Install 32-bit grub:
- Replace the Ubuntu bootloader with our GRUB one, making sure that there are only the listed files in the directory:
- Update the grub config:
You can set the UEFI boot order using the efibootmgr command, but I am not completely sure as to what the correct settings are. The following settings were generated by update-grub and seem to works on my tablet:
The probably much better way (only available on Ubuntu 15.04)
- Open a terminal and install the grub-efi-ia32-bin package:
- Update the grub config:
The end
Now your device should boot into the Ubuntu installation on every boot. If it doesn’t, try to fiddle with the boot order list. You can always boot into your installation by booting from the external USB storage medium and going through the GRUB console, as shown before.
As always you can find me on the FreeNode IRC.
Источник
Linux для bay trail
Сообщение отредактировал Rammsteiner — 04.06.21, 12:11
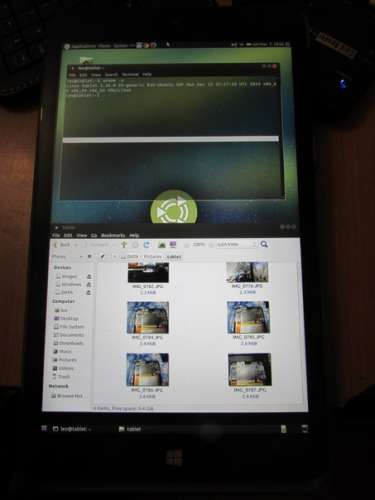
Из всех дистрибутивов которые я побывал у меня более или менее нормально запустилось только ubuntu mate 14.10
Скачиваем данный образ и переносим его содержимое на флешку, рекомендую для этого использовать программу Rufus
|
|
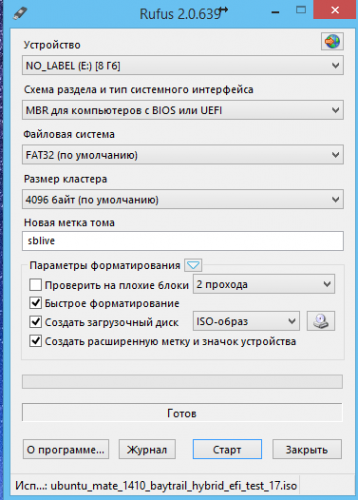
1. Запускаем Rufus
2. Выбираем образ(Снизу видим пункт «создать загрузочный диск» и и справа от него кнопка с изображением cd-rom. Нажимаем на кнопку и выбираем наш .iso с linux.)
3. Нажимаем «Старт» и ждём.
В других дистрибутивах как правило требуется еще добавить 32 битный загрузчик(bootia32.efi) в папку EFI/BOOT
Подключаем к планшету флешку клавиатуру и опционально мышку и перезапускаем планшет
На моем при включение надо жать кнопку Esc что бы появился доступ к выбору загрузочного устройства
В появившемся меню выбираем «Boot live in safe graphics mode» так как на первом варианте у меня виснет(возможно вам повезет больше)
ждем пока загрузиться система, если графика сама не стартовала то вводим логин пароль в текстовом режиме(baytrail/baytrail)
и набираем
Если все прошло успешно то запуститься рабочий стол
|
Сообщение отредактировал leonidy-85 — 16.03.15, 17:11 вроде и федора существует на 32битном уефи, вчера сайт ссылка работал, а сегодня когда захотел скачать сайт не работает. Сообщение отредактировал machetekills — 16.03.15, 16:59 Ubuntu 15.04 Daily Build vivid-desktop-amd64.iso от 13-Mar-2015 с ядром 3.19.0.9, вчера ставить пытался эту сборку, в grub.cfg убирал строки загрузки quiet и splash, в EFI/BOOT вставил bootia32 , но графика не стартует, нужен hdmi телек, подсоединяя планшет в телевизор на телеке должно стартовать графа а затем отсоединив графика стартует в планшете, но эту проблему не решить если нет hdmi на планшете. Сообщение отредактировал machetekills — 14.07.15, 18:39
что дальше делать один разраб знает. Сообщение отредактировал machetekills — 18.03.15, 12:36 Сообщение отредактировал machetekills — 18.03.15, 18:11 В появившемся меню выбираем «Boot live in safe graphics mode» так как на первом варианте у меня виснет(возможно вам повезет больше) Если все прошло успешно то запуститься рабочий стол Всем доброго времени суток, уважаемые форумчане. Сообщение отредактировал intro94 — 25.03.15, 14:34 Привет, друзья. Хочу поделиться с вами тем, как можно еще интересно использовать наши маленькие игрушки. А точнее про установку Kali Linux Live USB для возможности пин-теста вай-фай сетей. Почему Live USB? Потому что: Во-первых, в Live версии мы имеем все возможности Kali linux в сфере пин-теста. Для полноценной работы в kali linux нам понадобятся: Подготовительные работы: 4. У вас на рабочем столе или в «компьютере» должен быть диск (раздел) «Kali Linux». На него необходимо скопировать скаченный ранее bootia32.efi по пути /EFI/Boot/ предварительно создав эти папки. # Config file for GRUB2 — The GNU GRand Unified Bootloader set menu_color_normal=green/black function load_video < # Timeout for menu # Set default boot entry as Entry 0 menuentry ‘Kali Linux Live’ < menuentry ‘Windows 8.1’ < Сохраняем этот файл как grub.cfg на диск (раздел) «Kali Linux» по пути /boot/grub/ Теперь самое время подключить все девайсы к нашему планшету. В БИОС’е выбираем загрузиться с флешки и в меню grub выбираем или загрузку Kali Linux Live или Windows 8.1 и наслаждаемся. Источник |