COREUTILS. Команда du. Как узнать размер папки или файла из консоли Linux
Узнать размер папки Linux администратору дает возможность команда du из пакета coreutils. Просто набери в терминале «du» и вы получите размер всего дерева каталогов, начиная с текущего каталога. Однако, такой способ в большинстве случаев не всегда удобен, так как вывод команды получается огромным. Давайте на примерах рассмотрим, как можно менять поведение утилиты du с помощью дополнительных ключей.
Итак. Ключ «—max-depth=n» позволяет указать глубину просмотра, а ключ «-h» выводит информацию в удобочитаемом формате. Кроме того ключ «-a» дает возможность включить в вывод файлы и скрытые папки, тем самым позволяя получить исчерпывающую информацию:
du можно также передать папку в качестве аргумента, чтобы исключить необходимость перехода в каталог командой cd:
du -ha —max-depth=1 /var
По умолчанию, du подсчитывает также размер и тех папок, которые фактически могут являться частью других файловых систем, т.е. быть примонтированными. Ключ «-x» отключает такую возможность, имитируя поведения команды df, что может быть полезным при попытке узнать размер точки монтирования:
du -hax —max-depth=1 /home
Этот ключ не следует использовать, если вы пытаетесь взвесить размер папки перед, например, копированием на съемный носитель, так как, в зависимости конечно от того, что вы попросите, будет скопировано все дерево каталогов с их файлами. Вместо этого полезно использовать ключ «-L», который, при встрече с ссылками (ярлыками), пройдет по ссылке и включит размер файла (или папки), на который она ссылается, в вывод:
du -haL —max-depth=0 /home
Теперь мы знаем, как посмотреть размер папки и файла в Linux. Как обычно, вся дополнительная информация доступна по команде
Источник
Анализ дискового пространства в Linux – команды du и ncdu
Одной из распространённых задач в системном администрировании является оценка состояния жёстких дисков (а также и других устройств хранения), в том числе анализ использования дискового пространства. В Linux для таких целей давно существуют утилиты с удобным графическим интерфейсом, предоставляющих наглядную информацию о занятом пространстве в виде диаграмм и графиков. Однако, для системных администраторов, обслуживающих «серьёзные» сервера на основе Linux-систем, графический интерфейс — чрезмерное удовольствие, не оправдывающее затрачиваемых на него ресурсов. Поэтому необходимо уметь обходиться средствами командной консоли, используя специализированные консольные утилиты для анализа дискового пространства, которые доступны в виде двух команд — du и ncdu.
как посмотреть свободное место на диске
Давайте узнаем сколько у нас свободного места в системе. Узнать это можно с помощью команды
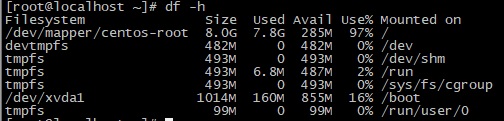
как видим у нас диск занят на 97%, и нам необходимо узнать что у нас заняло место. Давайте этим займемся.
Команда du – синтаксис и опции
Disk Usage – именно так интерпретируется название команды du. Она была написана ещё в самой первой версии UNIX (в определённом роде предшественницы Linux), еще в стенах одной из лабораторий компании AT&T. Этот факт даёт понять, насколько важно следить за дисковым пространством, а также анализировать его при наличии специализированных программных инструментов, ведь du – одна из самых первых утилит из стандартного комплекта UNIX/Linux.
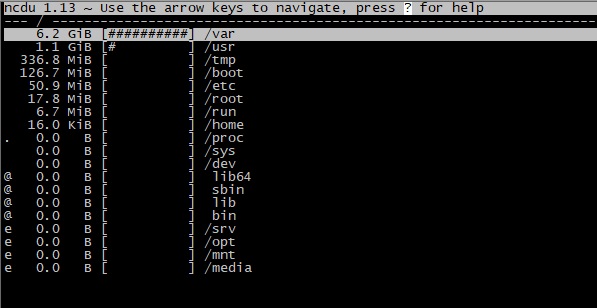
Итак давайте узнаем что у нас занимает место
Более подробное описание команды du и ключей вы можете прочитать ниже. Вывод будет следующий
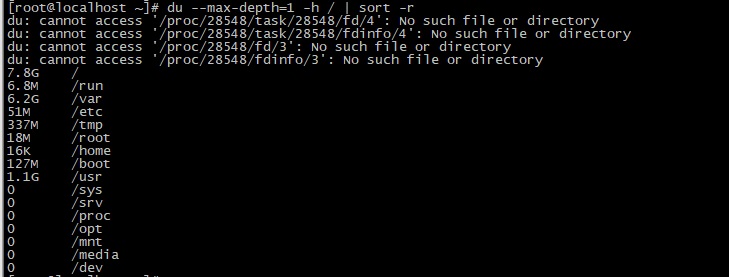
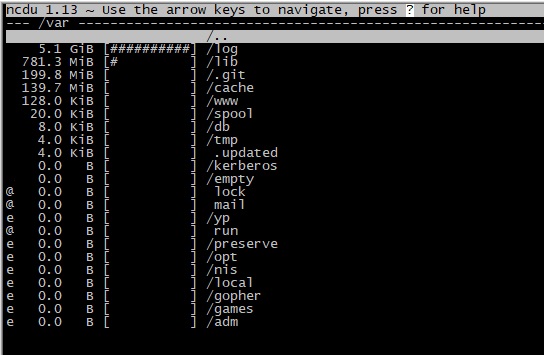
Отсюда мы видим что самый большой каталог у нас /var. Посмотрим что у на занимает место в каталоге /var
видим что это папка log
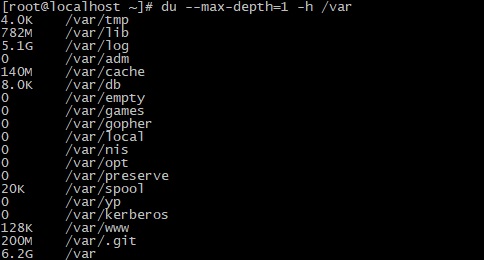
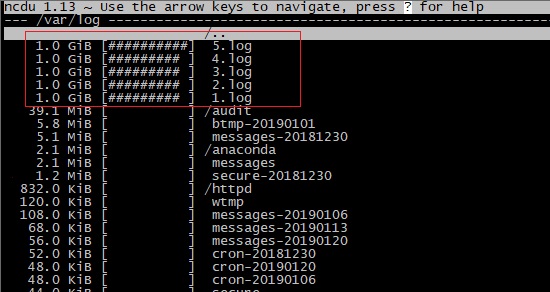
Теперь смотрим /var/log
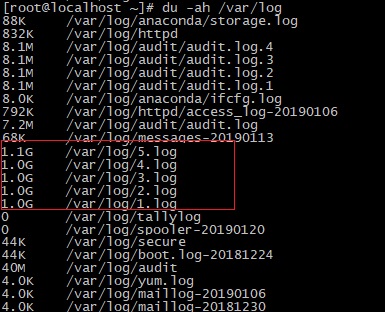
и вот здесь мы уже видим пять самых больших файлов с логами, именно они и заняли все место на диске. Давайте рассмотрим команду du подробнее.
Согласно описанию из официального man-руководства, утилита du суммирует использование дискового пространства набора элементов, рекурсивно с каталогами. Синтаксис команды не простой, а очень простой, поскольку представляет собой классический прототип команды Linux:
Если дать команду du без параметров, то по-умолчанию будет выведен список всех каталогов и подкаталогов для текущего каталога. Также по-умолчанию единицей измерения объёма является 1024 байта или 512 байт, в зависимости от конфигурации используемой системы:
Как видно, code_text.txt занимает 4 килобайта (т. к. 1024 байта = 1 килобайт) дискового пространства. То же самое и с папками, но по-умолчанию будет указан общий размер папки без детализации по файлам и подкаталогам. В следующей таблице приведены опции команды du:
| Опция | Назначение |
| -a | Выводит объём для всех элементов, а не только для каталогов |
| —apparent-size | Выводит действительные размеры, но не занимаемое место а диске |
| -B, —block-size=РАЗМЕР | Задаёт использование определённых единиц измерения объёма |
| -b, —bytes | То же самое, что и «—block-size —apparent-size=1» |
| -с, —total | Выводит общий результат |
| -D, —dereference-args | Указывает обрабатывать только те символьные ссылке, которые перечислены в командной строке |
| -d, —max-depth=N | Выводит общий размер только до N-го уровня (включительно) дерева каталогов |
| -h, —human-readable | Выводит размеры в удобном для человека виде |
| -k | Эквивалентно —block-size=1K |
| -L, —dereference | Разыменовывает символьные ссылки |
| -l, —count-links | Складывает размеры, если несколько жёстких ссылок |
| -m | Эквивалентно —block-size=1M |
| -t, —threshold=РАЗМЕР | Исключает элементы, которые меньше РАЗМЕРА, если это значение положительно или размер которых больше, если это значение отрицательно |
| —time | Выводит время последнего изменения в каталоге и во всех подкаталогах |
| —time=АТРИБУТ | Выводит указанный атрибут времени (atime, access, use, ctime, status), а не время последнего изменения |
| —time-style=СТИЛЬ | Выводит время в указанном в СТИЛЬ формате: full-iso, long-iso, iso |
| -X, —exclude-from=ФАЙЛ | Исключает все эдементы, которые совпадают с шаблоном из ФАЙЛа |
| —exclude=ШАБЛОН | Исключает элементы, совпадающие с шаблоном |
| -x, —one-file-system | Пропускать каталоги из других систем |
Используемые командой du единицы измерения размера (или объёма) задаются в формате «цифраБуква», где цифра — это коэффициент, а Буква — степень единицы измерения, например: 5K = 5 * 1024 = 5120 = 5 килобайт и по аналогии для M – мегабайт, G – гигабайт.
Примеры использования команды du
Узнать общий размер каталога (например с резервными копиями):
Вывод размеров всех подкаталогов (рекурсивно):
С учётом файлов:
С фильтрацией в зависимости от размера файла/каталога:
Как видно, были отброшены файлы/каталоги размером меньше 2 мегабайт. Следующая команда, напротив — исключит из вывода только файлы/каталоги больше 2 мегабайт:
Команда ncdu
Более удобный способ найти что занимает место на диске можно с помощью команды ncdu. Утилита ncdu (Ncurses Disk Usage) способна делать всё то же самое, что и утилита du и даже немного больше. К тому же, она предоставляет пользователю удобный в использовании псевдографический интерфейс, с помощью которого можно быстро перемещаться по дереву системы, оценивая размеры интересующих элементов и папок.
Фактически, ncdu может выполнять функции полноценного браузера системы, при этом имеет большое количество опций, позволяющих настраивать псевдоинтерфейс для разных режимов работы, экспортировать и импортировать результаты работы в файлы, выполнять сортировки, экономить сетевой трафик, если это нужно, когда анализируется удалённая (например по SSH) система.
По-умолчанию, выполнение команды ncdu без параметров, выводит файловый браузер, в котором после предварительного сканирования (с показом прогресса выполнения) отображается список элементов и подкаталогов текущего каталога. По этому списку можно перемещаться, используя клавиши курсора, спускаться в подкаталоги ( ) выходить из них, при этом информация о размере представленных элементах и папок отображается «как на ладони». В строке состояния отображается общий используемый объём (Total disk usage), фактический объём (Apparent size), а также количество файлов и папок для текущего анализируемого каталога.
Основные опции команды ncdu:
| Опция | Назначение |
| -o ФАЙЛ | Позволяет экспортировать результаты работы в указанный файл |
| -f ФАЙЛ | Загружает из файла для отображения данные ранее экспортированные с помощью опции -o |
| -0 | Не никаких информационных сообщений при сканировании файловой системы |
| -1 | Подобна опции -0, но выдаёт единственную строку о статусе выполненного действия. По-умолчанию используется при экспорте в файл |
| -q | Тихий режим. Во время сканирования директории экран с результатами сканирования будет обновляться каждые 2 секунды, вместо 10 раз за секунду. Обычно используется при работе с удаленными системами |
| -r | Включает режим «только для чтения» для отключения встроенной функции удаления. Не работает с опцией -o |
| -x | Не выходить за рамки текущей используемой файловой системы |
| —exclude ШАБЛОН | Исключает из подсчёта значения размеров файлов, имена которых удовлетворяют шаблону, но эти файлы будут отображаться в списке |
| -X ФАЙЛ, —exclude-from-file | Исключает из подсчёта значения размеров файлов, имена которых удовлетворяют шаблону из файла, но они также будут отображаться в списке |
Интерфейс ncdu действительно очень дружественный — размеры всегда отображаются в «человекопонятных» единицах.
Для работы с псевдоинтерфейсом ncdu предусмотрен целый набор «горячих клавиш», позволяющих удалять выбранные файлы и каталоги, включать режим представления используемого пространства в процентах, отображать информацию о выбранных элементах, а также выполнять другие полезные функции. Об этом более подробно можно прочитать в соответствующих man-страницах в разделе «KEYS», используя команду man ncdu.
Примеры команд ncdu
Сделаем поиск занимаемого пространства с помощью ncdu
ncdu /
Снова видим большой каталог /var, и уже с помощью клавишь и ENTER мы можем передвигаться по каталогам. Видим каталог log
А здесь мы видим наши большие логи
Еще несколько полезных примеров.
Сканирование объёмных каталогов с экспортом/архивированием в лог для последующего использования или просмотра:
Сканирование текущей директории, экспорт результатов в лог, и последующий просмотр этих результатов в браузере ncdu:
Работа с удалённой системой:
В данной команде опция -C используется для утилиты ssh для сжатия сетевого трафика при некачественном или медленном соединении.
Если вы нашли ошибку, пожалуйста, выделите фрагмент текста и нажмите Ctrl+Enter.
Источник
The du Command
The du (i.e., disk usage) command reports the sizes of directory trees inclusive of all of their contents and the sizes of individual files. This makes it useful for tracking down space hogs, i.e., directories and files that consume large or excessive amounts of space on a hard disk drive (HDD) or other storage media.
A directory tree is a hierarchy of directories that consists of a single directory, called the parent directory or top level directory, and all levels of its subdirectories (i.e., directories within a directory). Any directory can be regarded as being the start of its own directory tree, at least if it contains subdirectories. Thus, a typical computer contains a large number of directory trees.
du is commonly employed by system administrators as a supplement to automated monitoring and notification programs that help prevent key directories and partitions (i.e., logically independent sections of a HDD) from becoming full. Full, or even nearly full, directories and partitions can cause a system to slow down, prevent users from logging in and even result in a system crash. Although visually identifying heavy consumers of disk space can be practical if there are relatively few users on a system, it is clearly not efficient for large systems with hundreds or thousands of users.
A minor limitation of du is the fact that the sizes of directories and files it reports are approximations, not exact numbers, and there is frequently a small discrepancy between these sizes and the sizes reported by other commands. However, this rarely detracts from its usefulness.
Also, du can only be used to estimate space consumption for directories and files for which the user has reading permission. Thus, an ordinary user would generally not be able to use du to determine space consumption for files or directories belonging to other users, including those belonging to the root account (i.e., the system administrator). However, as du is used mainly by system administrators, this is usually not a problem.
Syntax
The basic syntax for du is:
du [options] [directories and/or files]
The items in the square brackets are optional. When used with no options or arguments (i.e., names of directories or files), du lists the names and space consumption of each of the directories (including all levels of subdirectories) in the directory tree that begins with the current directory (i.e., the directory in which the user is currently working). The space consumption of any directory consists of the space occupied by all of the files in it and all of its subdirectories at all levels inclusive of all of the files in them. A final line at the end of the report gives the total space consumption for the directory tree.
du can provide information about any directory trees or files on the system whose names are given as arguments. For example, the following will report the names and sizes for each directory in the directory tree that begins with a directory named directory2 that resides in a directory named directory1, which, in turn, is located in the current directory:
Likewise, the following will report the sizes of the two files named file1 and file2 that are located in the /sbin directory (which contains executable programs):
du can accept any number of arguments, and they can be any combination of files and directories. When there are multiple arguments, no grand total is provided by default, although a total is still provided for each argument.
Options
As is the case with most commands on Linux and other Unix-like operating systems, du has a number of options, a few of which are commonly used. The options can vary somewhat according to the particular operating system and the version of du.
One of the most useful options is -h (i.e., human readable), which can make the output easier to read by displaying it in kilobytes (K), megabytes (M) and gigabytes (G) rather than just in the default kilobytes. Thus, the following command can be used to show the sizes of all the subdirectories in the current directory as well as the total size of the current directory, all formatted with the appropriate K, M or G:
The -s (for suppress or summarize) option tells du to report only the total disk space occupied by a directory tree and to suppress individual reports for its subdirectories. Thus, for example, the following would provide the total disk space occupied by the current directory in an easy-to-read format:
The output is the same as the last line of a report issued by du with only the -h option.
The -a (i.e., all) option tells du to report not just the total disk usage for each directory at every level in a directory tree but also to report the space consumption for each individual file anywhere within the tree. Thus, for example, the following would list the name and size of every directory and file in the /etc directory (which contains system configuration files) for which the user has reading permission:
A somewhat similar report is provided by using the star ( * ) wildcard, which will match any character or characters. For example, the following command would list the sizes of all directories that are in the tree that begins with the current directory:
However, the only files listed are those in the the parent directory, not those in its subdirectories. Also, no total for the directory tree as a whole is provided.
The use of the -s option and the star wildcard together would cause du to report the names and sizes of only the files and directories contained directly in the top level directory itself (and to not list the names of any of its subdirectories and the files in them). The size of each listed directory is, of course, inclusive of all of its files and subdirectories (including all of the files in them). For example, such a report about the directory tree beginning with the current directory would be provided by the following:
The wildcard can also be used to filter the output to list only those items whose names begin with, contain or end with certain characters or sequences of characters. For example, the following would report the names and sizes of all of the directories and files in the current directory whose names begin with the letter s as well as the names and sizes of all levels of subdirectories of those directories regardless of what their names begin with:
The -c option can be added to provide a grand total for all of the files and directories that are listed. In the case of the above example, this would be
As another example of the use of the wildcard, the following command would report the name and size of each gif (one of the two most popular image formats) file in the current directory as well as a total for all of the gifs:
Another useful option is —max-depth=, which instructs du to list its subdirectories and their sizes to any desired level of depth (i.e., to any level of subdirectories) in a directory tree. For example, the following would cause du to list only the first tier (i.e., layer) of directories in the current directory and their sizes (inclusive of all of their contents, including those of their subdirectories):
The total space consumption for the current directory tree will also be reported, and it will, of course, be the same regardless of the depth of the files listed.
Setting —max-depth= to zero tells du to not list any of the subdirectories within the selected directory, i.e., to list only report the size of the selected directory itself. The result is the same as using the -s option.
Using du With Filters
As is the case with other commands on Unix-like operating systems, du can be linked with pipes to filters to create powerful pipelines of commands. A filter is a (usually) small and specialized program that transforms data in some meaningful way.
For example, to arrange the output items according to size, du can be piped to the sort command, whose -n option tells it to list the output in numeric order with the smallest files first, as follows:
As du will often generate more output than can fit on the monitor screen at one time, the output will fly by at high speed and be virtually unreadable. Fortunately, it is easy to display the output one screenful at a time by piping it to the less filter, for example,
The output of less can be advanced one screenful at a time by pressing the space bar, and it can be moved backward one screenful at a time by pressing the b key.
The output of du can likewise be piped to less after it has been passed through one or more other filters, for example,
The grep filter can be used to search through du’s output for any desired string (i.e., sequence of characters). Thus, for example, the following will provide a list of the names and sizes of directories and files in the current directory that contain the word linux:
One way in which du can be used to produce a list of (mostly) directories and files in a directory tree that are consuming large amounts of disk space is to use grep to search for all the lines that contain the upper case letter M (i.e., for megabytes) or G (for gigabytes), such as
The only problem with this approach is that it will also select directories and files that contain an upper case M or G in their names even if the file size is not measured in megabytes or gigabytes. (However, this problem could be overcome through the use of regular expressions, an advanced pattern matching technique).
Alternatives to du
There are several other ways of monitoring disk space consumption and reporting file sizes. Although very useful tools, they are generally not good substitutes for du.
Among them is the df command, which is likewise used by system administrators to monitor disk usage. However, unlike du, it can only show the space consumption on entire partitions, and it lacks du’s fine-grained ability to track the space usage of individual directories and files.
du is not designed to show the space consumption of partitions. The closest that it can come is to show the sizes of the first tier of directories in the root directory (i.e., the directory which contains all other directories and which is represented by a forward slash), several of which may be on their own partitions (depending on how the system has been set up). This is accomplished by becoming the root user and issuing the following command:
The ls (i.e., list) command can provide the sizes of individual files by using its -s option, and its -h option (which is similar to du’s -h option) can be added to make the output easier to read. For example, the following would list the names and sizes of the files in the current directory:
Although the names of the first tier of directories within the current directory are also listed, the size data accompanying them does not represent their actual disk space consumption (i.e., inclusive of their contents). Nor does ls report the contents of any lower tiers of directories, unless such directories are specifically listed as arguments.
A convenient alternative for finding the sizes of files and directory trees when using a GUI (graphical user interface) is to click with the right mouse button on the icon (i.e., a small picture or symbol) for that item and then select Properties from the menu that appears. Although this is frequently sufficient, it does not provide the detailed control and reporting that du provides.
Created August 21, 2004. Last updated April 18, 2007.
Copyright © 2004 — 2007 The Linux Information Project. All Rights Reserved.
Источник


