- Исправление битых секторов badblocks+e2fsck: Устройство занято, хотя не примонтировано
- Спасибо за ответ
- Спасибо за ответ
- Спасибо! Теперь команда выполняется!
- Как использовать команду fsck для исправления ошибок файловой системы в Linux
- Когда использовать fsck в Linux
- Опции программы fsck
- Как запустить fsck для исправления ошибок файловой системы Linux
- Понимание кодов выхода fsck
- Как исправить ошибки файловой системы Linux
- Как запустить fsck на корневом разделе Linux
- Как принудительно проверить диск с помощью fsck при загрузке системы
- Как запустить fsck в режиме восстановления
- Заключение
- e2fsck(8) — Linux man page
- Synopsis
- Description
- Options
- Exit Code
- Signals
- Reporting Bugs
- 5 UNIX / Linux e2fsck Command Examples
- What is e2fsck?
- 5 e2fsck Examples
- 1. Check a partition
- 2. Automatic repair using e2fsck
- 3. Check only (no change) using e2fsck
- 4. Force the filesystem check
- 5. Display a progress bar during e2fsck check
- Syntax and Options
Исправление битых секторов badblocks+e2fsck: Устройство занято, хотя не примонтировано
Доброго дня! К физической машине подключено три диска: — 6ТБ (sdb) — 2ТБ (sda) — 500Гб (sdc)
На 6ТБ стоит Centos 7, с которого происходит загрузка.
Задача: проверить диск (500Гб) на битые сектора.
Примонтирован только sdb, остальных в mount нет, в /etc/fstab тоже
Проверяю на битые сектора с записью в файлы, сначала диск целиком, потом только раздел:
После этого запускаю исправление диска с указанием битых секторов:
Для раздела диска — аналогичная ошибка:
При попытке проверить:
. выдаёт пустой результат.
Вопрос — как всё таки заблочить найденные бад-блоки?


У тебя на sdc2 — физический том LVM. И основная система тоже стоит на LVM. Ты уверен, что тома на sdc2 не используются? Посмотри, что pvdisplay, lvdisplay, pvs, lvs говорят. Попробуй отключить группу томов на sdc2 с помощью «vgchange -an».
Спасибо за ответ
Группу centos отключаю, выдает:
Логические тома активны:
Пробую деактивировать логические разделы диска, отвечает, что тоже используется:
Logical volume centos/root contains a filesystem in use.
Возможно, ты её ещё проверяешь в одной из консолей.
Скорее всего, /dev/centos/root у тебя всё-таки куда-то смонтирована.
Спасибо за ответ
Проверяю, какие еще консоли запущены:
Или не так/не там смотрю?
Правильно я понимаю, что, если смонтирована, то должна отображаться через mount?
Или еще где-нибудь может быть, не в mount’е?
Правильно я понимаю, что, если смонтирована, то должна отображаться через mount?
/dev/mapper/centos-root on /mnt type xfs (rw,relatime,attr2,inode64,noquota)
Спасибо! Теперь команда выполняется!
И, тогда напоследок, для понимания картины в целом: mapper — как он был примонтирован сам, если ручками я его не монтировала? И что это, как его посмотреть?
Через df -h видны mapper’ы только уже примонтированного диска:
Барабашка примонтировал, не иначе. 😀
Там в /dev просто куча разных символьных ссылок. К примеру, /dev/centos/root и /dev/mapper/centos-root оба указывают на какой-то один /dev/dm-N, где N — некоторое число.
Подумал я тут ещё, посмотрел в df. Оказалось, что df фильтрует файловые системы и показывает не все. В частности, не показывает псевдо-ФС и недоступные. Возможно, по какой-то причине тот том был именно «недоступным», но запись о монтировании при этом не отвалилась.
Источник
Как использовать команду fsck для исправления ошибок файловой системы в Linux
Файловые системы отвечают за организацию хранения и восстановления данных. Так или иначе, со временем файловая система может быть повреждена, и некоторые её части могут оказаться недоступными. Если ваша файловая система обнаруживает такую несогласованность, рекомендуется проверить её целостность.
Это можно сделать с помощью системной утилиты fsck (проверка целостности файловой системы). Эта проверка может выполняться автоматически во время загрузки или запускаться вручную.
В этой статье мы рассмотрим утилиту fsck и её использование, чтобы помочь вам исправить ошибки диска.
Когда использовать fsck в Linux
Есть разные сценарии, когда вы захотите запустить fsck. Вот несколько примеров:
- Система не загружается.
- Файлы в системе повреждаются (часто вы можете увидеть ошибку ввода/вывода).
- Подключенный диск (включая флешки/SD-карты) не работает должным образом.
Опции программы fsck
Команду fsck необходимо запускать с привилегиями суперпользователя или root. Вы можете использовать её с разными аргументами. Их использование зависит от вашего конкретного случая. Ниже вы увидите некоторые из наиболее важных опций:
Как запустить fsck для исправления ошибок файловой системы Linux
Чтобы запустить fsck, вам нужно убедиться, что раздел, который вы собираетесь проверить, не смонтирован. Для целей этой статьи я буду использовать свой второй диск /dev/sda, смонтированный в /mnt/disk_d.
Вот что произойдёт, если я попытаюсь запустить fsck, когда раздел смонтирован.

Если диск не только смонтирован, но и используется (например, диск, смонтированный в корневую файловую систему), то ошибка будет «/dev/nvme0n1 is in use».
Чтобы избежать этого, отключите раздел с помощью следующей команды (замените имя диска на ваше):
Тогда можно будет безопасно запускать fsck.

Понимание кодов выхода fsck
После запуска fsck он вернёт код выхода. Эти коды можно увидеть в руководстве по fsck, запустив:
Описание кодов выхода fsck:
Как исправить ошибки файловой системы Linux
Иногда в файловой системе может быть обнаружено более одной ошибки. В таких случаях вы можете захотеть, чтобы fsck автоматически пытался исправить ошибки. Это можно сделать с помощью:
Флаг -y означает автоматически отвечать «да» на любые запросы от fsck для исправления ошибки.
Точно так же вы можете запустить то же самое во всех файловых системах (с пропуском корневой файловой системы):
Как запустить fsck на корневом разделе Linux
В некоторых случаях вам может потребоваться запустить fsck в корневом разделе вашей системы. Поскольку вы не можете запустить fsck, пока раздел смонтирован, вы можете попробовать один из следующих вариантов:
- Принудительно использовать fsck при загрузке системы
- Запустите fsck в режиме восстановления
Мы рассмотрим обе ситуации.
Как принудительно проверить диск с помощью fsck при загрузке системы
Это относительно легко выполнить, единственное, что вам нужно сделать, это создать файл с именем forcefsck в корневом разделе вашей системы. Используйте следующую команду:
Затем вы можете просто принудительно перезагрузить или запланировать перезагрузку системы. Во время следующей загрузки будет выполнена проверка диска командой fsck. Если время простоя критично, рекомендуется тщательно его спланировать, поскольку, если в вашей системе много используемых inode, выполнение fsck может занять дополнительное время.
После загрузки системы проверьте, существует ли ещё файл:
Если это так, вы можете удалить его, чтобы избежать появления fsck при каждой загрузке системы.
Как запустить fsck в режиме восстановления
Для запуска fsck в режиме восстановления требуется ещё несколько шагов. Сначала подготовьте вашу систему к перезагрузке. Остановите все критически важные службы, такие как MySQL/MariaDB и т. д., а затем введите.
Во время загрузки удерживайте нажатой клавишу Shift, чтобы отобразилось меню grub. Выберите Advanced options («Дополнительные параметры»).
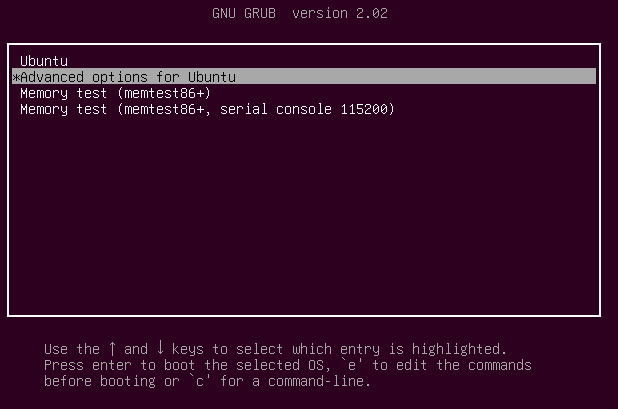
Затем выберите Recovery mode («Режим восстановления»).

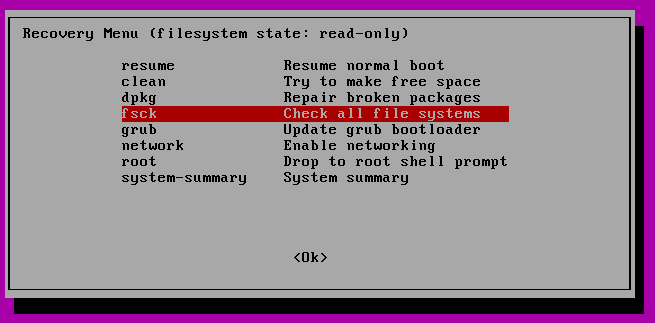
В следующем меню выберите «fsck».
Вас спросят, хотите ли вы перемонтировать / файловую систему. Выберите Yes («да»).
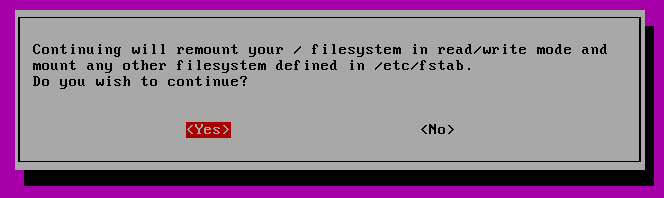
Вы должны увидеть нечто подобное.

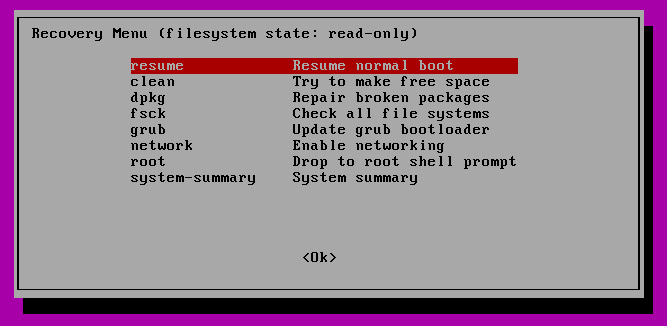
Затем вы можете вернуться к нормальной загрузке, выбрав Resume («Возобновить»).
Заключение
В этом руководстве вы узнали, как использовать fsck и выполнять проверки согласованности в разных файловых системах Linux. Если у вас есть какие-либо вопросы о fsck, не стесняйтесь задавать их в разделе комментариев ниже.
Источник
e2fsck(8) — Linux man page
Synopsis
Description
device is the device file where the filesystem is stored (e.g. /dev/hdc1).
Note that in general it is not safe to run e2fsck on mounted filesystems. The only exception is if the -n option is specified, and -c, -l, or -L options are not specified. However, even if it is safe to do so, the results printed by e2fsck are not valid if the filesystem is mounted. If e2fsck asks whether or not you should check a filesystem which is mounted, the only correct answer is »no». Only experts who really know what they are doing should consider answering this question in any other way.
Options
Exit Code
Signals
Reporting Bugs
Please include as much information as possible in your bug report. Ideally, include a complete transcript of the e2fsck run, so I can see exactly what error messages are displayed. (Make sure the messages printed by e2fsck are in English; if your system has been configured so that e2fsck‘s messages have been translated into another language, please set the the LC_ALL environment variable to C so that the transcript of e2fsck’s output will be useful to me.) If you have a writable filesystem where the transcript can be stored, the script(1) program is a handy way to save the output of e2fsck to a file.
It is also useful to send the output of dumpe2fs(8). If a specific inode or inodes seems to be giving e2fsck trouble, try running the debugfs(8) command and send the output of the stat(1u) command run on the relevant inode(s). If the inode is a directory, the debugfs dump command will allow you to extract the contents of the directory inode, which can sent to me after being first run through uuencode(1). The most useful data you can send to help reproduce the bug is a compressed raw image dump of the filesystem, generated using e2image(8). See the e2image(8) man page for more details.
Always include the full version string which e2fsck displays when it is run, so I know which version you are running.
Источник
5 UNIX / Linux e2fsck Command Examples
What is e2fsck?
Check ext2, ext3, or ext4 filesystems.
5 e2fsck Examples
1. Check a partition
You should be root to execute this command. If not, you’ll get the following error message.
Also, the filesystem should not be mounted when you are performing the check. If it is mounted, you’ll get the following error message.
So, login to root, unmount the filesystem, and perform the check as shown below.
2. Automatic repair using e2fsck
Using -p option, you can instruct e2fsck to check and automtically repair all issues without prompting you for confirmation.
You can also use option -y, which will use “yes” answer to all the questions that are asked by the e2fsck command.
3. Check only (no change) using e2fsck
Using -n option, you can instruct e2fsck to perform check only. i.e this will not make any changes to the filesystem, it will only check
4. Force the filesystem check
When the filesystem is clean, it will not perform any checks, it will return the following message
However, if you want to force the filesystem check, even when it is clean, use the -f option as shown below.
5. Display a progress bar during e2fsck check
Using -C option, you can specify a file descriptor, where e2fsck will send the output, which is useful when you are doing e2fsck from a shell script.
If you specify “-C 0”, it will display a progress bar while e2fsck is doing the check, which is useful, as you can see that it is doing something.
Syntax and Options
Explain the option of the e2fsck command. e.g. of chmod shown below.
| Short Option | Long Option | Option Description |
|---|---|---|
| -a | Same as option -p. It is only for backward compatibility. | |
| -b | Using this option, you can specify an alternative superblock. Use this when the main superblock is corrupted. For filesystems with 1k blocksizes, a backup superblock can be found at block 8193; for filesystems with 2k blocksizes, at block 16384; and for 4k block‐sizes, at block 32768. Use mke2fs -n option to see additional backup superblocks. The mke2fs -b option, which specifies blocksize of the filesystem must be specified in order for the superblock locations that are printed out to be accurate | |
| -B | /td> | Using this option it will search for the superblock using different block sizes. This option forces e2fsck to use only the specified superblock blocksize. If the superblock is not found, e2fsck will terminate with a fatal error. |
| -c | Using this option it use badblocks program to do a read-only scan of the device in order to find any bad blocks. If any bad blocks are found, they are added to the bad block inode to prevent them from being allocated to a file or directory. If this option is specified twice, then the bad block scan will be done using a non-destructive read-write test. | |
| -C | Using this option it writes completion information to the specified file descriptor so that the progress of the filesystem check can be monitored. This option is typically used by programs which are running e2fsck. | |
| -d | Print debugging output. Not useful except to debug e2fsck command itself. | |
| -D | Use this option to optimize directories in filesystem. Does this by reindexing them, or by sorting and compressing directories for smaller directories, or for filesystems using traditional linear directories. | |
| -E | Using this option you can set e2fsck extended options. These are comma separated, and may take an argument using the equals (‘=’) sign. It supports ea_ver=extended_attribute_version and fragcheck | |
| -f | Force checking even if the file system seems clean | |
| -F | Flush the filesystem device’s buffer caches before beginning. Only really useful for doing e2fsck time trials. | |
| -j | Set the pathname where the external-journal for this filesystem can be found. | |
| -k | When combined with the -c option, any existing bad blocks in the bad blocks list are preserved, and any new bad blocks found by running badblocks(8) will be added to the existing bad blocks list. | |
| -l | Add the block numbers listed in the file specified by filename to the list of bad blocks. | |
| -L | Using this option set the bad blocks list to be the list of blocks specified by filename. (This option is the same as the -l option, except the bad blocks list is cleared before the blocks listed in the file are added to the bad blocks list.) | |
| -n | Using this option open the filesystem read-only, and assume an answer of `no’ to all questions. Allows e2fsck to be used non-interactively. This option may not be specified at the same time as the -p or -y options. | |
| -p | Automatically repair (“preen”) the file system. This option will cause e2fsck to automatically fix any filesystem problems that can be safely fixed without human intervention. If e2fsck discovers a problem which may require the system administrator to take additional corrective action, e2fsck will print a description of the problem and then exit with the value 4 logically or’ed into the exit code. | |
| -r | This option does nothing at all; it is provided only for backwards compatibility. | |
| -t | Print timing statistics for e2fsck. If this option is used twice, additional timing statistics are printed on a pass by pass basis. | |
| -v | Verbose mode. | |
| -V | Print version information and exit. | |
| -y | Assume an answer of `yes’ to all questions; allows e2fsck to be used non-interactively. Don’t use it when you are using -n or -p options. |
The exit code returned by e2fsck is the sum of the following conditions:
- 0 – No errors
- 1 – File system errors corrected
- 2 – File system errors corrected, system should
- be rebooted
- 4 – File system errors left uncorrected
- 8 – Operational error
- 16 – Usage or syntax error
- 32 – E2fsck canceled by user request
- 128 – Shared library error
Источник


