- Increase the Size of a Linux Root Partition Without Rebooting
- Table of Contents
- Introduction
- Requirements
- Provision Additional Space
- Verify
- Summary
- Atomic Spin
- Atomic Object’s blog on everything we find fascinating.
- Resizing LVM Volumes on a Virtual Linux Host without Reboot
- Partition the Virtual Disk
- Step-by-Step
- 1. Primary Partition
- 2. Change Type
- 3. Print & Verify
- 4. Write to Disk
- Quick Note on LVM Terminology
- Create the LVM Physical Volume, Add it to the Volume Group, & Extend the Logical Volume
- Learn Linux CCNA CEH IPv6 Cyber-Security Online
- Linux Networking Cyber Security Ethical-Hacking Network-Security Online Training and Tutorials with Live Projects
- Create,Delete and Update partitions in RHEL6 without reboot
Increase the Size of a Linux Root Partition Without Rebooting
Table of Contents
Introduction
A typical Linux server deployed from a ProfitBricks supplied image has a single storage volume, /dev/vda . If we take a look at that using fdisk we will see that the disk is divided into two partitions. The first one, /dev/vda1 , is the boot partition where the OS resides. The second partition, /dev/vda2 , is configured as swap space.
In the example above, the total 50 GB storage volume is split into 46 GB usable space and 4 GB for swap. What if after provisioning we find that 46 GB of disk space is not enough but we prefer not to add an additional storage volume? The goal is to increase the amount of disk space available on the root filesystem. This can be accomplished with minimal disruption. We do not need to reboot the server!
Requirements
- A Linux Server created from a ProfitBricks supplied image.
- SSH or console access (via the DCD) to the Linux Server.
- The partprobe command. Can be installed from the parted package on most Linux distributions.
- The fdisk , swapoff , mkswap , swapon , and resize2fs commands. Likely available by default.
- A current snapshot or other backup of the system you are working on. Just to be safe!
Provision Additional Space
To increase the size of the hard drive, go into the DCD (Data Center Designer) and upscale the drive.

After you have increased the amount of drive space, click on «provisioning» to process the change. Takes around a minute and your hard drive is bigger.
We then need to switch off the swap — so make sure you can live a few minutes without swap space:
Once swap has been disabled, we need to reconfigure the partitions using fdisk :
We will delete the two existing partitions first. We run fdisk /dev/vda and then use the d command to delete partition 2, and then delete partition 1. Follow the example below:
Now we recreate our partitions. In the example we have 4 GB of swap space. So we need to keep at least that much space available for the new swap partition.
Recreate /dev/vda1 first. Press n to create a new partition. Enter p to create a primary partition. We can press Enter to accept the default value of 2048 for the first sector. Then enter a size for the partition. You can enter a value in GB, so if we are increasing the disk to 100 GB, we subtract our 4 GB for swap, and enter +96G for 96 GB.
Now we recreate the swap partition following a simalar process. Press n and then p to create a new primary partition. Press Enter to accept the default value for «First sector». We can also press Enter again to accept the default value for «Last sector».
Since this second partition is going to be used for swap space, we need to change the partition type. This can be done by pressing t at the fdisk prompt. We then press 2 to select the second partition. If you want to see the list of available partition types, press L, otherwise enter 82 to select «Linux swap / Solaris».
fdisk helpfully informs us that we have changed the partition type with the message:
After that, we save using the w command and are returned to a shell prompt:
You may get a message like this before the shell prompt:
Lets forgo rebooting and instead tell the kernel about the new partitions using partprobe :
We should be returned to the shell prompt with no output from partprobe .
Now we need to resize our filesystem on /dev/vda1 :
The filesystem on /dev/vda1 is now 25165824 (4k) blocks long.
Initialize the new swap location of /dev/vda2 :
Finally we edit /etc/fstab and replace the old UUID with the new one returned in the output of the mkswap command. The line to change has no value for «mount point» and has «type» set to swap.
After editing /etc/fstab , we need to enable swap again:
Verify
We can verify the new larger disk size by utilizing df and/or fdisk .
We can also confirm that the server was not rebooted by looking at the output of uptime :
Summary
We have successfully increased the amount of disk space available on our Linux server. If you have any questions or comments, please leave them here, or in the DevOps Community section of this site.
Источник
Atomic Spin
Atomic Object’s blog on everything we find fascinating.
Resizing LVM Volumes on a Virtual Linux Host without Reboot
 The architecture hosting the SME Toolkit, a project sponsored by the IFC (International Finance Corporation), a member of the World Bank Group, utilizes Linux virtual hosts, running on Citrix XenServer. To account for changing needs (specifically disk space), the decision was made to use LVM (Logical Volume Manager) to manage our permanent storage. LVM allows volumes to be dynamically resized online—no rebooting is required. This presumes, of course, that LVM is set up initially when the virtual host is created.
In my case, one of my servers was starting to run low on disk space because of unanticipated increases in the size of an index stored on disk. It would have been acceptable to resize the virtual host’s disk traditionally (with a reboot) if the virtual host had been a development or test server. However, the server in question was a production server. Downtime was not really an option I wanted to consider. Fortunately, LVM was available, and was perfect for just such a situation.
My production server had a single virtual disk, 20GB in size. I wanted to double this, and bring the total available space to 40GB. Using Citrix XenCenter (the graphical manager for XenServer), I added an additional virtual disk (20GB) to the virtual host. This is a relatively trivial operation, and is supported by most virtualization platforms without the need to reboot the virtual host (and presuming the guest OS supports this). Once the virtual host recognized the newly attached virtual disk as a device, I was able to continue.
Partition the Virtual Disk
The next step was to partition the virtual disk so that it was actually usable by the system.
Using fdisk -l , I was able to quickly determine the name of the new virtual disk. The new virtual disk, /dev/xvdb , didn’t have a valid partition table.
Then, I used fdisk /dev/xvdb to create a new Linux LVM partition on the new virtual disk.
Step-by-Step
1. Primary Partition
I created a new primary partition in position 1. It started on the first cylinder (default), and ended on the last cylinder (default). This uses the full available disk space.
2. Change Type
I changed the type of the new partition to “Linux LVM ”, identified by hex code 8e .
3. Print & Verify
I printed out the new partition table to verify it was correct.
4. Write to Disk
And finally, I wrote the new partition table to disk.
Quick Note on LVM Terminology
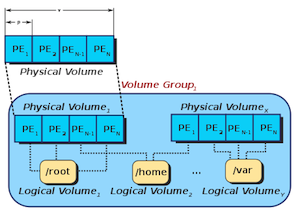
LVM defines physical volumes (PV’s) which together can be grouped into volume groups (VG’s). An example of a physical volume would be a physical hard drive, or a virtual disk drive. These physical volumes are usually divided into multiple units referred to as physical extents (PE’s). A volume group consists of at least one physical volume, and may contain several physical volumes. This volume group then has many available physical extents.
Several logical volumes (LV’s) can be created using the physical extents” available in a volume group. Physical extents are allocated to logical volumes as logical extents (LE’s). Unless mirroring is involved, there is a one-to-one mapping between physical extents and logical extents. Mirroring allows several physical extents to correspond to a single logical extent. Logical volumes are the actual disk volumes usable by the OS. In order to expand an existing logical volume, there must be unused physical extents inside the parent volume group. This can generally be accomplished by adding more physical volumes to the volume group.
This can all be a bit confusing at first, the image at the top of this post may be helpful for visualizing the working components of LVM.
Create the LVM Physical Volume, Add it to the Volume Group, & Extend the Logical Volume
Before adding a new physical volume to a volume group, LVM must be made aware of it. I did this using pvcreate /dev/xvdb1 , specifying the newly created partition. I checked available physical volumes before and after this operation using pvs .
Next, I added the new physical volume to my volume group. This is called ‘extending’ the volume group. I accomplished this by executing vgextend VolGroup00 /dev/xvdb1 , specifying the volume group and physical volume to use. I checked the size and free space available to the volume group before and after the operation with vgs .
When a volume group has free space, the extra space can be allocated to a new or existing logical volume. Since I wanted to increase the existing logical volume’s size, I used lvextend -l +100%FREE VolGroup00/LogVol00 . This specified that I wanted to extend the named logical volume (VolGroup00/LogVol00), using 100% of the available free extents. I checked the size of the logical volume before and after using lvs .
Increasing the size of the logical volume gave the OS access to the additional space. However, this did not make it usable. I needed to resize the filesystem on the volume to actually make the newly allocated space usable. I accomplish this with resize2fs /dev/mapper/VolGroup00-LogVol00 , specifying the filesystem on my logical volume. This resized the filesystem online. Running df showed the change in available disk space on the filesystem.
And Voilà ! More free space. This allowed my server to continue operating without interruption. No reboot was required, and more disk space became available—an elegant and effective solution.
Источник
Learn Linux CCNA CEH IPv6 Cyber-Security Online
Linux Networking Cyber Security Ethical-Hacking Network-Security Online Training and Tutorials with Live Projects
Create,Delete and Update partitions in RHEL6 without reboot
In this article we will learn how to Create,See,Mount,Use and Delete a partition in RHEL6 linux without reboot.In RHEL5 we use PARTPROBE command to update the changes made in partition table but in RHEL6 PARTPROBE command doesn’t work, in RHEL6 we use PARTX command.Here in this article we see step wise how to create,configure,manage,mount,use and delete a partition in RedHat Enterprise 6 Linux.In this article we also learn how to create an extended partition in linux and then how to create logical partition in linux and use it to store data.
First see the Partition Table Structure before Partition Creation:
[root@localhost
Disk /dev/sda: 17.2 GB, 17179869184 bytes
255 heads, 63 sectors/track, 2088 cylinders
Units = cylinders of 16065 * 512 = 8225280 bytes
Sector size (logical/physical): 512 bytes / 512 bytes
I/O size (minimum/optimal): 512 bytes / 512 bytes
Disk identifier: 0x000e1624
Device Boot Start End Blocks Id System
/dev/sda1 * 1 1275 10240000 83 Linux
/dev/sda2 1275 1530 2048000 82 Linux swap / Solaris
Now Create New Partition using fdisk command line tool:
[root@localhost
WARNING: DOS-compatible mode is deprecated. It’s strongly recommended to
switch off the mode (command ‘c’) and change display units to
sectors (command ‘u’).
Command (m for help): n
Command action
e extended
p primary partition (1-4)
e
Partition number (1-4): 4
First cylinder (1530-2088, default 1530):
Using default value 1530
Last cylinder, +cylinders or +size
Using default value 2088
Command (m for help): p
Disk /dev/sda: 17.2 GB, 17179869184 bytes
255 heads, 63 sectors/track, 2088 cylinders
Units = cylinders of 16065 * 512 = 8225280 bytes
Sector size (logical/physical): 512 bytes / 512 bytes
I/O size (minimum/optimal): 512 bytes / 512 bytes
Disk identifier: 0x000e1624
Device Boot Start End Blocks Id System
/dev/sda1 * 1 1275 10240000 83 Linux
/dev/sda2 1275 1530 2048000 82 Linux swap / Solaris
/dev/sda4 1530 2088 4482836 5 Extended
Command (m for help):
Command (m for help): n
Command action
l logical (5 or over)
p primary partition (1-4)
l
First cylinder (1530-2088, default 1530):
Using default value 1530
Last cylinder, +cylinders or +size
Command (m for help): p
Disk /dev/sda: 17.2 GB, 17179869184 bytes
255 heads, 63 sectors/track, 2088 cylinders
Units = cylinders of 16065 * 512 = 8225280 bytes
Sector size (logical/physical): 512 bytes / 512 bytes
I/O size (minimum/optimal): 512 bytes / 512 bytes
Disk identifier: 0x000e1624
Device Boot Start End Blocks Id System
/dev/sda1 * 1 1275 10240000 83 Linux
/dev/sda2 1275 1530 2048000 82 Linux swap / Solaris
/dev/sda4 1530 2088 4482836 5 Extended
/dev/sda5 1530 1555 201482 83 Linux
Command (m for help): n
Command action
l logical (5 or over)
p primary partition (1-4)
l
First cylinder (1556-2088, default 1556):
Using default value 1556
Last cylinder, +cylinders or +size
Command (m for help) : n
Command action
l logical (5 or over)
p primary partition (1-4)
l
First cylinder (1582-2088, default 1582):
Using default value 1582
Last cylinder, +cylinders or +size
Command (m for help) : p
Disk /dev/sda: 17.2 GB, 17179869184 bytes
255 heads, 63 sectors/track, 2088 cylinders
Units = cylinders of 16065 * 512 = 8225280 bytes
Sector size (logical/physical): 512 bytes / 512 bytes
I/O size (minimum/optimal): 512 bytes / 512 bytes
Disk identifier: 0x000e1624
Device Boot Start End Blocks Id System
/dev/sda1 * 1 1275 10240000 83 Linux
/dev/sda2 1275 1530 2048000 82 Linux swap / Solaris
/dev/sda4 1530 2088 4482836 5 Extended
/dev/sda5 1530 1555 201482 83 Linux
/dev/sda6 1556 1581 208813+ 83 Linux
/dev/sda7 1582 1633 417658+ 83 Linux
Command (m for help): w
The partition table has been altered!
Calling ioctl() to re-read partition table.
WARNING: Re-reading the partition table failed with error 16: Device or resource busy.
The kernel still uses the old table. The new table will be used at
the next reboot or after you run partprobe(8) or kpartx(8)
Syncing disks.
Explanation:
/dev/sda4 is an extended partition means /dev/sda4 itself cannot hold any data but several logical partition can be created inside an extended partition which can be mounted and used to storage data.Here in this example /dev/sda5,/dev/sda6 and /dev/sda7 are logical partition whome we can format,mount and use to store data in it.
Now Update The changes made in partition table without Reboot using partx command.
[root@localhost
]# partx -v -a /dev/sda
device /dev/sda: start 0 size 33554432
gpt: 0 slices
dos: 7 slices
# 1: 2048- 20482047 ( 20480000 sectors, 10485 MB)
# 2: 20482048- 24578047 ( 4096000 sectors, 2097 MB)
# 3: 0- -1 ( 0 sectors, 0 MB)
# 4: 24578048- 33543719 ( 8965672 sectors, 4590 MB)
# 5: 24578111- 24981074 ( 402964 sectors, 206 MB)
# 6: 24981138- 25398764 ( 417627 sectors, 213 MB)
# 7: 25398828- 26234144 ( 835317 sectors, 427 MB)
reduced size of partition #4 to 63
BLKPG: Device or resource busy
error adding partition 1
BLKPG: Device or resource busy
error adding partition 2
added partition 4
added partition 5
added partition 6
added partition 7
Now Create a File system using mkfs:
]# mkfs.ext4 /dev/sda5
mke2fs 1.41.12 (17-May-2010)
Filesystem label=
OS type: Linux
Block size=1024 (log=0)
Fragment size=1024 (log=0)
Stride=0 blocks, Stripe width=0 blocks
50400 inodes, 201480 blocks
10074 blocks (5.00%) reserved for the super user
First data block=1
Maximum filesystem blocks=67371008
25 block groups
8192 blocks per group, 8192 fragments per group
2016 inodes per group
Superblock backups stored on blocks:
8193, 24577, 40961, 57345, 73729
Writing inode tables: done
Creating journal (4096 blocks): done
Writing superblocks and filesystem accounting information: done
This filesystem will be automatically checked every 34 mounts or
180 days, whichever comes first. Use tune2fs -c or -i to override.
180 days, whichever comes first. Use tune2fs -c or -i to override.
Now create a new directory and Mount newly created partition to use it.
[root@localhost
]# mkdir /linux
[root@localhost
See the Mounted File System:
[root@localhost
]# df -Th
Filesystem Type Size Used Avail Use% Mounted on
/dev/sda1 ext4 9.7G 2.7G 6.5G 30% /
tmpfs tmpfs 504M 420K 504M 1% /dev/shm
/dev/sda5 ext4 191M 5.6M 176M 4% /linux
Now to make this mounting Permanent we make a entry in /etc/fstab file.

As you can clearly see how to make entry in /etc/fstab file.If you are still confused just see the last line.
After creating a partition and using it for our purpose we may need to do delete it or destroy it.So now it’s time to learn how to Delete or Destroy a partition in RHEL6 Linux.
Step1:First Remove the permanent mount.
To remove a partition from permanent mount comment the line in /etc/fstab file or delete that line.
Step2:Then unmount it.
Step3:Check whether it is unmounted or not using df command.
[root@localhost
]# df -Th
Filesystem Type Size Used Avail Use% Mounted on
/dev/sda1 ext4 9.7G 2.7G 6.5G 30% /
tmpfs tmpfs 504M 420K 504M 1% /dev/shm
Step4:Now its time to Delete and Destroy partition using FDISK command line tool.
WARNING: DOS-compatible mode is deprecated. It’s strongly recommended to
switch off the mode (command ‘c’) and change display units to
sectors (command ‘u’).
Command (m for help): d
Partition number (1-7): 5
Command (m for help): w
In above comand :d is used to delete partition and :w is to save the changes and write it to partition table.
Источник


