- Linux fetch что это
- PARAMETERS
- OUTPUTS
- NOTES
- EXAMPLES
- COMPATIBILITY
- Linux fetch что это
- ENVIRONMENT
- EXIT STATUS
- SEE ALSO
- HISTORY
- AUTHORS
- NOTES
- Введение в fetch
- Простой Fetch запрос
- XMLHttpRequest
- Fetch
- Метаданные ответа
- Типы ответа
- Цепочки Promises
- POST запрос
- Посылаем учётные данные через Fetch-запрос
- Neofetch — информация о системе linux и логотип в терминале
- Зависимости Neofetch
- Установка Neofetch в Linux
- В Debian
- В Ubuntu или Linux Mint
- В Red Hat или Fedora
- В ArchLinux
- В Gentoo
- Использование Neofetch в Linux
- Информация о LinuxMint
- Информация о Ubuntu
- Выводы
Linux fetch что это
FETCH retrieves rows using a previously-created cursor.
A cursor has an associated position, which is used by FETCH . The cursor position can be before the first row of the query result, on any particular row of the result, or after the last row of the result. When created, a cursor is positioned before the first row. After fetching some rows, the cursor is positioned on the row most recently retrieved. If FETCH runs off the end of the available rows then the cursor is left positioned after the last row, or before the first row if fetching backward. FETCH ALL or FETCH BACKWARD ALL will always leave the cursor positioned after the last row or before the first row.
The forms NEXT, PRIOR, FIRST, LAST, ABSOLUTE, RELATIVE fetch a single row after moving the cursor appropriately. If there is no such row, an empty result is returned, and the cursor is left positioned before the first row or after the last row as appropriate.
The forms using FORWARD and BACKWARD retrieve the indicated number of rows moving in the forward or backward direction, leaving the cursor positioned on the last-returned row (or after/before all rows, if the count exceeds the number of rows available).
RELATIVE 0, FORWARD 0, and BACKWARD 0 all request fetching the current row without moving the cursor, that is, re-fetching the most recently fetched row. This will succeed unless the cursor is positioned before the first row or after the last row; in which case, no row is returned.
PARAMETERS
count count is a possibly-signed integer constant, determining the location or number of rows to fetch. For FORWARD and BACKWARD cases, specifying a negative count is equivalent to changing the sense of FORWARD and BACKWARD. cursorname An open cursor’s name.
OUTPUTS
On successful completion, a FETCH command returns a command tag of the form
The count is the number of rows fetched (possibly zero). Note that in psql , the command tag will not actually be displayed, since psql displays the fetched rows instead.
NOTES
The cursor should be declared with the SCROLL option if one intends to use any variants of FETCH other than FETCH NEXT or FETCH FORWARD with a positive count. For simple queries PostgreSQL will allow backwards fetch from cursors not declared with SCROLL, but this behavior is best not relied on. If the cursor is declared with NO SCROLL, no backward fetches are allowed.
ABSOLUTE fetches are not any faster than navigating to the desired row with a relative move: the underlying implementation must traverse all the intermediate rows anyway. Negative absolute fetches are even worse: the query must be read to the end to find the last row, and then traversed backward from there. However, rewinding to the start of the query (as with FETCH ABSOLUTE 0) is fast.
Updating data via a cursor is currently not supported by PostgreSQL.
DECLARE [ declare (7)] is used to define a cursor. Use MOVE [ move (7)] to change cursor position without retrieving data.
EXAMPLES
The following example traverses a table using a cursor.
COMPATIBILITY
The SQL standard defines FETCH for use in embedded SQL only. The variant of FETCH described here returns the data as if it were a SELECT result rather than placing it in host variables. Other than this point, FETCH is fully upward-compatible with the SQL standard.
The FETCH forms involving FORWARD and BACKWARD, as well as the forms FETCH count and FETCH ALL, in which FORWARD is implicit, are PostgreSQL extensions.
The SQL standard allows only FROM preceding the cursor name; the option to use IN is an extension.
Источник
Linux fetch что это
The following options are available:
-1 Stop and return exit code 0 at the first successfully retrieved file. -4 Forces to use IPv4 addresses only. -6 Forces to use IPv6 addresses only. -A Do not automatically follow «temporary» (302) redirects. Some broken Web sites will return a redirect instead of a not-found error when the requested object does not exist. -a Automatically retry the transfer upon soft failures. -B bytes Specify the read buffer size in bytes. The default is 4096 bytes. Attempts to set a buffer size lower than this will be silently ignored. The number of reads actually performed is reported at verbosity level two or higher (see the — v flag). -c dir The file to retrieve is in directory dir on the remote host. This option is deprecated and is provided for backward compatibility only. -d Use a direct connection even if a proxy is configured. -F In combination with the — r flag, forces a restart even if the local and remote files have different modification times. Implies — R -f file The file to retrieve is named file on the remote host. This option is deprecated and is provided for backward compatibility only. -h host The file to retrieve is located on the host host This option is deprecated and is provided for backward compatibility only. -l If the target is a file-scheme URL, make a symbolic link to the target rather than trying to copy it. -M -m Mirror mode: if the file already exists locally and has the same size and modification time as the remote file, it will not be fetched. Note that the — m and — r flags are mutually exclusive. -N file Use file instead of
/.netrc to look up login names and passwords for FTP sites. See ftp(1) for a description of the file format. This feature is experimental. -n Do not preserve the modification time of the transferred file. -o file Set the output file name to file By default, a «pathname» is extracted from the specified URI, and its basename is used as the name of the output file. A file argument of ` — ‘ indicates that results are to be directed to the standard output. If the file argument is a directory, fetched file(s) will be placed within the directory, with name(s) selected as in the default behaviour. -P -p Use passive FTP. This is useful if you are behind a firewall which blocks incoming connections. Try this flag if seems to hang when retrieving FTP URLs. -q Quiet mode. -R The output files are precious, and should not be deleted under any circumstances, even if the transfer failed or was incomplete. -r Restart a previously interrupted transfer. Note that the — m and — r flags are mutually exclusive. -S bytes Require the file size reported by the server to match the specified value. If it does not, a message is printed and the file is not fetched. If the server does not support reporting file sizes, this option is ignored and the file is fetched unconditionally. -s Print the size in bytes of each requested file, without fetching it. -T seconds Set timeout value to seconds Overrides the environment variables FTP_TIMEOUT for FTP transfers or HTTP_TIMEOUT for HTTP transfers if set. -U When using passive FTP, allocate the port for the data connection from the low (default) port range. See ip(4) for details on how to specify which port range this corresponds to. -v Increase verbosity level. -w seconds When the — a flag is specified, wait this many seconds between successive retries.
If receives a SIGINFO signal (see the status argument for stty(1)), the current transfer rate statistics will be written to the standard error output, in the same format as the standard completion message.
ENVIRONMENT
FTP_TIMEOUT Maximum time, in seconds, to wait before aborting an FTP connection. HTTP_TIMEOUT Maximum time, in seconds, to wait before aborting an HTTP connection.
See fetch(3) for a description of additional environment variables, including FETCH_BIND_ADDRESS FTP_LOGIN FTP_PASSIVE_MODE FTP_PASSWORD FTP_PROXY ftp_proxy HTTP_AUTH HTTP_PROXY http_proxy HTTP_PROXY_AUTH HTTP_REFERER HTTP_USER_AGENT NETRC NO_PROXY and no_proxy
EXIT STATUS
SEE ALSO
HISTORY
AUTHORS
NOTES
One cannot both use the — h — c and — f options and specify URLs on the command line.
Источник
Введение в fetch
fetch() позволяет вам делать запросы, схожие с XMLHttpRequest (XHR). Основное отличие заключается в том, что Fetch API использует Promises (Обещания), которые позволяют использовать более простое и чистое API, избегать катастрофического количества callback’ов и необходимости помнить API для XMLHttpRequest.
Fetch API стал доступен пользователям вместе с Service Worker’ами в global скоупе в Chrome 40, однако уже в версии 42 он станет доступен в скоупе window. Разумеется, для всех остальных браузеров, которые пока ещё не поддерживают fetch существует полифил от GitHub, который доступен уже сегодня.
Простой Fetch запрос
Давайте начнём со сравнения простого примера, реализованного с XMLHttpRequest и fetch . Всё, что мы будем делать в этом примере — сделаем запрос на URL, получим ответ и распарсим его как JSON.
XMLHttpRequest
Пример с XMLHttpRequest потребует от нас установить два обработчика событий на success и error , а так же вызвать два метода: open() и send() . Пример из MDN документации:
Fetch
Наш fetch запрос будет выглядеть так:
Первым делом мы проверяем статус ответа и проверяем, успешно ли выполнился запрос (ожидаем 200 статус). Если всё хорошо, то парсим ответ как JSON.
Ответом fetch() является Stream-объект. Это означает, что в результате вызова метода json() мы получим Promise, т.к. чтение из подобного объекта является асинхронным.
Метаданные ответа
В предыдущем примере мы изучили, как можно проверить статус объекта ответа и конвентировать сам ответ в JSON. Остальные метаданные, к которым вы возможно получить доступ (например, заголовки), приведены ниже:
Типы ответа
Когда мы делаем fetch-запрос, ответу будет дан тип «basic», «cors» или «opaque». Эти «типы» указывают на то, с какого ресурса пришли данные и могут быть использованы для того, чтобы определить процесс обработки данных.
Когда запрос сделан на ресурс, находящимся на том же origin (имеется ввиду, что запрос выполняется в рамках одного сайта. прим. пер.), ответ будет содержать тип «базовый» и для такого запроса не будет никаких ограничений.
Если запрос сделан с одного origin’а на другой (кроссдоменный запрос), который, в свою очередь, вернул CORS заголовки, тогда типом будет являться «cors». Объекты с типами «cors» и «basic» почти идентичны, однако «cors» несколько ограничивает метаданные, к которым может быть получен доступ до «Cache-Control», «Content-Language», «Content-Type», «Expires», «Last-Modified», и «Pragma».
Что касается «opaque» — то он приходит в случаях, когда выполняется CORS запрос, но удаленный ресурс не возвращает CORS заголовки. Данный тип запроса не предоставляет доступ данным или заголовку статуса, поэтому мы не имеем возможности судить о результате выполнения запроса. В рамках текущей имплементации fetch() не представляется возможности выполнять CORS запросы из скоупа window, и вот здесь написано почему. Эта функциональность должна быть добавлена, как только Cache API станет доступным из объекта window.
Вы можете определить ожидаемый режим запроса, тем самым фильтруя результаты запросов с неподходящим типом. Режим запроса может быть установлен на следующий:
— “same-origin” успешно выполняется только для запросов на тот же самый origin, все остальные запросы будут отклонены.
— “cors” работает так же, как «same-origin» + добавляет возможность создавать запросы к сторонним сайтам, если они возвращают соответствующие CORS заголовки.
— “cors-with-forced-preflight” работает так же, как «cors», но перед запросом всегда отсылает тестовый запрос на проверку.
— “no-cors” используется, когда необходимо выполнить запрос к origin, который не отсылает CORS заголовки и результатом выполнения является объект с типом «opaque». Как говорилось выше, в данный момент это невозможно в скоупе window.
Чтобы определить режим запроса, добавьте объект опций вторым параметром к запросу и установите «mode» в этом объекте:
Цепочки Promises
Одной из прекрасных особенностей Promise’ов является возможность группировать их в цепочки. Если говорить о них в скоупе fetch() , то они позволяют нам «шарить» логику между запросами.
Если вы работаете с JSON API, вам потребуется проверить статус и распарсить JSON для каждого ответа. Вы можете упростить свой код, определив парсинг статуса и JSON как раздельные функции, которые вернут Promise’ы. Вам останется подумать только об обработке самих данных и, разумеется, исключений.
Мы определяем функцию, которая проверяет response.status и возвращает результат: Promise.resolve() или Promise.reject() . Это первый вызванный метод в нашей цепочке, и если он успешно завершается( Promise.resolve() ), то вызывается следующий за ним метод — fetch() , который, в свою очередь, опять возвращает Promise от response.json() . После этого вызова, в случае удачного выполнения, у нас будет готовый JSON объект. Если парсинг провалится, Promise будет отменен и сработает условие возникновения исключения.
Но самое лучшее здесь — это возможность переиспользовать такой код для всех fetch-запросов в приложении. Такой код проще поддерживать, читать и тестировать.
POST запрос
Уже давно никого не удивишь необходимостью использовать POST метод с передачей параметров в «теле» запроса для работы с API.
Чтобы осуществить такой запрос, мы должны указать соответствующие параметры в объекте настроек fetch() :
Посылаем учётные данные через Fetch-запрос
Если вы хотите отправить запрос с каким-либо учётными данными (например, с cookie), вам следует установить `credentials` в опциях запроса на «include»:
Могу ли я отменить fetch() запрос?
В настоящий момент это невозможно, но это активно обсуждается на GitHub
Существует ли полифил?
Да
Почему «no-cors» реализован для service workers, но не для window?
Это было сделано из соображений безопасности. Подробнее можно ознакомиться здесь.
Источник
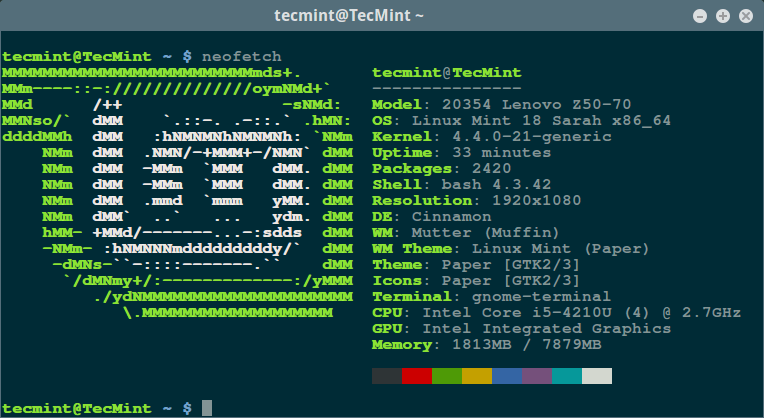
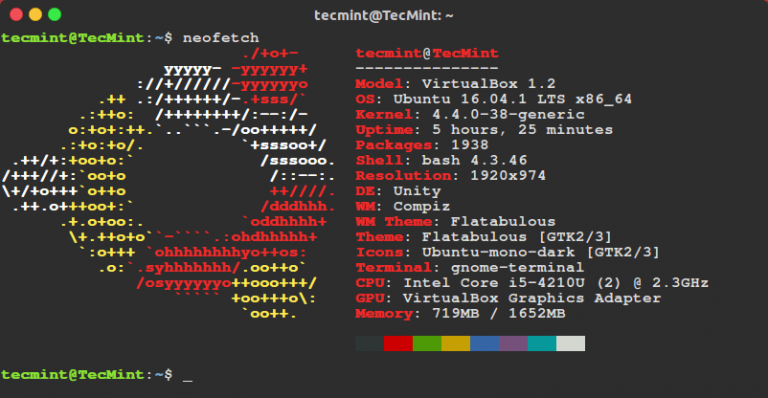
Neofetch — информация о системе linux и логотип в терминале
Neofetch — это очень простая в использовании и кроссплатформенная утилита которая позволяет отображать информацию о системе в терминале, рядом с красивой картинкой. В качестве картинки можно использовать логотип вашего дистрибутива или любую другую картинку.
Эта утилита очень похожа на ScreenFetch или LinuxLogo, но она более настраиваемая и гибкая, а также содержит некоторые дополнительные функции. Она очень быстрая, выводит изображение в формате ASCII рядом с системной информацией, а также может сделать снимок экрана после завершения работы скрипта.
Зависимости Neofetch
- Bash 3.0+ с поддержкой Ncurses;
- w3m-img или iTerm2 для сохранения изображений;
- imagemagick — для создания превью;
- Эмулятор терминала должен поддерживать \033[14t [3] или xdotool или xwininfo + xprop или xwininfo + xdpyinfo;
- Для работы с обоями вам необходимы feh, nitrogen или gsettings.
Bash 3.0+ и поддержка \033[14t обязательна, но эту возможность поддерживают большинство терминалов, что касается всего остального, то эти зависимости нужны для дополнительных функций.
Установка Neofetch в Linux
Информация о системе linux при запуске терминала, это не только красиво, но и временами может быть очень полезно. Установить утилиту можно из сторонних репозиториев практически в любом дистрибутиве Linux. Дальше мы рассмотрим инструкции для самых популярных из них.
В Debian
echo «deb http://dl.bintray.com/dawidd6/neofetch jessie main» | sudo tee -a /etc/apt/sources.list
$ curl -L «https://bintray.com/user/downloadSubjectPublicKey?username=bintray» -o Release-neofetch.key && sudo apt-key add Release-neofetch.key && rm Release-neofetch.key
$ sudo apt-get update
$ sudo apt-get install neofetch
В Ubuntu или Linux Mint
sudo add-apt-repository ppa:dawidd0811/neofetch
$ sudo apt-get update
$ sudo apt-get install neofetch
В Red Hat или Fedora
Сначала необходимо установить пакет плагинов dnf-plugins-core:
sudo yum install dnf-plugins-core
Затем добавьте репозиторий и установите от туда neofetch:
sudo dnf copr enable konimex/neofetch
$ sudo dnf install neofetch
В ArchLinux
Вы можете установить версии neofetch или neofetch-git из репозитория AUR с помощью packer или yaourt:
packer -S neofetch
$ packer -S neofetch-git
yaourt -S neofetch
$ yaourt -S neofetch-git
В Gentoo
sudo emerge app-misc/neofetch
Использование Neofetch в Linux
Чтобы вывести информацию о системе и лого достаточно выполнить одну команду:
Обратите внимание, если w3m-img или imagemagick не установлены в вашей системе, по умолчанию будет использован screenfetch и neofetch отобразит логотип linux в виде ASCI.
Информация о LinuxMint
Информация о Ubuntu
Если вы все-таки хотите отобразить логотип дистрибутива linux в виде обычной картинки, нужно установить w3m-img или imagemagick в вашей системе. В Ubuntu:
sudo apt-get install w3m-img
В Red Hat / Fedora:
sudo yum install w3m-img
Затем запустите утилиту еще раз, вы увидите изображение обоев рабочего стола по умолчанию в виде обычного изображения:
После первого запуска утилита создаст конфигурационный файл со своими настройками по адресу
/.config/neofetch/config. Этот файл содержит функцию printinfo(), которая позволяет настроить информацию о системе, которую следует выводить. Вы можете удалить ненужные строки, добавить новые или изменить их. Чтобы открыть конфигурационный файл выполните:
Содержимое файла будет выглядеть примерно вот так:
!/usr/bin/env bash
# vim:fdm=marker
#
# Neofetch config file
# https://github.com/dylanaraps/neofetch
# Speed up script by not using unicode
export LC_ALL=C
export LANG=C
# Info Options <<<
# Info
# See this wiki page for more info:
# https://github.com/dylanaraps/neofetch/wiki/Customizing-Info
printinfo() <
info title
info underline
info «Model» model
info «OS» distro
info «Kernel» kernel
info «Uptime» uptime
info «Packages» packages
info «Shell» shell
info «Resolution» resolution
info «DE» de
info «WM» wm
info «WM Theme» wmtheme
info «Theme» theme
info «Icons» icons
info «Terminal» term
info «Terminal Font» termfont
info «CPU» cpu
info «GPU» gpu
info «Memory» memory
# info «CPU Usage» cpu_usage
# info «Disk» disk
# info «Battery» battery
# info «Font» font
# info «Song» song
# info «Local IP» localip
# info «Public IP» publicip
# info «Users» users
# info «Birthday» birthday
info linebreak
info cols
info linebreak
>
Чтобы узнать все доступные опции утилиты, а также параметры настройки выполните такую команду:
Для проверки правильности всех настроек в файле конфигурации выполните:
С помощью флага —ascii вы можете указать, что логотип дистрибутива нужно рисовать в текстовом формате:
Вы можете запускать утилиту при каждом запуске терминала, просто добавив строчку запуска в конец
Выводы
В этой статье мы рассмотрели простую и очень настраиваемую утилиту командной строки, с помощью которой может быть выведена информация о системе linux и логотип дистрибутива в терминал. Вы используете подобные утилиты? Будете использовать? Напишите в комментариях!
Источник


