- Linux File Permissions and Ownership Explained with Examples
- File ownership in Linux
- Group
- Other
- File permissions in Linux
- Understanding file permissions and ownership in Linux
- Change file permissions in Linux
- Using chmod in absolute mode
- Using chmod in symbolic mode
- Change file ownership in Linux
- Bonus Tip: Is there a precedence in file permissions?
- What next?
- Chown Command: Change Owner of File in Linux
- Linux Chown Command Syntax
- How to Check Ownership of a File in Linux
- How to Change the Owner of a File
- Change the Owner of a File With UID
- Change Ownership of Multiple Linux Files
- How to Change the Group of a File
- Change the Group of a File Using GID
- Change Owner and the Group
- Change Group to a Users Login Group
- Transfer Ownership and Group Settings from One File to Another
- Check Owner and Group Before Making Changes
- Check Owner Only
- Check Group Only
- How to Recursively Change File Ownership
- Chown Command and Symbolic Links
- Display Chown Command Process Details
- Suppress Chown Command Errors
Linux File Permissions and Ownership Explained with Examples
By design, Linux is a multi-user operating system. In an enterprise system, there would be multiple users accessing the same system. But if any user could access and modify all files belonging to other users or system files, this would certainly be a security risk.
This is why UNIX and thus Linux (Linux is a Unix-like system) has built-in security measure in place. This ensures that a file or directory can be accessed, modified or executed by only desired users.
Which file would be accessed by which user is decided by two factors in Linux:
- File ownership
- File permission
Understanding file ownership and permission is crucial for a Linux user. I’ll explain these terms in detail here.
File ownership in Linux
Note: I might use the term file here but it is applicable to directories as well. I guess you know that directories are files anyway.
Every file and directory in Linux has three kinds of owners:
User is the owner of the file. When you create a file, you become the owner of the file. The ownership can be changed as well, but we’ll see that later.
Group
Every user is part of a certain group(s). A group consists of several users and this is one way to manage users in a multi-user environment.
For example, if you have dev team, QA team and sysadmin team accessing the same system, you should create separate groups for them. This way, you can manage files and security of the system effectively. It saves time because instead of manually adding permission for each user, you can simply add them to a group and change the permission for the group. You’ll see how to do it later in this article.
Even if you are the only user of the system, you’ll still be part of many groups. Distributions like Ubuntu also create a group with name same as the user’s name.
Tip: Run the command groups to see what user-groups you belong to.
Other
‘Other’ can be considered as a super group with all the users on the system. Basically, anyone with access to the system belongs to this group.
In other words, ‘User’ is a single user, Group is a collection of users and Other consists of all the users on the system.
File permissions in Linux
Every file and directory in Linux has the following three permissions for all the three kinds of owners:
Permissions for files
- Read – Can view or copy file contents
- Write – Can modify file content
- Execute – Can run the file (if its executable)
Permissions for directories
- Read – Can list all files and copy the files from directory
- Write – Can add or delete files into directory (needs execute permission as well)
- Execute – Can enter the directory
Understanding file permissions and ownership in Linux
Now that you are aware of the basic terminology of file permissions and ownership, it’s time to see it in action.
You can use the ‘stat command‘ or the ‘ls command’ to check the file permissions.
If you use the ls command with option -l on a file, you’ll see an output like this:
Let me explain this output with a picture:
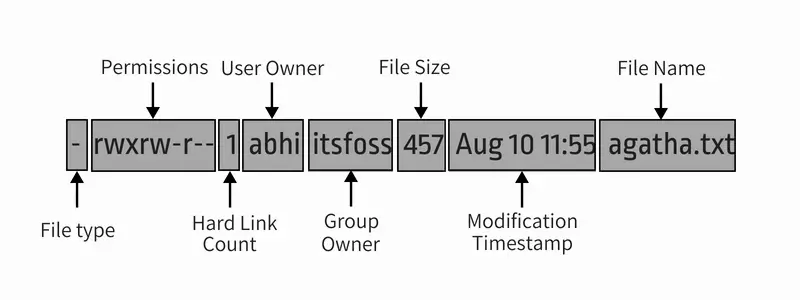
Let me further explain the entire output in detail:
- File type: Denotes the type of file. d means directory, – means regular file, l means a symbolic link.
- Permissions: This field shows the permission set on a file. I’ll explain it in detail in the next section.
- Hard link count: Shows if the file has hard links. Default count is one.
- User: The user who owns the files.
- Group: The group that has access to this file. Only one group can be the owner of a file at a time.
- File size: Size of the file in bytes.
- Modification time: The date and time the file was last modified.
- Filename: Obviously, the name of the file or directory.
Now that you have understood the ls -l command output, let’s focus on the file permission part.
In the above command, you see the file permission like this in the nine digit format:
Each letter denotes a particular permission:
- r : Read permission
- w : Write permission
- x : Execute permission
- – : No permission set
Permissions are always in the order of read, write and execute i.e., rwx. And then these permissions are set for all three kind of owners (see the ownership section) in the order of User, Group and Other.
This picture will explain things better:
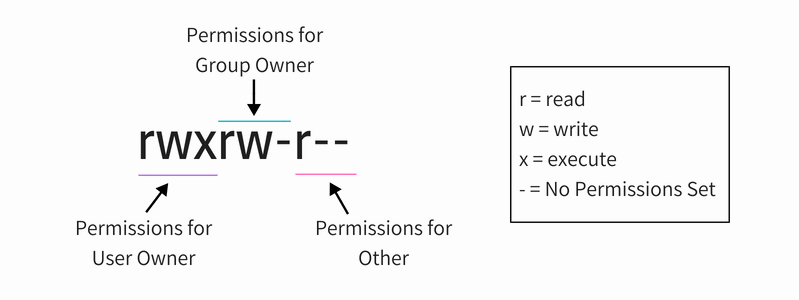
So, if you look at the above picture now, you can say the following things about the file permissions:
- The file has read, write and execute permissions for the User owner. But who is this use owner of the file? You have this info in the output of ls -l (i.e. user abhi).
- The file has read and write permissions for the Group but not execute. Which group is it? You have the group info in the output of the command ls -l (i.e. group itsfoss).
- The file has only read permission for Other i.e. everyone that has access to the system. You don’t need to know which other is it because ‘other’ means all the users.
Now if you see the entire ls -l command once again, you can read the file permissions and ownership together.
The file agatha.txt is owned by user abhi and abhi has read, write and execute permission. All the members of group istfoss have read and write access to this file while everyone else has only read access to this file.
Note: Root user has super powers and normally, it has read, write and execute permissions to all the files, even if you don’t see it in file permissions.
A single user may be the member of several groups but only the primary group of the user is the group owner of a file created by the user. The primary group of a user can be found using the id command like id -gn . Leave the username blank if you are trying to find your own primary group.
Now that you know how to find out permissions on a file, let’s see how you can change the permission and ownership of a file.
Change file permissions in Linux
You can use chmod command for changing the permissions on a file in Linux.
Trivia: Permissions used to be called mode of access and hence chmod was the short form of change the mode of access.
There are two ways to use the chmod command:

Using chmod in absolute mode
In the absolute mode, permissions are represented in numeric form (octal system to be precise). In this system, each file permission is represented by a number.
- r (read) = 4
- w (write) = 2
- x (execute) = 1
- – (no permission) = 0
With these numeric values, you can combine them and thus one number can be used to represent the entire permission set.
| Number | Permission |
|---|---|
| 0 | — |
| 1 | –x |
| 2 | -w- |
| 3 (i.e. 2+1) | -wx |
| 4 | r– |
| 5 (i.e. 4+1) | r-x |
| 6 (i.e. 4+2) | rw- |
| 7 (i.e. 4+2+1) | rwx |
Can you guess the file permission in numbers on agatha.txt file in our example so far? That’s right, it’s 764.
Now that you know what number represents which permission, let’s see how to change file permission using this knowledge.
Suppose you want to change the file permission on agatha.txt so that everyone can read and write but no one can execute it? In that case, you can use the chmod command like this:
If you list agatha.txt now, you’ll see that the permission has been changed.
Using chmod in symbolic mode
The problem with the absolute mode is that you should always provide three numbers for all the three owners even if you want to change the permission set for just one owner.
This is where you can use the symbolic mode with chmod command.
In symbolic mode, owners are denoted with the following symbols:
- u = user owner
- g = group owner
- o = other
- a = all (user + group + other)
The symbolic mode uses mathematical operators to perform the permission changes:
- + for adding permissions
- – for removing permissions
- = for overriding existing permissions with new value
Now that you know let’s see how to use chmod command in symbolic mode.
In our previous example, if you want to add execute permission for group owner, you can use chmod command like this:
If you look at the permissions on this file now, you’ll see that execute permission has now been added:
You can also combine multiple permission changes in one command. Suppose you want to remove the read and write permission and add execute permissions for Other. You also want to add execute permission for the User owner. You can do all of it one single command:
The resulting permissions would be like this:
If you want to change the permissions for all three kinds of users at the same time, you can use it in the following manner:
This will remove the execute permission for everyone.
Some people find converting the file permissions from one mode to another a tiresome job. This why I created this little tool that allows you to calculate Linux file permissions in various modes online.
Change file ownership in Linux
To change the ownership of a file, you can use the command chown. You may easily guess that chown stands for change owner.
You can change the user owner of a file in the following manner:
If you want to change the user as well as group, you can use chown command like this:
If you just want to change the group, you can either use chown command in this manner:
or use chgrp command specifically used for changing group owner of a file or directory. You can guess that chgrp stands for change group.
In our example so far, if you want to change the user owner and group to root, you can use the chown command like this:
This will change the ownership of the file to root for both user and the group.
Notice that I had to use sudo with chown? It’s because the root is involved here and to deal with root, you need superuser rights.
Tip: Two groups cannot own the same file.
Bonus Tip: Is there a precedence in file permissions?
Think of a situation, where the user owner doesn’t have any permissions, group has read permission while others have read and write permissions.
Now, if the user abhi tries to read the file using cat or less command, will he be able to? The answer is no because it doesn’t have the read permission.
But user abhi is part of group itsfoss and the group has read access. Heck! other has read and write permission. This should mean that everyone (including user abhi) can read and write the file, right? Wrong!
In Linux, the precedence takes from user and then group and then to other. Linux system checks who initiated the process (cat or less in our example). If the user who initiated the process is also the user owner of the file, the user permission bits are set.
If owner of the file didn’t initiate the process, then the Linux system checks the group. If the user who initiated the process is in the same group as the owner group of the file, group permissions bit are set.
If this process owner is not even in the group as the file’s group owner, then the other permission bits are set.
What next?
I hope you liked the article and now you have a better understanding of how file permissions work in Linux.
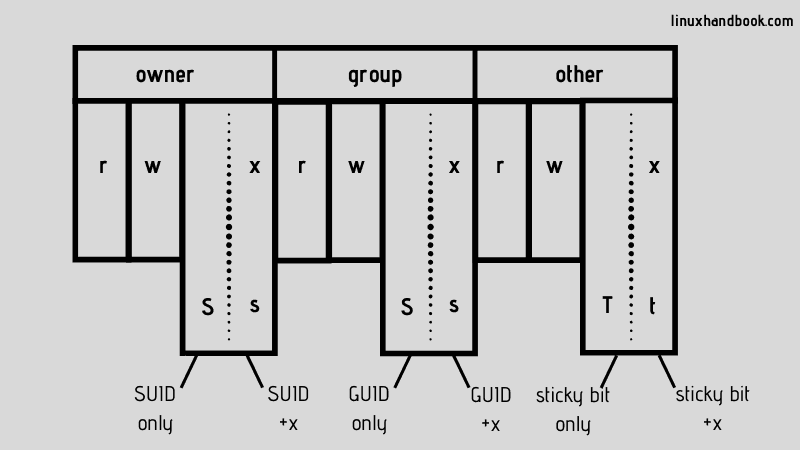
There are some advanced file permissions like SUID, GUID and sticky bit that you may learn next, if you want to.
If you have any questions or suggestions or if you just want to say thanks, please leave a comment below. If you liked the article, please share it on social media or various forums. This will help us and other Linux users as well.
Источник
Chown Command: Change Owner of File in Linux
Home » SysAdmin » Chown Command: Change Owner of File in Linux
The chown command changes user ownership of a file, directory, or link in Linux. Every file is associated with an owning user or group. It is critical to configure file and folder permissions properly.
In this tutorial, learn how to use the Linux chown command with examples provided.

- Linux or UNIX-like system
- Access to a terminal/command line
- A user with sudo privileges to change the ownership. Remember to run the commands with sudo to execute them properly.
Linux Chown Command Syntax
The basic chown command syntax consists of a few segments. The help file shows the following format:
- [OPTIONS] – the command can be used with or without additional options.
- [USER] – the username or the numeric user ID of the new owner of a file.
- [:] – use the colon when changing a group of a file.
- [GROUP] – changing the group ownership of a file is optional.
- FILE – the target file.
Superuser permissions are necessary to execute the chown command.
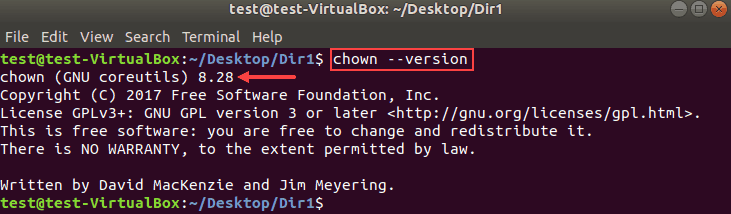
In this guide, we tested the command examples with the chown version 8.28 in Ubuntu 18.04.2 LTS.
To check the chown version on your machine, enter:
The output will look similar to this:
How to Check Ownership of a File in Linux
First, you need to know the original file owner or group before making ownership changes using the chown command.
To check the group or ownership of Linux files and directories in the current location, run the following command:
An example output of the ls command looks like this:

How to Change the Owner of a File
Changing the owner of a file with chown requires you to specify the new owner and the file. The format of the command is:
The following command changes the ownership of a file sample from root to the user test:
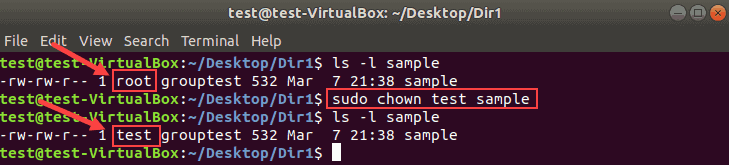
Use the same format to change the ownership for both files and directories.
Change the Owner of a File With UID
Instead of a username, you can specify a user ID to change the ownership of a file.
Make sure there is no user with the same name as the numeric UID. If there is, the chown command gives priority to the username, not the UID.
Note: To check a user’s ID, run id -u USERNAME from the terminal.
Change Ownership of Multiple Linux Files
List the target file names after the new user to change the ownership for multiple files. Use single spaces between the file names.
In the following example, root will be the new owner of files sample2 and sample3.
Combine file names and directory names to change their ownership with one command. For example:
Do not forget that the commands are case sensitive.
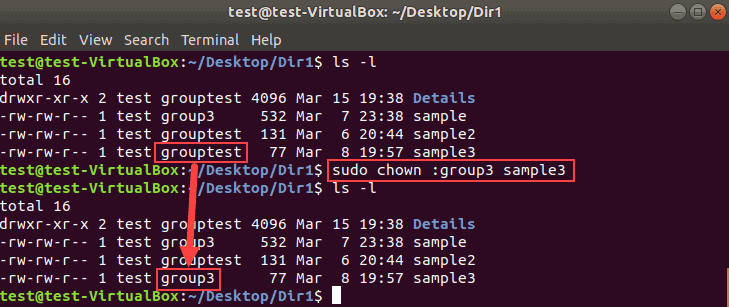
How to Change the Group of a File
With chown, you can change a group for a file or directory without changing the owning user. The result is the same as using the chgrp command.
Run the chown command using the colon and a group name:
The following example changes the group of the file sample3 from grouptest to group3.
List multiple names of files or directories to make bulk changes.
Change the Group of a File Using GID
Similar to UID, use a group ID (GID) instead of a group name to change the group of a file.
Change Owner and the Group
To assign a new owner of a file and change its group at the same time, run the chown command in this format:
Therefore, to set linuxuser as the new owner and group2 as the new group of the file sample2:
Remember that there are no spaces before or after the colon.
Change Group to a Users Login Group
The chown command assigns the owner’s login group to the file when no group is specified.
To do so, define a new user followed by a colon, space, and the target file:
The following example changes the group ownership to the login group of linuxuser:
Transfer Ownership and Group Settings from One File to Another
Rather than changing the ownership to a specific user, you can use the owner and a group of a reference file.
Add the —reference option to the chown command to copy the settings from one file to another:
Remember to type in the names of the files correctly to avoid the error message:
![]()
Check Owner and Group Before Making Changes
The chown command —from option lets you verify the current owner and group and then apply changes.
The chown syntax for checking both the user and group looks like this:
The example below shows we first verified the ownership and the group of the file sample3:
Then chown changed the owner to linuxuser and the group to group3.
Check Owner Only
The option —from can be used to validate only the current user of a file.
Check Group Only
Similar to the previous section, you can validate only the group of a file using the option —from .
Here is an example where we verified the current group before changing it:
Remember to use the colon for both group names to avoid error messages.
How to Recursively Change File Ownership
The chown command allows changing the ownership of all files and subdirectories within a specified directory. Add the -R option to the command to do so:
In the following example, we will recursively change the owner and the group for all files and directories in Dir1.
Chown Command and Symbolic Links
To change the owner of a symbolic link, use the -h option. Otherwise, the ownership of the linked file will be changed.
The following image shows how symbolic links behave when -h is omitted.
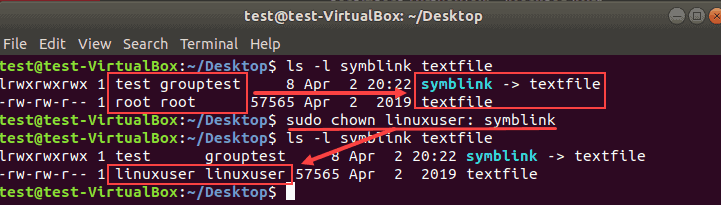
The owner and group of the symbolic link remain intact. Instead, the owner and the group of the file textfile changed.
To push the changes to the link, run the chown command with the -h flag:
In the following example, we changed the owner and group of a symbolic link.

Display Chown Command Process Details
By default, the terminal does not display the chown process information. To see what happens under the hood, use one of the two command line flags:
- The option –v produces the process details even when the ownership stays the same.
- The option –c displays the output information only when an owner or group of the target file changes.
For example, if we specify the current owner as a new owner of the file:
The terminal produces the following output:

Switch from -v to -c and there will be no messages in this case. This happens because there are no owner or group changes.
The information is particularly useful with the recursive chown command:

In this example, the output lists all objects affected after running the command.
Suppress Chown Command Errors
To avoid seeing potential error messages when running the chown command, use the -f option:
The example below shows the error message for a non-existent file or directory:

Adding the -f flag suppresses most error messages. However, if you specify an invalid username, the error message appears:

Now you know how to use chown command in Linux to change a file’s user and/or group ownership.
Take extra caution when changing the group or ownership of a file or directories.
Источник


