- How to Access Linux Files from Windows 10 [Full Guide] [MiniTool Tips]
- Summary :
- Quick Navigation :
- What’s Linux File System
- Can I Access Linux Files from Windows 10
- How to Access Linux Files from Windows 10
- Method 1. Use Ext4 Partition Manager — MiniTool Partition Wizard
- Method 2. Use Ext2Fsd
- Method 3. Use DiskInternals Linux Reader
- Method 4. Use Ext2explore
- What’s Your Opinion
- Access Linux Files from Windows 10 FAQ
- ABOUT THE AUTHOR
- Mount a Linux disk in WSL 2 (preview)
- Prerequisites
- Mounting an unpartitioned disk
- Mounting a partitioned disk
- Identifying the filesystem type
- Mount the selected partitions
- Access the disk content
- Unmount the disk
- Mount a VHD in WSL
- Command line reference
- Mounting a specific filesystem
- Mounting a specific partition
- Specifying mount options
- Attaching the disk without mounting it
- Detaching a disk
- Limitations
How to Access Linux Files from Windows 10 [Full Guide] [MiniTool Tips]
By Ariel | Follow | Last Updated May 25, 2021
Summary :
What’s a Linux file system? Can I read Linux drive on Windows? How to access Linux files from Windows 10? A lot of users are confused about these questions. In the article, MiniTool will explore them one by one together with you.
Quick Navigation :
If you have a Linux distribution alongside a Windows system on the laptop or desktop, you may need to access Linux files from Windows 10. After analyzing lots of user reports on forums, we conclude the following questions that are frequently talked about. Let’s start exploring them in detail.
What’s Linux File System
In order to access Linux files from Windows successfully, the first thing you should figure out is what file system is supported by Linux. The common Linux Files Systems are Ext2, Ext3, and Ext4.
At present, Ext4 has become the default file system for most Linux distributions including Debian and Ubuntu. This is because the Ext4 provides more flexibility for storing large files than other extended file systems. It’s reported that the Ext4 can support storing a file up to 16TB and creating a partition up to 1EB.
Can I Access Linux Files from Windows 10
There are a lot of users who have Windows 10 plus Linux dual boot or a hard drive formatted with Ext4. So, here comes a new question. Can I access Linux files from Windows 10? As discussed above, the most common Linux file system is Ext4. That is to say, you have to read Ext4 from Windows if you want to access Linux files.
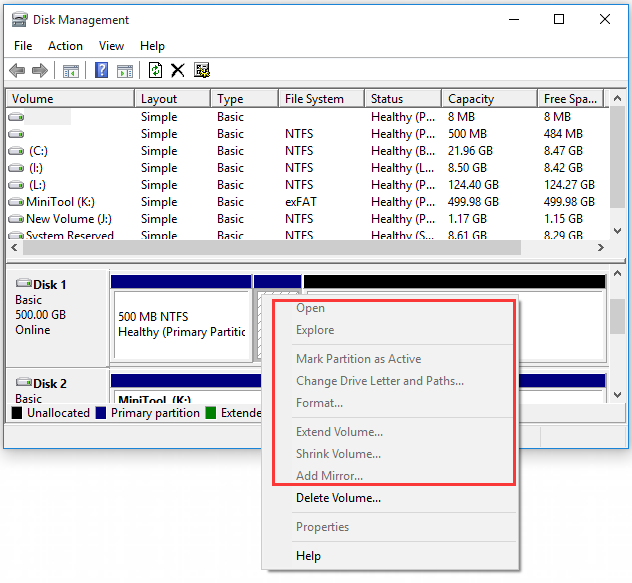
However, the Ext4 file system is not supported by Windows. When right-clicking the Ext4 partition, you will find the Open and other function menus become greyed out. Obviously, you can’t access Ubuntu files from Windows directly. What can I do if I have to read Linux drive on Windows? Please keep reading the following part.
How to Access Linux Files from Windows 10
Since Windows 10 doesn’t offer any direct methods to access Ext4, you need to utilize some professional tools to access Linux files from Windows. Here we summarize top 4 Ext4 partition readers on Windows.
Method 1. Use Ext4 Partition Manager — MiniTool Partition Wizard
MiniTool Partition Wizard is an all-in-one partition manager that supports many file systems including FAT16/32, NTFS, exFAT, and Ext2/3/4, Linux Swap. With this powerful software, you can format a hard drive, convert NTFS to FAT, convert MBR to GPT, recover lost data, migrate OS to SSD/HD, rebuild MBR, and so forth.
In order to access Ext4 from Windows smoothly, you can make it accessible by formatting it to NTFS. Although formatting will delete the data on the hard drive, MiniTool can help you restore the Ext4 partition data so that you can access Linux files from Windows 10.
Part 1. Read Linux Drive on Windows
Follow the steps below to format the Ext4 partition to NTFS or other file systems that are supported by Windows 10.
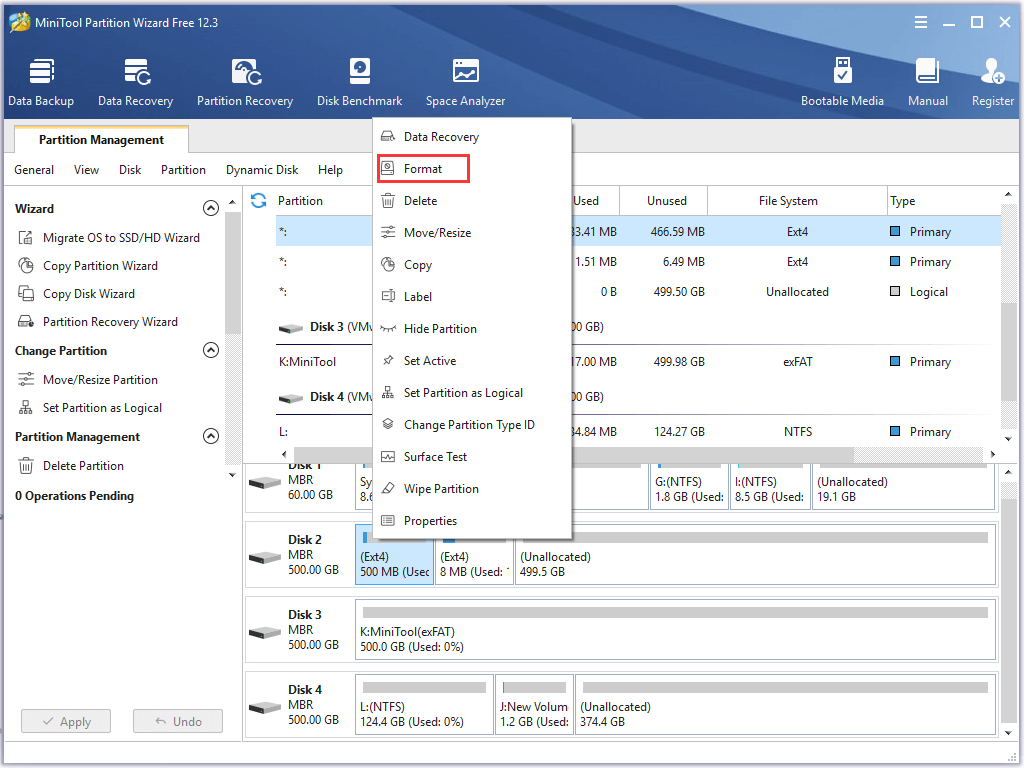
Step 1. Launch the MiniTool Partition Wizard to enter its main interface, and then right-click the Ext4 partition from the disk map and select Format.
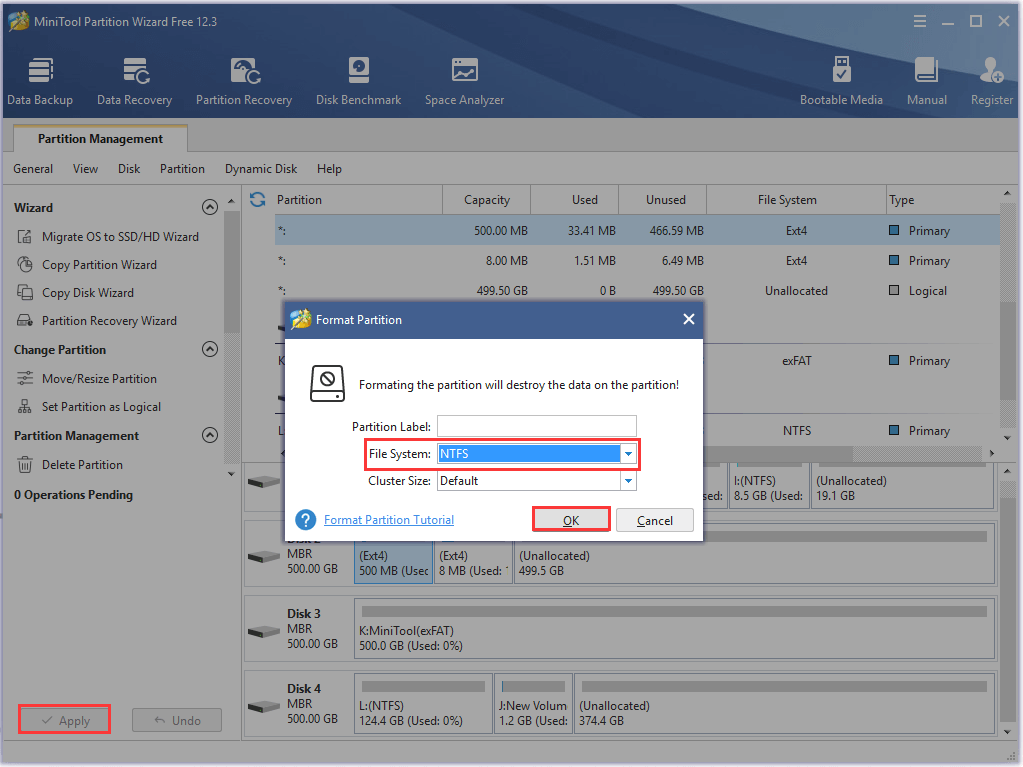
Step 2. In the pop-up window, select NTFS from the drop-down menu and click on OK to continue.
Step 3. Click on Apply button to execute the operation.
Part 2: Restore Data from the Ext4 Partition
Now, you should make the Ext4 accessible on Windows 10. Another question is how to regain data from the formatted partition. Here MiniTool Partition Wizard is capable of restoring Ext4 partition data. Please continue with the following steps.
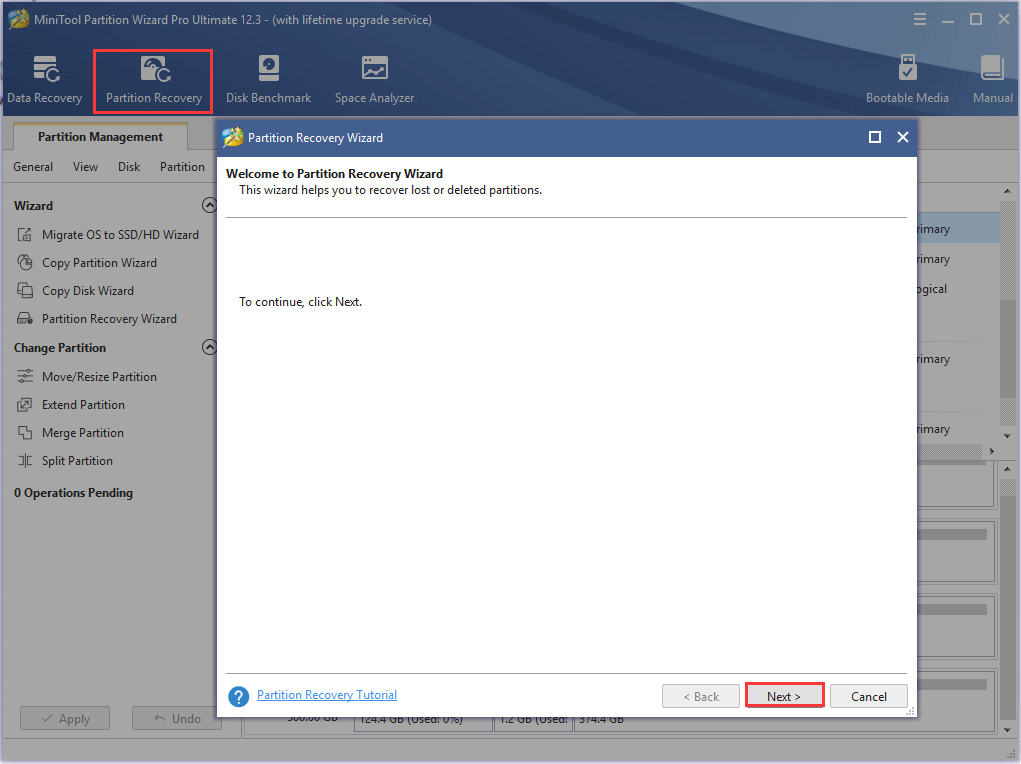
Step 1. In the main interface, select the partition that you just formatted to NTFS and click on Partition Recovery from the top toolbar. Click on Next in the pop-up window.
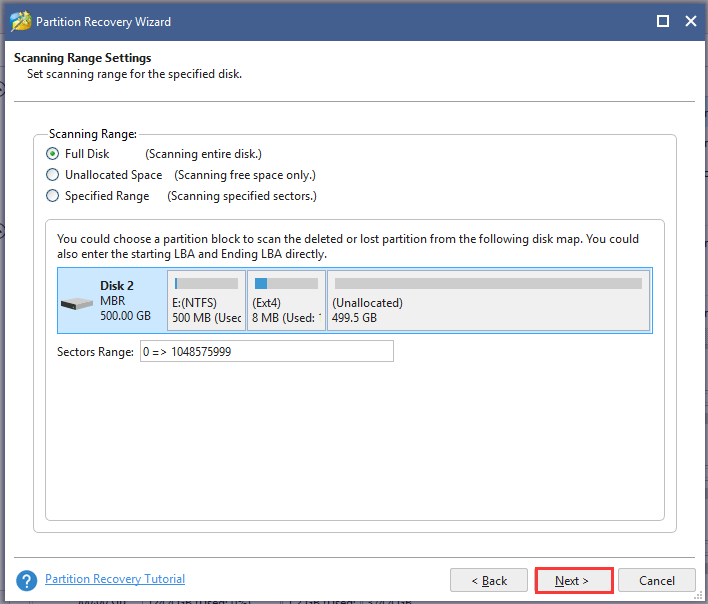
Step 2. Choose a scanning range based on your needs. There are 3 ranges to scan the disk including Full Disk, Unallocated Space, and Specified Range. Here we take Full Disk for example and click on Next to go on.
Step 3. Select a scanning method to scan the disk and click Next to continue.

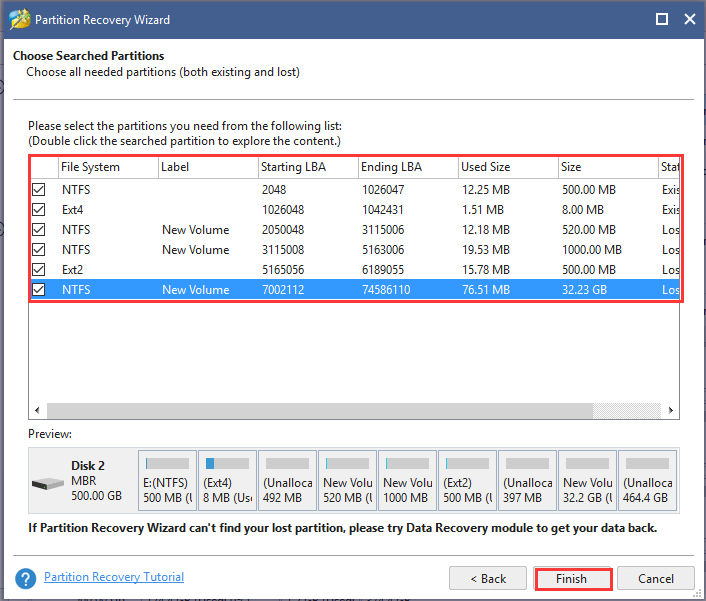
Step 4. Make sure that you check all partitions including existing partitions and deleted/formatted partitions. Wait for some time until the scanning completes and click on the Finish button.
Step 5. Click on Apply button to recover the formatted partition on the hard disk.
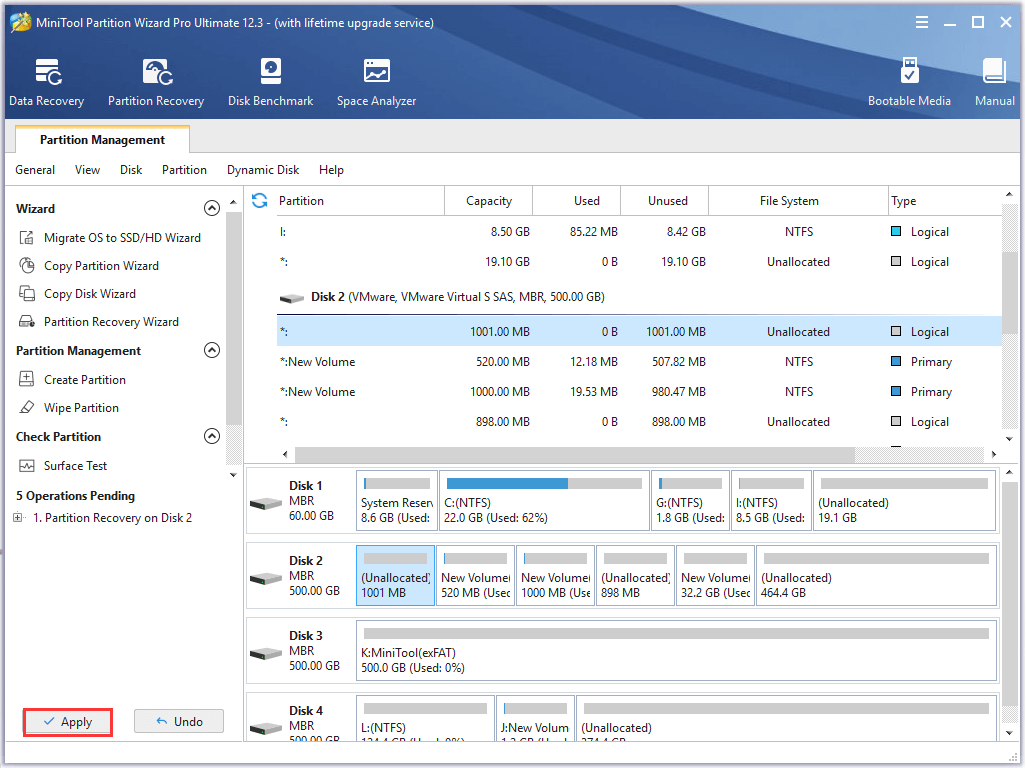
Up till now, the formatted partition should be recovered, and then you can read Linux partition Windows 10 and access its files.
Also, you can try the other three utilities to access Ext4 from Windows 10. Let’s keep reading!
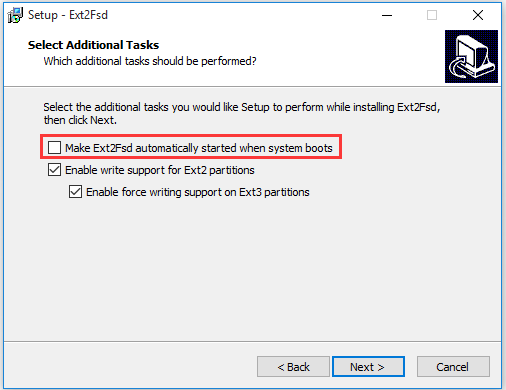
Method 2. Use Ext2Fsd
Ext2Fsd is a Windows file system driver that supports the Ext2/3/4 file system. It allows you to read Linux partition Windows 10 and access Ubuntu files by mounting the Ext4 partition and assigning a drive letter. You can lunch the Ext2Fsd at every boot or only open it when you need it.
To access Ext4 from Windows, follow the steps below:
Step 1. Install this tool on your Windows 10 PC and launch the driver.
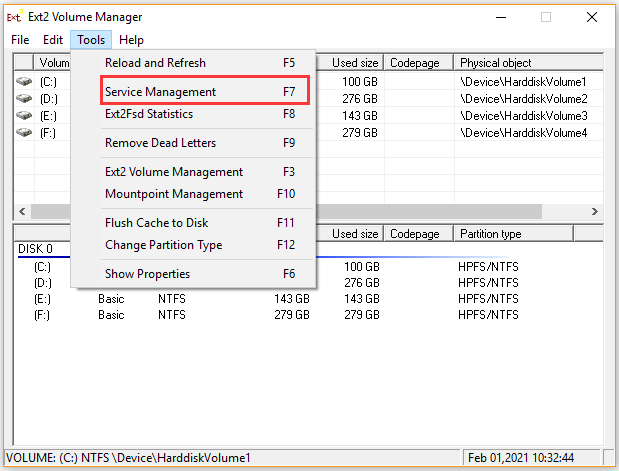
Step 2. In the main interface of Ext2Fsd, navigate to the Tools tab and select Service Management from the context menu.
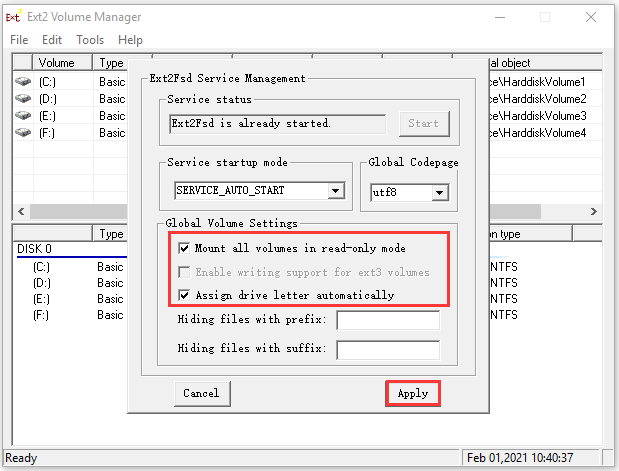
Step 3. In the Ext2Fsd Service Management window, select the checkboxes for Mount all volumes in read-only mode and Assign drive letter automatically. Then click on Apply to execute the operation. After that, this tool will automatically mount and assign drive letters to the Linux partitions.
Step 4. Press Win + E keys to open File Explorer, and then you will find the Ext4 partitions are mounted with their own drive letters and you can directly access Ubuntu files from Windows.
Method 3. Use DiskInternals Linux Reader
DiskInternals Linux Reader is a free utility to access Linux files from Windows 10. This tool can not only support the Ext4 file system but ReFS, HFS, and HFS+ file systems. Different from Ext2Fsd, this program allows you to read Linux drive on Windows within this application.
Step 1. Install DiskInternals Linux Reader on your Windows PC and launch it to enter the main interface.
Step 2. After the Linux Reader detects all partitions on your hard drive, navigate to the Ext4 partition from the list of drives.
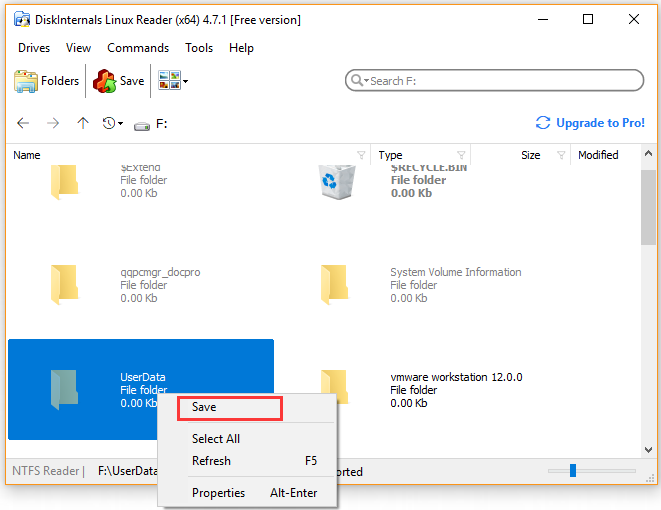
Step 3. Double click the Ext4 partition to open it and then you can preview and access the saved data on the drive.
Step 4. If you want to make full use of the Linux files on Windows, you have to transfer the files from the Ext4 partition to another location that is supported by the Windows file system. Here right-click the file that you need and click on Save from the context menu.
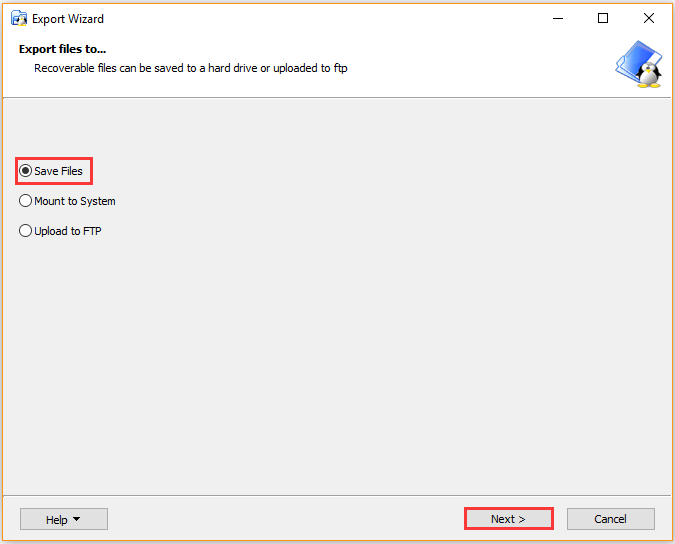
Step 5. Select the Save Files option and click on Next button.
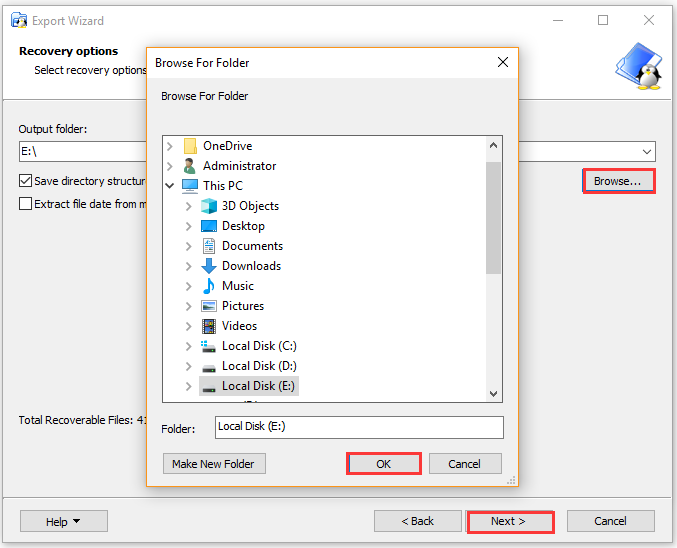
Step 6. Click on Browse button to select a location where you save the file and click on OK. Then click on Next. Wait for some time until the file is saved to your selected location.
Method 4. Use Ext2explore
Ext2explore is a practical explorer that can access Ext2/3/4 files on Windows 10. It works similarly to DiskInternals Linux Reader, but it doesn’t allow you to preview files using Ext2explore. This utility doesn’t have to be installed and you can run the .exe file directly.
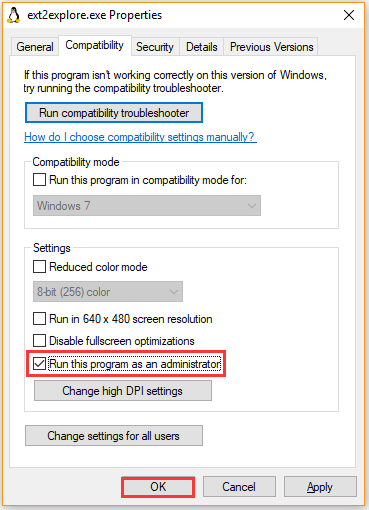
Bear in mind that you must run the Ext2explore.exe program as an administrator, or you will receive an error message.
Step 1. Right-click the Ext2explore.exe file that you download to Windows PC and select Run as administrator.
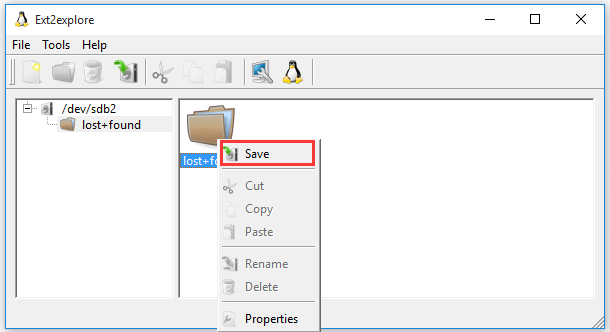
Step 2. Now, you can access the Ext4 partition and its Linux files. To open the files in the Windows system, you need to save them to the Windows partition. Right-click on the file and select Save, then navigate to another location to save files on the Windows system.
What’s Your Opinion
This post mainly focuses on how to access Linux files from Windows 10. You can choose one from the top 4 utilities to access Ext4 from Windows. If you have any better ideas on this topic, please share them in the comment area. Also, you can send us an email via [email protected] if you have any questions about the MiniTool software.
Access Linux Files from Windows 10 FAQ
After analyzing lots of user reports and references, we summarize the following 5 methods to transfer files between Windows and Linux.
- Use the Share network folders.
- Transfer files from Windows to Linux via FTP.
- Securely copy the files or folders to Linux via SSH.
- Share the files via sync software.
- Use the shared folder in Linux virtual machine.
Here are detailed steps to mount a Linux folder in Windows.
- Press Win + E keys to open the File Explorer, and then map your Linux home folder or directory on Windows.
- Click on Tools at the top menu and select Map network drive.
- Select the drive letter from the drop-down menu and click on Browse to select the folder that you want to mount.
- Click on Finish
- Open a terminal on your Linux, and then type sudo apt-get install smbfs in it and hit Enter.
- Type the sudo yum install cifs-utils line in terminal and press Enter.
- Execute the sudo chmod u+s /sbin/mount.cifs /sbin/umount.cifs
- Use the cifs utility to map a network drive to storage.
ABOUT THE AUTHOR

Position: Columnist
Fall in love with the hardware technology in early 2008. Now, Ariel has been a professional columnist for partition management publications. Graduated from Purdue University in 2010, Arial has about 10 years of working experience in the field of hardware technology. As a columnist on MiniTool, Ariel has provided numerous solutions ranging from data backup, disk management, and data recovery. These solutions helped millions of users fix all kinds of tricky problems. Ariel was born in Pennsylvania and lives with her husband and a lovely dog. She always says “Life is full of magic, but writing means the world to me.”
Источник
Mount a Linux disk in WSL 2 (preview)
If you want to access a Linux disk format that isn’t supported by Windows, you can use WSL 2 to mount your disk and access its content. This tutorial will cover the steps to identify the disk and partition to attach to WSL2, how to mount them, and how to access them.
Administrator access is required to attach a disk to WSL 2. The WSL 2 mount command does not support mounting a disk (or partitions that belong to the disk) that is currently in use. wsl —mount always attaches the entire disk even if only a partition is requested. You can’t mount the Windows installation disk.
Prerequisites
You will need to be on Windows 11 Build 22000 or higher to access this feature. You can join the Windows Insiders Program to get the latest preview builds.
Mounting an unpartitioned disk
In this simplest case, if you have a disk that doesn’t have any partitions, you can mount it directly using the wsl —mount command. First you need to identify the disk.
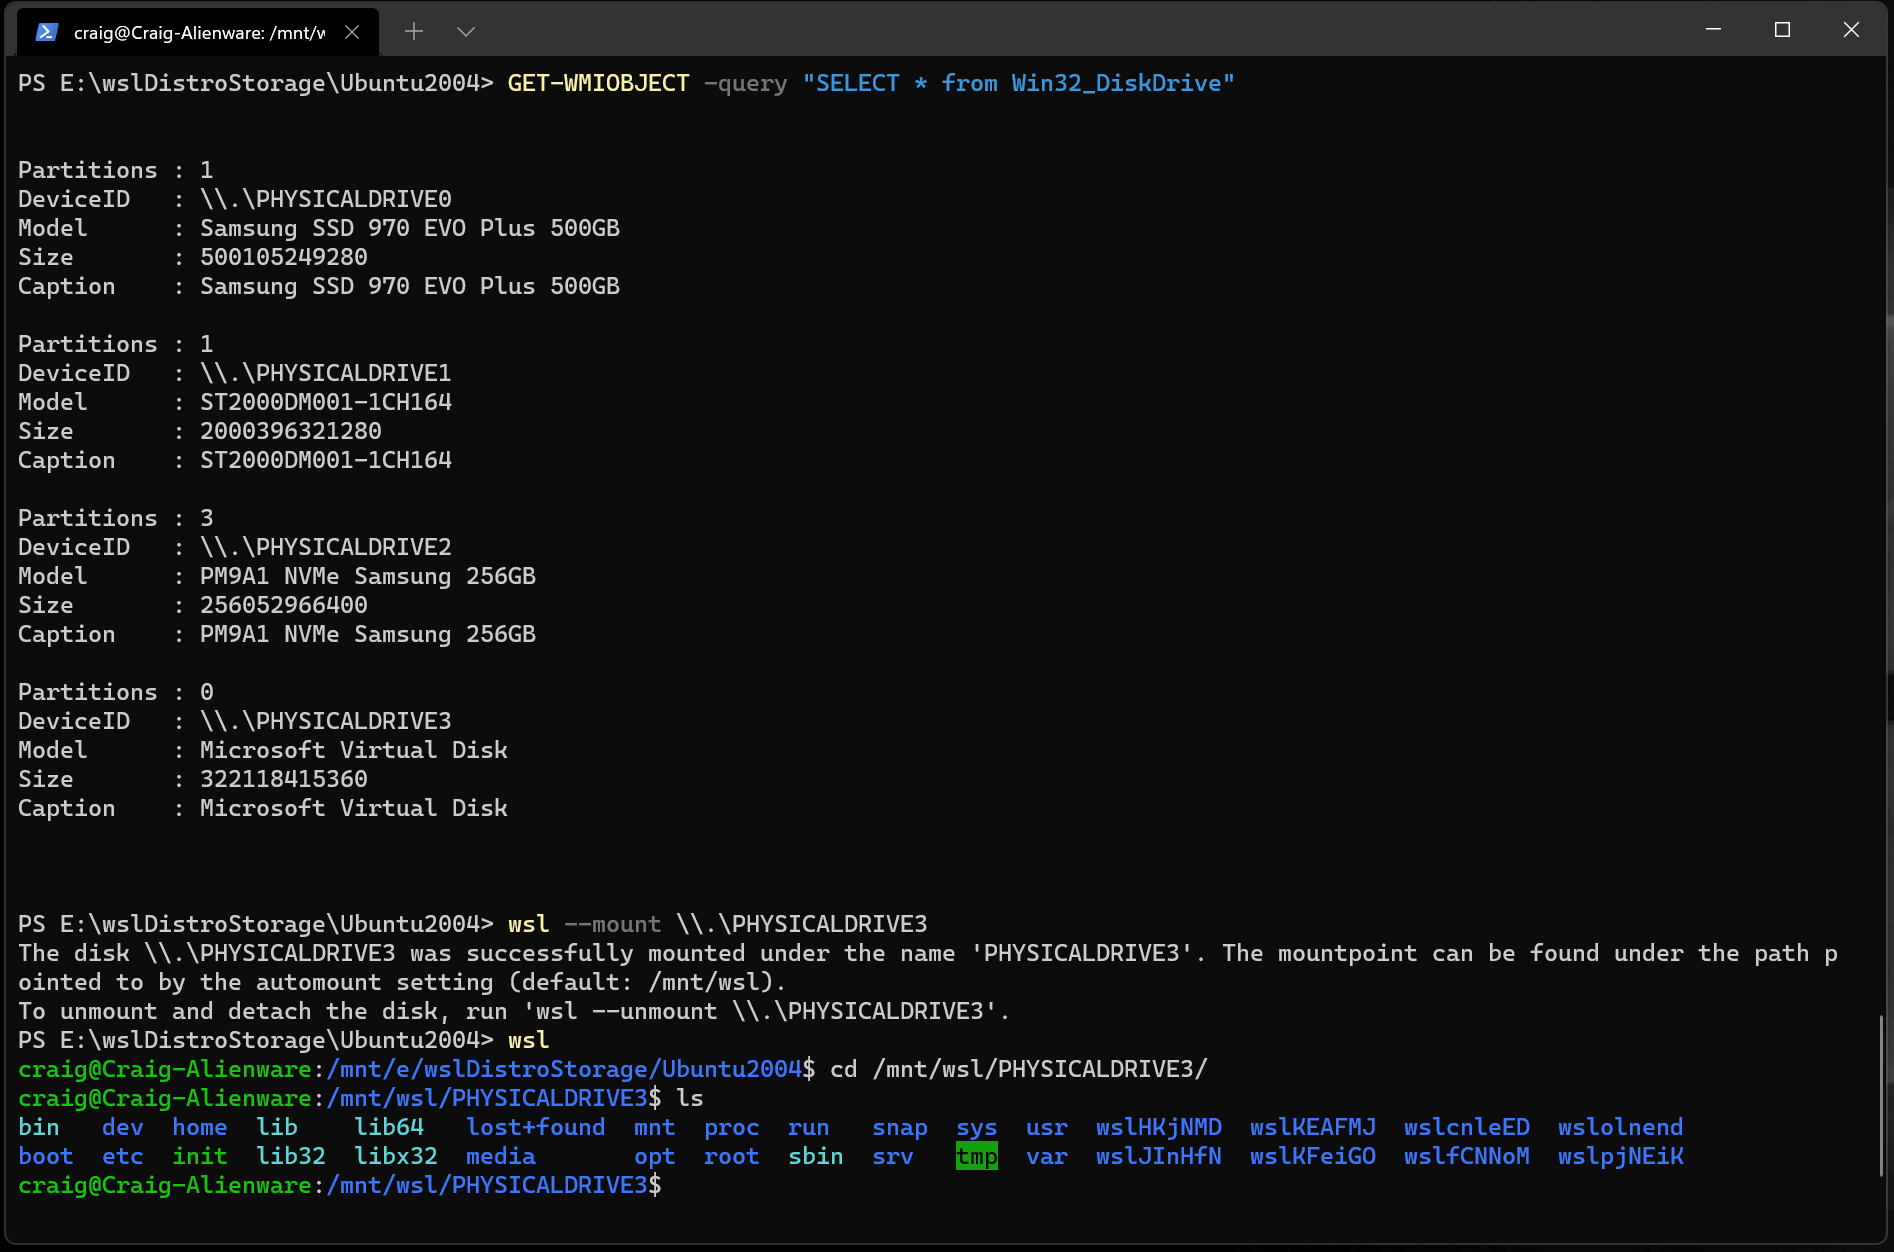
Identify the disk — To list the available disks in Windows, run:
The disks paths are available under the ‘DeviceID’ columns. Usually under the \\.\PHYSICALDRIVE* format.
Mount the disk — Using PowerShell, you can mount the disk using the Disk path discovered above, run:
Mounting a partitioned disk
If you have a disk that you aren’t sure what file format it is in, or what partitions it has, you can follow the steps below to mount it.
Identify the disk — To list the available disks in Windows, run:
The disks paths are listed after ‘DeviceID’, usually in the \\.\PHYSICALDRIVE* format.
List and select the partitions to mount in WSL 2 — Once the disk is identified, run:
This will make the disk available in WSL 2. (In the case of our example, the is \\.\PHYSICALDRIVE* .
Once attached, the partition can be listed by running the following command inside WSL 2:
This will display the available block devices and their partitions.
Inside Linux, a block device is identified as /dev/
. For example, /dev/sdb3, is the partition number 3 of disk sdb .
Identifying the filesystem type
If you don’t know the type of filesystem of a disk or partition, you can use this command:
This will output the detected filesystem type (under the TYPE=» » format).
Mount the selected partitions
Once you have identified the partitions you want to mount, run this command on each partition:
If you wish to mount the entire disk as a single volume (i.e. if the disk isn’t partitioned), —partition can be omitted.
If omitted, the default filesystem type is «ext4».
Access the disk content
Once mounted, the disk can be accessed under the path pointed to by the config value: automount.root . The default value is /mnt/wsl .
From Windows, the disk can be accessed from File Explorer by navigating to: \\wsl$\\ \\ (pick any Linux distribution).
Unmount the disk
If you want to unmount and detach the disk from WSL 2, run:
Mount a VHD in WSL
You can also mount virtual hard disk files (VHD) into WSL using wsl —mount . To do this, you first need to mount the VHD into Windows using the Mount-VHD command in Windows. Be sure to run this command with administrator privileges. Below is an example where we use this command, and also output the disk path. Be sure to replace
with your actual VHD path.
You can use the output above to obtain the disk path for this VHD and mount that into WSL following the instructions in the previous section.
You can also use this technique to mount and interact with the virtual hard disks of other WSL distros, as each WSL 2 distro is stored via a virtual hard disk file called: ext4.vhdx . By default the VHDs for WSL 2 distros are stored in this path: C:\Users\[user]\AppData\Local\Packages\[distro]\LocalState\[distroPackageName] , please exercise caution accessing these system files, this is a power user workflow. Make sure to run wsl —shutdown before interacting with this disk to ensure the disk is not in use.

Command line reference
Mounting a specific filesystem
By default, WSL 2 will attempt to mount the device as ext4. To specify another filesystem, run:
For example, to mount a disk as fat, run:
To list the available filesystems in WSL2, run: cat /proc/filesystems
When a disk has been mounted via WSL2 (Linux file system), it is no longer available to mount via an ext4 driver on the Windows file system.
Mounting a specific partition
By default, WSL 2 attempts to mount the entire disk. To mount a specific partition, run:
This only works if the disk is either MBR (Master Boot Record) or GPT (GUID Partition Table). Read about partition styles — MBR and GPT.
Specifying mount options
To specify mount options, run:
Only filesystem specific options are supported at this time. Generic options such as ro, rw, noatime, . are not supported.
Attaching the disk without mounting it
If the disk scheme isn’t supported by any of the above options, you can attach the disk to WSL 2 without mounting it by running:
This will make the block device available inside WSL 2 so it can be mounted manually from there. Use lsblk to list the available block devices inside WSL 2.
Detaching a disk
To detach a disk from WSL 2, run:
If Diskpath is omitted, all attached disks are unmounted and detached.
If one disk fails to unmount, WSL 2 can be forced to exit by running wsl —shutdown , which will detach the disk.
Limitations
At this time, only entire disks can be attached to WSL 2, meaning that it’s not possible to attach only a partition. Concretely, this means that it’s not possible to use wsl —mount to read a partition on the boot device, because that device can’t be detached from Windows.
USB flash drives and SD cards are not supported at this time and will fail to attach to WSL 2. USB disks are supported though.
Only filesystems that are natively supported in the kernel can be mounted by wsl —mount . This means that it’s not possible to use installed filesystem drivers (such as ntfs-3g for example) by calling wsl —mount .
Источник


