- Linux Command: Show Mounted Hard Drives Partition
- Examples
- How to List Mounted Drives on Linux
- 1) Listing from /proc using cat command
- 2) Using Mount Command
- 3) Using df command
- 4 ) Using findmnt
- Conclusion
- Findmnt — Better Way of Finding Mounted Filesystems on Linux
- Mount vs Findmnt
- Mount default output
- Findmnt default output
- Practical usage of findmnt command in Linux
- Narrowing your search
- Customizing the output of findmnt command
- Bonus Tip: Real life example of findmnt
Linux Command: Show Mounted Hard Drives Partition
[a] df command – Shoe file system disk space usage.
| Tutorial details | |
|---|---|
| Difficulty level | Easy |
| Root privileges | No |
| Requirements | Linux |
| Est. reading time | N/A |
[b] mount command – Show all mounted file systems. [c] /proc/mounts or /proc/self/mounts file – Show all mounted file systems.
Examples
Open a terminal or login using ssh into the remote server and type the following command:
$ cat /proc/mounts
OR
$ cat /proc/self/mounts
Sample outputs:
Type the mount command as follows to get same information:
Type the df command shows more human readable output:
- No ads and tracking
- In-depth guides for developers and sysadmins at Opensourceflare✨
- Join my Patreon to support independent content creators and start reading latest guides:
- How to set up Redis sentinel cluster on Ubuntu or Debian Linux
- How To Set Up SSH Keys With YubiKey as two-factor authentication (U2F/FIDO2)
- How to set up Mariadb Galera cluster on Ubuntu or Debian Linux
- A podman tutorial for beginners – part I (run Linux containers without Docker and in daemonless mode)
- How to protect Linux against rogue USB devices using USBGuard
Join Patreon ➔
Fig.01: df command in action
🐧 Get the latest tutorials on Linux, Open Source & DevOps via
| Category | List of Unix and Linux commands |
|---|---|
| Documentation | help • mandb • man • pinfo |
| Disk space analyzers | df • duf • ncdu • pydf |
| File Management | cat • cp • less • mkdir • more • tree |
| Firewall | Alpine Awall • CentOS 8 • OpenSUSE • RHEL 8 • Ubuntu 16.04 • Ubuntu 18.04 • Ubuntu 20.04 |
| Linux Desktop Apps | Skype • Spotify • VLC 3 |
| Modern utilities | bat • exa |
| Network Utilities | NetHogs • dig • host • ip • nmap |
| OpenVPN | CentOS 7 • CentOS 8 • Debian 10 • Debian 8/9 • Ubuntu 18.04 • Ubuntu 20.04 |
| Package Manager | apk • apt |
| Processes Management | bg • chroot • cron • disown • fg • glances • gtop • jobs • killall • kill • pidof • pstree • pwdx • time • vtop |
| Searching | ag • grep • whereis • which |
| Shell builtins | compgen • echo • printf |
| Text processing | cut • rev |
| User Information | groups • id • lastcomm • last • lid/libuser-lid • logname • members • users • whoami • who • w |
| WireGuard VPN | Alpine • CentOS 8 • Debian 10 • Firewall • Ubuntu 20.04 |
Comments on this entry are closed.
command not found…
Which command will display the number of devices in my system (routers/switches/AP)
I purchased the Hp 15-n018 model laptop, when i checking with vendor they said will not support for Linux operating and i didn’t found the driver in internet….. i able found in win 8 and 8.1….
But am very interested in Linux operating system…. any one can please help me where i can the driver.
Sudinhar: it really depends on what driver you’re talking about for which specific device and for which specific Linux distribution.
The laptop itself may require any number of drivers, including HD, CD/DVD, sound, display, network, etc.
Many Linux distributions come with drivers for a wide variety of systems & devices, and you can generally get Linux up & running on just about anything these days with enough patience.
You can generally repartition your hard drive without losing any data using tools provided in distribution ISOs/DVDs & install Linux as a dual boot without fear of not being able to also use Windows if necessary as a backup.
I first installed Linux on a laptop back in the 90s, and it was difficult to get all the drivers but I did eventually & it worked ok.
These days it’s usually much simpler and any up to date Linux distribution should run just fine on your laptop with a little setup & TLC.
As a side note, I’d like to thank the author of this article, the commands worked as advertised & provided the information I required.
Linux has a long history of not “playing well” with laptops, and unless you get a laptop that is “certified” to run with Linux, you’re bound to have headaches. Something else you might try is keeping the laptop as is, and installing Virtual Box, by Sun (Oracle?) I believe it’s available on-line at no charge. This is a VM system, which will allow you to load a real copy of Linux, as it emulates a real computer. Personally, I use VMware Workstation (I’ve had it for years, but it’s a commercial product) which does the same thing, but I’ve heard nothing but good things about Virtual Box. You can then launch Linux in a window, and it’s a “real” linux version, which you will install from the distribution ISO.
Let’s say I want to display on the i3status bar whether a device/share is mounted.
How would that be accomplished?
I’m kind of new to i3, but as of what I’ve found online about the wm, it is a matter of finding the right parameter on i3status or i3blocks (whichever you use).
Источник
How to List Mounted Drives on Linux

In this tutorial, I will show you the different ways to list mounted drives on Linux. We can use mount, findmnt, and df commands to list mounted device any Linux distribution like Ubuntu or Centos.
In Linux, mount command mounts a storage device or filesystem, and let’s go through commands that can display all those mounts.
1) Listing from /proc using cat command
To list mount points you can read contents of the file /proc/mounts.
In the following example, I have used cat command to read the /proc/mounts file:
2) Using Mount Command
You can use mount command to list mount points. When you run mount command without any options it will list mount points.
3) Using df command
You can use df command to list mount points.
The following command shows the output of df with -aTh option:
You can use -t followed by filesystem type (say ext3, ext4, nfs) to display respective mount points. For examples below df command display all NFS mount points.
4 ) Using findmnt
Findmnt is a powerful tool to find mounted filesystems. This command comes with lots of options to list mount filesystems.
The following command print all mounted filesystems:
Print mount point by specific filesystem type:
Search and list fstab contents:
Display all /etc/fstab file and converts LABEL= and UUID= tags to the real device names:
Conclusion
In this tutorial, we learned commands to list mounted drives or filesystems on Linux. I hope you enjoyed reading and please leave your suggestion in the comment section.
Источник
Findmnt — Better Way of Finding Mounted Filesystems on Linux
I have been working on a bash scripting project to auto build Linux from scratch. Every time I go through the code I find way to make it cleaner. I take a little section of code and make it better.
The other day I was making a modification to check if a filesystem is mounted before mounting it. I was looking for a better way to do so. I did not want to use the usual mount | grep or any code like it. I wanted something cleaner.
Mount vs Findmnt
I don’t know why, but at that moment I found myself wondering why I connect to the internet so often to find information that is already on my laptop. So, I fire up man mount, I quickly glanced at the man page and notice this:
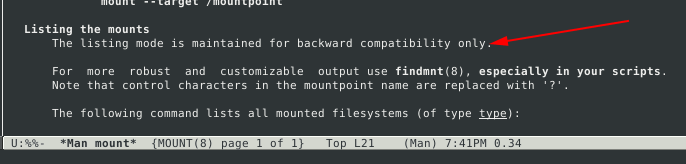
And there I had my answer. First I have been using the wrong command for a while now. Second, Google does not always have the best answer.
The irony here is that this is not mentioned in online man pages that I usually look through. See for yourself, on the man page of mount, findmnt is only referenced at the end. Should I have gone through my regular channels to find an answer I would not be writing this article.
Right away I got very curious, how much better is this findmnt? How many pipes will I be able to remove from my scripts? Turns out it is so much better then mount listing. First, lets compare the default output of each command.
Mount default output
Looking at the above listing of mounted file system, it is easy to see why grep became so popular. The information is all there, but a better format would make it easier to read. To accomplish that, you already would need a pipe and external command. Now let’s look at findmnt.
Findmnt default output
That looks a lot better. It gets better, with findmnt you won’t have to use a combination of tools anymore. It is very flexible and that gives you a chance to write cleaner code when used in a script.
Practical usage of findmnt command in Linux
Checking if a file system is mounted with findmnt is much easier. You can check for a source or target without using any options. Provide a mount point (target) or device (source) with no option and findmnt will attempt to match the argument you provided against both.

Findmnt really works like a search command for file system. If matches are found, they will be printed and findmnt returns 0. When nothing matches your query, findmnt prints nothing and returns 1.
A long list of options comes with findmnt. You have 2 main category of options, narrowing your search and formatting the output.
Narrowing your search
Like find for finding files, findmnt is for finding file system. You already know how to limit your search by providing a string that will be matched against SOURCE and TARGET. Should you need to narrow your search to a SOURCE or a TARGET, use the -S and -T options.

Already at this point, I was sold on using findmnt instead of mount. I can query the partition that I want. And I don’t use a pipe. Findmnt does not stop there, it has a multitude of options designed to give you a powerful search of the file system.
I think one of the most interesting options is -O, –options. The -O options lets you write a list of options to match your search against. Searching for read-only file system is now as easy as findmnt -O ro.

The -O options can also take a comma-separated list. This let you search against multiple options and list only file system that have all the desired options.
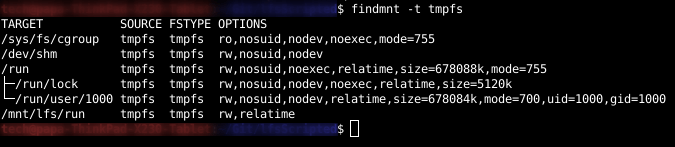
Searching for a given file system type also does not require the use of external tools. Simply use the -t options. In the example below I listed all tmpfs mount.
In all the examples above, findmnt searched /etc/fstab, /etc/mtab and /proc/self/mountinfo. You can easily limit this wide search with the following options:
- –fstab (Narrow search to /etc/fstab only)
- –mtab (Narrow search to /etc/mtab only)
- –kernel (Search in /proc/self/mountinfo only)
Another interesting option is -i, –invert. Which invert the sense of matching. In a previous example, we listed all tmpfs with the -t option. The example below will list all file system of type swap from fstab only.
This one will list all file systems except any of type swap.
Already with the given options you can avoid using a lot of pipes and external programs. And it does not stop here. Findmnt provides a good set of options to customize the output of your search results.
Customizing the output of findmnt command
You won’t need to use head command to remove the header. Simply call findmnt with -n option:

I was not expecting the next option to even be an option. Findmnt can imitate the output of the df command. Calling findmnt with -D or –df will tell findmnt to display information about space for each listed file system.
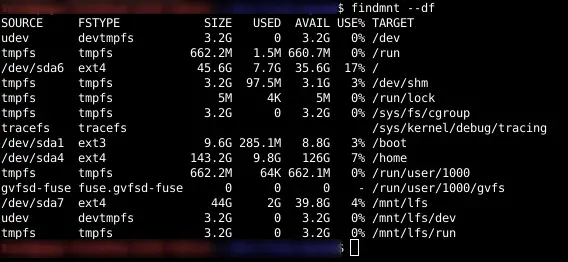
Options can be combined for more specific search. In this next example, I use findmnt to list all file system from /etc/fstab and request to display df information.

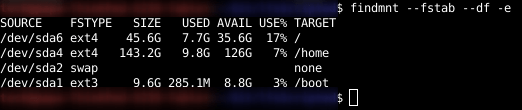
I don’t know about you, but I am starting to enjoy findmnt. Except for those UUID with the last command. I get it, it is a good way to identify device for the OS. Me, I would like a more human readable way. You accomplish this with the -e option.
The -e or –evaluate option with convert all tags like UUID, LABEL, PARTLABEL, PARTUUID to the corresponding device name. See the results when I run the same command with -e options.
I like to way findmnt format it’s output. It is more human friendly. On the other hand, this format when used in a script can be harder to manipulate. A simple line-by-line, space separated data set would be easier. This is easily done with -r, –raw option.

This next option is really nice. I think it remove the need to | grep almost entirely. You can tell findmnt exactly which column to print with the -o, –output. This options take a comma separated list of columns to print. Using the following command you can get just the available space of your root partition with no headers.

All you have to do in your scripts is to remove the last character. In the above command, I gave the –df option. That was not necessary, same results will be printed even without that option.

Findmnt provides quite an extensive list of output column. I provide you below with a short list of column that I think will be of interest. You can view the full list with findmnt –help
- SOURCE source device
- TARGET mountpoint
- FSTYPE filesystem type
- OPTIONS all mount options
- LABEL filesystem label
- UUID filesystem UUID
- MAJ:MIN major:minor device number
- SIZE filesystem size
- AVAIL filesystem size available
- USED filesystem size used
- USE% filesystem use percentage
- FSROOT filesystem root
The default list of printed column can be extended instead of replaced. Simply provide a list using the following format: +list. The following command will give the same information as using –df, except that the columns will be added to the end.

Already I am falling in love with findmnt. This will save me lots of piping and long command lines. And findmnt does not stop there. There is one more functionality I want to talk about. Polling.
Yes, findmnt can be used to monitor changes in /proc/self/mountinfo file. This effectively lets you watch your system for mounting related activities. No more while loop in bash scripts.
Findmnt will listen for the following actions, mount, umount, remount and move. You can limit this by providing a comma separated list of actions to listen for. For example, the following will only monitor for mounting file system.

In the above picture, you see the output printed by findmnt when a new partition got mounted. You notice the new column ACTION? With the –poll option you have 3 new column that can be displayed:
- ACTION: Available for mount, umount, remount and move
- OLD-TARGET: Available for umount and move action.
- OLD-OPTIONS: Avalable for umount and remount.
When used in this mode, findmnt will block, if used in a script, the script will “hang”. The time that –poll will block and listen for actions can be limited with 2 options
- –first-only: Findmnt will quit after the first action is detected.
- –timeout X: Findmnt will quit after X milliseconds.
When you put it all together, findmnt is one powerful tool. When used in scripts, you will do away with a lot of extra code. The need to pipe to external command as been greatly diminished.
Previously listed options can also be used with –poll. In the example below, findmnt will listen for a mount action and print the SOURCE,TARGET, SIZE and USE %. But only if the mount target matches the -T options.
Bonus Tip: Real life example of findmnt
I have been working on a bash scripted environment to compile Linux from Scratch for a little while now. Using findmnt in my scripts resulted in better and cleaner code.
During the initial startup of my script, I check to see if LFS partition are mounted, if not the scripts mounts them. The code used to look like this:
The project is for education purpose, this is why I used process substitution and pipe in the above test. Throughout my code I display multiple ways to do the same task. Using findmnt I came up with a cleaner way to do the same.
I redirect the output to /dev/null, I don’t need to have findmnt output printed on the console. Findmnt will return 1 if the search fails, which will cause the code within ( … ) to execute.
I hope you enjoyed and learned a new command. If you got interesting usage for it, please share in comments. There is also another take on this article: online search are not always the best. We tend to forget that Linux comes with a manual.
Источник


