- Use apt-get to fix missing and broken packages
- Using apt-get to fix missing and broken packages
- Other methods
- Method 2:
- About the author
- Karim Buzdar
- How to Fix Broken Packages in Linux
- Fixing Broken Packages in Ubuntu
- Permanent DPKG Lock
- Fixing Broken Packages in Fedora/CentOS/RHEL
- Conclusion
- 4 comments
- Debian Cleanup Tip #4: find broken packages and reinstall them
- Use debsums to identify modified files
- Find out the package affected and reinstall it
- Comments
- Trackbacks
- Get the Debian Handbook
Use apt-get to fix missing and broken packages
In this article, we will learn how to fix the missing dependencies and broken packages using the apt-get command. Note that, we have run the commands and procedure mentioned in this article on a Debian 10 system. The same procedure can be followed in Ubuntu and older Debian versions.
We will use the command-line Terminal for trying the solutions and fixing the problem. To open the Terminal application in Debian, hit the super key on the keyboard and search for it using the search bar that appears. When the search result appears, click on the Terminal icon to open it.
Using apt-get to fix missing and broken packages
Apt-get is a Terminal based package management tool used for installing, upgrading, and removing packages. Along with these features, it also has flags that can be used for fixing missing dependencies and broken packages.
Method 1
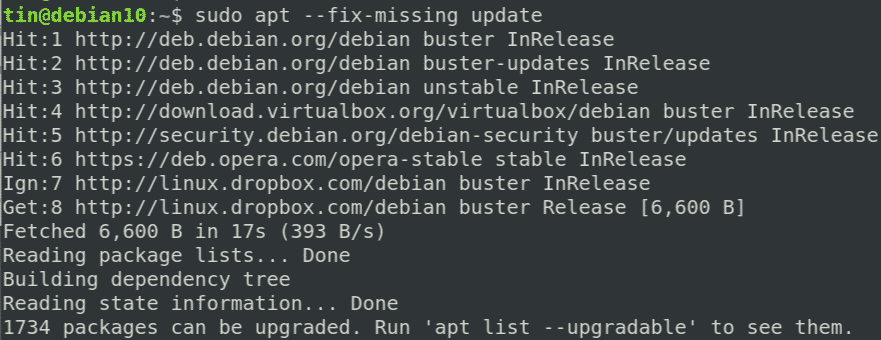
Use the “fix-missing” option with “apt-get update” to run the updates and ensure the packages are up to date and there is no new version available for the packages.
Once you are done with the update, execute the below command in order to force the package manager to find any missing dependencies or broken packages and install them.

Another approach to solving the broken package issue via apt-get is to edit the “/etc/apt/sources/list” file and adding sites with newer versions of packages available. Then running the “apt-get update” command to update the repository list.
If the above method does not fix the issue of broken dependencies and broken packages and still you are receiving the error, then try the following methods.
Other methods
Method 1:
In this method, we will use the “apt-get autoremove” and the “dpkg” in order to fix missing dependencies and broken packages.
1. Update the repository index by executing the below command in Terminal:
2. Next, execute the below command to clean out the local repository:
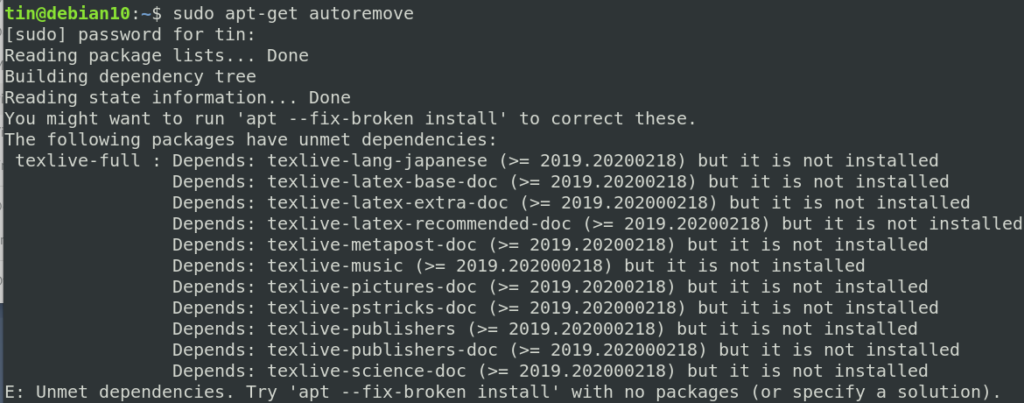
3. Execute the below command to remove all the unnecessary packages that are no longer needed:
The above command will display the unmet dependencies or broken package’s name.
4. Then try executing the below command in Terminal to force remove the broken package:
Method 2:
In the following method, we will use the “dpkg—configure” command in order to fix missing dependencies and broken packages.
Dpkg is a package management tool that can be used to install, remove and manage packages. Similar to apt-get, it can also help to fix broken packages and missing dependencies. If you receive some errors while installing or updating the packages, try the following solution with dpkg:
1. Execute the below command in the Terminal to reconfigure all the partially installed packages.
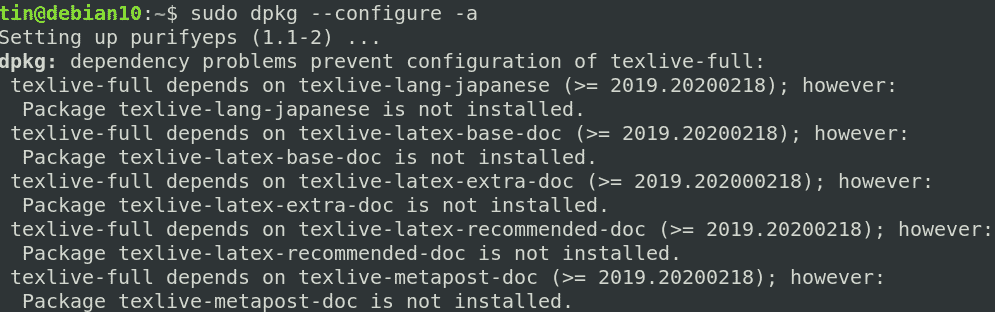
If the above command does not work, like in our case and you see similar results displaying the erroneous package, then try removing the package.
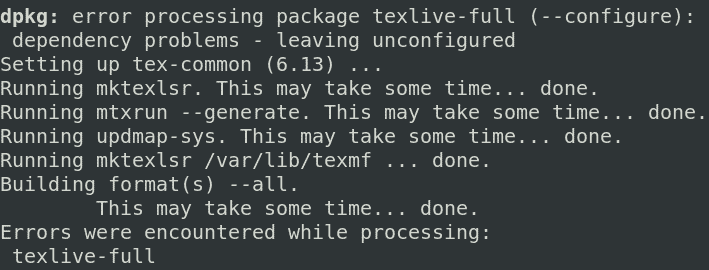
2. Execute the below command in Terminal in order to remove the erroneous package.
3. Then use the below command to clean out the local repository:
After trying any one of the above solutions, run the update command to ensure the dependencies are resolved and broken packages are fixed or removed.
Fixing the dependency and broken packages errors and then returning the system to the normal state may take hours. Sometimes it gets so complicated that when you finally fix it, you feel so lucky. We have presented some solutions regarding this error, so please give them a try. If you know some of the possible solutions we did not mention, please let us know in the comments.
About the author

Karim Buzdar
Karim Buzdar holds a degree in telecommunication engineering and holds several sysadmin certifications. As an IT engineer and technical author, he writes for various web sites. He blogs at LinuxWays.
Источник
How to Fix Broken Packages in Linux

Linux package managers, like Apt and DNF, are extremely powerful and intuitive, but that doesn’t mean things can’t go wrong. Occasionally, a package install goes wrong, and you’re left to pick up the pieces. Package managers have the ability to fix broken packages and skip broken updates to get your system working again and avoid troubles in the future. This article covers how to fix broken packages in Linux.
These tips and tricks should help you get unstuck in most instances. They’re all fairly universal, but every situation is different, so keep that in mind when trying to debug your own situation.
Also read:  How to Fix Ubuntu Update Errors
Fixing Broken Packages in Ubuntu
Apt has a couple of flags you can use to fix missing dependencies or packages that broke for one reason or another during install. A common use here would be installing a third-party .deb and finding that it had dependencies you didn’t know about. Those dependencies probably won’t be pulled in on their own, and dpkg will complain that the package is missing in them. In any case, you can try the following steps.

First, run an update to make sure there aren’t newer versions of the required packages.
Next, you can try forcing Apt to look for and correct any missing dependencies or broken packages. This will actually install any missing packages and repair existing installs.
Another place where error can pop up in package installations is the configuration process. Behind the scenes, dpkg is taking care of this part, not Apt, so it would stand to reason that when a package fails during configuration, dpkg is the tool to turn to in order to fix it.

Start by trying to force dpkg to reconfigure any broken or partially configured packages.
If that doesn’t solve the problem, you can take a more forceful approach. Start by listing any packages that dpkg marked as requiring a reinstall.
You should see the problematic package(s) there. As long as there isn’t anything that doesn’t seem to belong there, you can force-remove the broken packages.
When dpkg is done, try to clean up with Apt.
With any luck, that’ll get you back to where you started. It won’t get you the broken packages that you tried to install, but at least Apt will be functional again.
Also read:  Ubuntu Software Center Not Working? Here Are the Fixes
Permanent DPKG Lock
There’s a less common issue with ridiculous dpkg locks preventing you from doing anything. Every time you try to use Apt or dpkg, you get an error saying another application already is … when it isn’t.
It’s actually easy to delete the lock file preventing you from using Apt and getting back to doing what you need to. Sometimes these lock files remain in place after an error occurs in an install, derailing the process and preventing the file from being removed automatically. In this case, you’ll need to do it yourself.
For good measure, delete the lock in cache.
Fixing Broken Packages in Fedora/CentOS/RHEL
Fixing broken packages in Fedora/CentOS/RHEL is less common, as yum and dnf do really great work in making sure packages are installed correctly. However, sometimes things get mixed up in package use. The command to do that on rpm-based systems is:

The -V option is for verify, meaning it will go through and compare information on the installed files with the information stored in the rpm database. This is slightly unhelpful, as it will usually give you a long list of files, but it can give you somewhere to start if you’re having issues with a particular application. You can run a dnf reinstall on any packages you see in that list that might be giving you trouble.
That will set all metadata as expired, so it will crawl through every repository you have enabled and look for a new version of that package. If you find that there are broken dependencies with that package, DNF will probably complain and tell you to use the —skip-broken flag. This can also mean that you don’t have a particular repository enabled to pull in a dependency, so you may have to do some research there.
Also read:  How to Build a Package from Source in Linux
Conclusion
Hopefully, one of these fixes worked for you, and you’re back working on your Linux system normally. Remember that the best way to handle a totally out-of-hand situation is to try to return to the way it was before. Don’t try to power through and add more things to solve a breakage by adding more things unless you know exactly what you’re doing. Chances are you’ll end up with a tangled mess of broken things that’ll be harder to sort out.
You may also need to clean up your Linux system to get rid of unnecessary and broken packages. If the cause is due to an old PC not able to support newer software, you can also make use of these three ways to put your old PC to good use.
John is a young technical professional with a passion for educating users on the best ways to use their technology. He holds technical certifications covering topics ranging from computer hardware to cybersecurity to Linux system administration.
4 comments
When it comes to Debian-based distros, one should use Synaptic instead of error-prone tools such as APT or dpkg. While it may be real kewl to use command line but APT and dpkg lend themselves to easy misspellings of commands and options.
I find it sad many Debian based Distros no longer use Synaptic as a default app. It is the first thing I install if it is missing. While a bit less user friendly, it is much more powerful than any “Software Boutique” I have seen. (I believe PC Linux still uses Synaptic with .rpm files too?)
“I believe PC Linux still uses Synaptic with .rpm files too?”
Yes, it does and I’m very glad it does. PCLOS is my daily driver.
I also love and use Synaptic, but it has not always been able to fix broken packages for me. Sometimes I also use, “sudo dpkg –configure -a” which only failed me once, when I had forced a package and ended up in dependency hell (My own fault) I also use a cheat sheet that I can copy and paste, as I am a terrible typist and speller, to avoid those misspellings and typos.
Источник
Debian Cleanup Tip #4: find broken packages and reinstall them
February 21, 2011 by Raphaël Hertzog
Last week, we learned to get rid of third-party packages, now we’re going one step further: we’ll verify if the files of the installed packages are still exactly like they were when they got installed.
If you’re a tinkerer and hand-edit some files for some quick tests, or if you tend to re-install newer versions of some packages from the sources, you might have overwritten some packaged files and it would be good to be able to detect this (and remedy to the problem). debsums is the tool that makes it possible.
Use debsums to identify modified files
 I often use debsums when I take over the maintenance of a Debian server because I want to verify which files have been modified by the former administrator.
Without any argument, debsums is very verbose, it will list every installed file (except configuration files) and tells whether it’s unmodified (“OK”) or not (“FAILED”).
With the —all option, it will verify all files including configuration files. With —config it will verify only the configuration files.
With the —changed option, debsums will only list modified files among those inspected. The following invocation will thus list all files which have been modified on the system and which are not configuration files.
Find out the package affected and reinstall it
debsums told me that /usr/lib/perl5/AptPkg.pm was modified. Indeed I remember having manually installed a modified version of that perl module for a quick test.
I find out the affected package with dpkg —search /usr/lib/perl5/AptPkg.pm : it’s libapt-pkg-perl.
Now I just have to reinstall this package to overwrite the modified files with the original ones:
You might have to repeat the process until debsums no longer reports any modified file.
Do you want to read more tutorials like this one? Click here to subscribe to my free newsletter, you can opt to receive future articles by email.
Comments
please and what about:
debsums: no md5sums for binutils
is it maintainer’s problem?
Yes, it means the package doesn’t ship the “md5sums” file that debsums uses. The problem is partly resolved since recent versions of debsums generate those files on the fly while packages are installed.
Try “dpkg-reconfigure debsums” and it will ask you if you want to create them automatically with apt-get.
Thank you,
reinstalling some packages helps me, but one (dpkg installed) not. I will must to recretate it by my self 😉
or use debsums —generate=package.deb
Are ‘broken packages’ an accurate definition ? … I mean, I have 286 packages listed after issuing “sudo debsums –changed” … and my install (Ubuntu 10.10 amd64 desktop edition) is running appreciably fine to me. Could the big amount of ‘broken’ packages … could be related with a big amount of external repositories appended (around 20) in order to have more up-to-date software ?
Could on the other hand be related with the fact that I don’t usually make CLEAN installs ? … I usually UPGRADE from one to another Ubuntu versions.
I try to take much care of my install but even though I have a separate /home partition I don’t like making clean installs.
Thank you and regards.
Are you sure you’re not speaking of files here? Because debsums spits out files and not packages… and 286 packages with modified files would be a lot.
The fact that you upgrade from one version to the next, or the fact that you have a lot of repositories are unrelated to those modified files. Maybe you have used some tool that installs software outside of the knowledge of dpkg?
Well … first of all I am not a GNU/Linux advanced user at all so … frecuently, when I install something I don’t know for sure if dpkg is working underneath. I can assume that installing a deb package will be carried out through dpkg and I will also assume that installing from repositories will also use dpkg utility. You are right about 286 … they were files … not packages.
According to the big amount of files … well … without digging in depth (and having a quick look at the sorted file list) it looks like … well … I don’t really know what to think. Checking the installables files I have used (I usually keep installable files of applications installed apart from repositories or Synaptic) … most of them are deb packages (the exceptions: GoogleEarthLinux.bin , truecrypt-7.0a-setup-x64 without extension name at all , sopcast-player_vlc1.1x-fix.zip and veetle-0.9.17-linux-install.sh) … I can also remember Adobe Reader was installed forcing architecture due to the lack of support for amd64 architecture.
They are to many files … my install apparently works fine … broken packages ? … it’s a bit confusing …
Try “dpkg -S ” on a few of the files listed… it will tell you which package is “unclean”. Just like I explained in my article.
Maybe you’ll understand better where it comes from. Possibly parts of vlc overwritten by sopcast-player or something like that.
ed , kbd , less , sysv-rc , pcmciautils , wireless-tools , libfribidi0 , pxljr , mlocate , ntfsprogs , hal , libgtkhex0 , libgpgme11 , libgphoto2-port0 , libxcb-atom1 , base-passwd , toshset , rsyslog , libv4l-0 … and GROWING …
My godness . Am I the one supposed to be tinkering with I don’t know what ? … I don’t even know what are these packages for …
After all my install doesn’t seem to be so healthy. Who is supposed to have been modifying these files ? … if I reinstall the growing packages … wouldn’t it interact with WHO have modified them afterwards ?
In case of reinstalling the growing packages … is there an ‘automatic’ way of detecting them ? I have been doing it manually and besides ‘hal’ and two or three more packages who had several ‘FAILED’ files … the rest was one or two ‘FAILED’ files per package … I have 286 packages here … this could take long …
Maybe you should run a memory test… so many corrupted files could also be a sign of a hardware problem: bad memory or bad hard disk or whatever…
I don’t see any legitimate use case where anyone would changes some random files in “ed” and other base packages that you listed.
But maybe those files are not so random? Can you paste the list somewhere like on http://paste.debian.net ?
In any case, I don’t think reinstalling the affected packages will hurt.
Besides the Ubuntu install I have been talking about, I have another one … installed on a USB 2.0 16GiB pendrive. This one has also two partitions / and /home where Ubuntu 10.10 i386 runs. Some fewer applications on the pendrive than on the HD install, a bit slowlier than HD install … but apparently is also running fine. After issuing ‘debsums –changed’ on the pendrive … 272 files …
It doesn’t look like entirely random, it’s almost exclusively ELF executables and libraries. Really weird. I don’t know what happened on your computers but it’s unlikely to be a hardware problem if you have the same problem on 2 computers.
Since both installs are running fine I will leave them as they are now. Once I find out the reasons behind these anomalities I will proceed the proper way.
Raphaël … thank you for your time.
With your last comment you made me think and … I just have remembered … about a year ago, I was embedded in something like ‘performance for beginners’ in Linux and I installed and tested ‘prelink’ utility. I didn’t like the results and I uninstalled it very quickly (the installs turned unstables). I also installed ‘preload’ utility whose results were so nice (installs a bit more crisp without unstabilities) … ‘preload’ are still running on both my laptop and the pendrive.
It could have been ‘prelink’ utility … couldn’t it ?
So the modified binaries are those that have seen no updates since you uninstalled prelink. The other have been “fixed” when you upgraded to newer versions of the corresponding packages.
Yes … well … it’s fine knowing it. I think a clean install would have fixed that … but I don’t really like clean installs.
If I have properly understood through the article and the thread … the problem will get thinner as new sw comes in … and answering a previous own question … Reinstalling will no interact with WHO (prelink) have modified the sw afterwards.
Since they are so many packages I will reinstall some manually … and the time will do the rest … ;o)
Thank you very much.
Dison Hoyle says
This put me on the right track AFTER doing an ill advised dist-upgrade with Ubuntu 10.04.
What solved the problem for me was:
sudo apt-get autoclean #This identified the programs that wouldn’t u[grade
theh I reinstalled them with:
sudo apt-get –reinstall install … #List the programs – or better yet, copy them from the results of the first command to replace the …
Trackbacks
[…] ce que debsums ne remonte plus aucun fichier modifié. Ceci est une traduction de mon article Debian Cleanup Tip #4: find broken packages and reinstall them contribuée par Weierstrass01. Vous voulez d’autres tutoriels comme celui-ci ? Cliquez ici […]
Get the Debian Handbook
Available as paperback and as ebook. 
Источник


