- Как восстановить загрузчик Windows в главной загрузочной записи (MBR) из Ubuntu
- Требования
- Загрузка в Ubuntu live USB
- Способ первый: утилита Boot Repair
- Метод второй: Syslinux
- Метод третий: LILO
- Заключение
- Вот как исправить загрузчик Windows 10 из Linux
- Как исправить ошибки загрузчика Windows 10 из Linux
- Решение 1. Используйте утилиту Boot Repair в Ubuntu
- Решение 2 – Исправить загрузчик Windows 10 в Терминале
- Решение 3 – Попробуйте с LILO
- Ubuntu Documentation
- Using the Ubuntu CD (Recommended)
- The graphical way
- The terminal way
- Using the Ubuntu Alternate CD
- See also
- Ubuntu Documentation
- Getting Boot-Repair
- 1st option : get a disk including Boot-Repair
- 2nd option : install Boot-Repair in Ubuntu
- Using Boot-Repair
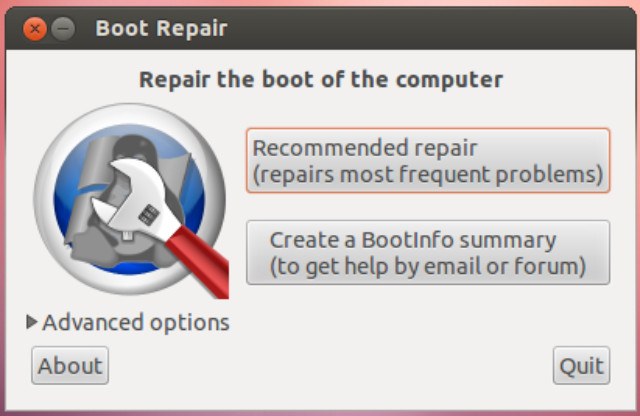
- Recommended repair
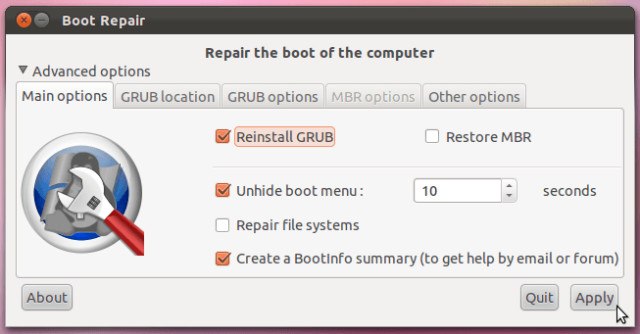
- Advanced options
- External Links
Как восстановить загрузчик Windows в главной загрузочной записи (MBR) из Ubuntu
Оригинал: How to Fix Windows MBR from Ubuntu
Автор: Matthew Muller
Дата публикации: 21 августа 2018 года
Перевод: А. Кривошей
Дата перевода: март 2019 г.
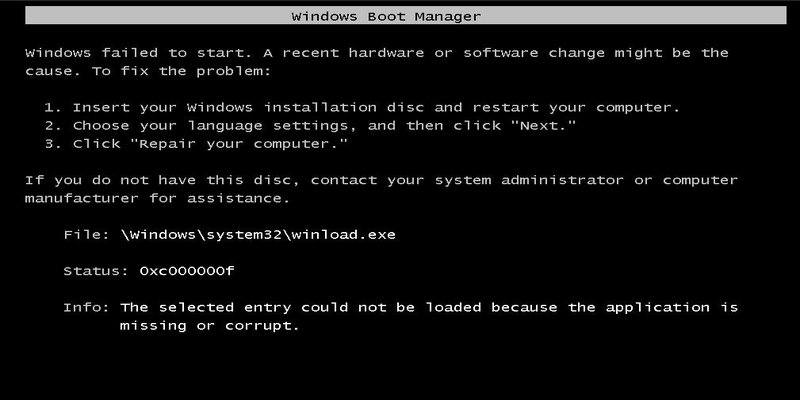
Если вы пытались настроить двойную загрузку Windows с Linux, то вы, вероятно, столкнулись с некоторыми изменениями, которые могут вами не приветствоваться. При установке Linux в такой среде загрузчик GRUB перезаписывает загрузчик Windows в основной загрузочной записи (MBR).
Это также верно в обратном направлении: если вы сначала установили Linux, а затем решили установить Windows, загрузчик Windows перезапишет GRUB, и вы обнаружите, что невозможно загрузить вашу систему Linux. Или, возможно, вы решили, что Linux не для вас, и хотите полностью удалить его, оставив только Windows.
Любой из этих сценариев может быть проблематичным для нового пользователя, но, к счастью есть способы восстановить загрузчик и MBR.
Примечание. В качестве дополнительной информации, который затронет многих пользователей, похоже, что Windows 10 Anniversary Update перезаписывает загрузчик как само собой разумеющееся.
Требования
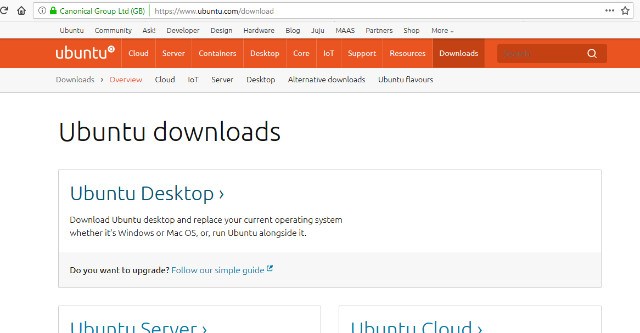
Первым шагом будет скачивание и создание вашего Linux live CD или USB. Ubuntu — безусловно, самый простой и доступный дистрибутив, хотя для наших целей могут использоваться большинство дистрибутивов Linux. Используя другой компьютер, перейдите на веб-сайт Ubuntu и загрузите версию, подходящую для вашей архитектуры. Если вы сомневаетесь, возьмите 32-битную версию, так как она будет загружаться на любой машине.
Следуйте этому руководству , чтобы создать Linux live USB в Windows.
Загрузка в Ubuntu live USB
Создав свой live-носитель, необходимо загрузить компьютер с вашего носителя с Ubuntu и выбрать в загрузочном меню пункт «Try Ubuntu without installing». Если это не удается, убедитесь, что в BIOS отключена secure boot, иначе ваша система никогда не загрузится с диска Linux.
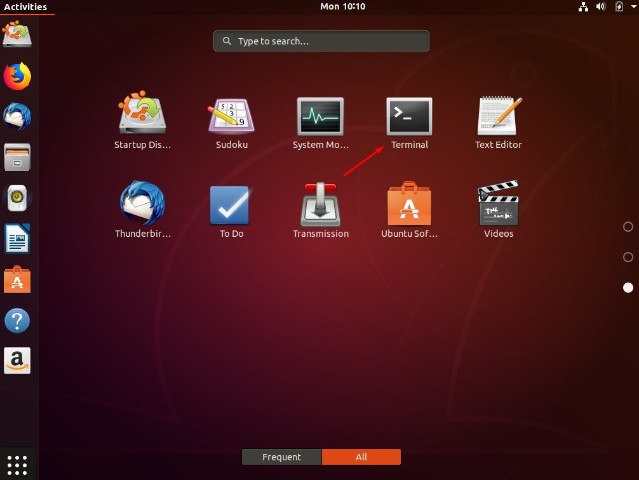
После запуска рабочего стола вам нужно будет открыть терминал, который можно найти в меню «Приложения».
Примечание: на этом этапе имейте в виду, что вы имеете дело напрямую с жестким диском, и полностью прочитайте руководство, прежде чем вносить какие-либо изменения, в противном случае вся ваша система может стать нестабильной или неработоспособной.
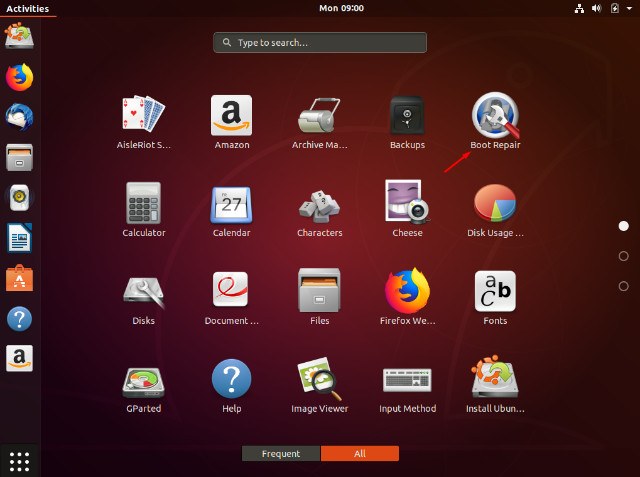
Безусловно, самый простой способ восстановить MBR — использовать небольшую утилиту под названием «boot-repair», а не работать непосредственно в терминале.
Способ первый: утилита Boot Repair
Во-первых, вам нужно добавить репозиторий. Введите:
После установки найдите приложение в меню «Приложения» и кликните, чтобы запустить.
После запуска утилиты выберите тип восстановления. Для большинства случаев это будет рекомендуемое восстановление.
Когда утилита завершит работу, вы сможете загрузить свою систему и выбрать либо Windows, либо Linux из меню GRUB. Запуск утилиты также позволит вам изменить или изучить некоторые другие опции, если вам требуется более сложное восстановление загрузки. Кликнув «Restore MBR», вы сможете использовать вкладку MBR.
Если вы застряли, у Ubuntu есть руководство на их сайте.
Метод второй: Syslinux
Это немного сложнее и требует от вас работы с терминалом. Если вы не уверены, то, пожалуйста, придерживайтесь первого метода.
Откройте терминал, как и раньше, и введите:
По завершении установки введите следующую команду, не забывая изменить имя диска «sda» на свое:
Кроме того, вы можете восстановить MBR, введя:
Метод третий: LILO
Загрузитесь с live CD или USB, и в терминале введите:
где «/dev/sda» — это имя вашего диска. Это должно исправить вашу MBR.
Заключение
Если вы используете двойную загрузку Windows и Linux, очень легко перезаписать MBR. Описанные выше действия должны помочь вам восстановить MBR.
Источник
Вот как исправить загрузчик Windows 10 из Linux
Из-за агрессивного и территориального характера Windows 10 подобные проблемы будут возникать довольно часто. Вот почему рекомендуется установить Windows 10 перед установкой Linux в режиме двойной загрузки.
Linux гораздо менее навязчив и не повредит загрузчик Windows 10. Несмотря на это, после крупных обновлений Windows 10 «переустановка» Windows 10 все еще может пойти не так, как надо. Если это произойдет, вы можете исправить это с помощью Linux (Ubuntu), и мы предложили 3 метода ниже.
Как исправить ошибки загрузчика Windows 10 из Linux
- Используйте утилиту Boot Repair в Ubuntu
- Исправить загрузчик Windows 10 в Терминале
- Попробуй с LILO
Решение 1. Используйте утилиту Boot Repair в Ubuntu
Давайте начнем с самого простого метода. Вероятно, со знанием дела, Ubuntu поставляется с небольшой утилитой Boot Repair, которая исправляет повреждение загрузчика Windows 10 при запуске. Вам потребуется последняя версия загрузочной Ubuntu, установленной на вашем USB-накопителе. После этого вам необходимо установить утилиту и, не вмешиваясь в Терминал, восстановить загрузчик Windows 10.
- ЧИТАЙТЕ ТАКЖЕ: Не можете установить Linux с Windows 10? Вот что нужно сделать
Вот как это сделать за несколько простых шагов:
-
- Загрузите Ubuntu живую дистрибутивную версию здесь и подключите ее к USB. Вы можете сделать это с помощью универсального установщика USB (желательно). Важно использовать это приложение, иначе диск не будет загрузочным.
- Подключите диск и загрузитесь с него.
- Выберите вариант Попробуйте Ubuntu без установки . В случае сбоя откройте настройки BIOS/UEFI, отключите безопасную загрузку и повторите попытку.
- После загрузки Ubuntu нажмите Ctrl + Alt + T , чтобы открыть терминал.
- В командной строке запустите следующую строку и нажмите Enter после каждого:
- sudo add-apt-repository ppa: yannubuntu/boot-repair
- Обновление sudo apt
- sudo apt установить загрузчик
- Это должно установить Boot Repair application , и теперь вы можете найти его среди меню приложений.
- Откройте его, выберите Рекомендуемый ремонт и подождите, пока он не будет сделан.
Решение 2 – Исправить загрузчик Windows 10 в Терминале
Второй метод основан на Syslinux, запущенном через Терминал. Для установки и использования Syslinux для исправления загрузчика Windows 10 вам потребуется выполнить ряд команд.
Если вы не знакомы с тем, как они работают, мы советуем вам придерживаться первого метода. В противном случае шаги довольно просты, и вам просто нужно заменить ввод «sda» на букву системного диска Windows 10.
- Читайте также: брандмауэр Защитника Windows поддерживает подсистему Windows для Linux
Выполните следующие действия, чтобы исправить загрузчик Windows 10 с помощью Syslinux:
-
- Загрузитесь снова с загрузочного диска USB .
- Откройте Терминал .
- В командной строке введите следующую строку и нажмите Enter после каждого:
- sudo apt-get install syslinux
- sudo dd if =/usr/lib/syslinux/mbr.bin из =/dev/sda
- sudo apt-get install mbr
- sudo install-mbr -i n -p D -t 0/dev/sda
- Не забудьте заменить «sda» на системный диск Windows 10.
- После этого перезагрузите компьютер, и Windows 10 загрузится без проблем.
Решение 3 – Попробуйте с LILO
Последний метод использует LILO (Linux Loader), небольшую программу, отвечающую за управление двойной загрузкой. Процедура похожа на предыдущую, по крайней мере, для непривычного глаза.
В любом случае, если предыдущие два шага не сработали (первый должен решить проблемы с загрузчиком), LILO, безусловно, является удобной альтернативой.
- ЧИТАЙТЕ ТАКЖЕ: Загрузите долгосрочную поддержку Ubuntu 18.04 из Магазина Microsoft
Вот как можно исправить проблемы загрузчика Windows 10 с LILO через Linux Terminal:
- Загрузитесь снова с загрузочного диска USB .
- Откройте Терминал .
- В командной строке введите следующую строку и нажмите Enter после каждого:
- sudo apt-get install lilo
- sudo lilo -M/dev/sda mbr
- Перезагрузитесь, и все готово. Загрузчик Windows 10 исправлен.
С учетом сказанного мы можем завершить эту статью. Надеюсь, вам удалось решить проблему с загрузчиком Windows 10 в
Источник
Ubuntu Documentation
This page documents how to restore or recover the boot-loader (GRUB) after installing Windows. Some reasons to repair your boot-loader might include installing Microsoft Windows after you have installed Ubuntu, adding or removing a hard drive, or changing hard drive settings.
Note: this tutorial does not apply if you had installed Ubuntu inside Windows (via the Wubi installer). In this case, please read this page.
Using the Ubuntu CD (Recommended)
The graphical way
- Insert your Ubuntu CD, reboot your computer and set it to boot from CD in the BIOS and boot into a live session. You can also use a LiveUSB if you have created one in the past.
Install and run Boot-Repair
The terminal way
* Open a terminal. As of Ubuntu 11.10 and 11.04, this can be done by opening the Unity Dash (you can click the Ubuntu logo in the top panel or use the Windows key on your keyboard) and typing in «Terminal», and clicking what comes up. On earlier versions, you can achieve this by going to Applications -> Accessories -> Terminal. Alternately use the Keyboard Shortcut: CTRL + ALT + T.
For full details on using terminal to fix grub on hard drive from Live Installer DVD or Flash: https://help.ubuntu.com/community/Grub2/Installing#via_the_LiveCD_terminal
- You are then presented with a standard bash prompt, type — this only works to reinstall to MBR of a working system:
where XXX is the device of your Ubuntu install. (eg: grub-install /dev/sdb). Hint: You can also use /dev/disk/by-label/ if the partition you installed on has a label. You can determine the /dev node for such a device by running:
This will give the output of something like:
You can also use fdisk if you do not see the /dev/disk/by-label:
From here, find only the drive name, ignore the partition number, that is, for partitions labeled «root», «data2», «fat», «home» and «swap» it’s all still just sda. This is due to the fact that GRUB is installed in the MBR of the drive, and not on a partition.
Trouble? If other things are messed up, e.g. if you have deleted the partition from where Grub was previously installed, grub-install may return an error message such as «cannot find a device for /. (is /dev mounted?)». You may have to do grub-install a bit differently. Refer to the handy guide on fixing a broken system
Now reboot your system. The usual GRUB boot menu should appear. If it does not, hold Left Shift while booting. You will be able to choose between Ubuntu and Windows.
Using the Ubuntu Alternate CD
- Boot your system from the Ubuntu Alternate CD.
When the Ubuntu splash screen comes up with the boot: prompt, type in rescue and press enter.
At this stage you are presented with a screen where you can select which partition is your root partition (there is a list of the partitions on your hard drive, so you are required to know which partition number Ubuntu is on). This will be dev/discs/discY/partX, where the X is a partition number and Y is the number of the drive.
See also
RecoveringUbuntuAfterInstallingWindows (последним исправлял пользователь mcchots 2015-01-27 14:44:04)
The material on this wiki is available under a free license, see Copyright / License for details
You can contribute to this wiki, see Wiki Guide for details
Источник
Ubuntu Documentation
Warning: This software is able to share information about your device for diagnostic purposes. You can chose to opt out in advanced settings. Please read this page fully. The log is quite helpful especially for the novice users.
Boot-Repair is a simple tool to repair frequent boot issues you may encounter in Ubuntu like when you can’t boot Ubuntu after installing Windows or another Linux distribution, or when you can’t boot Windows after installing Ubuntu, or when GRUB is not displayed anymore, some upgrade breaks GRUB, etc.
Boot-Repair lets you fix these issues with a simple click, which (generally reinstalls GRUB and) restores access to the operating systems you had installed before the issue.
Boot-Repair also has advanced options to back up table partitions, back up bootsectors, create a Boot-Info (to get help by email or forum), or change the default repair parameters: configure GRUB, add kernel options (acpi=off . ), purge GRUB, change the default OS, restore a Windows-compatible MBR, repair a broken filesystem, specify the disk where GRUB should be installed, etc.
For the purpose of helping the forum and IRC members help you diagnose issues with your boot setup, Boot-Repair (provided it has a network connection) will create a Ubuntu pastebin link for you to share that allows experienced members to see what’s wrong with your boot. Ubuntu’s Pastebin is not easily indexable or searchable, and purpose of the tool which creates this page (Boot-Info) is meant to be a very benign and helpful solution to the problem. The intention is not violate your privacy, nor is it meant to make you a target. This tool is aimed entirely at those new to Ubuntu who want to get past their booting issues and enjoy using Linux. If you’d like to, you may completely opt out of all internet usage including pastebin link generation by looking at the Advanced Options section below. Please do not use this software if this is a problem for you.
Boot-Repair is a free software, licensed under GNU-GPL.

Getting Boot-Repair
1st option : get a disk including Boot-Repair
The easiest way to use Boot-Repair is to create a disk containing the tool (eg Boot-Repair-Disk, a disk starting Boot-Repair automatically), and boot on it.
Remark : it is recommended to install the ISO on a live-USB (eg via UnetBootin or LiliUSB or Universal USB Installer). Do not burn it on a DVD if your computer has Windows8 pre-installed, or if your boot is in EFI mode.
2nd option : install Boot-Repair in Ubuntu
— either from an Ubuntu live-session (boot your computer on a Ubuntu live-CD or live-USB then choose «Try Ubuntu») or from your installed Ubuntu session (if you can access it)
— connect to the Internet
— open a new Terminal, then type the following commands (press Enter after each line):
Using Boot-Repair
Recommended repair
- launch Boot-Repair from either :
- the Dash (the Ubuntu logo at the top-left of the screen)
- or by typing ‘boot-repair’ in a terminal
-
Then click the «Recommended repair» button. When repair is finished, note the URL (paste.ubuntu.com/XXXXX) that appeared on a paper, then reboot and check if you recovered access to your OSs.
- If the repair did not succeed, indicate the URL to people who help you by email or forum.
Warning: the default settings are the ones used by the «Recommended Repair». Changing them may worsen your problem. Don’t modify them before creating a BootInfo URL, and asking for advice on Ubuntu Forums Absolute Beginners Section or in Installation and Upgrades.
Advanced options
* If you would like to opt-out of the paste.ubuntu.com link creation (Not recommended for inexperienced users who are seeking help from a forum or IRC member), you can. Simple click on the Advanced Options, and find the «Other Options» tab. Uncheck «Upload the report to a pastebin».
* The log may include UUIDs, LUKS headers, hex dump of your first sectors of your drives, device serial numbers, your username and more.

External Links
Boot-Repair (последним исправлял пользователь arunesh90 2015-12-03 20:42:26)
The material on this wiki is available under a free license, see Copyright / License for details
You can contribute to this wiki, see Wiki Guide for details
Источник


