- Как отформатировать флешку в файловую систему exFAT в Linux
- How to Format a Drive as exFAT on Linux
- Method 1: Install Support for exFAT Volumes
- Method 2: Formatting a Drive to exFAT
- Как в Linux форматировать флешку в exFAT
- 1. Отформатируйте флешку в exFAT с помощью exfatprogs из терминала
- 2. Отформатируйте флешку в exFAT с помощью инструмента Gnome Disks tool
- Заключение
- How to Format a USB Disk as exFAT on Linux [Graphically and Command Line]
- Method 1: Format disk as exFAT using GNOME Disks tool
- Method 2: Format disk as exFAT in Linux command line (for advanced users)
- Did you succeed to create exFAT disk?
Как отформатировать флешку в файловую систему exFAT в Linux
Неважно, являетесь ли вы пользователем или системным администратором, и не имеет значения то, что мы пытаемся избегать Windows. Все равно, время от времени, возникает необходимость загружать системы на базе Windows OS, и поэтому вы, скорее всего познакомитесь с exFAT — файловой системой от Microsoft, предназначенной для портативных устройств и флешек.
Пользователи Windows получают ее поддержку из коробки, но для приверженцев Linux все не так просто. Мы должны сами позаботиться о себе. Сегодня я покажу вам, как легко и просто мы можем обеспечить себе полную поддержку чтения/записи информации с устройств, использующих файловую систему exFAT. Сначала необходимо добавить соответствующий PPA, что делается с помощью команды:
После добавления PPA мы готовы к установке пакетов, обеспечивающих поддержку exFAT в Linux:
После их скачивания и установки система обретает поддержку чтения и записи на устройства exFAT.
Если вам досталось устройство, отформатированное в exFAT, для начала необходимо смонтировать его. Для этого создайте новую директорию, в которую вы будете его монтировать. В данном руководстве я просто работаю из домашней директории, и создаю новую с помощью команды:
Теперь, если устройство не отобразилось в списке доступных, необходимо найти его. Я использую для этого команду fdisk:
Естественно, вывод у каждого будет свой. Я знаю, что /dev/sda* — это мой системный жесткий диск. Поэтому я могу сказать, которое из устройств является SD-картой, которую я хочу смонтировать, так как ее размер всего 2 Гб:
Теперь необходимо смонтировать устройство в созданную ранее директорию:
Готово. Перейдем в директорию exfat и увидим, что все работает:
Но что, если вы сами хотите отформатировать флешку в exFAT? Это тоже можно сделать.
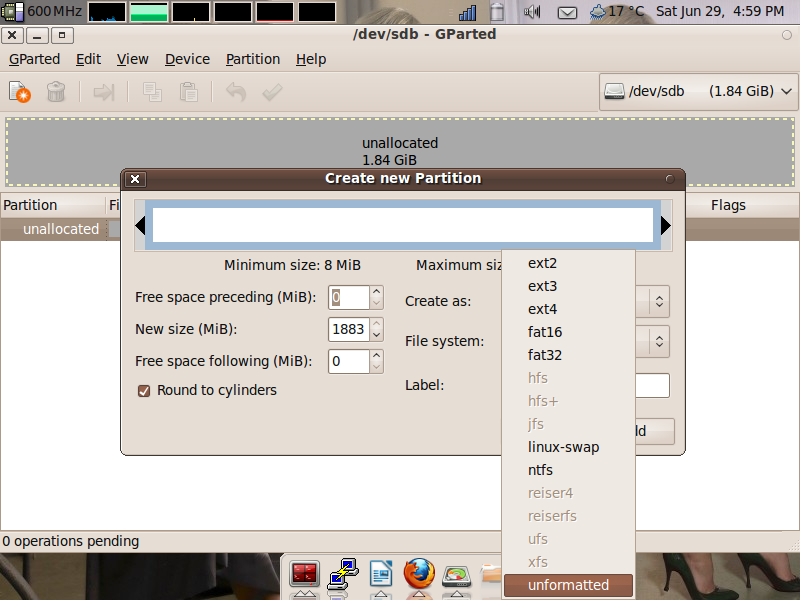
Для форматирования в exFAT устройство не должно быть отформатировано в какую-либо другую файловую систему. У вас должен быть пустой раздел, без файловой системы. Его проще всего создать с помощью GParted .
На скриншоте ниже вы можете видеть, как я создаю пустой раздел без файловой системы.
Если GParted у вас еще не установлен, вы можете сделать это с помощью команды:
Создав пустой раздел, выполните команду:
Это все. Повторите описанные выше шаги для монтирования устройства и вас будет подключенный раздел exFAT с полной поддержкой на чтение/запись.
Источник
How to Format a Drive as exFAT on Linux
If you’re transferring files between computers running Windows and Linux, then you can either format drives with the exFAT or NTFS file systems to make things smooth. Since Windows, OS X, Linux and now several mobile devices like the Sony Xperia Z can read exFAT, you may prefer to use it exclusively. Even though it’s a proprietary file system, it’s optimized for flash media and external drives, which is making it popular with Linux users.
While Linux offers built-in support for NTFS volumes through the ntfs-3 driver, you more than likely don’t have support for exFAT as a file system. To remedy this, open up a terminal by pushing Ctrl+Alt+T. You might also want to search for the word terminal from the Ubuntu Dash. Those with the LXDE, Xfce4, KDE or GNOME desktop environments might want to click on the Applications menu, point to System Tools and then click or tap on Terminal to start.
Method 1: Install Support for exFAT Volumes
Once you’re there, you’ll want to type sudo apt-get install exfat-fuse exfat-utils and push enter. You’ll probably be prompted for your password. You’ll be then asked to install it, so type the letter y. If you were given a warning about it being already installed, then you have the packages and don’t need to do anything else.
Assuming the installation proceeded, you’ll be back at the prompt. You can now plug an exFAT drive into your system and expect it to mount like it was any other volume. You can work with it easily as a result and won’t need to do anything else if your only goal was to read a drive created on Windows 10 or something similar.
Method 2: Formatting a Drive to exFAT
If you don’t know the name of the drive that you need to format, then type sudo fdisk -l at the command line and push enter. You’ll see a full list of devices that are attached to your system. Pay very close attention to make sure that you don’t format the wrong drive. If you have a /dev/sda1 and so on device in your list, then this is very often what you boot GNU/Linux off of. You don’t want to format this.
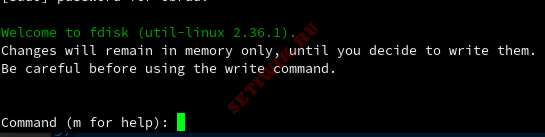
We plugged a pretty good sized USB drive into our system and found it showing up as /dev/sdb, which you could easily format. Needless to say, proceeding is going to wipe the data structures off your drive so please make sure to have backups before you loose anything you want. Assuming you wanted to destroy everything on it and start fresh with a new exFAT file system, type sudo wipefs -a /dev/sdb so you can start fresh. Next, you’ll want to type sudo fdisk /dev/sdb and push enter so you can make a new partition table. Please make sure you’re working with the right device file to avoid mucking anything up.
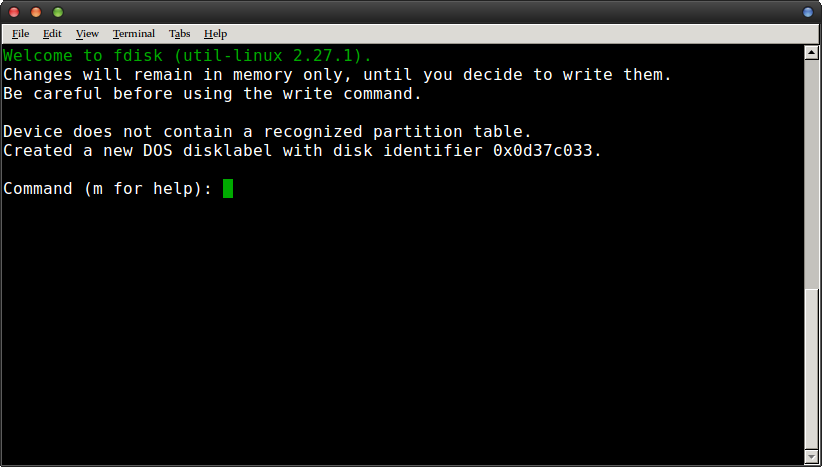
You’ll get a message about creating a new DOS table or something of the sort, which is simply safe to ignore.
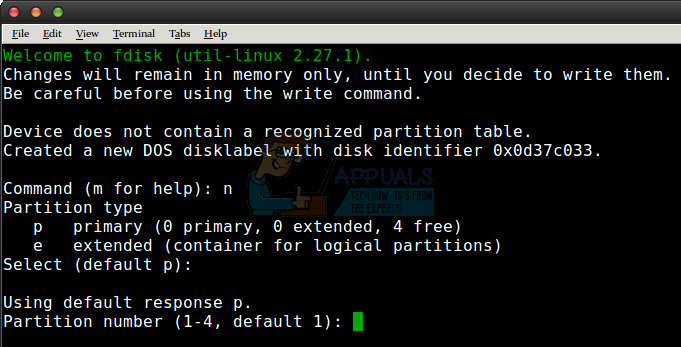
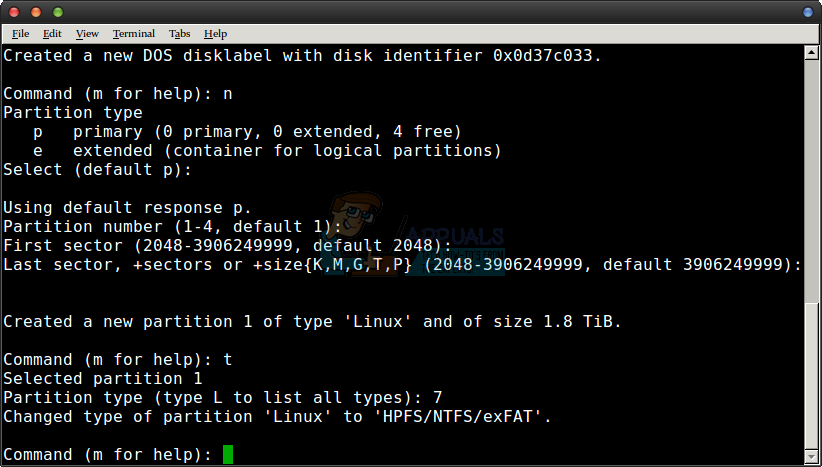
Now type the letter n and push enter.
Type enter again, then again to create a single partition.
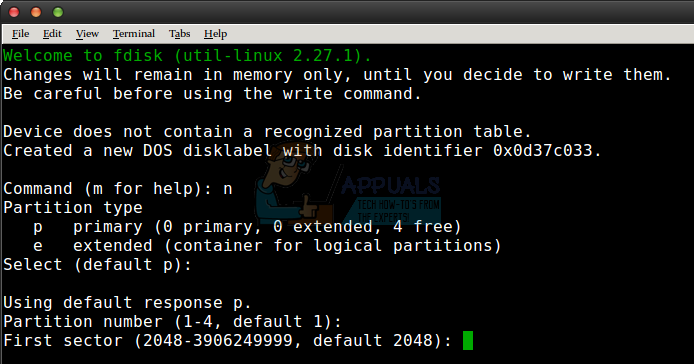
Type enter once more when asked about the first and last sectors. This will create one giant partition that takes over your whole disk, which is exactly what you want if you’re going to be plugging this into a macOS computer, a Windows 10 PC or any compatible mobile device. You might notice a problem though – the partition type is currently showing up as Linux, which you’re going to have a tough time reading on any of these kinds of machines!

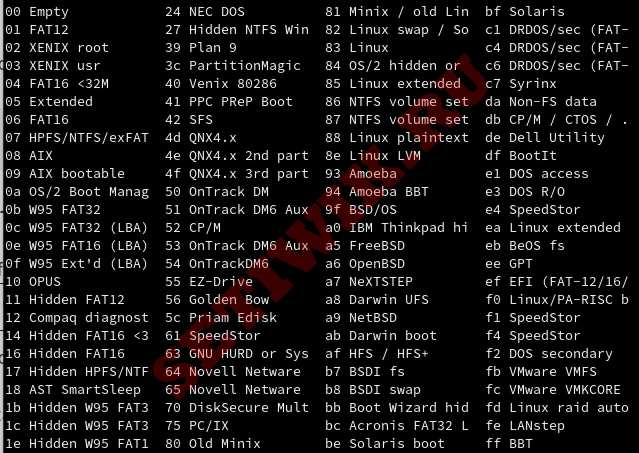
Push the letter t and then push the enter key so you can change the type. You can then push 7 to the expected type. It should give you a message about HPFS/NTFS/exFAT, which is exactly what you want if you’re looking to format your external disk with exFAT on Linux.
Finally, you simply have to push the w key and you’ll be warned that “The partition table has been altered” before fdisk syncs all the data out to disk. Depending on how massive your drive is, this might take a few seconds. We were working with a disk that was 2 metric terabytes, which comes to 1.8 terabytes in binary. It still took the software less than maybe 10 seconds to shoot the relevant information out.
Источник
Как в Linux форматировать флешку в exFAT
exFAT представляет собой файловую систему, специально разработанную и оптимизированную для USB-накопителей, SD-карт и внешних дисков. Это делает exFAT очень популярной среди пользователей Linux.
Для формирования флешки в exFAT на Linux необходимо установить exfat-utils или exfatprogs, которые могут позволить нам создавать, читать или записывать, файловую систему exFAT на любое устройство. Будь то флешка или раздел жесткого диска.
В этой статье мы покажем, как отформатировать флешку в exFAT на Linux из терминала и графического интерфейса.
Для этого существует два пути:
- Форматирование USB — диска с помощью инструмента exfatprogs из терминала.
- И Форматирование флешки в exFAT с помощью инструмента Gnome Disks.
Примечание: Если вы используете ядро Linux, начиная с версии 5.4.x, то в ядре Linux включена поддержка файловой системы exFAT по умолчанию. Если вы рассматриваете форматирование флешки в exFAT, то вам необходимо установить exfat-utils или exfatprogs. Мы рекомендуем использовать инструмент exfatprogs из-за множества новых функций.
1. Отформатируйте флешку в exFAT с помощью exfatprogs из терминала
Пакеты exfatprogs предоставляют инструмент используемый для управления файловой системой, расширенной таблицы распределения файлов. Который позволяет пользователям создавать, проверять и маркировать файловую систему exFAT.
Установите exfatprogs с помощью следующей команды:
Откройте терминал и найдите флешку с помощью следующей команды fdisk:
Вы также можете найти его с помощью команды df:
В моем случае: /dev/sdb эта моя флешка, а /dev/sdb1 представляет раздел.
Теперь откройте меню fdisk с помощью команды:
 Меню fdisk Меню fdisk
Чтобы создать и добавить новый раздел. Просто наберите n в меню fdisk:
n – команда предназначена для создания нового раздела.
После ввода терминал попросит ввести некоторые значения, вы можете просто нажать enter, и все значения добавятся по умолчанию.
Теперь вы можете проверить раздел с помощью команды p:
Теперь, когда у нас есть раздел, остается установить флаг. Чтобы изменить флаг на exFAT введите t
Fdisk попросит ввести номер указывающий на флаг, который вы хотите установить. Чтоб посмотреть все существующие флаги разделов введите L
 Список разделов fdisk Список разделов fdisk
Выберите и введите номер 7 в fdisk для установки флага раздела HPFS/NTFS/exfat
Теперь, когда флаг установлен, нам нужно написать и сохранить наши настройки. Для этого введите команду w в fdisk.
w – предназначен для записи таблицы на диск.
Вывод в терминале:
The partition table has been altered.
Calling ioctl() to re-read partition table.
Syncing disks.
Теперь у нас есть раздел и нам нужно создать файловую систему. Сделать это можно с помощью команды mkfs, что означает создание файловой системы exFAT..
Важно: Обратите внимание, что вы должны найти идентификатор номера вашего раздела и заменить файл /dev/sdb1.
Вывод в терминале:
mkexfatfs 1.3.0
Creating… done.
Flushing… done.
File system created successfully.
После создания файловой системы вы можете проверить ее, для того чтобы убедиться что все отформатировано правильно:
Вывод в терминале:
Если вы это сделали, то ваше USB-устройство готово к использованию!
2. Отформатируйте флешку в exFAT с помощью инструмента Gnome Disks tool
Если вы используете Gnome, то у вас вероятно есть дисковый инструмент, который устанавливается в системе во время установки Gnome.
Откройте Диски и найдите свою флешку с левой стороны. Убедитесь, что вы выбрали флешку и что вы выбрали нужный раздел, который хотите отформатировать в exFAT.
 Инструмент для работы с дисками Gnome Disks tool Инструмент для работы с дисками Gnome Disks tool
Выберите кнопку Settings:
 Выбрать настройку дисков Выбрать настройку дисков
Далее выберите Форматирование раздела под кнопкой настройки, у вас появится новое окно.
 Формат Настройки Диска Формат Настройки Диска
Выберите Other (Другой), чтобы перейти в новое окно. Где вы найдете тип формата exFAT. Дополнительно вы можете добавить имя тома, например: “Формат тома exFAT”.
 Выберите exFAT в разделе параметры Выберите exFAT в разделе параметры
В конце вам будет предложено подтвердить настройки которые вы выбрали:
 Подтверждение сделанных настроек. Вам удалось форматировать флешку в exFAT Подтверждение сделанных настроек. Вам удалось форматировать флешку в exFAT
Нажмите на красную кнопку Format (Формат), и все готово!
Заключение
В этой статье вы узнали, как форматировать флешку в exFAT с помощью терминала и графического интерфейса. Использование графического интерфейса для форматирования exfat более простой способ.
Источник
How to Format a USB Disk as exFAT on Linux [Graphically and Command Line]
Last updated October 29, 2020 By Dimitrios 66 Comments
Brief: This tutorial teaches you how to format a USB disk in exFAT format on Linux systems. Both GUI and command line methods have been discussed.
For a long time FAT has been the default choice of filesystem for formatting disks. It is compatible with pretty much all the major operating systems.
The one major problem with FAT filesystem is that you cannot transfer a file larger than 4 GB. This means even if your USB disk has 32 GB of free space, if you try to transfer a ISO image or some other file greater than 4 GB in size, the transfer will fail.
This creates a problem in situation like when you are creating a bootable USB of Windows in Linux. You cannot use NTFS and FAT filesystem has that 4 GB size restrictions.
To overcome the limitations of FAT filesystem, Microsoft came up with exFAT filesystem. And in this tutorial, I’ll show you how to format a USB disk in exFAT filesystem.
Prerequisite
Starting Linux kernel 5.4, exFAT filesystem support is enabled in Linux kernel itself. Check which Linux kernel version you are running. If it is kernel 5.4 or higher, you should be fine.
Otherwise, you’ll have to enable exFAT support explicitly. In Ubuntu-based distributions, you can use these packages for this purpose:
sudo apt install exfat-fuse exfat-utils
Method 1: Format disk as exFAT using GNOME Disks tool

Formatting a drive using GNOME Disks is a straightforward job. It comes preinstalled in a number of Linux distributions.
Plug in your external USB disk. Now, look for Disks in menu and open the GNOME Disks application. As a first step choose the drive that you want to format and follow the steps with me.
Warning: Pay attention to the disk you are selecting to format. Don’t format your main disk accidentally.
1. Gnome Disks 2
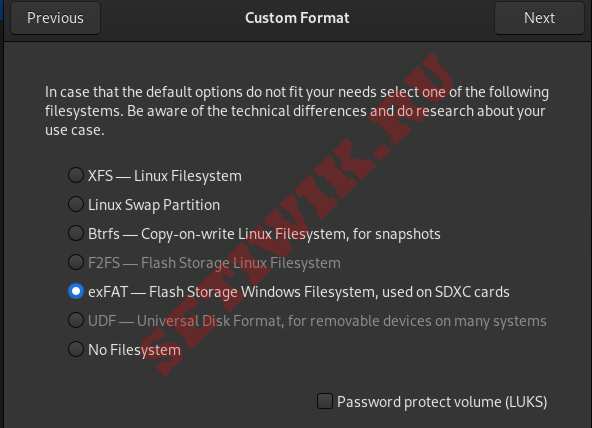
The commonly used file systems like Ext4, NTFS, FAT will appear first. To use exFAT, choose “Other” and then click on “Next“.
Final step: choose exFAT file system on this screen and then click Create. Job done!
See how easy it was to create a exFAT disk in Linux graphically? Now, let me show you the terminal method as well.
Method 2: Format disk as exFAT in Linux command line (for advanced users)
fdisk is a dialogue-driven command-line utility that creates and manipulates partition tables and partitions on a hard disk. In fact, it is considered one of the best partitioning tools for Linux.
Plug in your external hard disk then type the following command in the terminal:
This will list down all the hard disks and partitions in your computer. Identify the partition that you want to format in your external hard disk. Size of the disks should give you a hint. For me, the USB disk was labelled as /dev/sdb1.
Once you have identified your USB disk, format it as exfat using the command below. Replace /dev/sdXn with your disk’s device ID. LABEL is basically the name you want to give to your disk like Data, MyUSB etc.
Optionally, run fsck check to make sure the formatting has been done properly.
That’s it. Enjoy the exFAT disk.
Did you succeed to create exFAT disk?
I hope you find this tutorial simple enough, and a step forward to build a solid partitioning knowledge foundation.
Sometimes easy and simple tips and tricks will make you a better Linux in the long term. Our frequent readers know that first hand but if you discovered It’s FOSS recently, you may take the opportunity to explore our handy tutorials.
Don’t forget to subscribe and let me know your questions and suggestions in the comments below.
Like what you read? Please share it with others.
Источник


