- How to Manage File and Folder Permissions in Linux
- Command line: File permissions
- Command line: File ownership
- GUI: File permissions
- GUI: Change ownership
- How to Access Linux Files from Windows 10 [Full Guide] [MiniTool Tips]
- Summary :
- Quick Navigation :
- What’s Linux File System
- Can I Access Linux Files from Windows 10
- How to Access Linux Files from Windows 10
- Method 1. Use Ext4 Partition Manager — MiniTool Partition Wizard
- Method 2. Use Ext2Fsd
- Method 3. Use DiskInternals Linux Reader
- Method 4. Use Ext2explore
- What’s Your Opinion
- Access Linux Files from Windows 10 FAQ
- ABOUT THE AUTHOR
How to Manage File and Folder Permissions in Linux
For many users of Linux, getting used to file permissions and ownership can be a bit of a challenge. It is commonly assumed, to get into this level of usage, the command line is a must. Although there is always far more power and flexibility to be had, running seemingly complicated command isn’t alwaysa necessity. With the help of some of the most user-friendly desktop interfaces available, you can get away with little to no command line usage. Even with file permission and ownership.
That’s right, much to the surprise of many a new user, managing files and folders can be done from within the file managers. But before we get to the GUI, it’s always best to have a solid understanding of what it’s doing. So, we’ll start with the command line first.
Command line: File permissions
The commands for modifying file permissions and ownership are:
chmod – change permissions
chown – change ownership.
Neither command is difficult to use. It is important, however, that you understand the only user that can actually modify the permissions or ownership of a file is either the current owner or the root user. So, if you are user Bethany, you cannot make changes to files and folders owned by Jacob without the help of root (or sudo). For example:
A new folder was created on a data partition called /DATA/SHARE. Both users Bethany and Jacob need read and write access to this folder. There are a number of ways this can be done (one of which would be to join the users to a special group – we’ll go over managing groups in another post). If Bethany and Jacob are the only users on the system (and you know your network is safe – very important), you can change the permissions of the folder to give them access. One way to do this would be to issue the command:
The breakdown of the above command looks like:
sudo – this is used to gain admin rights for the command on any system that makes use of sudo (otherwise you’d have to ‘su’ to root and run the above command without ‘sudo’)
chmod – the command to modify permissions
-R – this modifies the permission of the parent folder and the child objects within
ugo+rw – this gives User, Group, and Other read and write access.
As you can probably surmise, this command opens wide the SHARE folder such that anyone on the system can have access to that folder. As I mentioned earlier, a more secure method would be to use groups. But we’re just using this for the purpose of demonstration.
The breakdown of permissions looks like this:
The ‘other’ entry is the dangerous one, as it effectively gives everyone permission for the folder/file. The permissions you can give to a file or folder are:
Using the -R switch is important. If you have a number of sub-folders and files within the SHARE directory, and you want the permissions to apply from the parent object (the containing folder) to the child objects (the sub-folders and files), you must use the -R (recursive) switch so the same permissions are applied all the way to the deepest folder, contained within the parent.
Command line: File ownership
Changing the ownership of a file or folder is equally as simple. Say Jacob moved a folder for Bethany into the SHARE directory – but Jacob still has ownership. This can be changed with a simple command:
Let’s break this down.
sudo – admin rights must be used since we are dealing with a folder that belongs to another user
chown – the command for changing ownership
-R – the recursive switch to make sure all child objects get the same ownership changes
bethany – the new owner of the folder
/DATA/SHARE – the directory to be modified
Should Bethany send the folder back to Jacob, the ownership would need to again be changed (again, this will be simplified with the use of groups).
GUI: File permissions
I’m going to demonstrate changing file permissions using the Nautilus file manager on an Ubuntu 13.10 system.
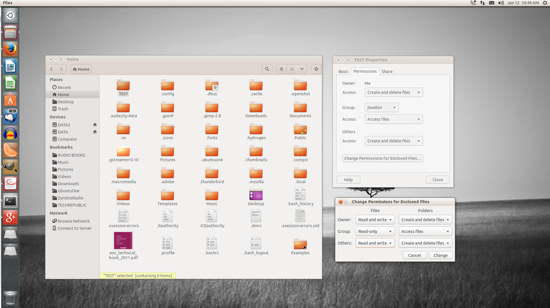
Let’s say you need to allow everyone to gain read/write permissions to the folder TEST. To do this, within the Nautilus file manager, follow these steps:
- Open Nautilus
- Navigate to the target file or folder
- Right click the file or folder
- Select Properties
- Click on the Permissions tab
- Click on the Access files in the Others section
- Select “Create and delete files”
- Click Change Permissions for Enclosed Files
- In the resulting window, Select Read and Write under Files and Create and delete files under Folders (Figure A)
- Click Change
- Click Close.
The trick comes when you need to change the permissions of a folder which does not belong to you. It can be done, but Nautilus must be started with admin access. To do this, follow these steps:
Open up a terminal window
Issue the command sudo -i
Issue the command nautilus
The sudo -i command gives you persistent access to sudo, until you enter the exit command to remove that access. Once Nautilus is open, you can change the permissions of the folder or file as described above – even if you are not the owner of the folder or file.
NOTE: If you’re using a distribution that doesn’t use sudo, alter the above instructions to:
Open up a terminal window
Issue the command su
Type your root password and hit Enter
Issue the command nautilus.
After you’ve completed the task, close the Nautilus window and then the terminal window.
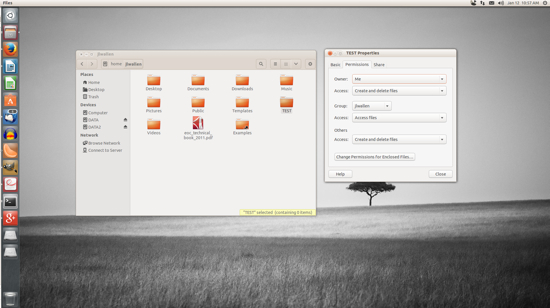
GUI: Change ownership
Changing the ownership of a file or folder will most often require the use of admin rights. So for this, you’ll need to start Nautilus in the method described above.
For changing ownership of a folder or file through Nautilus, do the following:
In the Nautilus window (opened with admin rights), locate the folder or file in question
Right click the folder (or file)
Click on the Permissions tab
Select the new owner from the Owner drop-down (below)
That’s all there is to it. At this point you shouldn’t have any problems changing permissions or ownership for a file or folder with either the command line or the GUI. The use of groups will empower you to alter permission and ownership with more power and security – we’ll cover that soon. Until then, enjoy modifying your files and folders!
Источник
How to Access Linux Files from Windows 10 [Full Guide] [MiniTool Tips]
By Ariel | Follow | Last Updated May 25, 2021
Summary :
What’s a Linux file system? Can I read Linux drive on Windows? How to access Linux files from Windows 10? A lot of users are confused about these questions. In the article, MiniTool will explore them one by one together with you.
Quick Navigation :
If you have a Linux distribution alongside a Windows system on the laptop or desktop, you may need to access Linux files from Windows 10. After analyzing lots of user reports on forums, we conclude the following questions that are frequently talked about. Let’s start exploring them in detail.
What’s Linux File System
In order to access Linux files from Windows successfully, the first thing you should figure out is what file system is supported by Linux. The common Linux Files Systems are Ext2, Ext3, and Ext4.
At present, Ext4 has become the default file system for most Linux distributions including Debian and Ubuntu. This is because the Ext4 provides more flexibility for storing large files than other extended file systems. It’s reported that the Ext4 can support storing a file up to 16TB and creating a partition up to 1EB.
Can I Access Linux Files from Windows 10
There are a lot of users who have Windows 10 plus Linux dual boot or a hard drive formatted with Ext4. So, here comes a new question. Can I access Linux files from Windows 10? As discussed above, the most common Linux file system is Ext4. That is to say, you have to read Ext4 from Windows if you want to access Linux files.
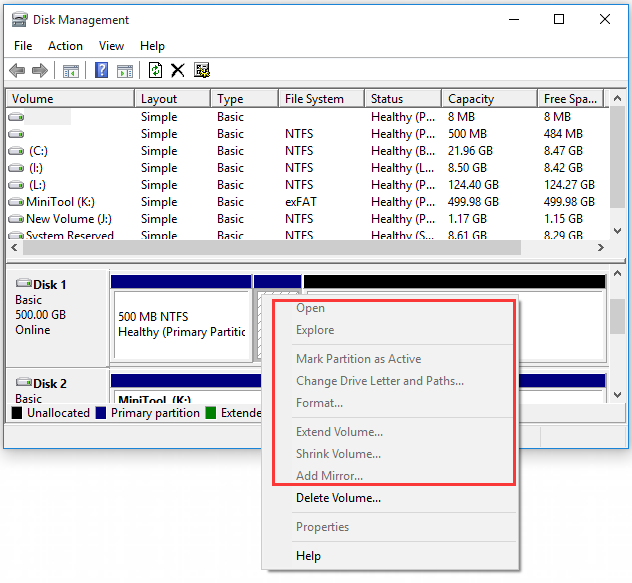
However, the Ext4 file system is not supported by Windows. When right-clicking the Ext4 partition, you will find the Open and other function menus become greyed out. Obviously, you can’t access Ubuntu files from Windows directly. What can I do if I have to read Linux drive on Windows? Please keep reading the following part.
How to Access Linux Files from Windows 10
Since Windows 10 doesn’t offer any direct methods to access Ext4, you need to utilize some professional tools to access Linux files from Windows. Here we summarize top 4 Ext4 partition readers on Windows.
Method 1. Use Ext4 Partition Manager — MiniTool Partition Wizard
MiniTool Partition Wizard is an all-in-one partition manager that supports many file systems including FAT16/32, NTFS, exFAT, and Ext2/3/4, Linux Swap. With this powerful software, you can format a hard drive, convert NTFS to FAT, convert MBR to GPT, recover lost data, migrate OS to SSD/HD, rebuild MBR, and so forth.
In order to access Ext4 from Windows smoothly, you can make it accessible by formatting it to NTFS. Although formatting will delete the data on the hard drive, MiniTool can help you restore the Ext4 partition data so that you can access Linux files from Windows 10.
Part 1. Read Linux Drive on Windows
Follow the steps below to format the Ext4 partition to NTFS or other file systems that are supported by Windows 10.
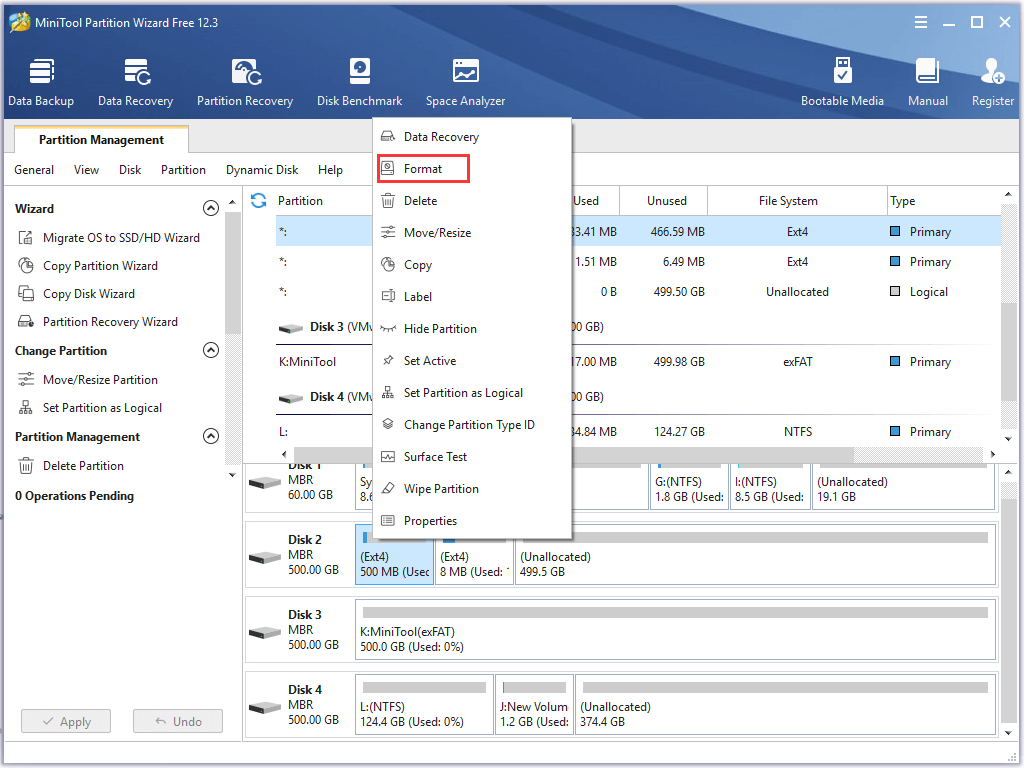
Step 1. Launch the MiniTool Partition Wizard to enter its main interface, and then right-click the Ext4 partition from the disk map and select Format.
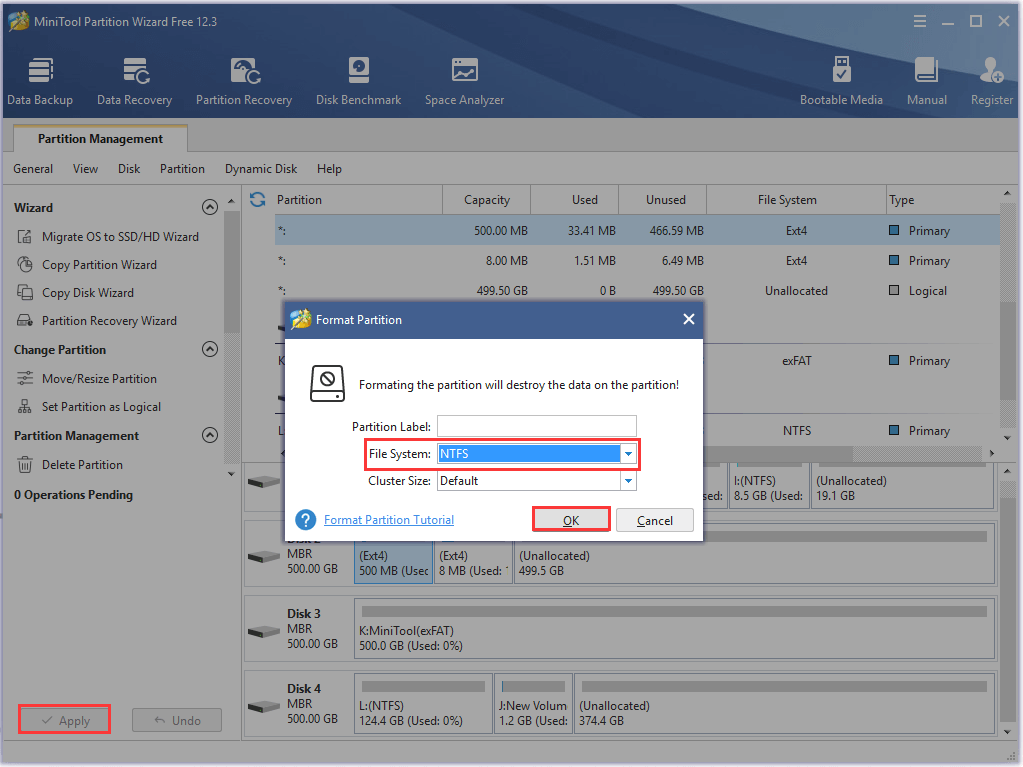
Step 2. In the pop-up window, select NTFS from the drop-down menu and click on OK to continue.
Step 3. Click on Apply button to execute the operation.
Part 2: Restore Data from the Ext4 Partition
Now, you should make the Ext4 accessible on Windows 10. Another question is how to regain data from the formatted partition. Here MiniTool Partition Wizard is capable of restoring Ext4 partition data. Please continue with the following steps.
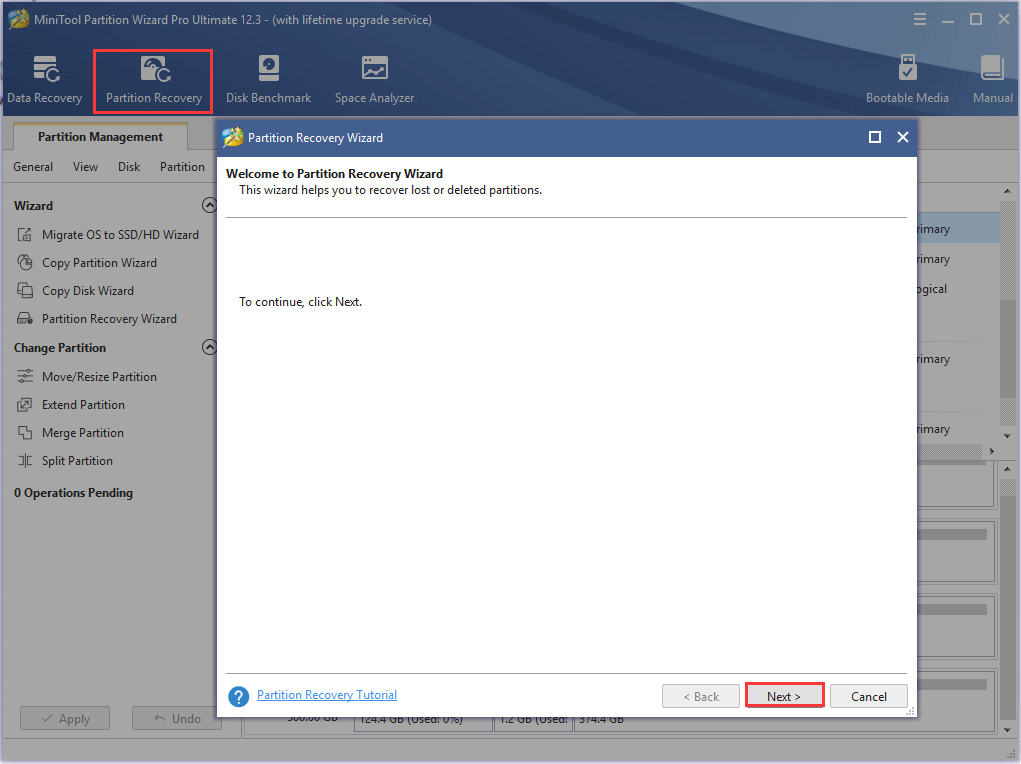
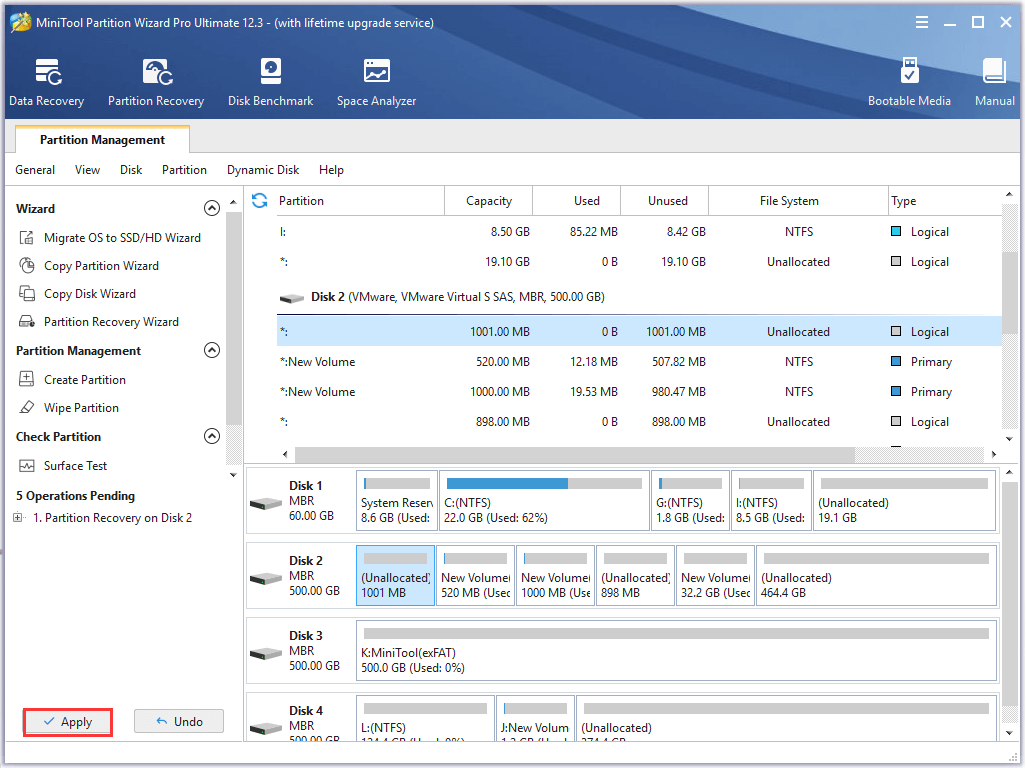
Step 1. In the main interface, select the partition that you just formatted to NTFS and click on Partition Recovery from the top toolbar. Click on Next in the pop-up window.
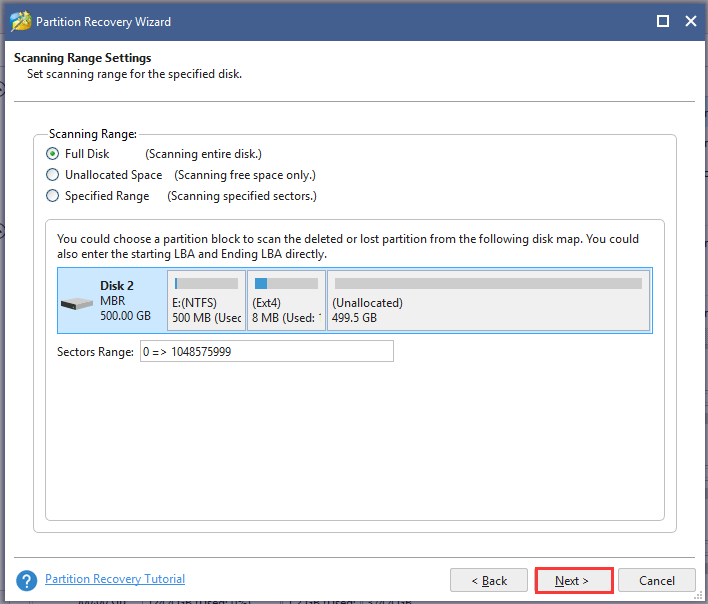
Step 2. Choose a scanning range based on your needs. There are 3 ranges to scan the disk including Full Disk, Unallocated Space, and Specified Range. Here we take Full Disk for example and click on Next to go on.
Step 3. Select a scanning method to scan the disk and click Next to continue.

Step 4. Make sure that you check all partitions including existing partitions and deleted/formatted partitions. Wait for some time until the scanning completes and click on the Finish button.
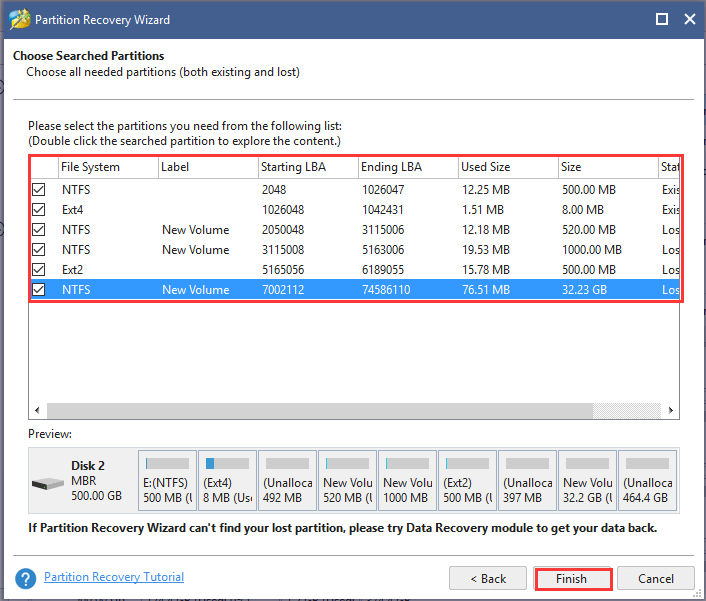
Step 5. Click on Apply button to recover the formatted partition on the hard disk.
Up till now, the formatted partition should be recovered, and then you can read Linux partition Windows 10 and access its files.
Also, you can try the other three utilities to access Ext4 from Windows 10. Let’s keep reading!
Method 2. Use Ext2Fsd
Ext2Fsd is a Windows file system driver that supports the Ext2/3/4 file system. It allows you to read Linux partition Windows 10 and access Ubuntu files by mounting the Ext4 partition and assigning a drive letter. You can lunch the Ext2Fsd at every boot or only open it when you need it.
To access Ext4 from Windows, follow the steps below:
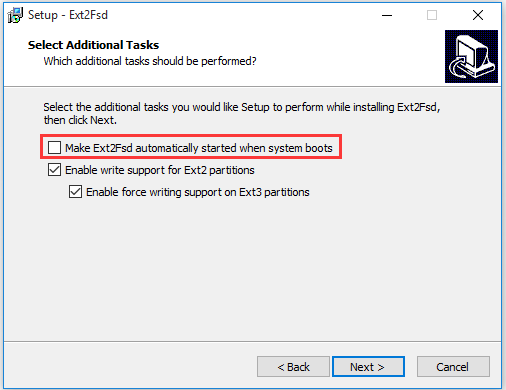
Step 1. Install this tool on your Windows 10 PC and launch the driver.
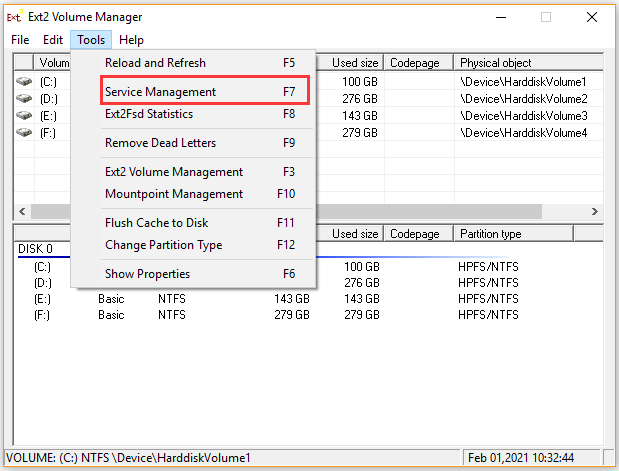
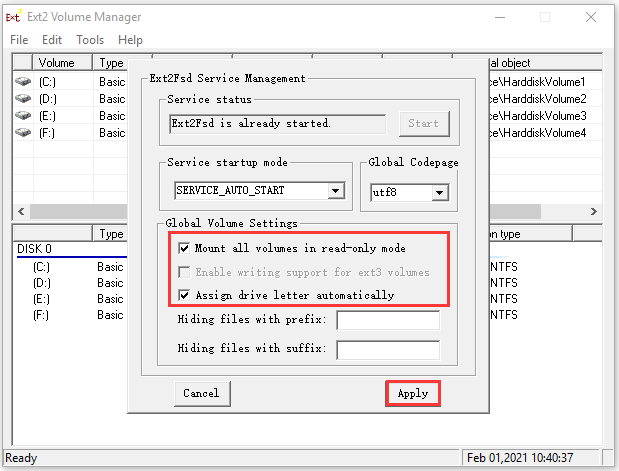
Step 2. In the main interface of Ext2Fsd, navigate to the Tools tab and select Service Management from the context menu.
Step 3. In the Ext2Fsd Service Management window, select the checkboxes for Mount all volumes in read-only mode and Assign drive letter automatically. Then click on Apply to execute the operation. After that, this tool will automatically mount and assign drive letters to the Linux partitions.
Step 4. Press Win + E keys to open File Explorer, and then you will find the Ext4 partitions are mounted with their own drive letters and you can directly access Ubuntu files from Windows.
Method 3. Use DiskInternals Linux Reader
DiskInternals Linux Reader is a free utility to access Linux files from Windows 10. This tool can not only support the Ext4 file system but ReFS, HFS, and HFS+ file systems. Different from Ext2Fsd, this program allows you to read Linux drive on Windows within this application.
Step 1. Install DiskInternals Linux Reader on your Windows PC and launch it to enter the main interface.
Step 2. After the Linux Reader detects all partitions on your hard drive, navigate to the Ext4 partition from the list of drives.
Step 3. Double click the Ext4 partition to open it and then you can preview and access the saved data on the drive.
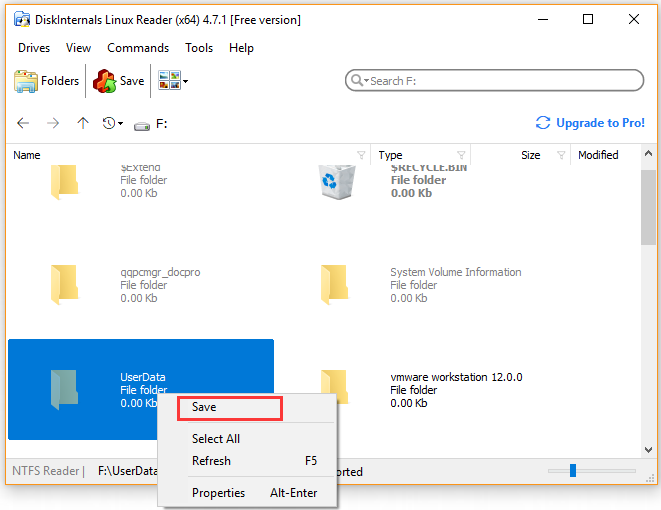
Step 4. If you want to make full use of the Linux files on Windows, you have to transfer the files from the Ext4 partition to another location that is supported by the Windows file system. Here right-click the file that you need and click on Save from the context menu.
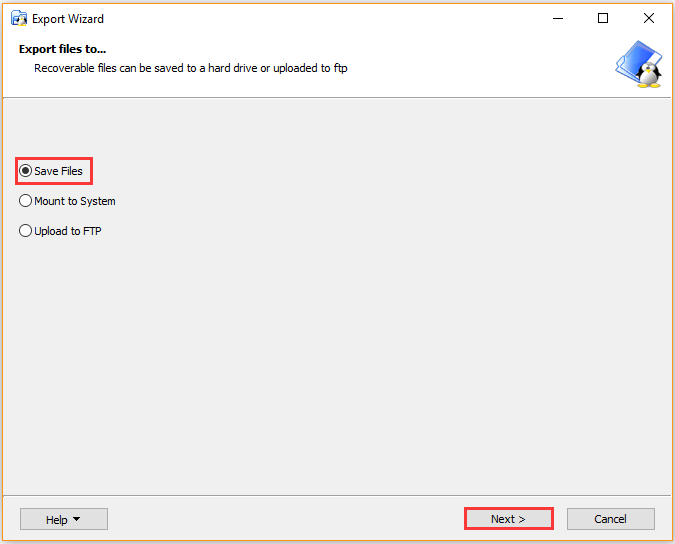
Step 5. Select the Save Files option and click on Next button.
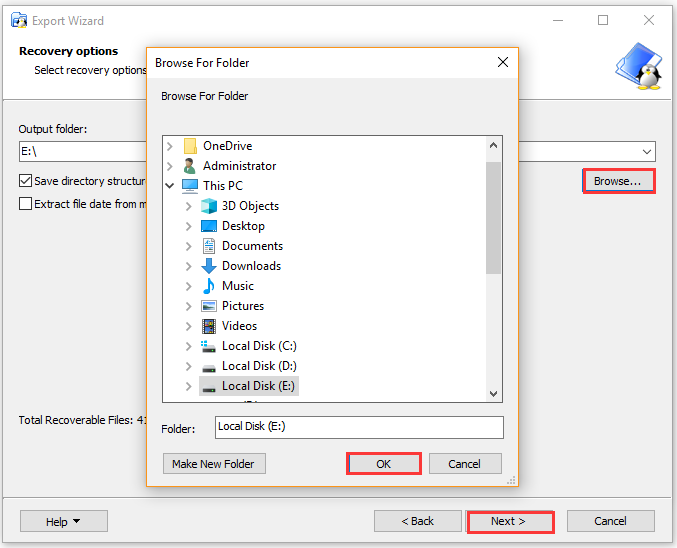
Step 6. Click on Browse button to select a location where you save the file and click on OK. Then click on Next. Wait for some time until the file is saved to your selected location.
Method 4. Use Ext2explore
Ext2explore is a practical explorer that can access Ext2/3/4 files on Windows 10. It works similarly to DiskInternals Linux Reader, but it doesn’t allow you to preview files using Ext2explore. This utility doesn’t have to be installed and you can run the .exe file directly.
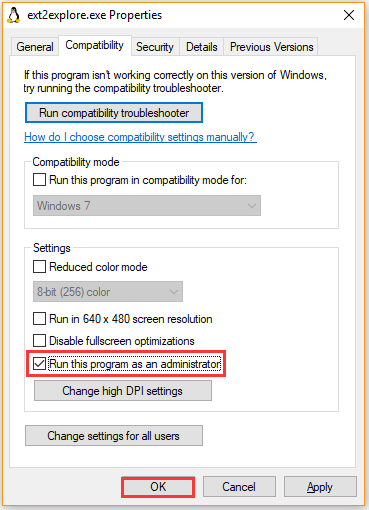
Bear in mind that you must run the Ext2explore.exe program as an administrator, or you will receive an error message.
Step 1. Right-click the Ext2explore.exe file that you download to Windows PC and select Run as administrator.
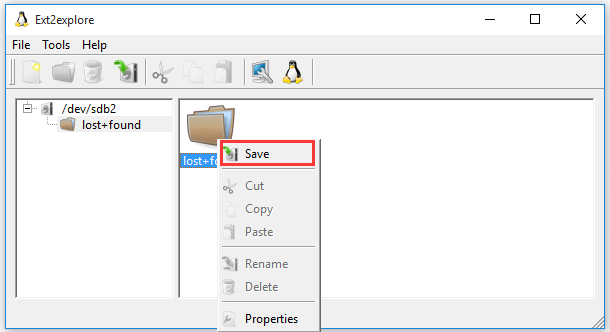
Step 2. Now, you can access the Ext4 partition and its Linux files. To open the files in the Windows system, you need to save them to the Windows partition. Right-click on the file and select Save, then navigate to another location to save files on the Windows system.
What’s Your Opinion
This post mainly focuses on how to access Linux files from Windows 10. You can choose one from the top 4 utilities to access Ext4 from Windows. If you have any better ideas on this topic, please share them in the comment area. Also, you can send us an email via [email protected] if you have any questions about the MiniTool software.
Access Linux Files from Windows 10 FAQ
After analyzing lots of user reports and references, we summarize the following 5 methods to transfer files between Windows and Linux.
- Use the Share network folders.
- Transfer files from Windows to Linux via FTP.
- Securely copy the files or folders to Linux via SSH.
- Share the files via sync software.
- Use the shared folder in Linux virtual machine.
Here are detailed steps to mount a Linux folder in Windows.
- Press Win + E keys to open the File Explorer, and then map your Linux home folder or directory on Windows.
- Click on Tools at the top menu and select Map network drive.
- Select the drive letter from the drop-down menu and click on Browse to select the folder that you want to mount.
- Click on Finish
- Open a terminal on your Linux, and then type sudo apt-get install smbfs in it and hit Enter.
- Type the sudo yum install cifs-utils line in terminal and press Enter.
- Execute the sudo chmod u+s /sbin/mount.cifs /sbin/umount.cifs
- Use the cifs utility to map a network drive to storage.
ABOUT THE AUTHOR

Position: Columnist
Fall in love with the hardware technology in early 2008. Now, Ariel has been a professional columnist for partition management publications. Graduated from Purdue University in 2010, Arial has about 10 years of working experience in the field of hardware technology. As a columnist on MiniTool, Ariel has provided numerous solutions ranging from data backup, disk management, and data recovery. These solutions helped millions of users fix all kinds of tricky problems. Ariel was born in Pennsylvania and lives with her husband and a lovely dog. She always says “Life is full of magic, but writing means the world to me.”
Источник


