- 4.3 Git на сервере — Генерация открытого SSH ключа
- Генерация открытого SSH ключа
- SSH Key Setup for GitHub
- Create an Account with Github
- Adding Your SSH Key to Your GitHub Account
- Check your Connection from local machine to Github
- Generating a new SSH key and adding it to the ssh-agent
- Help us make these docs great!
- 4.3 Git on the Server — Generating Your SSH Public Key
- Generating Your SSH Public Key
- Adding a new SSH key to your GitHub account
4.3 Git на сервере — Генерация открытого SSH ключа
Генерация открытого SSH ключа
Как отмечалось ранее, многие Git-серверы используют аутентификацию по открытым SSH-ключам. Для того чтобы предоставить открытый ключ, каждый пользователь в системе должен его сгенерировать, если только этого уже не было сделано ранее. Этот процесс аналогичен во всех операционных системах. Сначала вам стоит убедиться, что у вас ещё нет ключа. По умолчанию пользовательские SSH ключи сохраняются в каталоге
/.ssh домашнем каталоге пользователя. Вы можете легко проверить наличие ключа перейдя в этот каталог и посмотрев его содержимое:
Ищите файл с именем id_dsa или id_rsa и соответствующий ему файл с расширением .pub . Файл с расширением .pub — это ваш открытый ключ, а второй файл — ваш приватный ключ. Если указанные файлы у вас отсутствуют (или даже нет каталога .ssh ), вы можете создать их используя программу ssh-keygen , которая входит в состав пакета SSH в системах Linux/Mac, а для Windows поставляется вместе с Git:
Сначала программа попросит указать расположение файла для сохранения ключа ( .ssh/id_rsa ), затем дважды ввести пароль для шифрования. Если вы не хотите вводить пароль каждый раз при использовании ключа, то можете оставить его пустым или использовать программу ssh-agent . Если вы решили использовать пароль для приватного ключа, то настоятельно рекомендуется использовать опцию -o , которая позволяет сохранить ключ в формате, более устойчивом ко взлому методом подбора, чем стандартный формат.
Теперь каждый пользователь должен отправить свой открытый ключ вам или тому, кто администрирует Git-сервер (подразумевается, что ваш SSH-сервер уже настроен на работу с открытыми ключами). Для этого достаточно скопировать содержимое файла с расширением .pub и отправить его по электронной почте. Открытый ключ выглядит примерно так:
Источник
SSH Key Setup for GitHub
To start with you need to make sure you have a linux terminal with git command installed and have ability of using git command by the user at which you are trying. Always try to use a separate user and do not use root user for the same. Also you need to create a account with Github.
Create an Account with Github
To create a account with Github, you can follow the below steps
- Go to “Join GitHub”
- Fill in your information and click “Create an account”
- Select the plan you want and click “Finish sign up”
- When you sign up, you’ll receive an email to verify your email address. Click the link to complete verification.
Once account is created next step is to create a fresh key pair and then add them to Github.
Adding Your SSH Key to Your GitHub Account
Login to your terminal via SSH.
Generate a key pair by running the following command, substituting in your GitHub email address between the quotes:
When you’re prompted to “Enter a file in which to save the key,” press Enter to save it in the default location. If you wish to use a different location, you can provide the path to be used here as well.
At the prompt, type a secure passphrase that will be used when your key is authenticating, and confirm it. You can even do not setup this passphrase if you don’t need extra verification. So now you have generated the SSH key pair. Make sure you make a note on things like public key and private key files.
To add ssh key in the GitHub you need to take a copy of the public key and you can use the below ssh command to get this done.
Once you have copied the content in your clipboard or in any local text file, we can use the below steps to add the key to Github account.
- You need to login to Github Account using your user/pass
- Click on the Profile pic and select “Settings” from the Drop down.
- Select “SSH and GPG Keys” from the Menu in the left hand side
To add your first key or another key click on “New SSH key”
In the “Title” field, you need to add a label which you can remember. (I used “Sumesh’s MacBook Air”).
You can use any word and only thing you need to take care is you need to make sure that will help you to identify the machine on which that key is generated.
In “key” Field add the above key which you get by using the command “cat /home/user/.ssh/id_rsa.pub” which will start with ssh-rsa
If prompted, confirm your GitHub password which will be used for verification.
Now you can see the key listed which you have added in the title name. And you will need to do the same procedure for each computer , live servers dev/staging servers which needs to access your repositories.
Check your Connection from local machine to Github
Open a new ssh terminal and make sure you switch to the user for which you had created the ssh key pair. To connect with Github account via ssh key, you need to type the below and press enter # ssh -T [email protected]
If you connecting this for the first time from that machine, you will see a result like the below and you need to type Yes in this case:
You will see output like this:
If the above mentioned user is correct and is displayed as the same one which you tried adding, then all is fine and you have completed the ssh key setup with Github ! If you are getting permission denied, then we need to cross check the above steps and make sure you have done everything as per the above doc. You can always contact me if you need any help in this case.
Источник
Generating a new SSH key and adding it to the ssh-agent
After you’ve checked for existing SSH keys, you can generate a new SSH key to use for authentication, then add it to the ssh-agent.
About SSH key generation
If you don’t already have an SSH key, you must generate a new SSH key to use for authentication. If you’re unsure whether you already have an SSH key, you can check for existing keys. For more information, see «Checking for existing SSH keys.»
If you want to use a hardware security key to authenticate to GitHub, you must generate a new SSH key for your hardware security key. You must connect your hardware security key to your computer when you authenticate with the key pair. For more information, see the OpenSSH 8.2 release notes.
If you don’t want to reenter your passphrase every time you use your SSH key, you can add your key to the SSH agent, which manages your SSH keys and remembers your passphrase.
Generating a new SSH key
Open Terminal Terminal Git Bash .
Paste the text below, substituting in your GitHub email address.
Note: If you are using a legacy system that doesn’t support the Ed25519 algorithm, use:
This creates a new SSH key, using the provided email as a label.
When you’re prompted to «Enter a file in which to save the key,» press Enter. This accepts the default file location.
At the prompt, type a secure passphrase. For more information, see «Working with SSH key passphrases.»
Adding your SSH key to the ssh-agent
Before adding a new SSH key to the ssh-agent to manage your keys, you should have checked for existing SSH keys and generated a new SSH key. When adding your SSH key to the agent, use the default macOS ssh-add command, and not an application installed by macports, homebrew, or some other external source.
Start the ssh-agent in the background.
Depending on your environment, you may need to use a different command. For example, you may need to use root access by running sudo -s -H before starting the ssh-agent, or you may need to use exec ssh-agent bash or exec ssh-agent zsh to run the ssh-agent.
If you’re using macOS Sierra 10.12.2 or later, you will need to modify your
/.ssh/config file to automatically load keys into the ssh-agent and store passphrases in your keychain.
First, check to see if your
/.ssh/config file exists in the default location.
If the file doesn’t exist, create the file.
/.ssh/config file, then modify the file to contain the following lines. If your SSH key file has a different name or path than the example code, modify the filename or path to match your current setup.
Note: If you chose not to add a passphrase to your key, you should omit the UseKeychain line.
Note: If you see an error like this
add an additional config line to your Host * section:
Add your SSH private key to the ssh-agent and store your passphrase in the keychain. If you created your key with a different name, or if you are adding an existing key that has a different name, replace id_ed25519 in the command with the name of your private key file.
Note: The -K option is Apple’s standard version of ssh-add , which stores the passphrase in your keychain for you when you add an SSH key to the ssh-agent. If you chose not to add a passphrase to your key, run the command without the -K option.
If you don’t have Apple’s standard version installed, you may receive an error. For more information on resolving this error, see «Error: ssh-add: illegal option — K.»
Add the SSH key to your account on GitHub. For more information, see «Adding a new SSH key to your GitHub account.»
If you have GitHub Desktop installed, you can use it to clone repositories and not deal with SSH keys.
Ensure the ssh-agent is running. You can use the «Auto-launching the ssh-agent» instructions in «Working with SSH key passphrases», or start it manually:
Add your SSH private key to the ssh-agent. If you created your key with a different name, or if you are adding an existing key that has a different name, replace id_ed25519 in the command with the name of your private key file.
Add the SSH key to your account on GitHub. For more information, see «Adding a new SSH key to your GitHub account.»
Start the ssh-agent in the background.
Depending on your environment, you may need to use a different command. For example, you may need to use root access by running sudo -s -H before starting the ssh-agent, or you may need to use exec ssh-agent bash or exec ssh-agent zsh to run the ssh-agent.
Add your SSH private key to the ssh-agent. If you created your key with a different name, or if you are adding an existing key that has a different name, replace id_ed25519 in the command with the name of your private key file.
Add the SSH key to your account on GitHub. For more information, see «Adding a new SSH key to your GitHub account.»
Generating a new SSH key for a hardware security key
If you are using macOS or Linux, you may need to update your SSH client or install a new SSH client prior to generating a new SSH key. For more information, see «Error: Unknown key type.»
Insert your hardware security key into your computer.
Open Terminal Terminal Git Bash .
Paste the text below, substituting in the email address for your account on GitHub.
Note: If the command fails and you receive the error invalid format or feature not supported, you may be using a hardware security key that does not support the Ed25519 algorithm. Enter the following command instead.
When you are prompted, touch the button on your hardware security key.
When you are prompted to «Enter a file in which to save the key,» press Enter to accept the default file location.
When you are prompted to type a passphrase, press Enter.
Add the SSH key to your account on GitHub. For more information, see «Adding a new SSH key to your GitHub account.»
Help us make these docs great!
All GitHub docs are open source. See something that’s wrong or unclear? Submit a pull request.
Источник
4.3 Git on the Server — Generating Your SSH Public Key
Generating Your SSH Public Key
Many Git servers authenticate using SSH public keys. In order to provide a public key, each user in your system must generate one if they don’t already have one. This process is similar across all operating systems. First, you should check to make sure you don’t already have a key. By default, a user’s SSH keys are stored in that user’s
/.ssh directory. You can easily check to see if you have a key already by going to that directory and listing the contents:
You’re looking for a pair of files named something like id_dsa or id_rsa and a matching file with a .pub extension. The .pub file is your public key, and the other file is the corresponding private key. If you don’t have these files (or you don’t even have a .ssh directory), you can create them by running a program called ssh-keygen , which is provided with the SSH package on Linux/macOS systems and comes with Git for Windows:
First it confirms where you want to save the key ( .ssh/id_rsa ), and then it asks twice for a passphrase, which you can leave empty if you don’t want to type a password when you use the key. However, if you do use a password, make sure to add the -o option; it saves the private key in a format that is more resistant to brute-force password cracking than is the default format. You can also use the ssh-agent tool to prevent having to enter the password each time.
Now, each user that does this has to send their public key to you or whoever is administrating the Git server (assuming you’re using an SSH server setup that requires public keys). All they have to do is copy the contents of the .pub file and email it. The public keys look something like this:
Источник
Adding a new SSH key to your GitHub account
To configure your GitHub account to use your new (or existing) SSH key, you’ll also need to add it to your GitHub account.
Before adding a new SSH key to your GitHub account, you should have:
After adding a new SSH key to your GitHub account, you can reconfigure any local repositories to use SSH. For more information, see «Switching remote URLs from HTTPS to SSH.»
Note: GitHub is improving security by dropping older, insecure key types.
DSA keys ( ssh-dss ) are no longer supported. Existing keys will continue to function through March 15, 2022. You cannot add new DSA keys to your user account on GitHub.
RSA keys ( ssh-rsa ) with a valid_after before November 2, 2021 may continue to use any signature algorithm. RSA keys generated after that date must use a SHA-2 signature algorithm. Some older clients may need to be upgraded in order to use SHA-2 signatures.
Copy the SSH public key to your clipboard.
If your SSH public key file has a different name than the example code, modify the filename to match your current setup. When copying your key, don’t add any newlines or whitespace.
Tip: If pbcopy isn’t working, you can locate the hidden .ssh folder, open the file in your favorite text editor, and copy it to your clipboard.
In the upper-right corner of any page, click your profile photo, then click Settings. 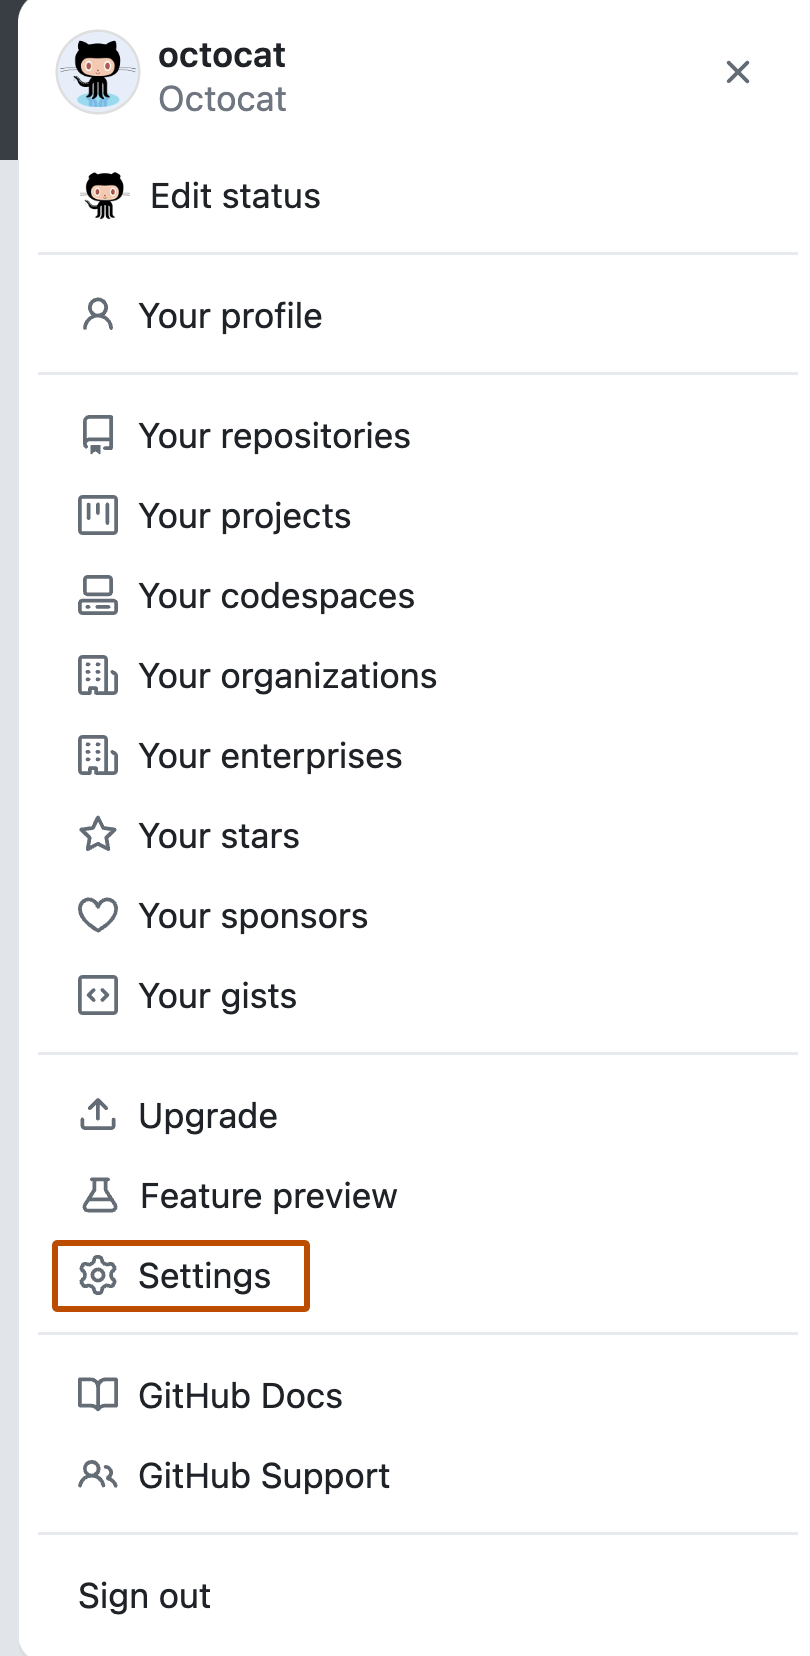
In the user settings sidebar, click SSH and GPG keys. 
Click New SSH key or Add SSH key. 
In the «Title» field, add a descriptive label for the new key. For example, if you’re using a personal Mac, you might call this key «Personal MacBook Air».
Paste your key into the «Key» field. 
Click Add SSH key. 
If prompted, confirm your GitHub password. 
Copy the SSH public key to your clipboard.
If your SSH public key file has a different name than the example code, modify the filename to match your current setup. When copying your key, don’t add any newlines or whitespace.
Tip: If clip isn’t working, you can locate the hidden .ssh folder, open the file in your favorite text editor, and copy it to your clipboard.
In the upper-right corner of any page, click your profile photo, then click Settings.
In the user settings sidebar, click SSH and GPG keys.
Click New SSH key or Add SSH key.
In the «Title» field, add a descriptive label for the new key. For example, if you’re using a personal Mac, you might call this key «Personal MacBook Air».
Paste your key into the «Key» field.
Click Add SSH key.
If prompted, confirm your GitHub password.
Copy the SSH public key to your clipboard.
If your SSH public key file has a different name than the example code, modify the filename to match your current setup. When copying your key, don’t add any newlines or whitespace.
Tip: Alternatively, you can locate the hidden .ssh folder, open the file in your favorite text editor, and copy it to your clipboard.
In the upper-right corner of any page, click your profile photo, then click Settings.
In the user settings sidebar, click SSH and GPG keys.
Click New SSH key or Add SSH key.
In the «Title» field, add a descriptive label for the new key. For example, if you’re using a personal Mac, you might call this key «Personal MacBook Air».
Paste your key into the «Key» field.
Click Add SSH key.
If prompted, confirm your GitHub password.
To learn more about GitHub CLI, see «About GitHub CLI.»
To add an SSH key to your GitHub account, use the ssh-key add subcommand, specifying your public key.
To include a title for the new key, use the -t or —title flag.
Источник


