- Failed to connect to my own mobile #279
- Comments
- Jeremy-Keith commented Jul 3, 2021
- tarkeshwarraj commented Jul 3, 2021
- Tucanaldetecnologia commented Jul 3, 2021
- thecakeisfalse commented Jul 3, 2021
- Jeremy-Keith commented Jul 4, 2021
- enty8080 commented Jul 4, 2021
- thecakeisfalse commented Jul 4, 2021
- Jeremy-Keith commented Jul 6, 2021
- Jeremy-Keith commented Jul 6, 2021
- thecakeisfalse commented Jul 6, 2021
- Jeremy-Keith commented Jul 7, 2021
- enty8080 commented Jul 7, 2021
- Jeremy-Keith commented Jul 7, 2021
- enty8080 commented Jul 7, 2021
- Jeremy-Keith commented Jul 7, 2021
- Jeremy-Keith commented Jul 7, 2021
- enty8080 commented Jul 7, 2021
- Jeremy-Keith commented Jul 7, 2021
- enty8080 commented Jul 7, 2021
- Jeremy-Keith commented Jul 7, 2021
- Jeremy-Keith commented Jul 7, 2021
- enty8080 commented Jul 7, 2021 •
- Jeremy-Keith commented Jul 7, 2021
- enty8080 commented Jul 7, 2021
- Jeremy-Keith commented Jul 7, 2021
- enty8080 commented Jul 7, 2021 •
- Jeremy-Keith commented Jul 7, 2021
- thecakeisfalse commented Jul 7, 2021 •
- Jeremy-Keith commented Jul 7, 2021
- Ghost Framework — Control Android Devices Remotely
- What we can do with Ghost Framework
- «ghost install local» uses production config that is not even created and fails because tries to connect to mysql+ sqlite3 is not installed #827
- Comments
- hackhat commented Sep 20, 2018 •
- acburdine commented Sep 25, 2018
- javenschuetz commented Jun 9, 2019 •
- Fix: Activation of Network Connection Failed in Linux
- Solution 1: Disable/Enable the Network Connection
- Solution 2: Disable Fast Boot (Dual Boot System)
- Solution 3: Disable Connect Automatically for the Network
- Solution 4: Change DNS to DNSMASQ for the Network
- Solution 5: Correct Date/Time Settings of Your System
- Solution 6: Delete the Bluetooth Devices in the Settings of Your System
- Solution 7: Blacklist Other Communication Devices
- Solution 8: Remove the Network Drivers from the Blacklist
- Solution 9: Reinstall the Network Manager
- Solution 10: Disable Power Management of the Network Card/Driver
- Solution 11: Disable the Hardware Encryption by the Network Device
- Solution 12: Update the Kernel of Your Linux Distro to the Latest Build
- Solution 13: Upgrade Your Linux Variant to the Latest Build
Failed to connect to my own mobile #279
Comments
Jeremy-Keith commented Jul 3, 2021
Thanks for bringing out the new and updated version of Ghost framework!
I’d like to know few things which can get me going. I tried to connect using my mobile IP but it keeps saying, «failed to connect». Did nmap on my mobile and it says ‘all ports are closed’.
Is it because of all the ports being closed that ghost framework can’t connect?
The text was updated successfully, but these errors were encountered:
tarkeshwarraj commented Jul 3, 2021
yes bro I think so bcs my phn also not connecting and now I m going to check my ports I ll update you soon..
Tucanaldetecnologia commented Jul 3, 2021
Amigos, alguien me enseña como ejecutarlo? ya clone y todo pero no se como correrlo
thecakeisfalse commented Jul 3, 2021
@Jeremy-Keith you need to enable debug mode on your mobile
Jeremy-Keith commented Jul 4, 2021
@Jeremy-Keith you need to enable debug mode on your mobile
I did.. Tried all the bits and then i raised an issue. But the issue is closed without giving any solution :/
enty8080 commented Jul 4, 2021
@Jeremy-Keith, I know, this is not an issue in my program. Ghost Framework uses adb binaries for connecting to Android devices, so the issue in your phone, network, or adb . The issue was closed because it is invalid
thecakeisfalse commented Jul 4, 2021
@Jeremy-Keith what version of android do you use?
Jeremy-Keith commented Jul 6, 2021
@enty8080 Agree. But this is the only place to ask about the problems, so I raised an issue hoping I could find some answers. Your program is spot-on! compared to the old version, No question on that. But what versions of android does the framework supports?
Jeremy-Keith commented Jul 6, 2021
@thecakeisfalse I’m using it on my old mobile which runs on android 8. If I can get this work on this one, i’ll test on android 11 which I heard people say its not possible to breach into android 11.
thecakeisfalse commented Jul 6, 2021
@Jeremy-Keith do you have wireless debugging enabled on your mobile?
Jeremy-Keith commented Jul 7, 2021
@thecakeisfalse The only wireless thing that I see in Developer options is «Wireless Display Certification»
enty8080 commented Jul 7, 2021
@Jeremy-Keith This means that your device does not support wireless debugging, so it can not be exploited by Ghost Framework.
Jeremy-Keith commented Jul 7, 2021
@enty8080 Yea now I understood. And what about the ports? It says All 1000 ports are closed on my mobile’s IP
enty8080 commented Jul 7, 2021
@Jeremy-Keith Did you perform a scan by nmap ?
Jeremy-Keith commented Jul 7, 2021
@enty8080 Can I establish adb connection on Ghost framework for a remote mobile which is on different network? This tool is so good but sadly I can’t try it on my device 🙁
Jeremy-Keith commented Jul 7, 2021
@enty8080 Yes. I scanned using nmap and it says all ports are closed
enty8080 commented Jul 7, 2021
@Jeremy-Keith This means that all ports in range 1-1000 are closed.
Jeremy-Keith commented Jul 7, 2021
@enty8080 So I can’t use even the default connection port on 5555? I noticed its establishing connection over port 5555.
enty8080 commented Jul 7, 2021
@enty8080 Port 5555 is closed on your device because, as I noticed before, your phone does not support Wireless Debug
Jeremy-Keith commented Jul 7, 2021
@enty8080 I have my cousin’s mobile and she has Wireless Debugging on her mobile. Can I get access to her mobile? She’s on a different network, can I still do it?
Jeremy-Keith commented Jul 7, 2021
@enty8080 Okay. now I understand why I can’t access my device. Thanks for the answers 🙂
What about a remote device?
enty8080 commented Jul 7, 2021 •
@Jeremy-Keith She should has wireless debug turned on and she should be connected to your network.
P.S. Or she should has static global IP address.
Jeremy-Keith commented Jul 7, 2021
@enty8080 I do know her mobile’s IP address. Any guidance on how can I get her on a static global IP?
enty8080 commented Jul 7, 2021
@Jeremy-Keith This is what I do not know, just google about IP addresses. I know only one thing: static global IP addresses are not free, you should buy them.
Jeremy-Keith commented Jul 7, 2021
@enty8080 Yea I read about it. Some says we should contact our ISP and ask for a static IP address and they said it doesn’t come cheap either.
enty8080 commented Jul 7, 2021 •
@Jeremy-Keith Can I close this issue, because the problem has been solved?
Jeremy-Keith commented Jul 7, 2021
@enty8080 Thanks Ivan! I got my issue solved. Will look forward for more android exploit tools from you in future 😁 But the only disappointing thing is, I didn’t get to see it on my mobile 🙁
Yea sure, close the issue
thecakeisfalse commented Jul 7, 2021 •
@Jeremy-Keith if you want to enable wireless debugging on your mobile, read this
Jeremy-Keith commented Jul 7, 2021
@thecakeisfalse Dude. you’re awesome man!! With the article you linked here, I was able to connect wirelessly to my device 😃 😃 Looking forward to know how can I do this on devices using different network. Thank you mate!!
Источник
Ghost Framework — Control Android Devices Remotely
Ghost Framework is an Android post-exploitation framework that uses an Android Debug Bridge to remotely access and control Android device. Ghost Framework 7.0 gives us the power and convenience of remote Android device administration.
We can use this framework to control old Android devices which have turn on the debug bridge in the «Developer options». Now this becomes very harmful because an attacker gets the full admin control on the vulnerable Android device.
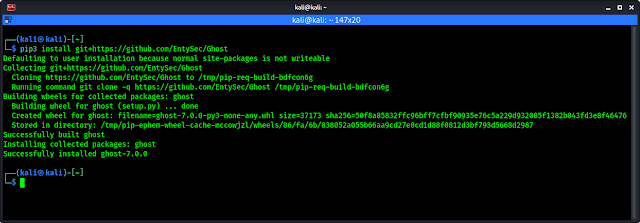
In our this detailed tutorial we will practically learn how we can use the Ghost Framework to take control of Android device from our Kali Linux system. So we start from cloning the Ghost Framework from GitHub by using following command:
In the following screenshot we can see that Ghost is downloaded on our system.
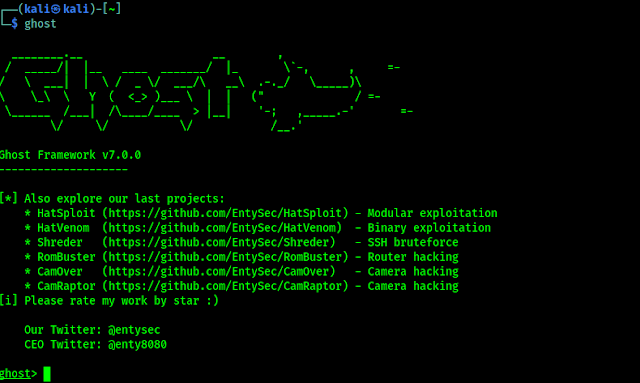
Now ghost framework is ready to use on our system, we can run it from any where in our terminal by only the ghost command:
The following screenshot shows ghost console is up on our system and it is successfully running.
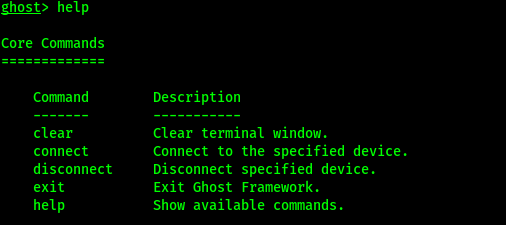
Now we can see the help options of ghost framework by simply running help command on the console.
The help option will be like following screenshot:
Now we can connect it with vulnerable Android devices. Now how we get a IP address of an old vulnerable Android devices? Shodan is here. Shodan is a grate search engine for searching the devices connected to internet. We already have a tutorial on Shodan.
In Shodan search engine we have to search for «Android Debug Bridge«, as we have shown in following screenshot:
Here we can see over 2.5k search results. Every device is vulnerable for ghost and those devices are connected to internet. If ghost shows failed to connect then Shodan is showing us an offline device. We also can try this with our Android device.
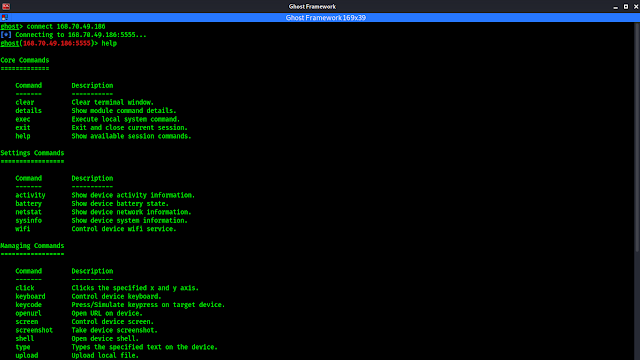
From here we can pick any IP address and use with connect command. For an example we select the highlighted IP address and connect it with ghost by using following command:
In some seconds it will be connected as we can see in the following screenshot.
Here we can see we are connected with the IP address. Now we can run anything from Ghost Framework. We can see the commands we can run after connecting by using help command here.
In the following screenshot we can see a lot of things that we can do with this device.
Now we can do almost everything with this device.
What we can do with Ghost Framework
- See device activity information.
- See device battery state.
- See device network information.
- See device system information.
- See device system information.
- Clicks the specified x and y axis.
- Control device keyboard.
- Press/Simulate key-press on target device.
- Open URL on device.
- Control device screen.
- Take device screenshot.
- Open device shell.
- Types the specified text on the device.
- Upload local file.
- Download remote file.
- Show Contacts Saved on Device.
- Reboot device.
Ghost Framework has a simple and clear UX/UI. It is easy to understand. Ghost Framework can be used to remove the remote Android device password if it was forgotten. It is also can be used to access the remote Android device shell without using OpenSSH or other protocols.
Love our articles? Make sure to follow us on Twitter and GitHub, we post article updates there. To join our KaliLinuxIn family, join our Telegram Group . We are trying to build a community for Linux and Cybersecurity. For anything we always happy to help everyone on the comment section . As we know our comment section is always open to everyone. We read each and every comment and we always reply .
Источник
«ghost install local» uses production config that is not even created and fails because tries to connect to mysql+ sqlite3 is not installed #827
Comments
hackhat commented Sep 20, 2018 •
To reproduce just run ghost install local . When it failed I tried ghost start .
(by the way on this page https://docs.ghost.org/docs/install-local you forget to mention that ghost start even exists)
(Also note that the link in ghost doctor goes to v1 not v2: You can always refer to https://docs.ghost.org/v1/docs/troubleshooting#section-cli-errors for troubleshooting )
Looks like it tries to connect to some kind of database on 3306. Not sure why this happens when in my config is:
(Not really sure why my filename is absolute, is crazy. If I use this project in another folder will break completely lol)
Somehow the KnexMigrator in ghost/versions/2.1.3/node_modules/knex-migrator/lib/index.js receives this config:
Maybe ghost is not reading my config.development.json and using some kind of default (I think should throw an error not use some random default config).
As I’ve expected, ghost is not reading my config.development.json and creates a default. Now I put a new config config.production.json and now it reads correctly. Wow, looks pretty confusing. Why ghost run runs in production mode?!
Now I’m getting Error: Cannot find module ‘sqlite3’ . I will add with yarn add sqlite3 and let’s see what happens.
And congrats! It finally works. Makes me feel like nobody is even using this library, how come nobody have this issue?!
The text was updated successfully, but these errors were encountered:
acburdine commented Sep 25, 2018
@hackhat unfortunately I don’t use Windows 10 normally, and thus it’s a bit more work to test the local setup there 😕 There definitely seems to be an issue, and I’ll spin up a windows VM and look into this further later this week.
(Also note that the link in ghost doctor goes to v1 not v2: You can always refer to https://docs.ghost.org/v1/docs/troubleshooting#section-cli-errors for troubleshooting)
good catch! will definitely fix that.
javenschuetz commented Jun 9, 2019 •
I’m getting this on ubuntu 19.04 with node 10.x today.
«Ensuring user is not logged in as ghost user [skipped]
ℹ Checking if logged in user is directory owner [skipped]
✔ Checking current folder permissions
✔ Validating config
✖ Starting Ghost
A GhostError occurred.
Message: Ghost process exited with code: null
Debug Information:
OS: Ubuntu, v19.04
Node Version: v10.16.0
Ghost-CLI Version: 1.11.0
Environment: development
Command: ‘ghost restart'»
«Message: Ghost process exited with code: null
Stack: Error: Ghost process exited with code: null
at ChildProcess.cp.on (/home/fff/.npm-global/lib/node_modules/ghost-cli/lib/utils/local-process.js:56:24)
at ChildProcess.emit (events.js:198:13)
at Process.ChildProcess._handle.onexit (internal/child_process.js:248:12)»
Ghost run gives that same ECONNREFUSED for 3306 error also
EDIT: downgrading from node 10.16 to node 10.15 fixed it.
Источник
Fix: Activation of Network Connection Failed in Linux
Your Linux distribution may fail to activate network connection due to the misconfiguration of your network. Also, incorrect date/time settings of your system may also cause the error under discussion.
The affected user encounters the error when he logs in to the system or tries to use the internet. Some users faced it just after installing the OS, whereas other users encounter it after some time. This issue is not limited to a particular Linux distro, nearly all the distros are affected by it. Moreover, the issue can occur on ethernet as well as on the Wi-Fi connection.
Before moving on with the solutions, make sure your router and modem are connected. If the issue is with a USB modem, then try to connect to a different port of the system. Moreover, restart your system and networking equipment. If both ethernet and Wi-Fi are not working, then try to use a USB dongle to connect to the internet or try to use the hotspot of your phone. Additionally, enable/disable the airplane mode of your system and check if the problem is solved.
Solution 1: Disable/Enable the Network Connection
The issue could be caused by a temporary software glitch and could be cleared by reinitializing the network connection. For illustration, we will discuss the process for Ubuntu.
- Open Settings of your system and in the left pane of the window, click on Network.
- Now disable the problematic connection by toggling the switching to the off position.
Disable the Network Connection
- Then restart your system. Upon restart, enable the network connection and check if the problem is solved.
- If not, press the Alt + F2 keys simultaneously to open the run command box and type:
- Now expand the type of network you were having issues with e.g. ethernet and delete all the entries under it.
Delete the Connection
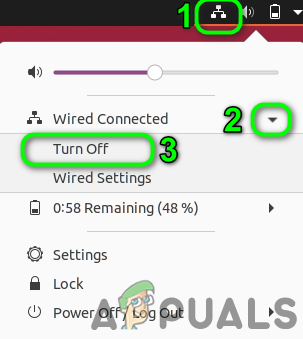
- Then close all the network editor and click on the network icon in the system tray.
- Now disable the network and then reenable it.
Disable the Network Connection from the System Tray
- Now restart your system and then check if the problem is solved.
Solution 2: Disable Fast Boot (Dual Boot System)
The fast startup option of Windows is known to create issues for dual boot systems with Linux. The same could be the reason for the current issue. In this context, disabling fast boot in Windows may solve the problem.
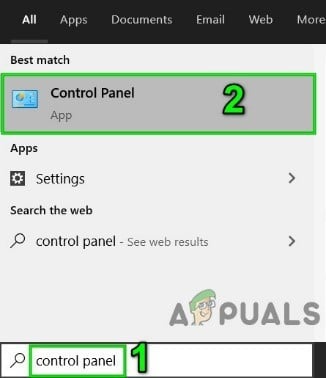
- In the Windows environment of your system, click on the Windows Search box and type Control Panel. In the search results shown, click on Control Panel.
Open Control Panel
- Now click on Hardware and Sound.
Open “Hardware and Sound”
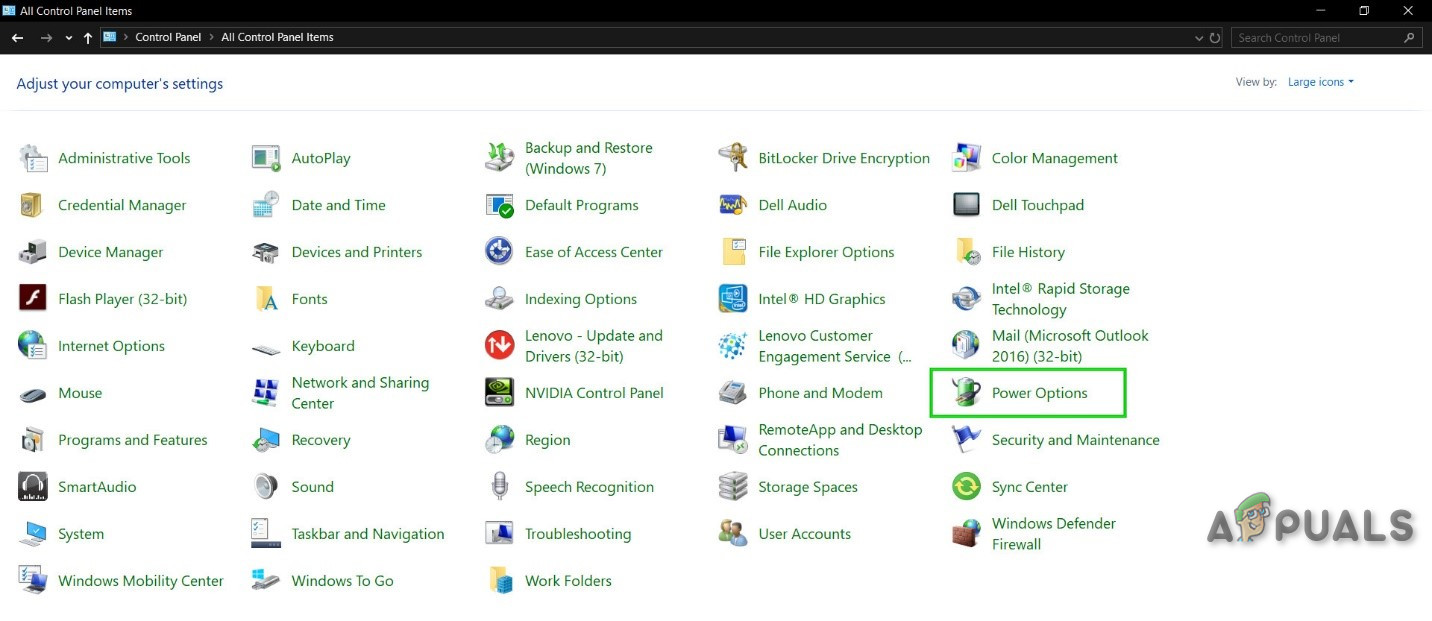
- Then click on Power Options.
Click Power Options in Control Panel
- Now in the left pane of the window, click on Choose What the Power Buttons Do.
Choose what Power Buttons do – Control Panel
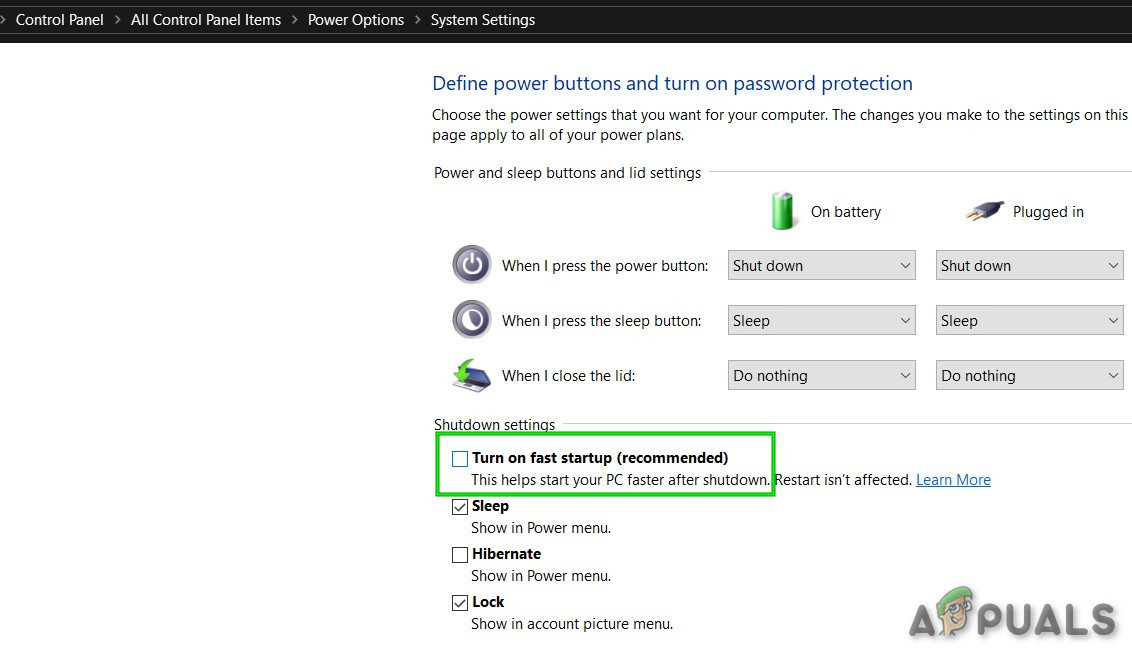
- Uncheck the option of Turn on Fast Startup. If the option is grayed out, click on Change Settings that are Currently Unavailable and then uncheck the said option.
Uncheck the Turn on fast startup
- Now save changes and boot into the Linux environment to check if the problem is solved. You may have to fully uninstall/reinstall your Linux distro.
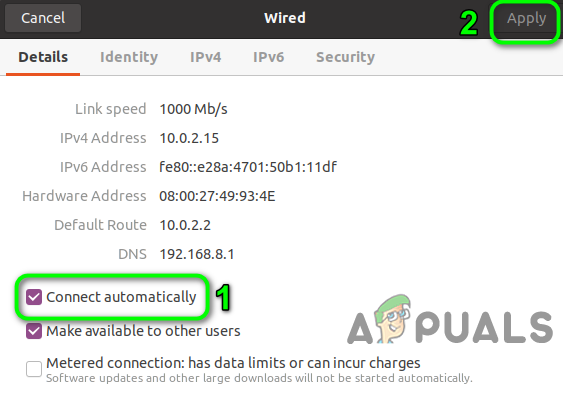
Solution 3: Disable Connect Automatically for the Network
It can be quite annoying for a user to get the error prompts for a connection type he is not using e.g. a USB ethernet. You can get rid of the prompt for that particular network by disabling the Connect Automatically option.
- Open Settings of your Linux distro and click on Network.
- Then click on the gear icon next to the problematic network. Click the Gear Icon of the Network
- Now uncheck the option of Connect Automatically and apply your changes.
Disable Connect Automatically
- Then check if the connection issue is resolved.
Solution 4: Change DNS to DNSMASQ for the Network
You may encounter the error under discussion if your system is having trouble with DNS. In this scenario, switching to the free DNSMASQ (which requires low system resources) may solve the problem.
- Execute the following command in the Linux terminal:
Edit Network Manager Configuration
- Now change dns with dnsmasq and close the file after saving the changes.
- Now restart your system and then check if the issue has been resolved.
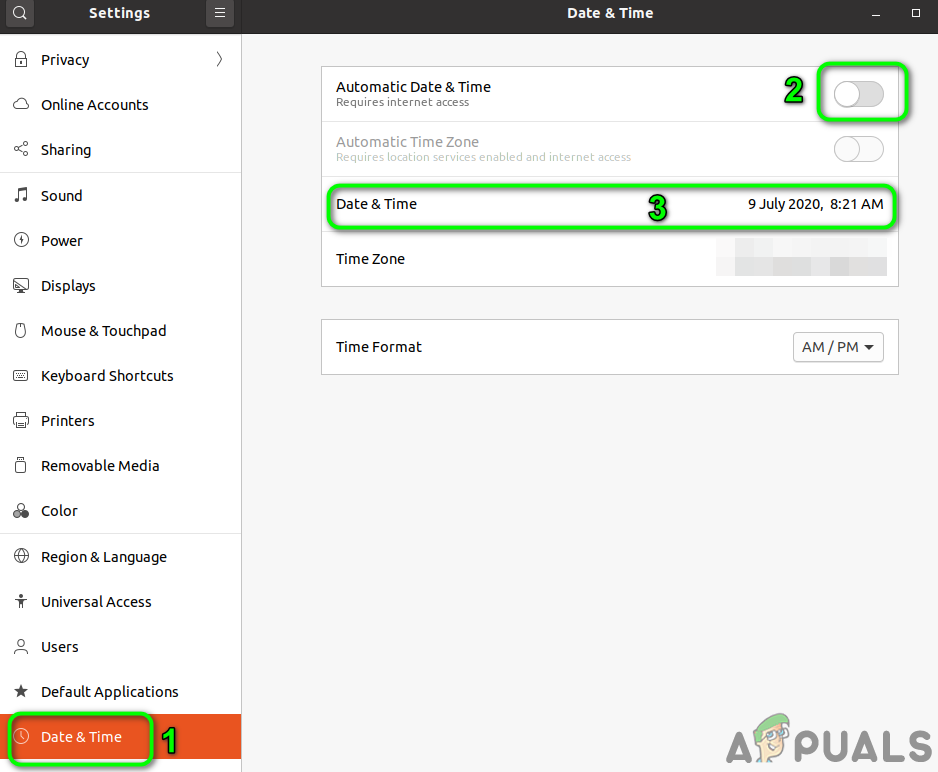
Solution 5: Correct Date/Time Settings of Your System
The date/time settings of your system play different roles in the operation of your system. You may encounter the error under discussion if the date/time settings of your system are not correct. In this context, correcting the date/time settings of your system may solve the problem.
- Near the left bottom of the screen, click on Show Applications and then click on Settings.
- Now, in the left pane of the window, click on Date & Time.
- Then disable Automatic Date & Time.
- Now correct the date and time of your system and then check if the issue has been resolved.
Change Date & Time
Solution 6: Delete the Bluetooth Devices in the Settings of Your System
If you have configured many Bluetooth devices, which are not available (at the occurrence of the error), then the error is triggered as the network manager will not be able to connect any of those devices. In this context, deleting the Bluetooth devices may solve the problem.
- Remove any Bluetooth devices connected to your system.
- Open Settings of your system and in the left pane of the window, click on Bluetooth.
- Now disable Bluetooth.
Disable Bluetooth
- Now launch the Linux terminal and type:
Open Bluetooth Contro
- Now a list of all Bluetooth devices will be shown. Then type the following command:
- Replace AA:BB:CC:DD:EE:FF with the ID string of the device. You can find the ID string by selecting the network icon>>Device Name>>Gear Icon.
- Repeat the process for all the Bluetooth devices and then check if the problem is solved.
- If not, check the path of the .crt file. If there are spaces in the name of the folder (in which .crt file is stored), remove spaces and then check if the problem is solved.
Solution 7: Blacklist Other Communication Devices
You may encounter the error under discussion if there is second ethernet/Wi-Fi like device present on the system like a built-in 4G device and your system is trying to use that device to connect to the internet. In this scenario, blacklisting other communication devices may solve the problem.
- Open the Linux terminal and type:
Open Network Connections through Linux Terminal
- Then a list of network devices will show up. Now check for the device that you are not using. For example, cdc_ether (which you are not using) is shown in the network devices.
- Now, type the following command in the terminal (which will create a new blacklist file):
Create a File to Blacklist the Problematic Connection
- Now add following two lines in the file:
Blacklist the Network Device
- Now save the file and restart your system.
- Upon restart, check if the issue has been resolved. Keep in mind that whenever you have to use the internal 4G device, you should enable it.
Solution 8: Remove the Network Drivers from the Blacklist
You may encounter the error under discussion if the network device is blacklisted in the system. In this context, removing the files from the blacklist may solve the problem.
- Type the following command in the Linux terminal and press the enter key:
Open the Blacklist File
- Now, in the file opened, check if the network-related drivers/modules are blacklisted. For example, if you are using a Broadcom network card, then remove the entries related to bcma and bcmsmac.
- Now restart your system and then check if the problem is solved.
Solution 9: Reinstall the Network Manager
The network manager is responsible for all the network-related operations in a Linux distro. You may encounter the error at hand if the installation of your network manager has corrupted. In this context, reinstalling the network manager may solve the problem.
- Launch the Linux Shell of your system and type the following command:
Restart Network Service
- Now check if the problem is solved.
- If not, then run the following command:
Force Reload Network Manager
- If asked for, then enter your user password and then check if the problem is solved.
- If not, then run the following command:
Reinstall Network Manager
- Now check if the problem is solved.
Solution 10: Disable Power Management of the Network Card/Driver
Power management implementation is known to cause issues for network connections. The same could be the reason for the current error. In this context, disabling power management may solve the problem. For illustration, we will discuss the process for Ubuntu and RTL8192CU driver.
- Open the Linux terminal and execute the following commands one by one:
- Now reboot your system and then check if the problem is solved.
Solution 11: Disable the Hardware Encryption by the Network Device
You may encounter the error under discussion if your network device is having trouble in encryption. In this context, disabling the hardware encryption may solve the problem. For elucidation, we will discuss the process for Ubuntu and RT2800PCI device.
- Execute the following command in the Linux terminal:
Disable Hardware Encryption by the Network Device
- Then execute the following commands one by one:
- Now restart your system and then check if the problem has been solved.
Solution 12: Update the Kernel of Your Linux Distro to the Latest Build
The Linux kernel is the central core of the OS and is a mediator between software applications and computer hardware. It is the foundation of all the different types of Linux distro. The kernel is regularly updated to cater to new technological advancements and patch the known bugs. You may encounter the error under discussion if the kernel of your Linux distro is an outdated one. In this context, updating the Linux kernel may solve the problem. We will discuss the process for Ubuntu.
- Open the Linux shell and type:
Update the Linux Kernel
- Now restart your system and then check if the connection problem has been solved.
Solution 13: Upgrade Your Linux Variant to the Latest Build
To add new features and patch the known bugs, every variant of Linux is updated. You may encounter the error under discussion if you are using an outdated version of the Linux distro. In this context, updating the distro may solve the problem. For elucidation, we will discuss the process for Ubuntu.
- Open the Linux terminal and type:
Upgrade Ubuntu
- Enter the password of the user account and a list of available updates will be shown.
- Press the y key to confirm the update and then the Enter key.
- Now wait for the completion of the update process and then check if the problem has been solved.
If nothing has helped you so far, then you may have to reinstall your Linux distro. But before reinstalling, it will be a good idea to try the iwconfig command. Also, try to update BIOS of your system. Moreover, try the WICD network manager. Furthermore, try to use IPV6 (Link-Local) or disable TCP.
Источник


 Disable the Network Connection
 Delete the Connection
 Disable the Network Connection from the System Tray
 Open Control Panel
 Open “Hardware and Sound”
 Click Power Options in Control Panel
 Choose what Power Buttons do – Control Panel
 Uncheck the Turn on fast startup
 Disable Connect Automatically
 Edit Network Manager Configuration
 Change Date & Time
 Disable Bluetooth
 Open Bluetooth Contro
 Open Network Connections through Linux Terminal
 Create a File to Blacklist the Problematic Connection
 Blacklist the Network Device
 Open the Blacklist File
 Restart Network Service
 Force Reload Network Manager
 Reinstall Network Manager
 Disable Hardware Encryption by the Network Device
 Update the Linux Kernel
 Upgrade Ubuntu


