- Using Grep Case Insensitive
- Case Sensitive
- Case Insensitive
- Case Insensitive and Recursive
- Dozens of Unix/Linux ‘grep’ command examples
- Abridged grep command examples
- Searching for a text string in one file
- Searching for a string in multiple files
- Case-insensitive file searching with the Unix grep command
- Reversing the meaning of a grep search
- Using grep in a Unix/Linux command pipeline
- Using the Linux grep command to search for multiple patterns at one time (egrep)
- Searching for regular expressions (regex patterns) with grep
- Display only filenames with a grep search
- Showing matching line numbers with Linux grep
- grep before/after — Showing lines before or after your grep pattern match
- Power file searching with find and grep
- Related Unix/Linux grep commands and tutorials
- How Do You Grep Case Sensitive?
- Prerequisite
- Example 1:
- Example 2
- Example 3
- Example 4
- Example 5
- Example 6
- Example 7
- Example 8
- Conclusion
- About the author
- Aqsa Yasin
Using Grep Case Insensitive
grep is very useful too to match and find phrases, words and characters in test. One of the most used situation is using grep case sensitive or case insensitive. In this tutorial we will examine different examples. We have all ready examined grep in the following tutorial.
Case Sensitive
We will start with the default behavior of the grep command which is case sensitive. In this example we will search for ismail in /etc/passwd .
 Case Sensitive
Case Insensitive
Now we will search for ISMAIL in a case insensitive manner. We expect to match both ismail and ISMAIL in /etc/passwd file. We will use -i option in order to specify case insensitivity.
 Case Insensitive
Case Insensitive and Recursive
In some cases we may need to search case insensitive and recursive manner. We will use -r option in order to make our case insensitive searchs recursively. In this case we will search for ISMAIL case insensitive in /etc directory.
 Case Insensitive and Recursive
Источник
Dozens of Unix/Linux ‘grep’ command examples
Linux grep FAQ: Can you share some Linux/Unix grep command examples?
Sure. The name grep means «general regular expression parser», but you can think of the grep command as a “search” command for Unix and Linux systems: It’s used to search for text strings and regular expressions within one or more files.
I think it’s easiest to learn how to use the grep command by showing examples, so let’s dive right in.
Abridged grep command examples
First up, if you don’t like reading a bunch of text and just want to see a collection of grep commands, this section is for you.
(If the Table of Contents over there on the right side is still in the way, click or tap the ‘hide’ link in its title to hide it):
That’s the short version of the grep examples. The rest of this document describes many of these examples.
Searching for a text string in one file
This first grep command example searches for all occurrences of the text string ‘fred’ within the /etc/passwd file. It will find and display all of the lines in this file that contain the text string fred , including lines that contain usernames like «fred», and also other strings like «alfred»:
In a simple example like this, the quotes around the string fred aren’t necessary, but they are needed if you’re searching for a string that contains spaces, and will also be needed when you get into using regular expressions (search patterns).
Searching for a string in multiple files
Our next grep command example searches for all occurrences of the text string joe within all files of the current directory:
The ‘*’ wildcard matches all files in the current directory, and the grep output from this command will show both (a) the matching filename and (b) all lines in all files that contain the string ‘joe’.
As a quick note, instead of searching all file with the «*» wildcard, you can also use grep to search all files in the current directory that end in the file extension .txt, like this:
Case-insensitive file searching with the Unix grep command
To perform a case-insensitive search with the grep command, just add the -i option, like this:
This grep search example matches the string «score», whether it is uppercase (SCORE), lowercase (score), or any mix of the two (Score, SCore, etc.).
Reversing the meaning of a grep search
You can reverse the meaning of a Linux grep search with the -v option. For instance, to show all the lines of my /etc/passwd file that don’t contain the string fred , I’d issue this command:
Using grep in a Unix/Linux command pipeline
The grep command is often used in a Unix/Linux pipeline. For instance, to show all the Apache httpd processes running on my Linux system, I use the grep command in a pipeline with the ps command:
This returns the following output:
(I deleted about half of the » httpd -k start » lines from that output manually to save a little space.)
Similarly, here’s how you can find all the Java processes running on your system using the ps and grep commands in a Unix pipeline:
In this example I’ve piped the output of the ps auxwww command into my grep command. The grep command only prints the lines that have the string «java» in them; all other lines from the ps command are not printed.
One way to find all the sub-directories in the current directory is to mix the Linux ls and grep commands together in a pipe, like this:
Here I’m using grep to list only those lines where the first character in the line is the letter d .
Using the Linux grep command to search for multiple patterns at one time (egrep)
You can use a different version of the grep command to search for multiple patterns at one time. To do this, just use the egrep command instead of grep, like this:
This Unix egrep command searches the file named gettysburg-address.txt for the four strings shown (score, nation, liberty, and equal). It returns any lines from the file that contain any of those words.
I should also note that «egrep» stands for «extended grep», and as you can see, it lets you do things like searching for multiple patterns at one time.
Searching for regular expressions (regex patterns) with grep
Of course the Linux grep command is much more powerful than this, and can handle very powerful regular expressions (regex patterns). In a simple example, suppose you want to search for the strings «Foo» or «Goo» in all files in the current directory. That grep command would be:
If you want to search for a sequence of three integers with grep you might use a command like this:
This next grep command searches for all occurrences of the text string fred within the /etc/passwd file, but also requires that the «f» in the name «fred» be in the first column of each record (that’s what the caret character tells grep). Using this more-advanced search, a user named «alfred» would not be matched, because the letter «a» will be in the first column:
Regular expressions can get much, much more complicated (and powerful) than this, so I’ll just leave it here for now.
Display only filenames with a grep search
If you’re looking through a lot of files for a pattern, and you just want to find the names of the files that contain your pattern (or «patterns», as shown with egrep) — but don’t want to see each individual grep pattern match — just add the -l (lowercase letter L) to your grep command, like this:
This command doesn’t show every line in every file that contains the string «StartInterval»; it just shows the names of all the files that contain this string, like this:
Of course you can also combine grep command arguments, so if you didn’t happen to know how to capitalize «StartInterval» in that previous example, you could just add the -i argument to ignore case, like this:
and that would have worked just fine as well, returning the same results as the previous grep command example.
Showing matching line numbers with Linux grep
To show the line numbers of the files that match your grep command, just add the -n option, like this:
Searching my sample gettysburg-address.txt file, I get the following output from this command:
grep before/after — Showing lines before or after your grep pattern match
After a recent comment, I just learned that you can display lines before or after your grep pattern match, which is also very cool. To display five lines before the phrase «the living» in my sample document, use the -B argument, like this:
This grep command example returns this output:
Similarly, to show the five lines after that same search phrase, use the -A argument with your Unix grep command, like this:
This grep «after» command returns the following output:
Of course you can use any number after the -A and -B options, I’m just using the number five here as an example.
Power file searching with find and grep
A lot of times I know that the string «foo» exists in a file somewhere in my directory tree, but I can’t remember where. In those cases I roll out a power command, a Linux find command that uses grep to search what it finds:
This is a special way of mixing the Linux find and grep commands together to search every file in every subdirectory of my current location. It searches for the string «foo» in every file below the current directory, in a case-insensitive manner. This find/grep command can be broken down like this:
- «.» means «look in the current directory»
- -type f means «look in files only»
- -exec grep -il foo means «search for the string ‘foo’ in a case-insensitive manner, and return the matching line and filename when a match is found
- <> \; is a little bizarre syntax that you need to add to the end of your find command whenever you add the -exec option. I try to think of it as a placeholder for the filenames the find command finds.
Note that on Mac OS X systems you may be able to use the mdfind command instead of this find/grep combination command. The mdfind command is a command-line equivalent of the Spotlight search functionality.
Related Unix/Linux grep commands and tutorials
I hope you enjoyed this Linux grep command tutorial and our grep examples.
There are at least two other commands related to grep that you should at least be aware of. The fgrep command stands for «fast grep», or «fixed strings», depending on who you talk to. The egrep command stands for «extended grep», and lets you use even more powerful regular expressions.
The strings command is good at finding printable strings in a binary file.
The locate command is more related to the find command, but I thought I would note that it is good at finding files in the entire filesystem when you know the filename, or part of the filename.
And as I mentioned in the previous section Mac OS X systems have the mdfind command. As a practical matter I use plain old grep 99% of the time.
Источник
How Do You Grep Case Sensitive?
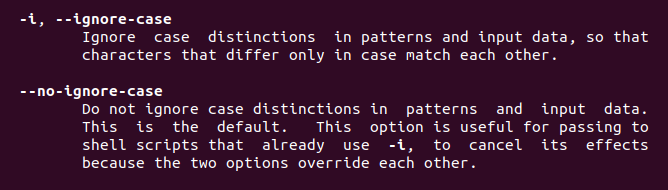
From that command, we will find two features described above. –I mean to ignore the case, wherever this keyword is used, the case affection is removed.
Prerequisite
To fulfill the accomplishment of that feature’s functionality in the Linux operating system, we need to have a Linux OS installed. After configuration, you will provide the required user information, with the help of that the user will be logged in. Furthermore, when the username and password are provided, the user will be able to access all built-in features of the operating system. Finally, once the desktop is accessed, you are required to access the terminal, as commands have to be run on it.
Example 1:
In this example, we will see how grep helps in making use of avoiding case sensitivity. Consider a file named files11.txt. The file contains the following data in it; as you can see the word mango is written in different ways, some words are in uppercase and some are in lowercase. By using the cat command we will display the data of the file.
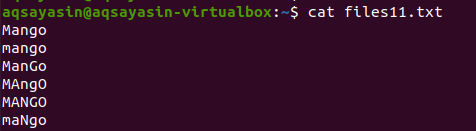
Once the command is used to display the data, it can be observed that the only word that matches the case of the letter present in the command is displayed. All letters are in lowercase.

Now to understand the concept of case insensitivity, we will use “-I” in the command to handle case-sensitivity by providing all the data present in the file, the matches with the string present inside the command.
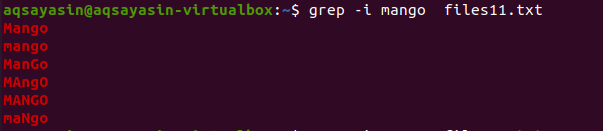
From the output, you will come to know that all data that matches the word “mango” is displayed either with some words written in uppercase and some are in lowercase.
Example 2
This example resembles the first one, the difference is that only a single word is obtained. This command helps in obtaining the whole string by matching it with the word provided in the command. Let us have a file filea.txt. as an example, we want to fetch a record according to the given match.

Now apply the same command to ignore the case and depict the output. The technical word is displayed by excluding the case to make it case-sensitive.

Example 3
Another method of using grep to ignore case is to introduce a filename first and later apply the –I command with grep following “|” operator. Cat is used in conjunction with “|”. Let us have a file named file24.txt. as an example.
This command will fetch the word “Aqsa” in both upper and lower cases.

Example 4
Moving towards another example. Here we will display the data of the file containing the word “my”. Here searching is done by introducing a directory thus command will sort the word in all files having the extension .txt in the system.
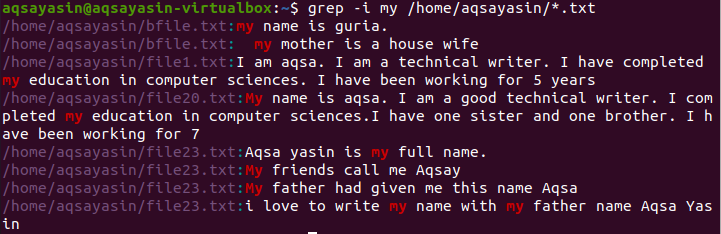
The above image shows the output obtained from the command. “my” word is highlighted, that is in both cases. Some files contain it in small letters while others have it in capital ones. The address of the files and file names are also displayed.
Example 5
This example can be applied to the directory having all files present in it. Limitations will be applied to display the specific result that matched with the word we have defined in the command. “is” word is used for searching in all files present in the system.
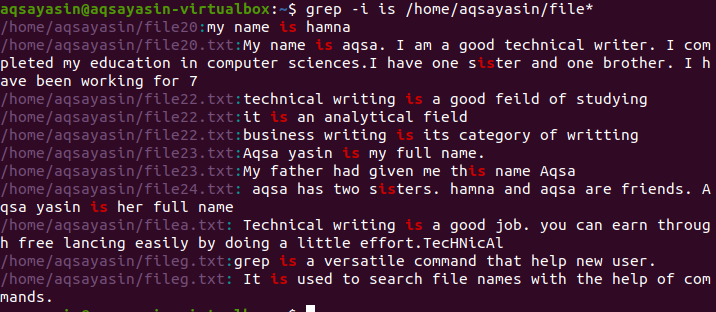
The output shows whole strings containing the matched word in it. As “is” is written separately or combined within another word i.e. sister.
Example 6
The next command shows how –iw works together in the command. Besides here, the search is through two words in a single file. The backslash and “|” are used to describe two words in a file while –w is used for the exact match of the respective word in the file.
$ grep –iw ‘hamna\ | house’ file21.txt
$ grep ‘hamn\ | house’ file21.txt

-I will ignore the case sensitivity. In the above example, we can see that the presence of –w with –I, allows a house in the first command not to be considered because –w allows the exact match. In the second command, we have removed both –iw, hence both words are displayed after matching in string.
Example 7
More than one word is searched by applying a different method. Both words are searched from the same file these words are “job” and “earn”. Earn is fetched from the word learning as well take note that each word is separated from the keyword –e.

The above image shows the whole strings in a paragraph regarding the words present in the command. Like the above examples, -I have ignored all case discrimination of the words job and earn.
Example 8
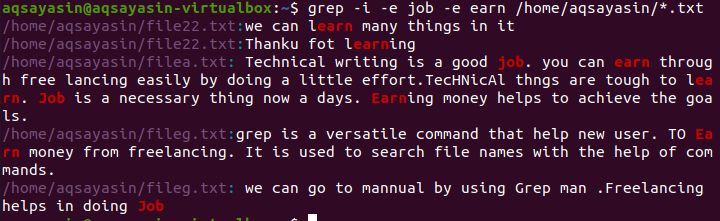
In this example, searching two words present in all files of the .txt extension. These two words are separated with –e, as –e is the right way for the separation of two words. The output obtained will have both words shown in all files of text extension. The whole address of the file is obtained and is displayed. –I will ignore the case sensitivity and will display both words present in all files.
Conclusion
In this guide, we have used the simplest example to elaborate on the concept of case sensitivity. We have tried our best to go through each aspect to enhance the knowledge regarding grep.
About the author

Aqsa Yasin
I am a self-motivated information technology professional with a passion for writing. I am a technical writer and love to write for all Linux flavors and Windows.
Источник


