- How to Check Bad Sectors or Bad Blocks on Hard Disk in Linux
- Check Bad Sectors in Linux Disks Using badblocks Tool
- Scan Bad Sectors on Linux Disk Using Smartmontools
- If You Appreciate What We Do Here On TecMint, You Should Consider:
- badblocks
- Contents
- Installation
- Storage device fidelity
- Comparisons with other programs
- Testing for bad sectors
- Read-write test (warning: destructive)
- Define specific test pattern
- Read-write test (non-destructive)
- Have filesystem incorporate bad sectors
- During filesystem check
- Before filesystem creation
- Block size
- Finding bad sectors
- Проверка жесткого диска на плохие сектора и блоки в Linux
- Проверка диска на плохие сектора с помощью утилиты badblocks
- Поиск плохих секторов в Linux Disk с помощью Smartmontools
How to Check Bad Sectors or Bad Blocks on Hard Disk in Linux
Let us start by defining a bad sector/block, it’s a section on a disk drive or flash memory that can not be read from or written to anymore, as a result of a fixed physical damage on the disk surface or failed flash memory transistors.
As bad sectors continue to accumulate, they can undesirably or destructively affect your disk drive or flash memory capacity or even lead to a possible hardware failure.
It is also important to note that the presence of bad blocks should alert you to start thinking of getting a new disk drive or simply mark the bad blocks as unusable.
Therefore, in this article, we will go through the necessary steps that can enable you determine the presence or absence of bad sectors on your Linux disk drive or flash memory using certain disk scanning utilities.
That said, below are the methods:
Check Bad Sectors in Linux Disks Using badblocks Tool
A badblocks program enables users to scan a device for bad sectors or blocks. The device can be a hard disk or an external disk drive, represented by a file such as /dev/sdc.
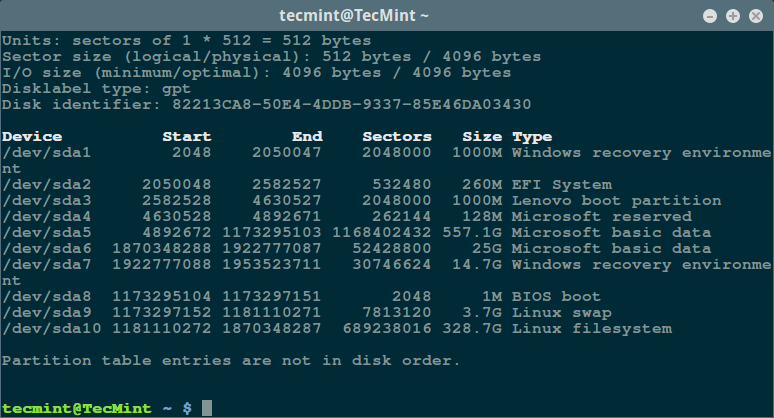
Firstly, use the fdisk command with superuser privileges to display information about all your disk drives or flash memory plus their partitions:
![]() List Linux Filesystem Partitions
List Linux Filesystem Partitions
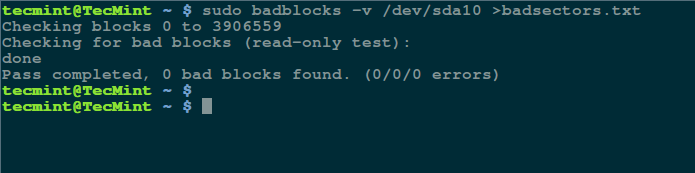
Then scan your Linux disk drive to check for bad sectors/blocks by typing:
![]() Scan Hard Disk Bad Sectors in Linux
Scan Hard Disk Bad Sectors in Linux
In the command above, badblocks is scanning device /dev/sda10 (remember to specify your actual device) with the -v enabling it to display details of the operation. In addition, the results of the operation are stored in the file badsectors.txt by means of output redirection.
In case you discover any bad sectors on your disk drive, unmount the disk and instruct the operating system not to write to the reported sectors as follows.
You will need to employ e2fsck (for ext2/ext3/ext4 file systems) or fsck command with the badsectors.txt file and the device file as in the command below.
The -l option tells the command to add the block numbers listed in the file specified by filename (badsectors.txt) to the list of bad blocks.
Scan Bad Sectors on Linux Disk Using Smartmontools
This method is more reliable and efficient for modern disks (ATA/SATA and SCSI/SAS hard drives and solid-state drives) which ship in with a S.M.A.R.T (Self-Monitoring, Analysis and Reporting Technology) system that helps detect, report and possibly log their health status, so that you can figure out any impending hardware failures.
You can install smartmontools by running the command below:
Once the installation is complete, use smartctl which controls the S.M.A.R.T system integrated into a disk. You can look through its man page or help page as follows:
Now execute the smartctrl command and name your specific device as an argument as in the following command, the flag -H or —health is included to display the SMART overall health self-assessment test result.
![]() Check Linux Hard Disk Health
Check Linux Hard Disk Health
The result above indicates that your hard disk is healthy, and may not experience hardware failures any soon.
For an overview of disk information, use the -a or —all option to print out all SMART information concerning a disk and -x or —xall which displays all SMART and non-SMART information about a disk.
In this tutorial, we covered a very important topic concerning disk drive health diagnostics, you can reach us via the feedback section below to share your thoughts or ask any questions and remember to always stay connected to Tecmint.
If You Appreciate What We Do Here On TecMint, You Should Consider:
TecMint is the fastest growing and most trusted community site for any kind of Linux Articles, Guides and Books on the web. Millions of people visit TecMint! to search or browse the thousands of published articles available FREELY to all.
If you like what you are reading, please consider buying us a coffee ( or 2 ) as a token of appreciation.

We are thankful for your never ending support.
Источник
badblocks
badblocks is a program to test storage devices for bad blocks.
S.M.A.R.T. (Self-Monitoring, Analysis, and Reporting Technology) is featured in almost every HDD still in use nowadays, and in some cases it can automatically retire defective HDD sectors. However, S.M.A.R.T. only passively waits for errors while badblocks can actively write simple patterns to every block of a device and then check them, searching for damaged areas (Just like memtest86* does with RAM).
This can be done in a destructive write-mode that effectively wipes the device (do backup!) or in non-destructive read-write (backup advisable as well!) and read-only modes.
Contents
Installation
See badblocks(8) for the usage.
Storage device fidelity
Although there is no firm rule, it is common thinking that a new drive should have zero bad sectors. Over time, bad sectors will develop and although they are able to be defined to the file system so that they are avoided, continual use of the drive will usually result in additional bad sectors forming and it is usually the harbinger of its eventual death. Replacing the device is recommended.
Comparisons with other programs
Typical recommended practice for testing a storage device for bad sectors is to use the manufacturer’s testing program. Most manufacturers have programs that do this. The main reasoning for this is that manufacturers usually have their standards built into the test programs that will tell you if the drive needs to be replaced or not. The caveat here being is that some manufacturers testing programs do not print full test results and allow a certain number of bad sectors saying only if they pass or not. Manufacturer programs, however, are generally quicker than badblocks sometimes a fair amount so.
Testing for bad sectors
To test for bad sectors in Linux the program badblocks is typically used. badblocks has several different modes to be able to detect bad sectors.
Read-write test (warning: destructive)
This test is primarily for testing new drives and is a read-write test. As the pattern is written to every accessible block, the device effectively gets wiped. The default is an extensive test with four passes using four different patterns: 0xaa (10101010), 0x55 (01010101), 0xff (11111111) and 0x00 (00000000). For some devices this will take a couple of days to complete.
-w : do a destructive write test -s : show progress -v : be «verbose» and output bad sectors detected to stdout
Additional options you might consider:
-b number : specify the block size of the hard disk which can significantly improve testing time. ( tune2fs -l partition as the root user) -p number : run through the extensive four pass test number of sequent iterations -o /path/to/output-file : print bad sectors to output-file instead of stdout -t test_pattern : Specify a pattern. See below.
Define specific test pattern
From the manpage: «The test_pattern may either be a numeric value between 0 and ULONG_MAX-1 inclusive [. ].»
 This article or section needs expansion.
Random pattern
Badblocks can be made to repeatedly write a single «random pattern» with the -t random option.
Read-write test (non-destructive)
This test is designed for devices with data already on them. A non-destructive read-write test makes a backup of the original content of a sector before testing with a single random pattern and then restoring the content from the backup. This is a single pass test and is useful as a general maintenance test.
The -n option signifies a non-destructive read-write test.
Have filesystem incorporate bad sectors
To not use bad sectors they have to be known by the filesystem.
During filesystem check
Incorporating bad sectors can be done using the filesystem check utility ( fsck ). fsck can be told to use badblocks during a check. To do a read-write (non-destructive) test and have the bad sectors made known to the filesystem run:
The -cc option tells run fsck in non-destructive test mode, the -v tells fsck to show its output, and the -k option preserves old bad sectors that were detected.
To do a read-only test (not recommended):
Before filesystem creation
Alternately, this can be done before filesystem creation.
If badblocks is run without the -o option bad sectors will only be printed to stdout.
Example output for read errors in the beginning of the disk:
For comfortably passing badblocks error output to the filesystem it has to be written to a file.
Then (re-)create the file system with the information:
From the mke2fs(8) manual page:
Note that the block numbers in the bad block list must be generated using the same block size as used by mke2fs. As a result, the -c option to mke2fs is a much simpler and less error-prone method of checking a disk for bad blocks before formatting it.
So the recommended method is to use:
Use -cc to do a read-write bad block test.
Block size
 This article or section is a candidate for merging with Securely wipe disk#Block size.
First find the file systems block size. For example for ext# filesystems:
Feed this to badblocks:
Finding bad sectors
You can use badblock to find bad sectors. Note that badblocks calls sectors «blocks». It supports a few scan modes. There is read-only mode (default) which is the least accurate. There is the destructive write-mode ( -w option) which is the most accurate but takes longer and will (obviously) destroy all data on the drive, thus making it quite useless for matching sectors up to files. There is finally the non-destructive read-write mode which is probably as accurate as the destructive mode, with the only real downside that it is probably the slowest. However, if a drive is known to be failing then read-only mode is probably still the safest.
To do a verbose ( -v option), read-only scan, run one of these commands (with x being the drive letter and y being partition number you want to scan):
Whole disk scan:
Single partition scan:
The downside to scanning the drive as a whole is that each filesystem is going to start its block count relative to the partition it is on. This means that if you have a bad block that happens to be on, let us say, the second partition, and that partition starts on block 1000, then you will have to subtract 1000 from your block number in order to get the number you want. So if a scan from the beginning of the disk results in block number 1005 being bad, then block 5 of the second partition is what you will actually be using.
Otherwise, if you have found bad blocks after doing a full scan, you can simply figure out which partitions they are on, and rescan those in order to get the block number, rather than do any block math.
Another thing to note is that badblocks defaults to 1024 byte blocks so you will either have to change the default size with the -b option in order to match your filesystem or manually convert the block number(s) later.
If you need to figure out where your partitions start and end run fdisk.
Make sure to note the block size fdisk is using so that you can convert the block counts to match your scan.
After all this, you should have the block number(s) of your bad block(s), relative to the partition they exist on.
Источник
Проверка жесткого диска на плохие сектора и блоки в Linux
Оригинал: How to Check Bad Sectors or Bad Blocks on Hard Disk in Linux
Автор: Aaron Kili
Дата публикации: 26 октября 2016 года
Перевод: А. Кривошей
Дата перевода: сентябрь 2017 г.
Плохой сектор/блок — это участок жесткого диска или флеш-памяти, который не читается или не записывается в результате физического повреждения поверхности жесткого диска или выхода из строя транзисторов флеш-памяти.
Поскольку в процессе работы жесткого диска плохие сектора накапливаются, они могут постепенно уменьшать доступную емкость вашего диска или флешки, или даже привести к их отказу.
В этой статье мы опишем, что нужно делать для того, чтобы проверить свой жесткий диск на наличие плохих секторов в Linux, с помощью специальных утилит.
Проверка диска на плохие сектора с помощью утилиты badblocks
Программа badblocks позволяет пользователю сканировать устройство на наличие плохих секторов или блоков. Устройство может быть внутренним или внешним жестким диском, представленным в виде файла вида /dev/sdc.
Сначала мы с помощью команды fdisk, запущенной от имени суперпользователя, выводим информацию о всех дисках и их разделах:
Затем запустите сканирование жесткого диска на плохие сектора/блоки с помощью команды:
В приведенной выше команде badblocks сканирует устройство /dev/sda10, опция -v указывает на вывод детальной информации о производимых действиях. Кроме того, результаты операции сохраняются в файле badsectors.txt с помощью перенаправления вывода.
В случае обнаружения плохих секторов на вашем диске отмонтируйте его и запретите операционной системе запись в эти сектора.
Для этого вам необходимо будет воспользоваться командами e2fsck (для файловых систем ext2/ext3/ext4) или fsck вместе с файлом badsectors.txt и файлом устройства, как показано ниже.
Опция -l указывает команде, что необходимо добавить номера блоков, заданные в соответствующем файле (badsectors.txt) в список плохих блоков.
Для файловых систем ext2/ext3/ext4
Для других файловых систем
Поиск плохих секторов в Linux Disk с помощью Smartmontools
Этот метод более надежен и эффективен при работе с современными дисками (ATA/SATA, SCSI/SAS, а также твердотельными накопителями), оснащенными системой S.M.A.R.T (Self-Monitoring, Analysis and Reporting Technology), которая помогает детектировать, сообщать и в некоторых случаях вести лог состояния жесткого диска.
Вы можете установить smartmontools с помощью следующих команд:
В системах на базе Debian/Ubuntu
В системах на базе RHEL/CentOS
Для контроля интегрированной в диск системы S.M.A.R.T используется утилита smartctl. Подробно ознакомиться с ее возможностями вы можете с помощью следующих команд:
Теперь введите команду smartctrl, указав в качестве аргумента название своего диска и флаг -H или —health, чтобы получить результаты тестирования диска.

Представленные выше результаты показывают, что с вашим диском все в порядке, и у него в ближайшем времени не должно быть никаких аппаратных сбоев.
Для вывода обзорной информации о состоянии диска используется опция -a или —all, при этом выводится все информация системы SMART, а при использовании опции -x или —xall выводится также информация, не относящаяся к системе SMART.
Источник


