- Как проверить работоспособность SSD/HDD в Linux
- Проверка работоспособности SSD накопителя с помощью Smartctl
- Ubuntu
- RHEL и CentOS
- FEDORA
- Проверка работоспособности SSD/HDD
- Проверка работоспособности SSD/HDD дисков с помощью Gnome
- Установка Gnome Disks
- Заключение
- Узнаём данные S.M.A.R.T. в Linux. Контроль состояния HDD или SSD
- Ubuntu Documentation
- Introduction
- Prerequisites
- Setting up
- Installation
- Checking a drive for SMART Capability
- Enabling SMART
- Testing a Drive
- Results
- Suggested application: GSmartControl
- Advanced: Running as Smartmontools as a Daemon
- Actions in case of trouble
- Personal computer
- Server
- Testing
- Utility: Checking all disks at once
- Testing drives behind MegaRAID
- Examples of SMART reports
Как проверить работоспособность SSD/HDD в Linux
SMART (Технология самоконтроля, анализа и отчетности) — это функция, включенная во все современные жесткие диски и твердотельные накопители для мониторинга и тестирования надежности. Он проверяет различные атрибуты диска, чтобы обнаружить возможность отказа диска. Существуют различные инструменты, которые доступны в Linux и Windows для выполнения интеллектуальных тестов работоспособности.
Из этой инструкции вы узнаете, как проверить работоспособность SSD/HDD в Linux с помощью CLI и GUI
Здесь объясняются два метода:
- Использование Smartctl
- Использование Gnome disk
Проверка работоспособности SSD накопителя с помощью Smartctl
Smartctl — это утилита командной строки, которая может быть использована для проверки состояния жесткого диска или SSD с поддержкой S.M.A.R.T в системе Linux.
Утилита Smartctl utility tool поставляется вместе с пакетом smartmontools.Smartmontools доступна по умолчанию во всех дистрибутивах Linux, включая Ubuntu, RHEL, Centos и Fedora.
Как установить smartmontools в Linux:
Ubuntu
$ sudo apt install smartmontools
Запустите службу с помощью следующей команды.
RHEL и CentOS
$ sudo yum install smartmontools
FEDORA
$ sudo dnf install smartmontools
Служба Smartd запустится автоматически после успешной установки.
Если вдруг Smartd не запустился, сделать это можно командой:
Проверка работоспособности SSD/HDD
Чтобы проверить общее состояние введите команду:
Опишу команды подробнее:
d – Указывает тип устройства.
ata – тип устройства ATA, используйте scsi для типа устройства SCSI.
H – Проверяет устройство, чтобы сообщить о его состоянии и работоспособности.
 Проверка общего состояния
Полученный результат указывает на то, что диск исправен. Если устройство сообщает о неисправном состоянии работоспособности, это означает, что устройство уже вышло из строя или может выйти из строя очень скоро.
Это указывает на неудачное использование и появляется возможность получить дополнительную информацию.
Вы можете увидеть следующие атрибуты:
[ID 5] Reallocated Sectors Count – Количество секторов, перераспределенных из-за ошибок чтения.
[ID 187] Reported Uncorrect – Количество неисправимых ошибок при доступе к сектору чтения/записи.
[ID 230] Индикатор износа носителя – Текущее состояние работы диска на основе срока службы.
Если вы видите 100 — это лучшее значение. А если видите 0 — это ХУДШЕЕ значение.
Дополнительные сведения см. в разделе Сведения о интеллектуальных атрибутах.
Чтобы инициировать расширенный тест (long), выполните следующую команду:
Чтобы выполнить самотестирование, введите команду:
Чтобы найти результат самопроверки диска, используйте эту команду.
Чтобы оценить время выполнения теста, выполните следующую команду.
Вы можете распечатать журналы ошибок диска с помощью команды:
Проверка работоспособности SSD/HDD дисков с помощью Gnome
С помощью утилиты GNOME disks вы можете получить информацию о ваших SSD-дисков. Можете отформатировать диски, создать образ диска, выполнить стандартные тесты SSD-дисков и восстановить образ диска.
Установка Gnome Disks
В Ubuntu 20.04 приложение GNOME поставляется с установленным инструментом GNOME disk. Если вы не можете найти инструмент, используйте следующую команду для его установки.
$ sudo apt-get install gnome-disk-utility
GNOME Disk теперь установлен, далее вы можете перейти в меню рабочего стола и запустить его. Из приложения вы можете просмотреть все подключенные диски. А также можете использовать следующую команду для запуска приложения GNOME Disk.
Для того чтоб выполнить тест, запустите GNOME disks и выберите диск, который вы хотите протестировать. Вы можете найти быструю оценку дисков, таких как размер, разделение, серийный номер, температура и работоспособность. Нажмите на значок шестеренки и выберите SMART Data & Self-tests.
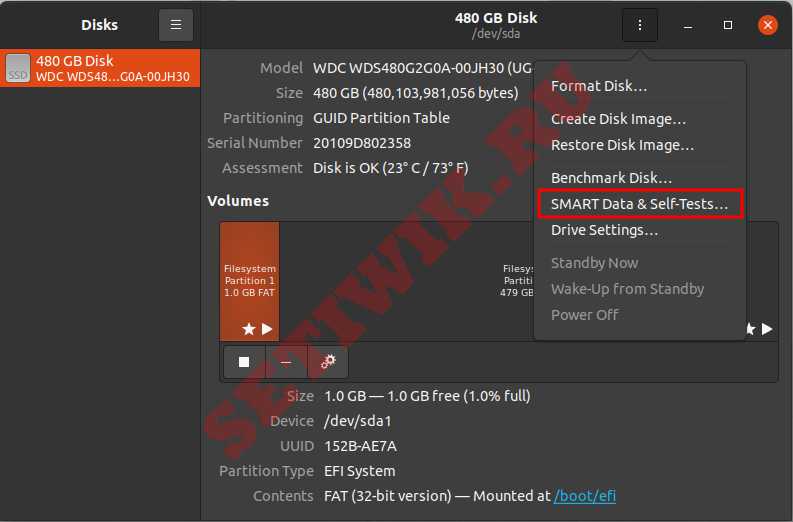 GNOME disks данные и самопроверки
В новом окне вы можете найти результаты последнего теста. В правом верхнем углу окна вы можете обнаружить, что интеллектуальная опция включена. Если SMART отключен, его можно включить, нажав на ползунок. Чтобы начать новый тест, нажмите на кнопку Начать тестирование.
 GNOME disks работает самотестирование
Как только будет нажата кнопка Начать Тестирование, появится выпадающее меню для выбора типа тестов:
- Короткие
- Расширенные
- Транспортировочные.
Выберите тип теста и введите свой пароль sudo. На индикаторе прогресса можно увидеть процент завершения теста.
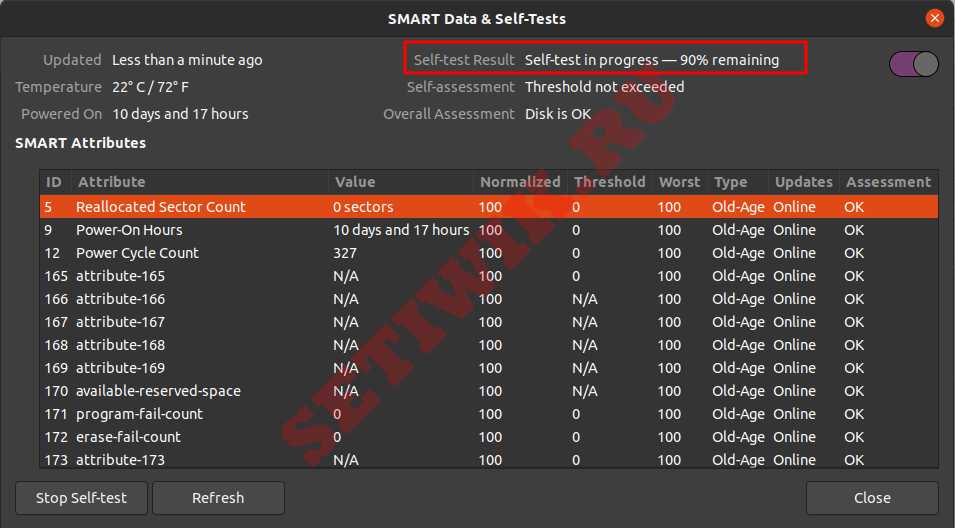 Результат самопроверки
Заключение
В этой инструкции я объяснил основную концепцию технологии S. M. A. R. T,. Кроме того, я рассказал о том, как установить утилиту командной строки smartctl компьютер с Linux и как ее можно использовать для мониторинга работоспособности жестких дисков. У вас также есть представление о утилите GNOME Disks utility tool для мониторинга SSD-накопителей. Надеюсь, что эта статья поможет вам контролировать ваши SSD-диски с помощью утилиты smartctl и GNOME Disks.
Источник
Узнаём данные S.M.A.R.T. в Linux. Контроль состояния HDD или SSD
Дата добавления: 07 июля 2012

S.M.A.R.T. (Self-Monitoring, Analisys and Reporting Technology) — это технология, предоставляющая пользователю различные данные о текущем состоянии жесткого диска или твердотельного накопителя. Анализируя данные S.M.A.R.T., пользователь может оценить состояние своих накопителей и решить, требуют ли они замены или ещё смогут работать долго и без сбоев.
Консольный способ: smartmontools
Узнать данные S.M.A.R.T. в чистом виде нам поможет утилита под названием smartmontools .
Приведем пример установки для дистрибутивов на основе Debian:
Количество атрибутов может отличаться в зависимости от модели диска.
В этой таблице нам нужно смотреть на значение поля RAW_VALUE для нужного атрибута. Именно оно показывает текущее значение атрибута.
Наиболее важные показатели:
Raw_Read_Error_Rate — количество ошибок чтения. Ненулевое значение должно сильно насторожить, а большие значение и вовсе говорят о скором выходе диска из строя. Известно, что на дисках Seagate, Samsung (семейства F1 и более новые) и Fujitsu 2,5? большое значение в этом поле является нормальным. Для остальных же дисков в идеале значение должно быть равно нулю;
Spin_Up_Time — время раскрутки диска. Измеряется в миллисекундах т.е. в моём случае это 1.3 секунды. Чем меньше — тем лучше. Большие значения говорят о низкой отзывчивости;
Start_Stop_Count — количество циклом запуска/остановки шпинделя;
Reallocated_Sector_Ct — количество перераспределённых секторов. Большое значение говорит о большом количестве ошибок диска;
Seek_Error_Rate — количество ошибок позиционирования. Большое значение говорит о плохом состоянии диска;
Power_On_Hours — количество наработанных часов во включённом состоянии. По нему можно узнать сколько проработал диск во включённом состоянии. Довольно полезно, например, если покупать ноутбук с витрины и хочется узнать долго ли он там стоял;
Power_Cycle_Count — количество включений/выключений диска;
Spin_Retry_Count — количество попыток повторной раскрутки. Большое значение говорит о плохом состоянии диска;
Temperature_Celsius — температура диска в градусах Цельсия. При слишком высокой температуре диски могут быстрее выйти из строя;
Reallocated_Event_Count — количество операций перераспределения секторов;
Offline_Uncorrectable — количество неисправных секторов. Большое значение говорит о повреждённой поверхности.
Более наглядный графический способ: gnome-disk-utility
В графическом варианте и с описанием атрибутов, данные SMART представляет программа gnome-disk-utility . В русской локализации в меню она называется как «дисковая утилита». В английской локализации известна как «Disks».
Пример установки для дистрибутивов на основе Debian:
Запускаем программу. 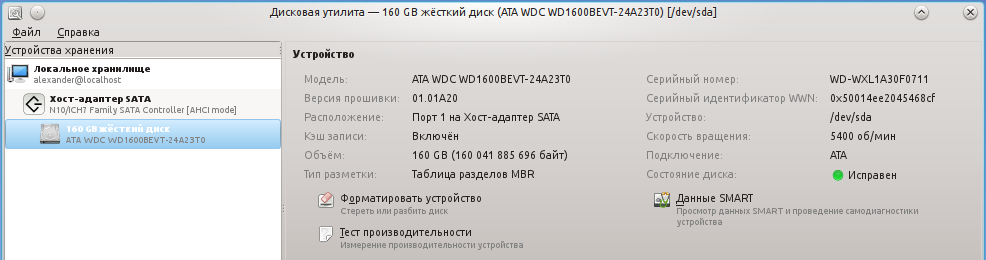
В поле «состояние диска» уже можно увидеть оценку состояния диска на основе данных S.M.A.R.T. Чтобы увидеть значение конкретных атрибутов нажимаем на кнопку «Данные SMART»: 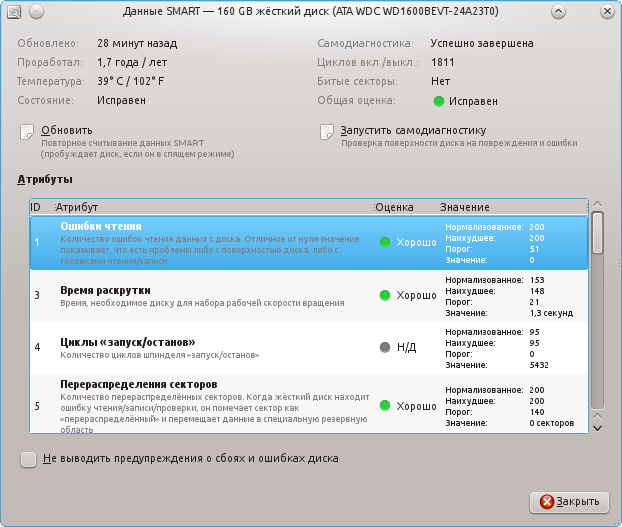
Пример данных о SSD (Твёрдотельном накопителе): 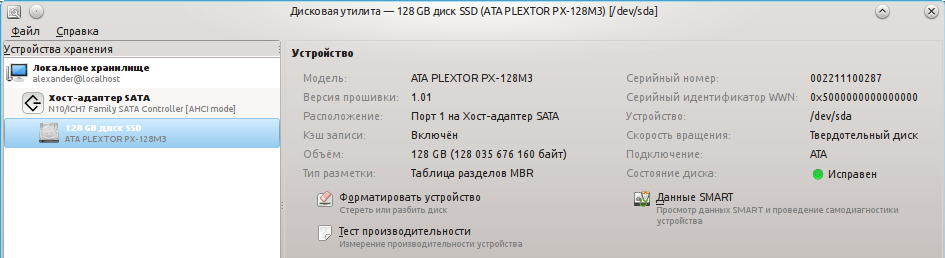
S.M.A.R.T.: 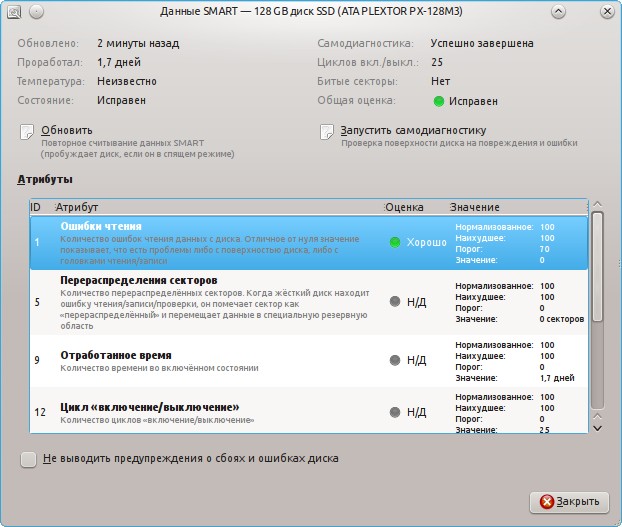
Здесь всё понятно и наглядно. Также присутствует описание атрибутов и оценка их показаний. Проблемные значения будут выделены красным цветом.
Источник
Ubuntu Documentation
Introduction
Smartmontools is a set of applications that can test hard drives and read their hardware SMART statistics. Note: SMART data may not accurately predict future drive failure, however abnormal error rates may be an indication of possible hardware failure or data inconsistency.
This how to will help you to configure Smartmontools to do actions such as shut down the computer or send an e-mail when the disk is going to fail.
Prerequisites
- A modern S.M.A.R.T. capable hard disk
Setting up
Installation
You can install the smartmontools package from the Synaptic Package Manager (see SynapticHowto), or by typing the following into the terminal:
Checking a drive for SMART Capability
To ensure that your drive supports SMART, type:
where /dev/sda is your hard drive. This will give you brief information about your drive. The last two lines may look something like this:
Enabling SMART
In the case that SMART is not enabled for your drive, you can enable it by typing:
Testing a Drive
You may run any type of test while the drive is mounted although there may be some drop in performance. There are three types of test that can be conducted on a drive:
- Short
- Extended (Long)
- Conveyance
To find an estimate of the time it takes to conduct each test, type:
The most useful test is the extended test (long). You can initiate the test by typing:
Results
You can view a drive’s test statistics by typing:
To display detailed SMART information for an IDE drive, type:
To display detailed SMART information for a SATA drive, type:
Note: This also works for IDE drives in new kernels that are being run through the SCSI stack and show up as /dev/sdX
Suggested application: GSmartControl
Take a look at GSmartControl. It’s a nice graphical frontend to smartctl; it shows all SMART values, and highlights those that indicate old age or impending failure, plus you may run tests on demand:


As usual, you may install it from Synaptic or running sudo apt-get install gsmartcontrol.
Advanced: Running as Smartmontools as a Daemon
You can run Smartmontools in the background and have it check drives and email when there are issues:
Open the file /etc/default/smartmontools with your favourite text editor. For example (using vim): sudo vim /etc/default/smartmontools. Uncomment the line start_smartd=yes.
How smartd is going to scan the disks and what it will do in case of errors is controlled by the daemon configuration file, /etc/smartd.conf. Again, use your favourite text editor to open this file. There should be one uncommented line, similar to:
In this example (which is the default for Karmic), smartd will:
scan for all ATA/SCSI devices (DEVICESCAN). The rest of the file will be ignored;
mail a report to the ‘root’ account in case of trouble (-m);
but instead of the mail command, it will execute /usr/share/smartmontools/smartd-runner and feed the report to it (-M exec program).
/usr/share/smartmontools/smartd-runner is a script that basically saves the report to a temporary file, and then runs anything it finds in /etc/smartmontools/run.d/; take a look there to understand what you already have (there should be a script that mails the report).
There are several -M directives that change when and how often reports are sent. You need to specify (-m something) in order to use them, even if you’re not sending any mail.
You may include some useful options:
In this example, smartd will:
check the SMART health status (-H);
report increases in both SMART error logs (-l);
check for failure of any Usage Attributes (-f);
schedule an Offline Immediate Test every Friday at 11 am, a Long Self-Test every Friday at 1 pm, and a Conveyance Self-Test every Friday at 3 pm (-s) — see the smartd manual page for what these tests do so you can choose what suits you.
You may also replace DEVICESCAN with the path of the device which you’d like to be monitored (e.g. /dev/sda), and the daemon will only monitor this drive. You’ll need one such line for each device.
Actions in case of trouble
You’ll want to configure the actions smartd will take in case of trouble. If all you want is a notification shown on your desktop, skip to «Personal computer» below.
Most of the time, you only need to place a script in /etc/smartmontools/run.d/. Whenever smartd wants to send a report, it will execute smart-runner and the latter will run your script.
You have several variables available to your script (again, see the smartd manpage). These come from a test run:
Your script also has a temporary copy of the report available as «$1». It will be deleted after you finish but the same content is written to /var/log/syslog.
Personal computer
For a visual notification, you may just install smart-notifier. You will see a large popup with the report:

Alternatively, you may create a custom notification (bubble) as seen in other GNOME programs.
You will need to install the libnotify-bin package:
Now create a text file called 60notify in /etc/smartmontools/run.d:
and add the following to the file:
(The DISPLAY=:0.0 part is a variable assignment that helps programs to locate your X server. It’s already set for your terminal, but the script lacks it since it is being run inside a different session).
Now give it execute permissions:
This will produce a nice libnotify bubble with a warning icon:

You may also experiment with Zenity:
Notice: Be very careful with these scripts as they are run under the root account.
Server
Here, you may wish to handle things differently. In this example we want to mail an admin and shut down the server. Comment out the line that contains DEVICESCAN, by adding # to the beginning of the line. Then, add this to the end of the file:
(Be sure not to add any whitespace after the «\»)
Now, we are going to make the script which is going to shut down the computer *after* we mail the admin. Create a text file called 99shutdown in /etc/smartmontools/run.d and add the following to the file:
The number 99 at the start of the filename is to ensure that it is called last when smartd-runner runs. It will wait 40 seconds and then shut down the computer. Of course, you may customize this at will; you may not wish to turn off the server.
Now, it is time to start the daemon:
Testing
If you want to test all these actions, add -M test after exec /usr/share/smartmontools/smartd-runner and restart the daemon (sudo service smartmontools restart). When the daemon comes up, it will execute the script immediately with a test message. Notice: If you included the shutdown -h line, the script will shut down the computer as soon as the service starts. To fix this, you will have to start the computer in recovery mode and remove the -M test option from /etc/smartd.conf.
Before running this, be sure to check that you have a «mail» command, and do a test first to your address. On my default Fiesty:
The program ‘mail’ can be found in the following packages:
- mailx
- mailutils
Try: sudo apt-get install
Make sure you have the ‘universe’ component enabled
bash: mail: command not found
Utility: Checking all disks at once
Note: Following the Gentoo Wiki I made a modified script which checks all the disk in /dev/disk/by-id/ Just invoke the script below as follows:
The script creates a directory named smart-logs and stores all the files there.
(Remember to give execute permissions to the script with chmod +x smart.sh).
Testing drives behind MegaRAID
If /dev/sda is a MegaRAID device then straightforward execution of smartctl on it is not effective. It just returns an empty report for the controller itself. To get S.M.A.R.T. attributes of a drive behind the RAID controller you need to use the following command:
Examples of SMART reports
See large collection of smartctl reports for various hard drives here.
Smartmontools (последним исправлял пользователь linuxhw 2019-12-24 11:07:49)
The material on this wiki is available under a free license, see Copyright / License for details
You can contribute to this wiki, see Wiki Guide for details
Источник


