- Как я могу указать IP и порты для имени хоста в файле хостов Windows?
- Сценарий типичной проблемы
- Возможное решение
- обзор
- действия
- Ссылки на ресурсы:
- 👠 КАК настроить файлы /ETC/HOSTS И /ETC/NSSWITCH.CONF
- РАЗРЕШЕНИЕ ДОМЕННОГО ИМЕНИ В LINUX
- КОНФИГУРАЦИЯ ФАЙЛА HOSTS В LINUX
- Файл hosts в Linux
- Разрешение доменных имён в Linux
- Настройка файла hosts в Linux
- Выводы
- ChapterВ 1В Configuring the System’s Network
- 1.1В About Network Interface Names
- 1.2В About Network Interface Names
- 1.3В About Network Configuration Files
- 1.3.1В About the /etc/hosts File
- 1.3.2В About the /etc/nsswitch.conf File
- 1.3.3В About the /etc/resolv.conf File
- 1.3.4В About the /etc/sysconfig/network File
- 1.4В Command-Line Network Configuration Interfaces
- 1.5В Configuring Network Interfaces Using Graphical Interfaces
- 1.6В About Network Interface Bonding
- 1.6.1В Configuring Network Interface Bonding
- 1.7В About Network Interface Teaming
- 1.7.1В Configuring Network Interface Teaming
- 1.7.2В Adding Ports to and Removing Ports from a Team
- 1.7.3В Changing the Configuration of a Port in a Team
- 1.7.4В Removing a Team
- 1.7.5В Displaying Information About Teams
- 1.8В Configuring VLANs with Untagged Data Frames
- 1.8.1В Using the ip Command to Create VLAN Devices
- 1.9В Configuring Network Routing
Как я могу указать IP и порты для имени хоста в файле хостов Windows?
Я хочу указать имена хостов с двумя разными портами в hosts файле Windows .
Есть ли способ сделать это? Или это не разрешено самой Windows?
Я трачу свое время на поиски решения в течение последних 8 часов.
Можно ли указать порты в файле хоста hosts ? Например: 127.0.0.1:80 и 127.0.0.1:9211
Просто используйте IP-адреса без портов. Пример:
Затем для доступа к 192.168.2.50:5555 из вашего браузера (или другой программы):
hosts Файл можно найти по адресу:
Linux /etc/hosts
Windows : C:\Windows\System32\drivers\etc\hosts
Вы не можете связать номер порта с именем хоста, сопоставленным с IP в файле hosts. Вы можете достичь этого с помощью Fiddler, используя FiddlerScript:
- hosts Файл только для разрешения имен
- Браузер , при отсутствии непосредственно с указанием порта: то есть :
, по умолчанию порт 80
Сценарий типичной проблемы
- приложения обычно устанавливают свои серверы на тот же адрес IP по умолчанию 127.0.0.1 ака localhost (определенного в файле хостов) .
чтобы избежать коллизий между, возможно, другими существующими / работающими серверами, приложение, как правило, позволяет изменить порт, но не IP-адрес.
2а. Если бы вы могли изменить ip-адрес сервера на другой в зарезервированном адресном пространстве loopback 127.0.0.0/8 , вы, вероятно, не пытались бы устанавливать порты в файле hosts.
Возможное решение
Вы можете обойти это, используя Windows Networking Network netsh в качестве прокси порта.
обзор
действия
- Запустите свой сервер на localhost:8081
- Добавьте «локальный DNS» в файл hosts в качестве новой строки
- 127.65.43.21 example.app
- Любой свободный адрес в сети 127.0.0.0/8 может быть использован.
- Примечание: я предполагаю, 127.65.43.21:80 что не занят другой службой.
- Вы можете проверить с netstat -a -n -p TCP | grep «LISTENING»
- 127.65.43.21 example.app
- добавьте следующую конфигурацию сети с помощью утилиты netsh
- netsh interface portproxy add v4tov4 listenport=80 listenaddress=127.65.43.21 connectport=8081 connectaddress=127.0.0.1
- Доступ к серверу по адресу http://example.app
Примечания:
— Эти команды / изменения файла должны выполняться с правами администратора.
— netsh portproxy нуждается в библиотеках ipv6 даже только для использования v4tov4, обычно они также будут включены по умолчанию, в противном случае установите их с помощью следующей команды: netsh interface ipv6 install
Вы можете увидеть запись, которую вы добавили с помощью команды:
netsh interface portproxy show v4tov4
Вы можете удалить запись с помощью следующей команды:
netsh interface portproxy delete v4tov4 listenport=80 listenaddress=127.65.43.21
Ссылки на ресурсы:
Примечание: этот ответ является дублированием моего ответа, который обсуждался в этом аналогичном вопросе / ответе по stackoverflow.
Источник
👠 КАК настроить файлы /ETC/HOSTS И /ETC/NSSWITCH.CONF

DNS (система доменных имен) используется для определения того, какой IP принадлежит требуемому домену в Интернете.
Когда программе требуется доступ к сайту по ее доменному имени, операционная система отправляет запрос на DNS-сервер, чтобы выяснить, с какого IP-адреса пересылать пакеты.
Но это не всегда так.
Например, когда мы получаем доступ к домену localhost, запрос всегда отправляется на наш локальный компьютер.
Вся причина в файлах хостов.
Если вы использовали Windows раньше, вы, вероятно, уже слышали о таком файле.
Там его чаще всего использовали для быстрого блокирования доступа к ресурсу.
Но его применение намного шире.
В этой статье мы рассмотрим, как настроить файл hosts в Linux, а также какие функции он нам предоставляет.
РАЗРЕШЕНИЕ ДОМЕННОГО ИМЕНИ В LINUX
Прежде чем перейти к самому файлу hosts, вам необходимо выяснить, как найти IP-адрес для доменного имени в Linux.
Я сказал, что операционная система немедленно отправляет запрос на DNS-сервер, но это не совсем так.
Существует определенный порядок поиска, в соответствии с которым он выполняется.
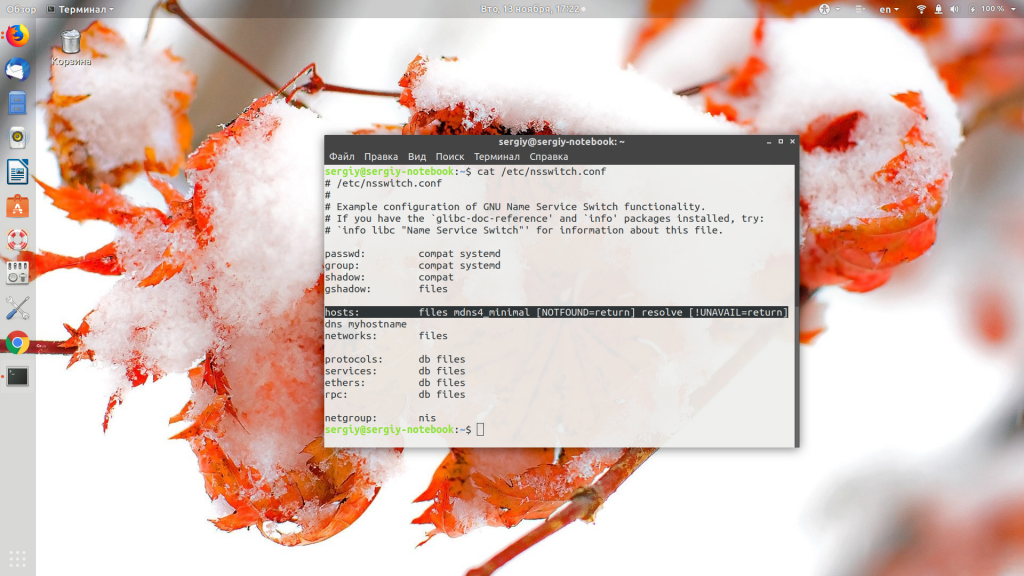
Этот порядок устанавливается в файле конфигурации /etc/nsswitch.conf.
Здесь нас интересует строка hosts.
В ней перечислены службы в порядке приоритета, которые используются для поиска IP-адреса для доменного имени.
Столбец «files» означает использование файла /etc/hosts, а «dns» означает использование службы доменных имен.
Если «files» расположены перед «dns», это означает, что система сначала попытается найти домен в /etc/hosts, а затем – по DNS.
Это конфигурация по умолчанию.
КОНФИГУРАЦИЯ ФАЙЛА HOSTS В LINUX
Файл hosts находится в каталоге /etc/.
Чтобы открыть его, вы можете использовать любой текстовый редактор как в командной строке, так и в графическом интерфейсе, нам нужно только открыть его с привилегиями суперпользователя.
Например, используя vim:
Синтаксис файла довольно прост.
Он содержит несколько строк с доменными именами и IP-адресами, которые вам нужно использовать.
Каждая из них выглядит так:
IP_ADDRESS domain alias
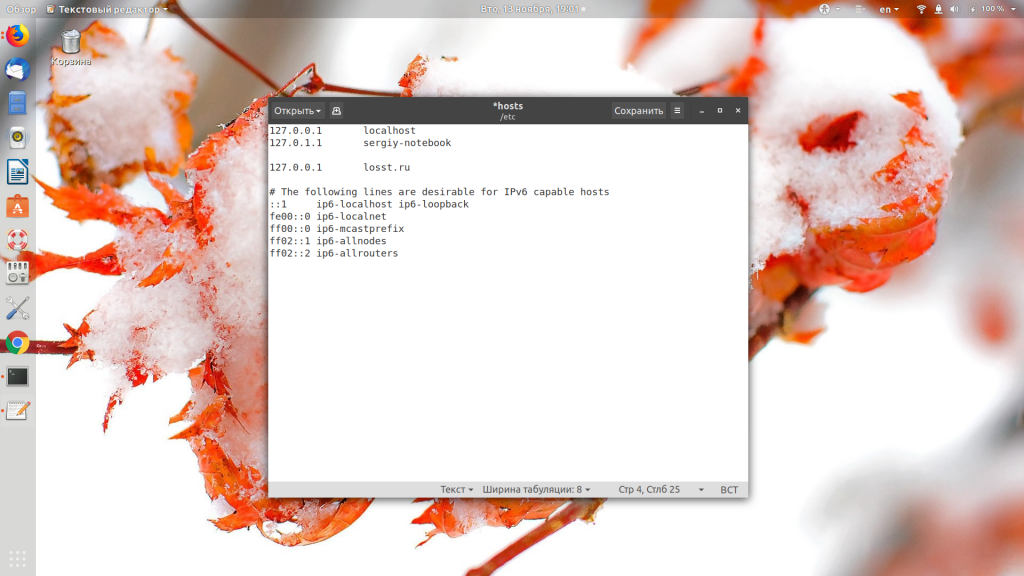
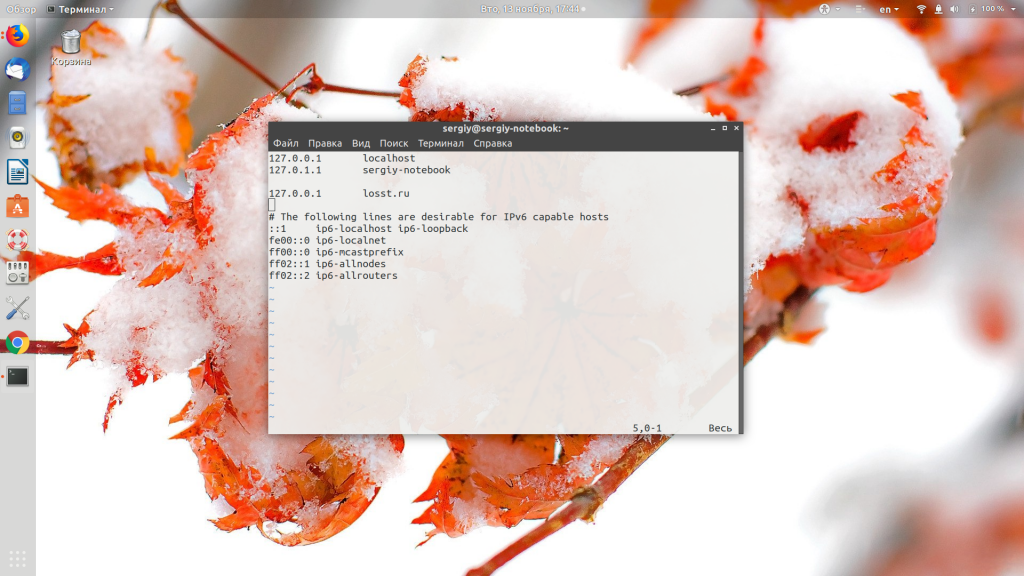
Обычно первая строка содержит правило для перенаправления всех запросов в домен localhost на локальный IP-адрес – 127.0.0.1.
Также в этом файле по умолчанию перенаправления размещаются для имени вашего компьютера и для адресов IPv6.
Вы можете создать свои собственные настройки для любого желаемого домена.
Для этого добавьте строку в конец файла.
Например, мы будем направлять все запросы в домен itisgood.ru по ip 127.0.0.1:
Обратите внимание, что здесь указан только домен, без протокола.
Вам не нужно указывать префикс http или https, иначе он не будет работать.
Но для субдомена www вам нужно создать отдельную запись или написать ее как псевдоним.
Теперь, когда вы запросите домен itisgood.ru, откроется наш локальный IP.
Чтобы вернуть доступ к исходному ресурсу, просто удалите добавленную строку.
Вы можете использовать не только локальный адрес, но и любой другой.
Это очень удобно, если вы только что зарегистрировали домен, а доменная зона еще не была обновлена, и вы уже хотите работать с новым сайтом.
Просто добавьте данные в /etc/hosts и работайте как обычно.
В этой небольшой статье мы рассмотрели настройку DNS через файл hosts в Linux.
Как видите, с его помощью вы можете заблокировать доступ к нежелательным ресурсам, например, к которым программы не должны получать доступ.
Источник
Файл hosts в Linux
Система доменных имен DNS используется для определения, какой IP принадлежит к нужному домену в сети интернет. Когда какой-либо программе понадобится обратиться к сайту по его доменному имени, операционная система отправляет к DNS-серверу запрос, чтобы узнать, по какому IP ей дальше передавать пакеты. Но так происходит не всегда. Например, когда мы обращаемся к домену localhost, то всегда запрос отправляется нашему локальному компьютеру.
Всему причиной файл hosts. Если вы раньше пользовались Windows, то, наверное, уже слышали о таком файле. Там чаще всего он использовался для того, чтобы быстро заблокировать доступ к какому-либо ресурсу. Но применение его гораздо шире. В этой статье мы рассмотрим, как настроить файл hosts в Linux, а также какие возможности он нам предоставляет.
Разрешение доменных имён в Linux
Прежде чем мы перейдём к самому файлу hosts, нужно разобраться, как происходит поиск IP-адреса для доменного имени в Linux. Я говорил, что операционная система сразу же отправляет запрос DNS-серверу, но это не совсем так. Существует определённый порядок поиска, согласно которому он выполняется. Этот порядок установлен в конфигурационном файле /etc/nsswitch.conf
Здесь нас интересует строчка hosts. В ней в порядке очередности записаны службы, которые используются для поиска IP-адреса для доменного имени. Пункт files означает использование файла /etc/hosts, а dns — сервиса доменных имён интернета. Если files расположена перед hosts, это означает, что сначала система попытается найти домен в /etc/hosts, а уже потом по DNS. По умолчанию дело обстоит именно так.
Настройка файла hosts в Linux
Нужный нам файл находится в директории /etc/. Для его открытия можно использовать любой текстовый редактор как в командной строке, так и в графическом интерфейсе, только открывать его нужно с правами суперпользователя. Например, с помощью vim:
sudo vi /etc/hosts
sudo gedit /etc/hosts
Синтаксис файла довольно простой. В нём находится несколько строчек с доменными именами и IP-адресами, которые нужно для них использовать. Каждая из них выглядит вот так:
ip_адрес домен алиас
Обычно первая же строчка создаёт правило для перенаправления всех запросов к домену localhost на локальный IP-адрес — 127.0.0.1:
Также в этом файле по умолчанию размещаются перенаправления для имени вашего компьютера и для IPv6-адресов. Вы можете создать свои настройки для любого нужного домена. Для этого нужно добавить строчку в конец файла. Например, направим все запросы к домену losst.ru на ip 127.0.0.1:
Обратите внимание, что здесь указывается только домен, без протокола. Префикс http или https указывать не нужно, иначе ничего работать не будет. А вот для поддомена www нужно создавать отдельную запись или записывать его в виде алиаса. Например:
127.0.0.1 losst.ru www.losst.ru

Теперь при запросе домена losst.ru будет открываться наш локальный IP. Чтобы вернуть доступ к оригинальному ресурсу, достаточно убрать добавленную строчку. Но вы можете использовать не только локальный адрес, но и любой другой. Это очень удобно, если вы только зарегистрировали домен и доменная зона ещё не успела обновиться, а вы уже хотите работать с новым сайтом. Просто добавьте данные в /etc/hosts и работайте как обычно.
Выводы
В этой небольшой статье мы разобрали, как выполняется настройка DNS через файл hosts Linux. Как видите, с его помощью вы можете блокировать доступ к нежелательным ресурсам, например, к которым программы не должны получить доступ, а также использовать его в работе веб-мастера.
Источник
ChapterВ 1В Configuring the System’s Network
This chapter describes how to configure a system’s network interfaces and network routing.
1.1В About Network Interface Names
Each physical and virtual network device on an Oracle Linux system has an associated configuration file named ifcfg- interface in the /etc/sysconfig/network-scripts directory, where interface is the name of the interface. For example:
In this example, there are two configuration files for motherboard-based Ethernet interfaces, ifcfg-em1 and ifcfg-em2 , and one for the loopback interface, ifcfg-lo . The system reads the configuration files at boot time to configure the network interfaces.
On your system, you might see other names for network interfaces. See Section 1.2, “About Network Interface Names”.
The following are sample entries from an ifcfg-em1 file for a network interface that obtains its IP address using the Dynamic Host Configuration Protocol (DHCP):
If the interface is configured with a static IP address, the file contains entries such as the following:
The following configuration parameters are typically used in interface configuration files:
How the interface obtains its IP address:
Bootstrap Protocol (BOOTP).
Dynamic Host Configuration Protocol (DHCP).
Statically configured IP address.
IPv4 broadcast address.
Whether this interface is the default route.
Name of the physical network interface device (or a PPP logical device).
IPv4 gateway address for the interface. As an interface can be associated with several combinations of IP address, network mask prefix length, and gateway address, these are numbered starting from 0.
Media access control (MAC) address of an Ethernet device.
IPv4 address of the interface.
Whether the device is disabled if IPv4 configuration fails.
IPv6 gateway address for the interface. For example: IPV6_DEFAULTGW=2001:0daa::2%em1 .
Whether the device is disabled if IPv6 configuration fails.
IPv6 address of the interface in CIDR notation, including the network mask prefix length. For example: IPV6ADDR=»2001:0db8:1e11:115b::1/32″
Whether to enable IPv6 for the interface.
Specifies the name of the primary bonded interface, of which this interface is backup.
Name of the interface as displayed in the Network Connections GUI.
IPV4 address of the network.
Whether the network interface device is controlled by the network management daemon, NetworkManager .
Whether the interface is activated at boot time.
Whether the /etc/resolv.conf file used for DNS resolution contains information obtained from the DHCP server.
Whether the information for the routing table entry that defines the default gateway for the interface is obtained from the DHCP server.
Length of the IPv4 network mask prefix for the interface.
Specifies that this interface is a backup of a bonded interface.
Whether users other than root can control the state of this interface.
Universally unique identifier for the network interface device.
1.2В About Network Interface Names
Network interface names are based on information derived from the system BIOS or alternatively from a device’s firmware, system path, or MAC address. This feature ensures that interface names persist across system reboots, hardware reconfiguration, and updates to device drivers and the kernel.
If you enable the biosdevname boot option ( biosdevname=1 ), the biosdevname plugin to the udev device manager assigns names to network interfaces as follows:
Ethernet interfaces on the motherboard are named em N , where N is the number of the interface starting from 1.
Network interfaces on a PCI card are named p S p P , where S is the slot number and P is the port number.
Virtual interfaces are named p S p P _ V , where S is the slot number, P is the port number, and V is the virtual interface number.
If biosdevname is set to 0 (the default), systemd naming assigns the prefixes, en , wl , and ww to Ethernet, wireless LAN, and wireless WAN interfaces respectively. The prefix is followed by a suffix based on the hardware configuration, system bus configuration, or MAC address of the device:
Onboard device with index number N .
PCI device with bus number B , slot number S , function number F , and device ID D .
USB device with bus number B , slot number S , function number F , port number P , configuration number C , and interface number I .
Hot-plug device with slot number S , function number F , and device ID D .
Device with MAC address M .
For example, an Ethernet port on the motherboard might be named eno1 or em1 , depending on whether the value of biosdevname is 0 or 1.
The kernel assigns a legacy, unpredictable network interface name ( eth N and wlan N ) only if it cannot discover any information about the device that would allow it to disambiguate the device from other such devices. You can use the net.ifnames=0 boot parameter to reinstate the legacy naming scheme.
Using the net.ifnames or biosdevname boot parameters to change the naming scheme can rendering existing firewall rules invalid. Changing the naming scheme can also affect other software that refers to network interface names.
1.3В About Network Configuration Files
The following sections describe additional network configuration files that you might need to configure on a system.
1.3.1В About the /etc/hosts File
The /etc/hosts file associates host names with IP addresses. It allows the system to look up ( resolve ) the IP address of a host given its name, or the name given the IP address. Most networks use DNS (Domain Name Service) to perform address or name resolution. Even if your network uses DNS, it is usual to include lines in this file that specify the IPv4 and IPv6 addresses of the loopback device, for example:
The first and second column contains the IP address and host name. Additional columns contain aliases for the host name.
For more information, see the hosts(5) manual page.
1.3.2В About the /etc/nsswitch.conf File
The /etc/nsswitch.conf file configures how the system uses various databases and name resolution mechanisms. The first field of entries in this file identifies the name of the database. The second field defines a list of resolution mechanisms in the order in which the system attempts to resolve queries on the database.
The following example hosts definition from /etc/nsswitch.conf indicates that the system first attempts to resolve host names and IP addresses by querying files (that is, /etc/hosts ) and, if that fails, next by querying a DNS server, and last of all, by querying NIS+ (NIS version 3) :
For more information, see the nsswitch.conf(5) manual page.
1.3.3В About the /etc/resolv.conf File
The /etc/resolv.conf file defines how the system uses DNS to resolve host names and IP addresses. This file usually contains a line specifying the search domains and up to three lines that specify the IP addresses of DNS server. The following entries from /etc/resolv.conf configure two search domains and three DNS servers:
If your system obtains its IP address from a DHCP server, it is usual for the system to configure the contents of this file with information also obtained using DHCP.
For more information, see the resolv.conf(5) manual page.
1.3.4В About the /etc/sysconfig/network File
The /etc/sysconfig/network file specifies additional information that is valid to all network interfaces on the system. The following entries from /etc/sysconfig/network define that IPv4 networking is enabled, IPv6 networking is not enabled, the host name of the system, and the IP address of the default network gateway:
In previous releases of Oracle Linux, the host name of the system was defined in /etc/sysconfig/network . The host name is now defined in /etc/hostname and can be changed by using the hostnamectl command. The host name must be a fully qualified domain name (FQDN), for example, host20.mydomain.com , instead of a simple short name.
Additionally, system-wide default localization settings such as the default language, keyboard, and console font were defined in /etc/sysconfig/i18n . These settings are now defined in /etc/locale.conf and /etc/vconsole.conf .
For more information, see the hostname(5) , hostnamectl(1) , locale.conf(5) , and vconsole.conf(5) manual pages.
1.4В Command-Line Network Configuration Interfaces
If the NetworkManager service is running, you can use the nmcli command to display the state of the system’s physical network interfaces, for example:
You can use the ip command to display the status of an interface, for debugging, or for system tuning. For example, to display the status of all active interfaces:
For each network interface, the output shows the current IP address, and the status of the interface. To display the status of a single interface such as em1 , specify its name as shown here:
You can also use ip to set properties and activate a network interface. The following example sets the IP address of the em2 interface and activates it:
You might be used to using the ifconfig command to perform these operations. However, ifconfig is considered obsolete and will eventually be replaced altogether by the ip command.
Any settings that you configure for network interfaces using ip do not persist across system reboots. To make the changes permanent, set the properties in the /etc/sysconfig/network-scripts/ifcfg- interface file.
Any changes that you make to an interface file in /etc/sysconfig/network-scripts do not take effect until you restart the network service or bring the interface down and back up again. For example, to restart the network service:
To restart an individual interface, you can use the ifup or ifdown commands, which invoke the script in /etc/sysconfig/network-scripts that corresponds to the interface type, for example:
Alternatively, you can use the ip command to stop and start network activity on an interface without completely tearing down and rebuilding its configuration:
The ethtool utility is useful for diagnosing potentially mismatched settings that affect performance, and allows you to query and set the low-level properties of a network device. Any changes that you make using ethtool do not persist across a reboot. To make the changes permanent, modify the settings in the device’s ifcfg- interface file in /etc/sysconfig/network-scripts .
For more information, see the ethtool(8) , ifup(8) , ip(8) , and nmcli(1) manual pages.
1.5В Configuring Network Interfaces Using Graphical Interfaces
The NetworkManager service and the nmcli command are included in the NetworkManager package. The Network Connections editor is included in the nm-connection-editor package.
The NetworkManager service dynamically detects and configures network connections. You can click on the network icon in the GNOME notification area to obtain information about the status of the network interfaces and to manage network connections:
To enable or disable a network interface from the pull-down menu, use the On/Off toggle.
To display the Settings window, select Network Settings from the drop-down menu.
FigureВ 1.2 shows the Network Settings editor.
To edit an existing interface, select it from the list and click the gear icon. You can add a profile to any interface to provide alternate configurations that you can use at any point in time. You can equally use this window to configure a network proxy or add an enable a Virtual Private Network (VPN) connection.
To perform more complex configuration and to add additional connection types, use the Network Connections editor. This tool allows you to configure wired, wireless, mobile broadband, VPN, Digital Subscriber Link (DSL), and virtual (bond, bridge, team, and VLAN) interfaces. You can open this window by using the nm-connection-editor command. FigureВ 1.2 shows the Network Connections editor.

To create a new network interface, click the + icon, select the type of interface (hardware, virtual, or VPN) and click Create . To edit an existing interface, select it from the list and click the gear icon. To remove a selected interface, click the — icon.
You can also use the nmcli command to manage network connections through NetworkManager . For more information, see the nmcli(1) manual page.
1.6В About Network Interface Bonding
Network interface bonding combines multiple network connections into a single logical interface. A bonded network interface can increase data throughput by load balancing or can provide redundancy by allowing failover from one component device to another. By default, a bonded interface appears like a normal network device to the kernel, but it sends out network packets over the available secondary devices by using a simple round-robin scheduler. You can configure bonding module parameters in the bonded interface’s configuration file to alter the behavior of load-balancing and device failover.
Basic load-balancing modes ( balance-rr and balance-xor ) work with any switch that supports EtherChannel or trunking. Advanced load-balancing modes ( balance-tlb and balance-alb ) do not impose requirements on the switching hardware, but do require that the device driver for each component interfaces implement certain specific features such as support for ethtool or the ability to modify the hardware address while the device is active. For more information see /usr/share/doc/iputils-*/README.bonding .
1.6.1В Configuring Network Interface Bonding
The bonding driver that is provided with the Oracle Linux kernel allows you to aggregate multiple network interfaces, such as em1 and em2 , into a single logical interface such as bond0 . You can use the Network Settings editor to create the bond and then add network interfaces to this bond. Alternatively, you can use the nmcli command to create and configure the bond.
To create and configure a bonded interface from the command line:
Create the bond:
This example sets the name of the bond to bond0 and its mode to balance-rr . For more information about the available options for load balancing or ARP link monitoring, see /usr/share/doc/iputils-*/README.bonding and the nmcli(1) manual page.
Add each interface to the bond:
These commands add the em1 and em2 interfaces to bond0 .
Restart the NetworkManager service:
After restarting the service, the bonded interface is available for use.
1.7В About Network Interface Teaming
Network interface teaming requires Unbreakable Enterprise Kernel Release 3 (UEK R3) Quarterly Update 7 or later.
Network interface teaming is similar to network interface bonding and provides a way of implementing link aggregation that is relatively maintenance-free, as well as being simpler to modify, expand, and debug as compared with bonding.
A lightweight kernel driver implements teaming and the teamd daemon implements load-balancing and failover schemes termed runners . The following standard runners are defined:
Monitors the link for changes and selects the active port that is used to send packets.
Sends packets on all member ports.
Provides load balancing by implementing the Link Aggregation Control Protocol 802.3ad on the member ports.
In passive mode, uses the BPF hash function to select the port that is used to send packets.
In active mode, uses a balancing algorithm to distribute outgoing packets over the available ports.
Selects a port at random to send each outgoing packet.
UEK R3 does not currently support this runner mode.
Transmits packets over the available ports in a round-robin fashion.
For specialized applications, you can create customized runners that teamd can interpret. The teamdctl command allows you to control the operation of teamd .
For more information, see the teamd.conf(5) manual page.
1.7.1В Configuring Network Interface Teaming
You can configure a teamed interface by creating JSON-format definitions that specify the properties of the team and each of its component interfaces. The teamd daemon then interprets these definitions. You can use the JSON-format definitions to create a team interface by starting the teamd daemon manually, by editing interface definition files in /etc/sysconfig/network-scripts , by using the nmcli command, or by using the Network Configuration editor ( nm-connection-editor ). This section describes the first of these methods.
To create a teamed interface by starting teamd manually:
Create a JSON-format definition file for the team and its component ports. For sample configurations, see the files under /usr/share/doc/teamd-*/example_configs/ .
The following example, which is based on the contents of the file activebackup_ethtool_1.conf , defines an active-backup configuration where em4 is configured as the primary port and em3 as the backup port and these ports are monitored by ethtool .
Use the ip command to bring down the component ports:
Active interfaces cannot be added to a team.
Start an instance of the teamd daemon and have it create the teamed interface by reading the configuration file (in this example, /root/team_config/team0.conf) :
The -g option displays debugging messages and can be omitted.
Use the ip command to set the IP address and network mask prefix length of the teamed interface:
For more information, see the teamd(8) manual page.
1.7.2В Adding Ports to and Removing Ports from a Team
To add a port to a team, use the teamdctl command, for example:
To remove a port from a team:
For more information, see the teamdctl(8) manual page.
1.7.3В Changing the Configuration of a Port in a Team
You can use the teamdctl command to update the configuration of a constituent port of a team, for example:
Enclose the JSON-format definition in single quotes and do not split it over multiple lines.
For more information, see the teamdctl(8) manual page.
1.7.4В Removing a Team
To remove a team, use the following command to kill the teamd daemon:
For more information, see the teamd(8) manual page.
1.7.5В Displaying Information About Teams
To display the network state of the teamed interface, use the ip command:
You can use the teamnl command to display information about the component ports of the team:
To display the current state of the team, use the teamdctl command, for example:
You can also use teamdctl to display the JSON configuration of the team and each of its constituent ports:
For more information, see the teamdctl(8) and teamnl(8) manual pages.
1.8В Configuring VLANs with Untagged Data Frames
A virtual local area network (VLAN) consists of a group of machines that can communicate as if they were attached to the same physical network. A VLAN allows you to group systems regardless of their actual physical location on a LAN. In a VLAN that uses untagged data frames, you create the broadcast domain by assigning the ports of network switches to the same permanent VLAN ID or PVID (other than 1, which is the default VLAN). All ports that you assign with this PVID are in a single broadcast domain. Broadcasts between devices in the same VLAN are not visible to other ports with a different VLAN, even if they exist on the same switch.
You can use the Network Settings editor or the nmcli command to create a VLAN device for an Ethernet interface.
To create a VLAN device from the command line, enter:
This example sets up the VLAN device bond0-pvid10 with a PVID of 10 for the bonded interface bond0 . In addition to the regular interface, bond0 , which uses the physical LAN, you now have a VLAN device, bond0-pvid10 , which can use untagged frames to access the virtual LAN.
You do not need to create virtual interfaces for the component interfaces of a bonded interface. However, you must set the PVID on each switch port to which they connect.
You can also use the command to set up a VLAN device for a non-bonded interface, for example:
To obtain information about the configured VLAN interfaces, view the files in the /proc/net/vlan directory.
1.8.1В Using the ip Command to Create VLAN Devices
The ip command provides an alternate method of creating VLAN devices. However, such devices do not persist across system reboots.
To create a VLAN interface em1.5 for em1 with a PVID of 5:
For more information, see the ip(8) manual page.
1.9В Configuring Network Routing
A system uses its routing table to determine which network interface to use when sending packets to remote systems. If a system has only a single interface, it is sufficient to configure the IP address of a gateway system on the local network that routes packets to other networks.
To create a default route for IPv4 network packets, include an entry for GATEWAY in the /etc/sysconfig/network file. For example, the following entry configures the IP address of the gateway system:
If your system has more than one network interface, you can specify which interface should be used:
A single statement is usually sufficient to define the gateway for IPv6 packets, for example:
Any changes that you make to /etc/sysconfig/network do not take effect until you restart the network service:
To display the routing table, use the ip route show command, for example:
This example shows that packets destined for the local network (10.0.2.0/24) do not use the gateway. The default entry means that any packets destined for addresses outside the local network are routed via the gateway 10.0.2.2.
You might be used to using the route command to configure routing. However, route is considered obsolete and will eventually be replaced altogether by the ip command.
You can also use the netstat -rn command to display this information:
To add or delete a route from the table, use the ip route add or ip route del commands. For example, to replace the entry for the static default route:
To add a route to the network 10.0.3.0/24 via 10.0.3.1 over interface em2 , and then delete that route:
The ip route get command is a useful feature that allows you to query the route on which the system will send packets to reach a specified IP address, for example:
In this example, packets to 23.6.118.140 are sent out of the em1 interface via the gateway 10.0.2.2.
Any changes that you make to the routing table using ip route do not persist across system reboots. To permanently configure static routes, you can configure them by creating a route- interface file in /etc/sysconfig/network-scripts for the interface. For example, you would configure a static route for the em1 interface in a file named route-em1 . An entry in these files can take the same format as the arguments to the ip route add command.
For example, to define a default gateway entry for em1 , create an entry such as the following in route-em1 :
The following entry in route-em2 would define a route to 10.0.3.0/24 via 10.0.3.1 over em2 :
Any changes that you make to a route- interface file do not take effect until you restart either the network service or the interface.
For more information, see the ip(8) and netstat(8) manual pages.
Copyright В© 2020, 2021, Oracle and/or its affiliates. Legal Notices
Источник


