- Установка Adobe Flash Player в Linux
- Устанавливаем Adobe Flash Player в Linux
- Способ 1: Официальный репозиторий
- Способ 2: Инсталляция загруженного пакета
- How to Install Flash Player on Linux
- Content
- Install Flash Player in Chromium
- Flash Player disabled in Chromium
- Install Flash Player in Chromium (snap)
- Install Flash Player in Firefox
- Install Flash Player in Firefox (snap)
- Install Flash Player in Google Chrome
- Conclusion
- How to Install Linux OS on USB Drive and Run it On Any PC
- Requirements:
- Step 1: Create Bootable Linux Installation Media
- Step 2: Create Partitions On Main USB Drive
- Step 3: Install Linux on USB Drive
- Step 4: Customize the Lubuntu System
- If You Appreciate What We Do Here On TecMint, You Should Consider:
Установка Adobe Flash Player в Linux
Передача видео, аудио и показ различного мультимедийного контента, включая игры, в браузере осуществляется с помощью дополнения под названием Adobe Flash Player. Обычно пользователи загружают и устанавливают этот плагин с официального сайта, однако с недавнего времени разработчик не предоставляет ссылок на загрузку для обладателей операционных систем на ядре Linux. Из-за этого юзерам придется использовать другие доступные методы инсталляции, о которых мы и хотим поговорить в рамках данной статьи.
Устанавливаем Adobe Flash Player в Linux
В каждом популярном дистрибутиве Линукс установка происходит по одному и тому же принципу. Сегодня мы возьмем за пример последнюю версию Ubuntu, а вам будет нужно лишь выбрать наиболее оптимальный вариант и следовать приведенным ниже инструкциям.
Способ 1: Официальный репозиторий
Хоть с сайта разработчика загрузить Flash Player и не получится, его последняя версия находится в хранилище и доступна к скачиванию через стандартный «Терминал». От вас требуется только использовать указанные ниже команды.
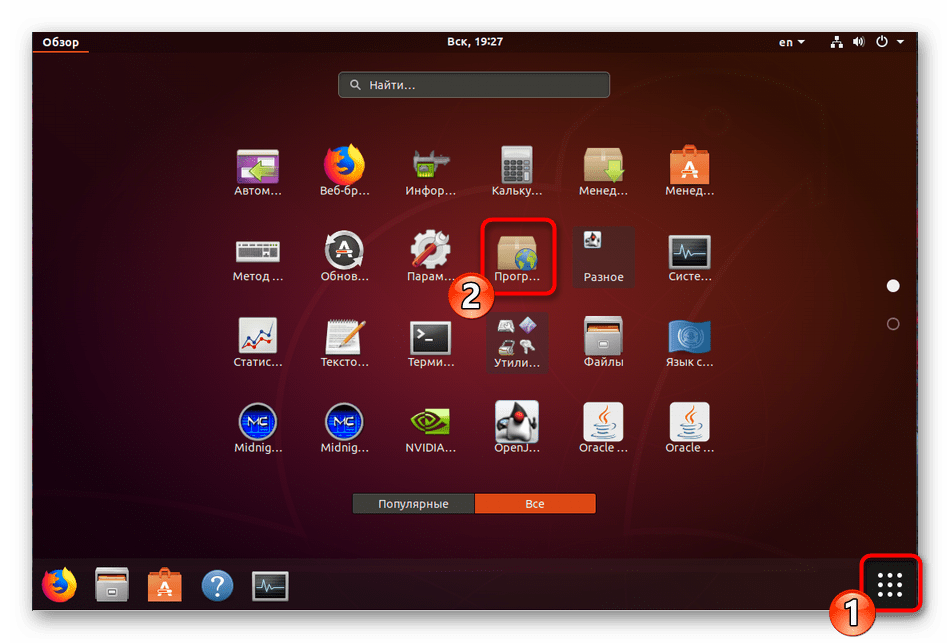
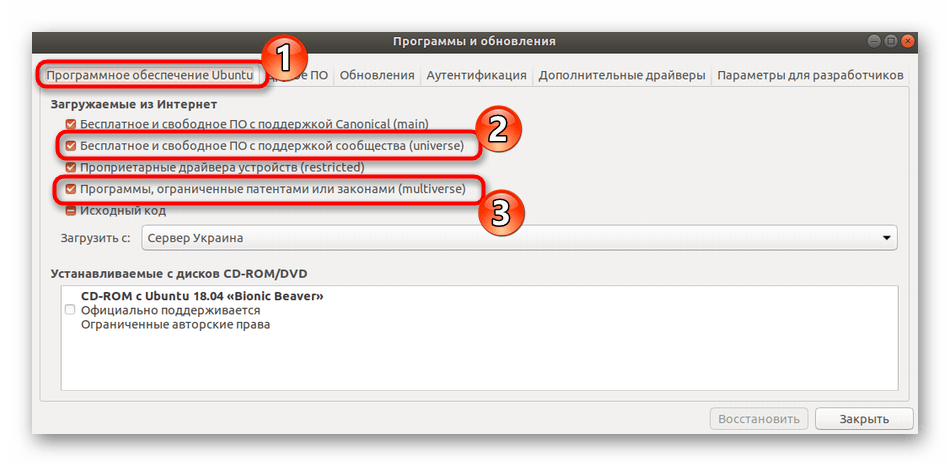
- Для начала убедитесь в том, что включена поддержка репозиториев Canonical. Они понадобятся для выгрузки необходимых пакетов из сети. Откройте меню и запустите инструмент «Программы и обновления».
Во вкладке «Программное обеспечение» отметьте галочками пункты «Бесплатное и свободное ПО с поддержкой сообщества (universe)» и «Программы, ограниченные патентами или законами (multiverse)». После этого примите изменения и закройте окно настройки.
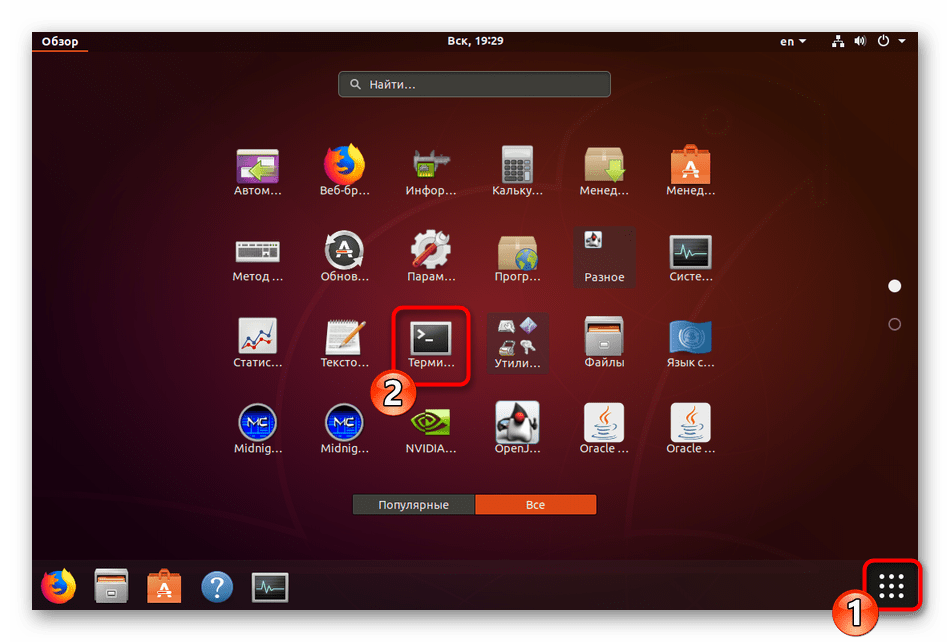
Переходим непосредственно к работе в консоли. Запустите ее через меню или через горячую клавишу Ctrl + Alt + T.
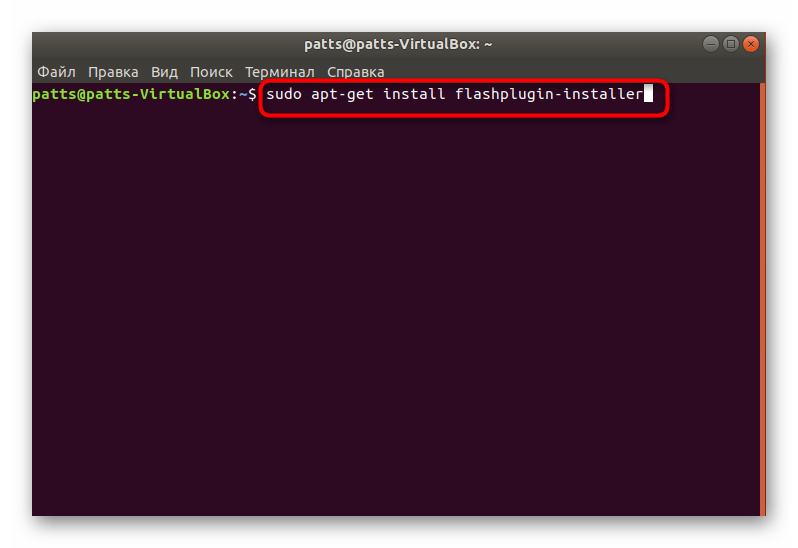
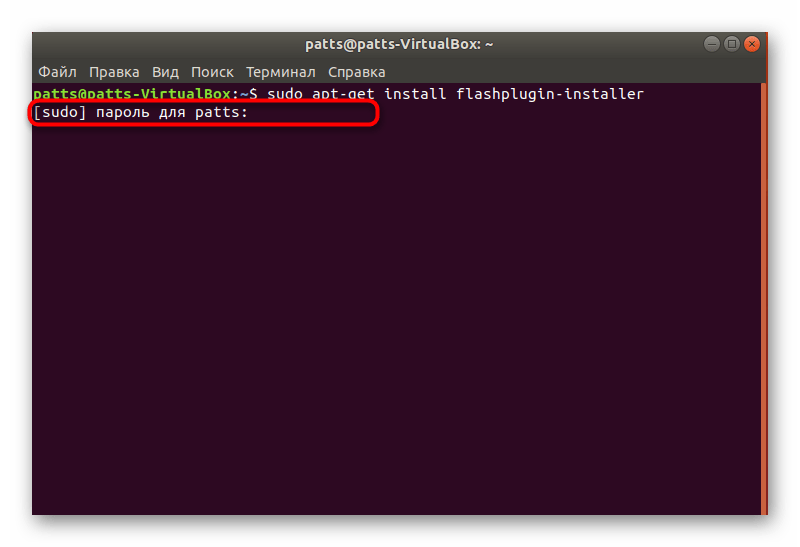
Укажите пароль своей учетной записи, чтобы снять ограничения.
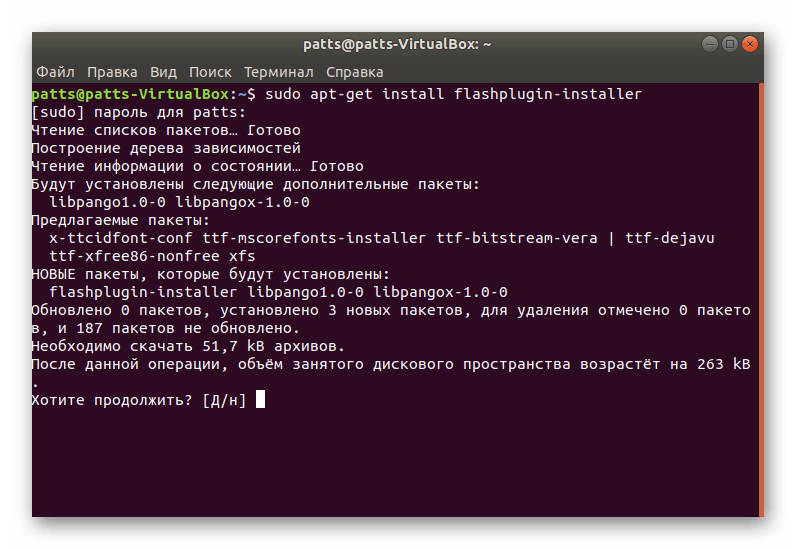
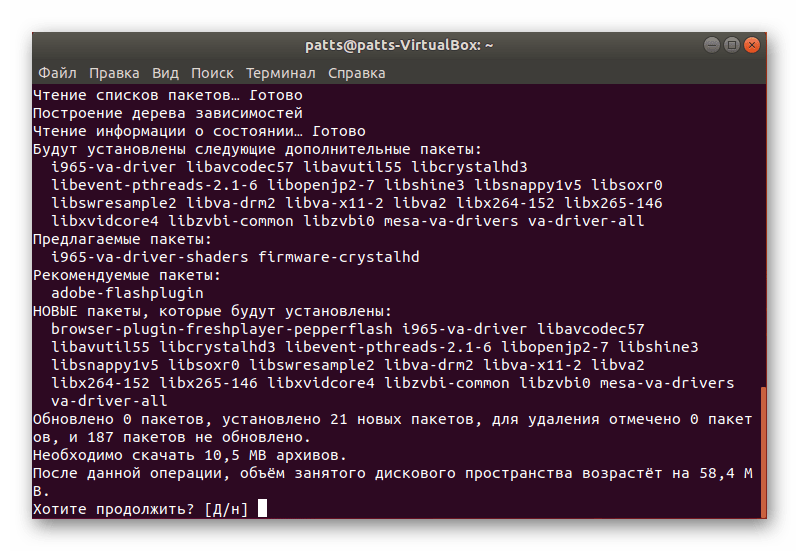
Подтвердите добавление файлов, выбрав соответствующий вариант Д.
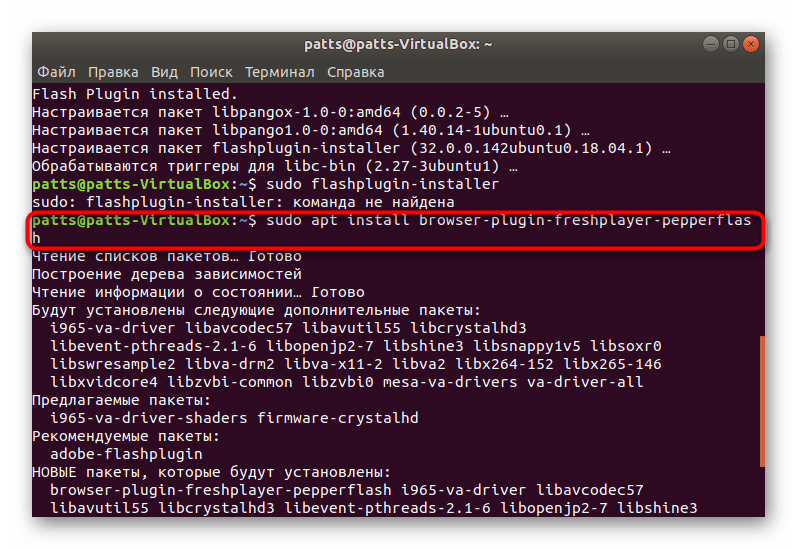
Для уверенности в том, что плеер будет доступен в браузере, проведите инсталляцию еще одного дополнения через sudo apt install browser-plugin-freshplayer-pepperflash .
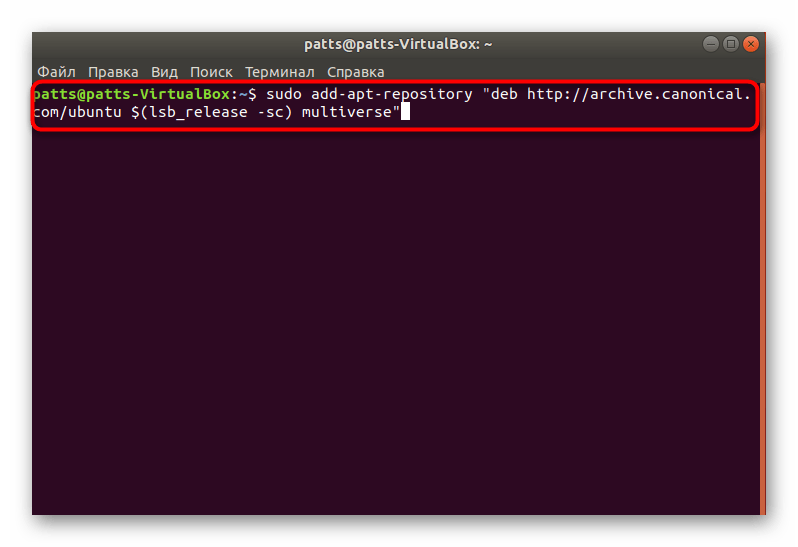
Иногда в 64-битных дистрибутивах появляются различные ошибки, связанные с установкой официального пакета Flash Player. Если у вас возникла такая проблема, сначала установите дополнительный репозиторий sudo add-apt-repository «deb http://archive.canonical.com/ubuntu $(lsb_release -sc) multiverse» .
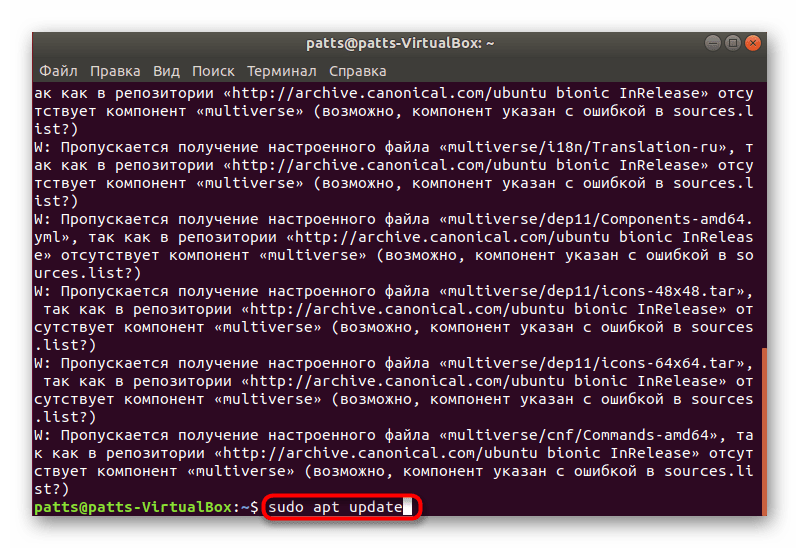
Затем проведите обновление системных пакетов через команду sudo apt update .
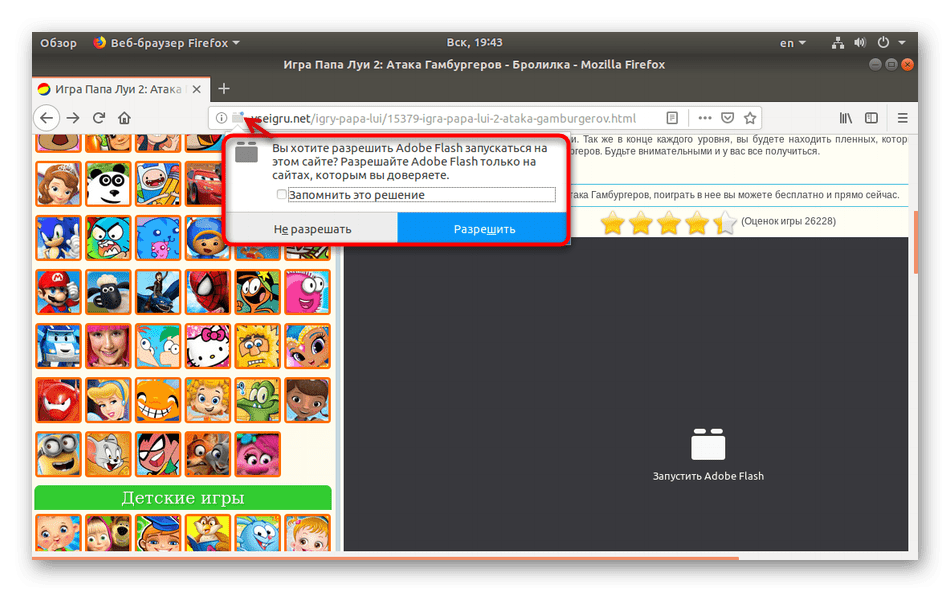
Кроме этого, не стоит забывать, что при запуске приложений и видео в браузере может появиться уведомление о разрешении на запуск Adobe Flash Player. Примите его, чтобы запустить функционирование рассматриваемого компонента.
Способ 2: Инсталляция загруженного пакета
Часто различные программы и дополнения распространяются в пакетном виде, Flash Player не стал исключением. Пользователи могут найти на просторах интернета пакеты формата TAR.GZ, DEB или RPM. В таком случае их нужно будет распаковать и добавить в систему любым удобным методом. Развернутые инструкции по проведению упомянутой процедуры с разными типами данных вы найдете в других наших статьях по ссылкам ниже. Все инструкции были написаны на примере Ubuntu.
Подробнее: Установка TAR.GZ / RPM-пакетов / DEB-пакетов в Ubuntu
В случае с типом RPM при использовании дистрибутива openSUSE, Fedora либо Fuduntu просто запускайте имеющийся пакет через стандартное приложение и его инсталляция пройдет успешно.
Хоть ранее компания Adobe и заявляла о прекращении поддержки Flash Player на операционных системах Linux, сейчас ситуация с обновлениями наладилась. Однако при возникновении ошибок разного рода в первую очередь ознакомьтесь с ее текстом, обратитесь за помощью к официальной документации своего дистрибутива или посетите сайт дополнения для поиска новостей по поводу вашей проблемы.
Помимо этой статьи, на сайте еще 12315 инструкций.
Добавьте сайт Lumpics.ru в закладки (CTRL+D) и мы точно еще пригодимся вам.
Отблагодарите автора, поделитесь статьей в социальных сетях.
Источник
How to Install Flash Player on Linux
Flash Player is an outdated technology but some websites still use it. To access such websites, you need to install Flash Player on Linux. You will learn how to install Flash Player for Chromium, Firefox, and Google Chrome.
Content
It is not recommended to install Flash Player on Linux because Flash is outdated technology and it has many security holes. However, you may still find some websites that use Flash, and there is no other way to access the content of these websites than to install Flash Player.
If you search for a Flash Player in Ubuntu 20.04, you will find two options:
The first package, flashplugin-installer, is created by Adobe. It is not developed anymore. It only received the security fixes and it will be discontinued by the end of this year
The second package, pepperflashplugin-nonfree, is created and maintained by Google. It is more actively developed and usually it is considered to be better. The only drawback is that it works only with Chromium Browser, but not with Firefox. However, there is a way to connect it with Firefox as you will learn below.
I recommend using the second option — pepperflashplugin-nonfree. First, it is considered to be better than flashplugin-installer. Second, you can install Flash Player only for Chromium and use it only when you need to access websites that require Flash. For all the rest, you can use Firefox that doesn’t have a Flash Player. This way you will minimize the security risks.
Install Flash Player in Chromium
To install Flash Player in Chromium, you need to run this command to install it:
I assume you use Debian-based Linux such as Ubuntu. If you run any other Linux distro, you should also have pepperflashplugin available in the repository. Its name, however, may slightly differ.
After the installation, test if Flash works in your Chromium browser by accessing the Adobe Flash Test page.
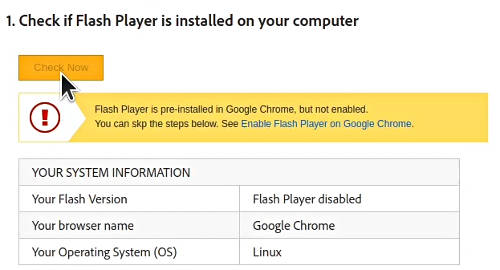
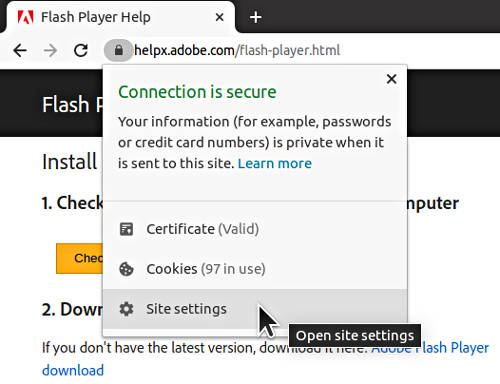
Flash Player is disabled in Chromium by default. You need to able it for this website. For that, click in the View site information:
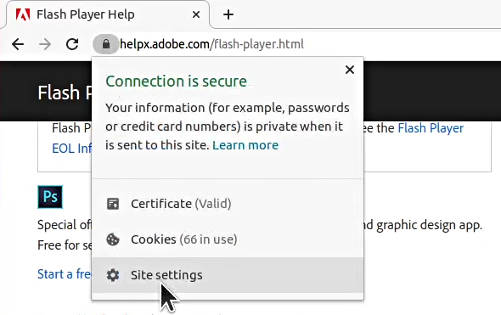
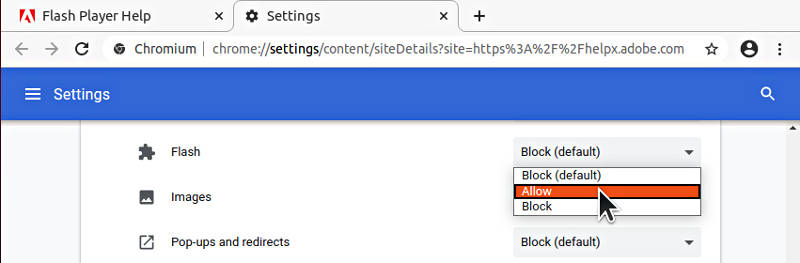
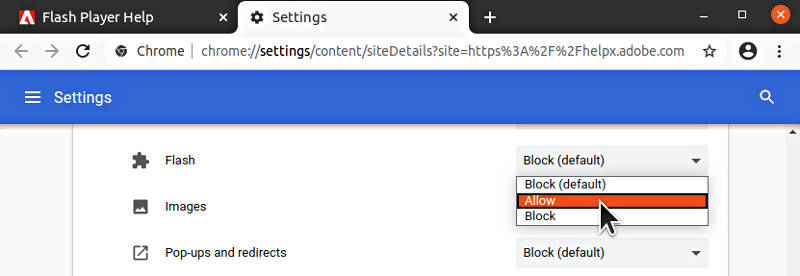
Go to Site settings and enable Flash for this website:
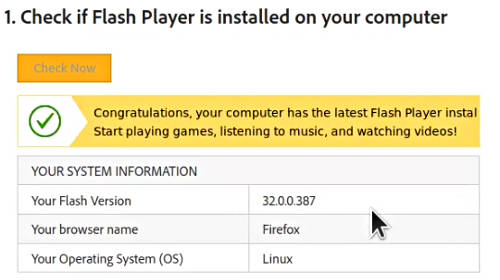
Reload the page, click on the Check Now button, and you should see a message similar to this:
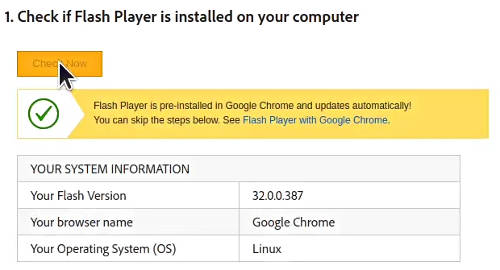
You will see the current version of your Flash Player, which indicates that Flash payer is working. If you scroll down that Test page, you should also find this animation working:

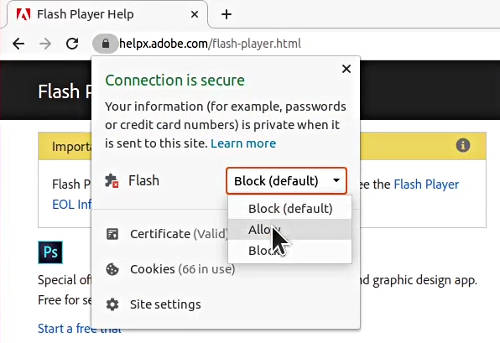
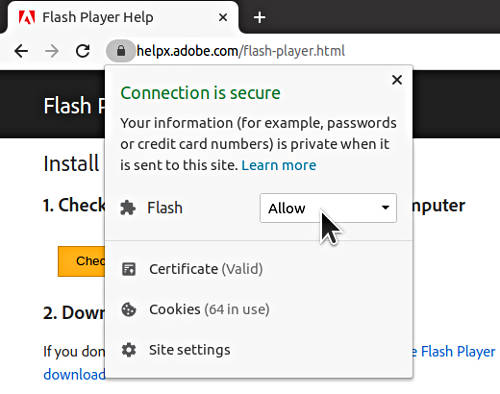
Next time you access this website, you do not need to go to the Site settings, you should be able to Allow Flash usage right form the Site information window:
Flash Player disabled in Chromium
If you see that Flash Player is disabled even after you have enabled it, most likely it is because you use a snap version of Chromium. You can check that with this command:
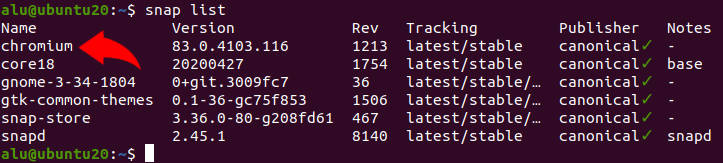
If you find Chromium among the listed programs, you indeed run a snap version of Chromium. You need to do a few more steps to connect pepperflashplugin with Chromium snap.
Install Flash Player in Chromium (snap)
If you run Ubuntu 20.04 or its derivatives, most likely you have a snap version of Chromium. It is the only available version of Chromium in Ubuntu 20.04. Unfortunately, it doesn’t automatically find pepperflashplugin after you install it. You need to copy pepperflashplugin library to your Chromium snap. You can do that by running these two commands:
After that, restart Chromium, activate Flash in the Site settings and test Flash Player. You should have Flash Player working with the snap version of Chromium.
Install Flash Player in Firefox
As I said above, I recommend installing Flash Player in Chromium and use it as a secondary browser, and keep Firefox Flash-free. However, if you only use Firefox and you need Flash Player working in Firefox, you can connect pepperflashplugin, which is designed for Chromium, with Firefox. It is pretty simple. You just need to install the browser-plugin-freshplayer-pepperflash package:
Then restart Firefox, go to the Adobe Flash Test page, and Allow to use Flash on this website:
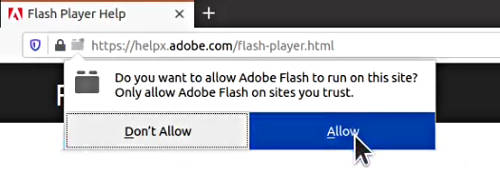
Click the Check Now button and you should see that Flash Player works:
Install Flash Player in Firefox (snap)
If you use Firefox as a snap package, you need to connect browser-plugin-freshplayer-pepperflash with it, by executing these two commands:
And test it again as described above.
Install Flash Player in Google Chrome
Google Chrome has a built-in Flash Player and you do not need to install anything. You only need to activate it similar to how it is done for Chromium.
On the website where you need a Flash Player, click on the Site information:
Go to the Site settings and enable Flash for this website:
Reload the page and make sure that Flash is allowed in the Site information window:
Then Flash Player should work fine on that website. You can test it on the the Adobe Flash Test page.
Conclusion
Sometimes using Flash is inevitable and you need to install Flash Player on Linux. I think it is not a problem if you use Flash. You just need to keep it disabled by default and activate it only for the websites you trust. It is even better if you install Flash Player only for Chromium and use it only when you need to access websites that require Flash. For all the rest, use Firefox. And remember to keep your Flash Player up-to-date.
Источник
How to Install Linux OS on USB Drive and Run it On Any PC
Ever thought of using any computer which is not yours, with all your personal stuff and configuration? It is possible with any Linux distribution. Yes! You can use your own, customized Linux OS on any machine with just a USB drive.
This tutorial is all about installing Latest Linux OS on your pen-drive ( fully reconfigurable personalized OS, NOT just a Live USB ), customize it, and use it on any PC you have access to. Here I am using Lubuntu 18.04 Bionic beaver for this tutorial (but, you can use any Linux distribution). So let’s gets started.
Requirements:
- One Pendrive 4GB or More (Let’s call it as Main USB drive/Pendrive).
- One more Pen drive or DVD disk to use as bootable Linux installation media.
- Linux OS ISO file, for example Lubuntu 18.04.
- One PC (Warning: Disconnect internal hard drives to prevent boot record alteration).
Important: While this procedure will not cause loss of data, some users have experienced changes to their internal drive’s bootup behavior depending on Linux distributions selected. To prevent any possibility of this occurrence, you may wish to disconnect your hard drive before continuing with the USB install portion of the tutorial.”
TIP: Use 32 bit Linux OS to make it compatible with any available PC.
That’s it! Go, and collect all of these. It’s time to do something new.
Step 1: Create Bootable Linux Installation Media
Use your Linux ISO image file to create a bootable USB installation media. You can use any software like Unetbootin, Gnome Disk Utility, Yumi Multi Boot, xboot, Live USB Creator, etc. to create bootable USB with the help of ISO image file.
Alternatively, you can use DVD disk by writing that ISO image to it (but that is the old school method).
Step 2: Create Partitions On Main USB Drive
You have to make two partitions on your Main USB drive using Gparted or Gnome Disk Utility, etc.
- The root partition of format ext4 of size according to your use.
- Optionally you can use the rest of the space as a FAT partition for using it as a normal USB drive.
I am having 16GB USB drive and I have created one root partition of 5GB and using rest 11GB as normal FAT partition. So my 16 GB USB drive is converted to 11GB drive for normal use on any PC. Sounds good.
This step you can do while installing Linux also, but it will be very complex while installing Operating Systems like Arch Linux.
![]() Main USB Drive Partitions
Main USB Drive Partitions
Once you have created required partitions on the Main USB drive. Now take a deep breath because it’s time to go for Linux installation section.
Step 3: Install Linux on USB Drive
1. First, boot Linux OS (Lubuntu 18.04) from your bootable installation media and launch installation application from a live session. Live session of Lubuntu 18.04 will look like this.
![]() Lubuntu Live Boot
Lubuntu Live Boot
2. Installer welcome screen will appear, select Language there and hit Continue.
![]() Select Lubuntu Installation Language
Select Lubuntu Installation Language
3. Select Keyboard Layout and continue…
![]() Select Lubuntu Keyboard Layout
Select Lubuntu Keyboard Layout
4. Select Wifi internet if you want to update Lubuntu while installation. I will skip it.
![]() Select Wifi to Update Lubuntu
Select Wifi to Update Lubuntu
5. Select Installation Type and Third-party installation as per your choice and go to next..
![]() Select Lubuntu Software Updates
Select Lubuntu Software Updates
6. Here select Something Else Option (It is Mandatory) and go to next…
![]() Select Lubuntu Installation Type
Select Lubuntu Installation Type
7. This is an Important step, here you need to find out where your Main USB drive is mounted.
![]() Find Main USB Drive
Find Main USB Drive
In my case /dev/sda are an internal hard disk of the PC and I am using /dev/sdb is USB Lubuntu Installation media from where this live session is booted.
And /dev/sdc is my Main USB drive where I want to install my Linux system and where I have made two partitions in step number 2. If you have skipped step 2, you can also make partitions in this window.
First, change the mount point of the first partition on this Main USB drive to ROOT (i.e. “ / ” ). And as shown in the second red square select bootloader installation device as the Main USB drive.
In my case it is /dev/sdc . This is the most important step in this tutorial. If it is not done correctly your system will boot only on the current PC you are using, which is exactly opposite of your motivation to follow this tutorial.
Once it is completed, double-check it and hit continue. You will get a small window showing devices and drive which will be affected.
8. Make sure that the device and drives shown on this window are of your Main USB drive, which is in my case /dev/sdc . Hit continue…
![]() Write Partition Changes to Disk
Write Partition Changes to Disk
9. Now select your Region and hit Continue…
![]() Select Lubuntu Region
Select Lubuntu Region
10. Add username, password, and hostname, etc…
![]() Create a Lubuntu User
Create a Lubuntu User
11. Let the installation finish.
![]() Lubuntu Installation
Lubuntu Installation
12. After completing installation hit restart and remove your installation media and press Enter.
![]() Lubuntu Installation Completes
Lubuntu Installation Completes
13. Congratulations, you have successfully installed your own Linux OS on your pen drive to use it on any PC. Now you can connect a USB drive to any PC and start your system on that PC by simply selecting boot from USB option while booting.
Step 4: Customize the Lubuntu System
Now it’s time for fun. Just boot your system on any PC and start customizing. You can install any software you want. You can change Themes, Icon themes, install docker.
You can add and store your online accounts on it. Install/modify/customize whatever you want. All the changes will be permanent. They will not change or reset after rebooting or booting on other PCs.
The following figure shows my customized Lubuntu 18.04.
![]() Lubuntu Running on USB Drive
Lubuntu Running on USB Drive
The main advantage of this method is you can use your personal stuff, your online accounts securely on any PC. You can even do secure online transactions as well on any available PC.
I hope it will be helpful for you, if you have questions regarding this article, please feel free to ask in the comment section below.
If You Appreciate What We Do Here On TecMint, You Should Consider:
TecMint is the fastest growing and most trusted community site for any kind of Linux Articles, Guides and Books on the web. Millions of people visit TecMint! to search or browse the thousands of published articles available FREELY to all.
If you like what you are reading, please consider buying us a coffee ( or 2 ) as a token of appreciation.

We are thankful for your never ending support.
Источник


