- Steven-Rose / gist:3943830
- This comment has been minimized.
- ustroetz commented Oct 29, 2015
- This comment has been minimized.
- JusticeN commented Jan 28, 2016
- This comment has been minimized.
- n1tt3n commented Jan 29, 2016
- This comment has been minimized.
- danielyaa5 commented Jan 31, 2016
- This comment has been minimized.
- michelleXIE2014 commented Mar 2, 2016
- This comment has been minimized.
- denisinla commented Mar 2, 2016
- This comment has been minimized.
- BunHouth commented Mar 16, 2016
- This comment has been minimized.
- sundareswarans commented Mar 18, 2016
- This comment has been minimized.
- deven003 commented Mar 19, 2016
- This comment has been minimized.
- nicholasblexrud commented Apr 4, 2016
- This comment has been minimized.
- assocoppa commented Apr 7, 2016
- This comment has been minimized.
- hrishikesh commented Apr 14, 2016
- This comment has been minimized.
- z2z commented Apr 24, 2016
- This comment has been minimized.
- CoffiDev commented May 4, 2016
- This comment has been minimized.
- Jonarzz commented May 4, 2016
- This comment has been minimized.
- nsunnivo commented Jun 9, 2016
- This comment has been minimized.
- rwoloszyn commented Jul 5, 2016
- This comment has been minimized.
- blakrin commented Jul 13, 2016
- This comment has been minimized.
- johannes112 commented Jul 26, 2016
- This comment has been minimized.
- arshadkazmi42 commented Aug 19, 2016
- This comment has been minimized.
- huyinjie commented Aug 26, 2016
- This comment has been minimized.
- minikomi commented Sep 7, 2016
- This comment has been minimized.
- marctorresbcn commented Oct 10, 2016
- This comment has been minimized.
- StanleyEbenezer123 commented Nov 18, 2016
- This comment has been minimized.
- hndr91 commented Feb 11, 2017
- This comment has been minimized.
- parayaluyanta commented Apr 11, 2017
- This comment has been minimized.
- AntoscencoVladimir commented May 25, 2017
- This comment has been minimized.
- leoliaolei commented Aug 17, 2017
- This comment has been minimized.
- arenadoon commented Aug 25, 2017
- This comment has been minimized.
- 0x008800 commented Dec 29, 2017
- This comment has been minimized.
- pedropinheiro75 commented Apr 11, 2018
- This comment has been minimized.
- saudkhanzada commented May 21, 2018
- This comment has been minimized.
- Weavingtempest commented Oct 1, 2020
- This comment has been minimized.
- peidong110 commented Nov 27, 2020
- This comment has been minimized.
- Docetom commented Dec 4, 2020
- This comment has been minimized.
- masterbpro commented Jul 26, 2021
- Linux List All Users In The System Command
- Linux list all users account using the /etc/passwd file
- How to list users in Linux using pagers
- Linux list user names only
- Get a list of all users using the getent command
- Find out whether a user account exists in the Linux server
- How to count user accounts in the Linux server
- A Note About System and General Users
- 6 Different Ways to List Hard Drives in Linux
- Listing Hard Drives in Linux
- 2. fdisk
- 3. lsblk
- 4. cfdisk
- 5. parted
- 6. sfdisk
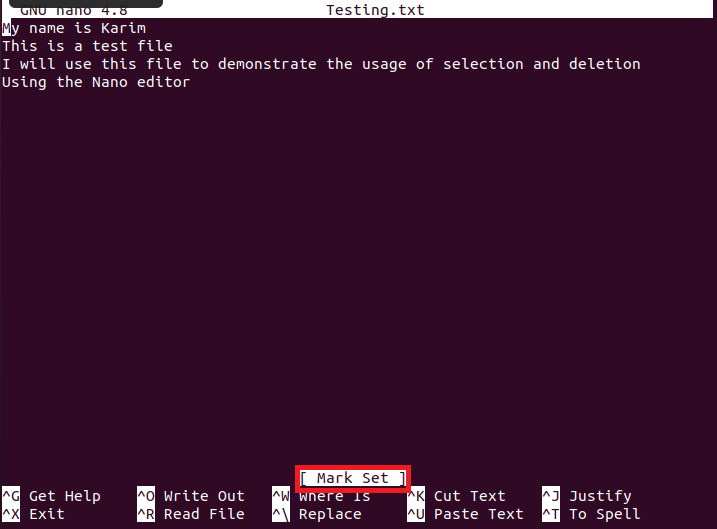
- How can I Select and Delete all Text in Nano?
- About the author
- Karim Buzdar
Steven-Rose / gist:3943830
| Select all and delete (actually move to buffer ) |
| : % d |
| Select all and copy to buffer |
| : % y |
| Use p to paste the buffer . |
This comment has been minimized.
Copy link Quote reply
ustroetz commented Oct 29, 2015
This comment has been minimized.
Copy link Quote reply
JusticeN commented Jan 28, 2016
This comment has been minimized.
Copy link Quote reply
n1tt3n commented Jan 29, 2016
This comment has been minimized.
Copy link Quote reply
danielyaa5 commented Jan 31, 2016
This comment has been minimized.
Copy link Quote reply
michelleXIE2014 commented Mar 2, 2016
This comment has been minimized.
Copy link Quote reply
denisinla commented Mar 2, 2016
This comment has been minimized.
Copy link Quote reply
BunHouth commented Mar 16, 2016
This comment has been minimized.
Copy link Quote reply
sundareswarans commented Mar 18, 2016
This comment has been minimized.
Copy link Quote reply
deven003 commented Mar 19, 2016
Thanks, it worked.
This comment has been minimized.
Copy link Quote reply
nicholasblexrud commented Apr 4, 2016
This comment has been minimized.
Copy link Quote reply
assocoppa commented Apr 7, 2016
This comment has been minimized.
Copy link Quote reply
hrishikesh commented Apr 14, 2016
This comment has been minimized.
Copy link Quote reply
z2z commented Apr 24, 2016
This comment has been minimized.
Copy link Quote reply
CoffiDev commented May 4, 2016
This comment has been minimized.
Copy link Quote reply
Jonarzz commented May 4, 2016
This comment has been minimized.
Copy link Quote reply
nsunnivo commented Jun 9, 2016
This comment has been minimized.
Copy link Quote reply
rwoloszyn commented Jul 5, 2016
This comment has been minimized.
Copy link Quote reply
blakrin commented Jul 13, 2016
This comment has been minimized.
Copy link Quote reply
johannes112 commented Jul 26, 2016
This comment has been minimized.
Copy link Quote reply
arshadkazmi42 commented Aug 19, 2016
This comment has been minimized.
Copy link Quote reply
huyinjie commented Aug 26, 2016
This comment has been minimized.
Copy link Quote reply
minikomi commented Sep 7, 2016

This comment has been minimized.
Copy link Quote reply
marctorresbcn commented Oct 10, 2016
This comment has been minimized.
Copy link Quote reply
StanleyEbenezer123 commented Nov 18, 2016
This comment has been minimized.
Copy link Quote reply
hndr91 commented Feb 11, 2017
This comment has been minimized.
Copy link Quote reply
parayaluyanta commented Apr 11, 2017
This comment has been minimized.
Copy link Quote reply
AntoscencoVladimir commented May 25, 2017
This comment has been minimized.
Copy link Quote reply
leoliaolei commented Aug 17, 2017
This comment has been minimized.
Copy link Quote reply
arenadoon commented Aug 25, 2017
This comment has been minimized.
Copy link Quote reply
0x008800 commented Dec 29, 2017
Very useful! Thank!
This comment has been minimized.
Copy link Quote reply
pedropinheiro75 commented Apr 11, 2018
This comment has been minimized.
Copy link Quote reply
saudkhanzada commented May 21, 2018
This comment has been minimized.
Copy link Quote reply
Weavingtempest commented Oct 1, 2020
This comment has been minimized.
Copy link Quote reply
peidong110 commented Nov 27, 2020
This comment has been minimized.
Copy link Quote reply
Docetom commented Dec 4, 2020
This comment has been minimized.
Copy link Quote reply
masterbpro commented Jul 26, 2021
You can’t perform that action at this time.
You signed in with another tab or window. Reload to refresh your session. You signed out in another tab or window. Reload to refresh your session.
Источник
Linux List All Users In The System Command
| Tutorial requirements | |
|---|---|
| Requirements | Linux |
| Root privileges | No |
| Difficulty | Easy |
| Est. reading time | 5 mintues |

 cfdisk example