- Получение информации о компьютере на UNIX
- Информация о процессоре
- 1. lscpu (Linux)
- 2. sysctl -a (FreeBSD)
- 3. Файл /proc/cpuinfo (Linux)
- 4. Температура процессора
- Linux
- FreeBSD
- Информация об оперативной памяти
- 1. Файл /proc/meminfo (Linux)
- 2. free (Linux)
- How To Get Hardware Information In Linux
- 1. lshw
- 2. lshw-gtk
- 3. HardInfo
- 4. SysInfo
- 5 GUI Tools to See Hardware Information in Ubuntu/Linux
- 1. I-Nex
- 2. Hardinfo
- 3. Sysinfo
- 4. lshw-gtk (Hardware Lister)
- 5. KInfoCenter (KDE Info Center)
- Author: Jaber Al Nahian
- 10 Commands to Collect System and Hardware Info in Linux
- 1. How to View Linux System Information
- 2. How to View Linux System Hardware Information
- 3. How to View Linux CPU Information
- 4. How to Collect Linux Block Device Information
- 5. How to Print USB Controllers Information
- 6. How to Print PCI Devices Information
- 7. How to Print SCSI Devices Information
- 8. How to Print Information about SATA Devices
- 9. How to Check Linux File System Information
- 10. How to Check Linux Hardware Components Info
- Summary
- If You Appreciate What We Do Here On TecMint, You Should Consider:
Получение информации о компьютере на UNIX
В данной статье пойдет речь о способах сбора сведений об оборудовании компьютера, который находится под управлением операционных систем семейства UNIX, такие как Linux и BSD. Также, будет немного затронута часть получения системной информации. Действия будут выполняться из командной строки без графической оболочки — их можно выполнить, подключившись к компьютеру удаленно по SSH.
Информация о процессоре
Команды для получения данных о процессоре.
1. lscpu (Linux)
Команда показывает информацию о характеристиках процессора в удобном виде:
Architecture: x86_64
CPU op-mode(s): 32-bit, 64-bit
Byte Order: Little Endian
CPU(s): 8
On-line CPU(s) list: 0-7
Thread(s) per core: 1
Core(s) per socket: 4
Socket(s): 2
NUMA node(s): 1
Vendor ID: GenuineIntel
CPU family: 6
Model: 62
Model name: Intel(R) Xeon(R) CPU E5-2650 v2 @ 2.60GHz
Stepping: 4
CPU MHz: 2592.918
BogoMIPS: 5187.50
Hypervisor vendor: VMware
Virtualization type: full
L1d cache: 32K
L1i cache: 32K
L2 cache: 256K
L3 cache: 20480K
NUMA node0 CPU(s): 0-7
* больше всего нас интересует:
- Architecture — архитектура процессора — 32 бит или 64.
- Core(s) per socket — количество ядер на процессор.
- Socket(s) — количество физических/виртуальных процессоров.
- CPU(s) — суммарное количество процессорных ядер.
- Model name — модель процессора.
2. sysctl -a (FreeBSD)
Команда отображает множество данных, поэтому добавляем фильтр:
sysctl -a | egrep -i ‘hw.machine|hw.model|hw.ncpu’
hw.model: Intel(R) Xeon(R) CPU X5690 @ 3.47GHz
hw.machine: amd64
hw.ncpu: 2
* на самом деле, команда sysctl работает и в Linux, но формат вывода менее удобен, по сравнению с вышерассмотренной lscpu.
3. Файл /proc/cpuinfo (Linux)
Позволяет увидеть подробную информацию по каждому ядру:
Команда для подсчета количества ядер:
cat /proc/cpuinfo | grep processor | wc -l
4. Температура процессора
Linux
Сначала необходимо установить утилиту.
yum install lm_sensors
apt-get install lm-sensors
После установки утилиты выполняем:
FreeBSD
Загружаем необходимый модуль:
* для автоматической его загрузки добавляем в файл /boot/loader.conf строку coretemp_load=»YES»
sysctl -a | grep temperature
dev.cpu.0.temperature: 40.0C
dev.cpu.1.temperature: 41.0C
Информация об оперативной памяти
1. Файл /proc/meminfo (Linux)
MemTotal: 8010284 kB
MemFree: 1058580 kB
MemAvailable: 2791616 kB
Buffers: 1884 kB
Cached: 1754092 kB
SwapCached: 122280 kB
Active: 4330296 kB
Inactive: 2006792 kB
Active(anon): 3623768 kB
Inactive(anon): 983120 kB
Active(file): 706528 kB
Inactive(file): 1023672 kB
Unevictable: 0 kB
Mlocked: 0 kB
SwapTotal: 1048572 kB
SwapFree: 597684 kB
Dirty: 20 kB
Writeback: 0 kB
AnonPages: 4466532 kB
Mapped: 92808 kB
Shmem: 25776 kB
Slab: 408732 kB
SReclaimable: 308820 kB
SUnreclaim: 99912 kB
KernelStack: 7312 kB
PageTables: 23276 kB
NFS_Unstable: 0 kB
Bounce: 0 kB
WritebackTmp: 0 kB
CommitLimit: 5053712 kB
Committed_AS: 3770324 kB
VmallocTotal: 34359738367 kB
VmallocUsed: 159328 kB
VmallocChunk: 34359341052 kB
HardwareCorrupted: 0 kB
AnonHugePages: 3248128 kB
HugePages_Total: 0
HugePages_Free: 0
HugePages_Rsvd: 0
HugePages_Surp: 0
Hugepagesize: 2048 kB
DirectMap4k: 257984 kB
DirectMap2M: 8130560 kB
* чаще всего, самое важное:
- MemTotal — общий объем оперативной памяти.
- MemFree — объем памяти, который не используется системой.
- Buffers — память, которая в данным момент ожидает записи на диск.
- Cached — объем, задействованный под кэш чтения с диска.
- MemAvailable — объем памяти, доступной в распределители без необходимости обмена.
- SwapTotal — объем файла подкачки.
- SwapFree — свободный объем файла подкачки.
* Объем используемой памяти = MemTotal – MemFree — Cached — Buffers.
Для перевода килобайт в гигабайты можно воспользоваться онлайн калькулятором.
2. free (Linux)
Данная команда позволяет получить информацию об использовании памяти в удобной таблице. Для еще большего удобства, мы выведем ее с помощью дополнительного параметра -h:
total used free shared buff/cache available
Mem: 3,7G 568M 378M 193M 2,8G 2,6G
Swap: 4,0G 94M 3,9G
Источник
How To Get Hardware Information In Linux
Author : Andrew | Posted: July 27, 2011
1. lshw
Or click the button below:
To install lshw in Fedora, use the command below:
To use lshw, run the following command in a terminal:
To get the hardware information in a HTML file, use the command below:
To see an HTML report generated using lshw on my netbook (Asus 1005 HA), click HERE.
2. lshw-gtk
To install it in Ubuntu, use the command below:
Or click the button below:
To install it in Fedora, use the command below:
Once installed, look for «Hardware Lister» in the menu / Dash or run the following command:


3. HardInfo
- CPU: Blowfish, CryptoHash, Fibonacci, N-Queens
- FPU: FFT and Raytracing
To install HardInfo in Ubuntu, use the command below:
Or click the following button:
To install it in Fedora, use the command below:
To run it, look for «System Profiler and Benchmark» in the menu / dash.

4. SysInfo
- System (Linux distribution release, versions of GNOME, kernel, gcc and Xorg and hostname);
- CPU (vendor identification, model name, frequency, level2 cache, bogomips, model numbers and flags);
- Memory (total system RAM, free memory, swap space total and free, cached, active, inactive memory);
- Storage (IDE interface, all IDE devices, SCSI devices);
- Hardware (motherboard, graphic card, sound card, network devices);
- NVIDIA graphic card: only with NVIDIA display driver installed.

To install SysInfo in Ubuntu, run the following command in a terminal:
Источник
5 GUI Tools to See Hardware Information in Ubuntu/Linux
Here are 5 best graphical tools to check your Linux hardware information without using harsh commands.
Checking hardware (CPU, motherboard, process, etc.) information is one of the most common and important tasks we do in our computers. Viewing details of physical components of a computer lets us get idea about a computer’s configuration. It let’s us assume which physical system we are working with, as well as having idea how good a machine would perform and which operating systems and drivers are applicable for it. In one word, hardware info is an obvious part of the details a user should know about his/her system.

In Windows OS, the most general way to see hardware configuration is to right-click on My Computer icon and then clicking Properties from context menu. This provides a minimal information. For more detailed view, Windows Device Manger and System Information utilities can be used. As third party tools, Speccy and CPU-Z seem to be very popular, though the number of system/hardware information tool for Windows is endless.
As of Linux OS, most of the tools you get to see system information are command-line based. This means, once you install those tools, you need to type-in commands in Terminal to get output about installed hardware units. This is really a boring procedure and not convenient to anyone.
I have searched for programs that present hardware specifications in Linux system without requiring any command to input, and found a plenty of utilities. I have selected 5 best ones to show here that works out of the box. You may search for the following tools in your software store (if you have one in your Linux) for jump installation.
1. I-Nex
Probably the best CPU-Z alternative for Linux. I-Nex resembles CPU-Z’s UI. And you would probably like it.

I-Nex shows detailed information on your CPU, Graphics(GPU), Motherboard, Audio hardware and many more in very beautiful way. Major hardware units have their one tab. Every tab contains the device name/model, manufacturer, driver info, and other available data. The presentation provided here is very clear and easy to understand. It even lets you generate customizable report on the whole system. It lets you take screenshot too.
Along with hardware, in also shows useful details on your operating system, such as, Linux distro name, version, GCC version, X.Org version, etc. There’s also a tab for Kernel information.
To install I-Nex on Ubuntu/Mint or any derivatives, type the following commands one after another at each prompt in Terminal.
For Arch Linux, Fedora, openSUSE, Manjaro and other derivatives, here’s the official guide to install.
2. Hardinfo
HardInfo is a hardware analysis, system benchmark and report generator tool that can be found pre-installed in Linux Mint. It lists all hardware units vertically on left side of the program. You need to click on the name of a device to reveal details of that component. The Summary entry shows overview of your whole system in a short form.
![]()
Besides generating report in HTML, you can compare your system with other systems with its benchmarking tools from bottom.
To install Hardinfo, run the following commands into Terminal in Debian/Ubuntu/Mint and its derivatives.
On Fedora, use the following command:
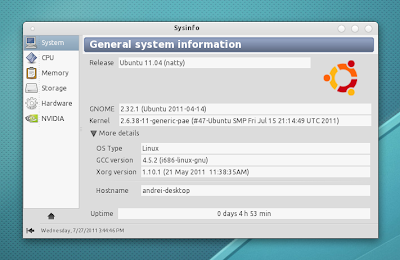
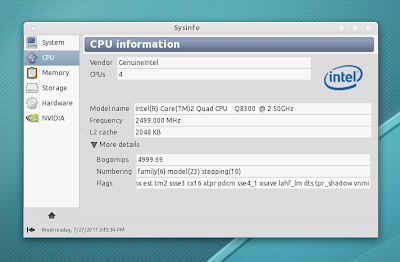
3. Sysinfo
A lightweight program that shows your hardware information in simple way. Unlike above programs, it doesn’t show much information.
![]()
Use the following command to install in Ubuntu/Mint:
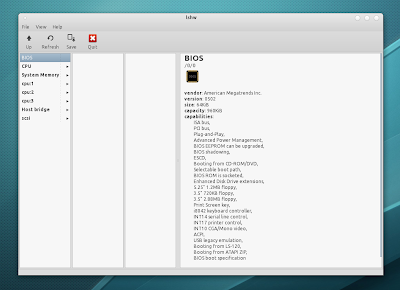
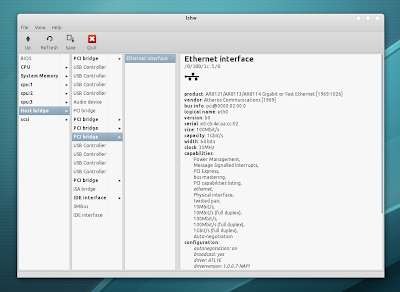
4. lshw-gtk (Hardware Lister)
![]()
This the graphical version the popular command-line hardware info tool lshw. Use Refresh from toolbar if you see blank window. Though it looks so simple, the information it provides are really extensive and informative. It also features export function with XML, HTML and plain text support. Use Save button to export your report.
Installation command for Ubuntu/Mint:
Then type lshw-gtk in Terminal to launch it.
For Fedora, use the following command:
Use lshw-gui command in Terminal to launch it.
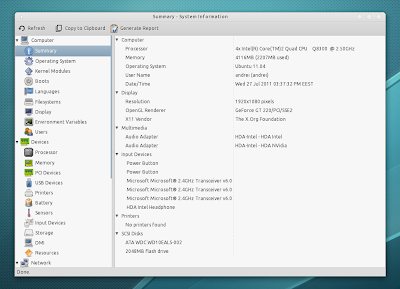
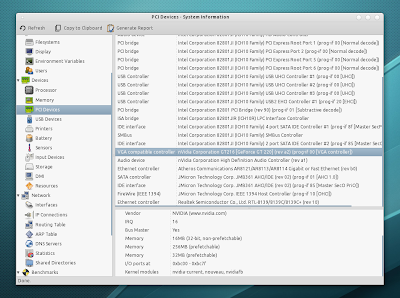
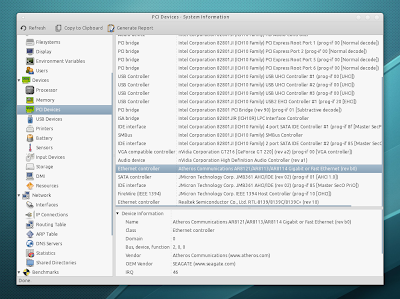
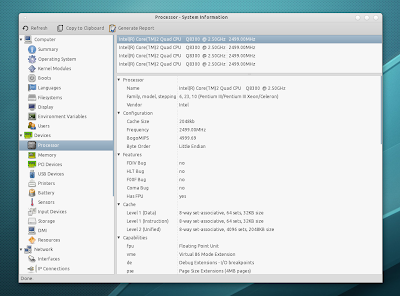
5. KInfoCenter (KDE Info Center)
![]()
KInfoCenter is a part of KDE desktop environment. But it can be installed on other desktops too. This utility provides various information that are unique to your hardware. You get information on PCI, Network Interfaces, X Server, USB Devices, IO Ports, etc. along with main hardware units. If you have a Linux with KDE desktop, you may already have this installed.
Install KInfoCenter in Ubuntu/Mint using following command:
To install in Fedora, use following command:
On both OS, type kinfocenter in Terminal to launch it.
I personally like I-Nex. It’s sleek design and faster startup beats anything. Let us know which hardware info utility you are using.
![]()
Author: Jaber Al Nahian
Jaber is a Programmer and Tech Enthusiast Geek from Dhaka, Bangladesh. He is the founder and Chief-Editor of TechGainer. While he is away from his keyboard, either he’s fishing or messing with wildlife. In case, you can contact him at rijans[at]techgainer[dot]com.
Источник
10 Commands to Collect System and Hardware Info in Linux
It is always a good practice to know the hardware components of your Linux system is running on, this helps you to deal with compatibility issues when it comes to installing packages, drivers on your system using yum, dnf, or apt.
![]() 10 Commands to Check Hardware and System Information in Linux
10 Commands to Check Hardware and System Information in Linux
Therefore in these tips and tricks series, we shall look at some useful commands that can help you to extract information about your Linux system and hardware components.
1. How to View Linux System Information
To know only the system name, you can use the uname command without any switch that will print system information or the uname -s command will print the kernel name of your system.
To view your network hostname, use the ‘-n’ switch with the uname command as shown.
To get information about kernel-version, use the ‘-v’ switch.
To get the information about your kernel release, use the ‘-r’ switch.
To print your machine hardware name, use the ‘-m’ switch:
All this information can be printed at once by running the ‘uname -a’ command as shown below.
2. How to View Linux System Hardware Information
Here you can use the lshw tool to gather vast information about your hardware components such as cpu, disks, memory, usb controllers, etc.
lshw is a relatively small tool and there are few options that you can use with it while extracting information. The information provided by lshw was gathered from different /proc files.
Note: Do remember that the lshw command is executed by the superuser (root) or sudo user.
To print information about your Linux system hardware, run this command.
You can print a summary of your hardware information by using the -short option.
If you wish to generate output as an html file, you can use the option -html.
![]() Generate Linux Hardware Information in HTML
Generate Linux Hardware Information in HTML
3. How to View Linux CPU Information
To view information about your CPU, use the lscpu command as it shows information about your CPU architecture such as a number of CPUs, cores, CPU family model, CPU caches, threads, etc from sysfs and /proc/cpuinfo.
4. How to Collect Linux Block Device Information
Block devices are storage devices such as hard disks, flash drives, etc. lsblk command is used to report information about block devices as follows.
If you want to view all block devices on your system then include the -a option.
5. How to Print USB Controllers Information
The lsusb command is used to report information about USB controllers and all the devices that are connected to them.
You can use the -v option to generate detailed information about each USB device.
6. How to Print PCI Devices Information
PCI devices may include usb ports, graphics cards, network adapters, etc. The lspci tool is used to generate information concerning all PCI controllers on your system plus the devices that are connected to them.
To print information about PCI devices run the following command.
Use the -t option to produce output in a tree format.
Use the -v option to produce detailed information about each connected device.
7. How to Print SCSI Devices Information
To view all your scsi/sata devices, use the lsscsi command as follows. If you do not have the lsscsi tool installed, run the following command to install it.
After installation, run the lsscsi command as shown:
Use the -s option to show device sizes.
8. How to Print Information about SATA Devices
You can find some information about sata devices on your system as follows using the hdparm utility. In the example below, I used the block device /dev/sda1 which is the hard disk on my system.
To print information about device geometry in terms of cylinders, heads, sectors, size, and the starting offset of the device, use the -g option.
9. How to Check Linux File System Information
To gather information about file system partitions, you can use the fdisk command. Although the main functionality of the fdisk command is to modify file system partitions, it can also be used to view information about the different partitions on your file system.
You can print partition information as follows. Remember to run the command as a superuser or else you may not see any output.
10. How to Check Linux Hardware Components Info
You can also use the dmidecode utility to extract hardware information by reading data from the DMI tables.
To print information about memory, run this command as a superuser.
To print information about the system, run this command.
To print information about BIOS, run this command.
To print information about the processor, run this command.
Summary
There are many other ways you can use to obtain information about your system hardware components. Most of these commands use files in the /proc directory to extract system information.
Hope you find these tips and tricks useful and remember to post a comment in case you want to add more information to this or if you face any difficulties in using any of the commands. Remember to always stay connected to Tecmint.
If You Appreciate What We Do Here On TecMint, You Should Consider:
TecMint is the fastest growing and most trusted community site for any kind of Linux Articles, Guides and Books on the web. Millions of people visit TecMint! to search or browse the thousands of published articles available FREELY to all.
If you like what you are reading, please consider buying us a coffee ( or 2 ) as a token of appreciation.

We are thankful for your never ending support.
Источник


