- How To Install Development Tools In Linux
- Install Development Tools In Linux
- 1. Install Development Tools In Arch Linux and derivatives
- 2. Install Development Tools In RHEL, CentOS, Fedora
- 3. Install Development Tools In Debian, Ubuntu and derivatives
- 4. Install Development Tools In openSUSE/SUSE
- Verifying Installation
- How to install the Development and build tools on Ubuntu 20.04?
- Install the Development and build tools on Ubuntu 20.04
- Conclusion
- How to install development tools in Linux
- Install Development Tools in RHEL/CentOS
- Installing Development Tools in Fedora
- Installing Development Tools in Debian base
- Installing Development Tools in Arch Linux
- Installing Development Tools in openSUSE
- Installing Development Tools in Mageia
- Development Tools Installation In Linux
- Install Development Tools In Linux
- 1. Arch Linux and derivatives
- 2. RHEL, CentOS, Scientific Linux, Fedora
- 3. Debian, Ubuntu, and derivatives
- 4. Install Development Tools In openSUSE/SUSE
- Verifying Installation
- How to install Development tools on Linux
- Comments ( 0 )
- Frequently asked questions ( 5 )
- = 5 || postCtrl.tagPost[‘tutorials’].current_page» ng-bind-html=»postCtrl.showtype1[‘tutorials’] | unsafe»>
- = 5 || postCtrl.tagPost[‘forums’].current_page» ng-bind-html=»postCtrl.showtype1[‘forums’] | unsafe»>
- = 5 || postCtrl.tagPost[‘news’].current_page» ng-bind-html=»postCtrl.showtype1[‘news’] | unsafe»>
How To Install Development Tools In Linux
In this brief tutorial, we will be discussing how to install development tools in Linux distributions such as Arch Linux, CentOS, RHEL, Fedora, Debian, Ubuntu, and openSUSE etc. These development tools includes all necessary applications, such as GNU GCC C/C++ compilers, make, debuggers, man pages and others which are needed to compile and build new software and packages.
Install Development Tools In Linux
The developer tools can be installed either individually one by one or all at once. We are going to install all at once to make things much easier.
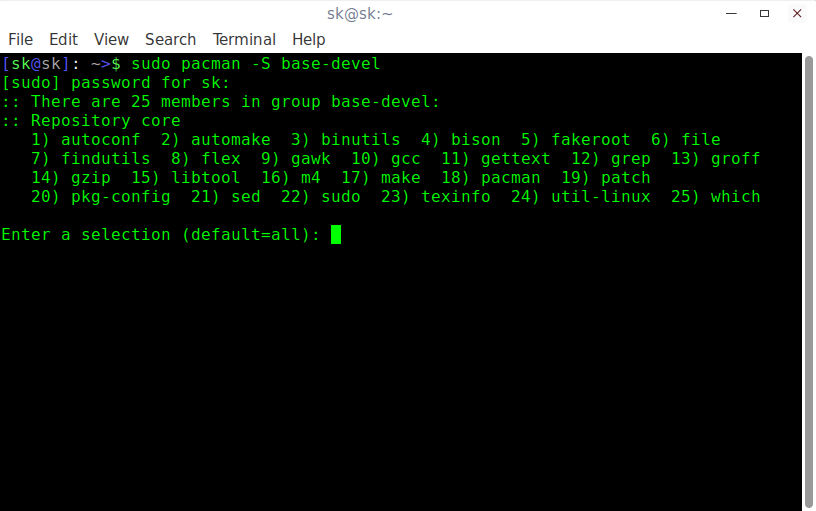
1. Install Development Tools In Arch Linux and derivatives
To install development tools in Arch Linux and its derivatives like Antergos, Manjaro Linux, just run:
The above command will install the following package(s) in your Arch-based systems.
Just hit ENTER to install all of them.
Install Development Tools In Arch Linux
If you want to install to a specific package group, just type its number and hit ENTER to continue installation.
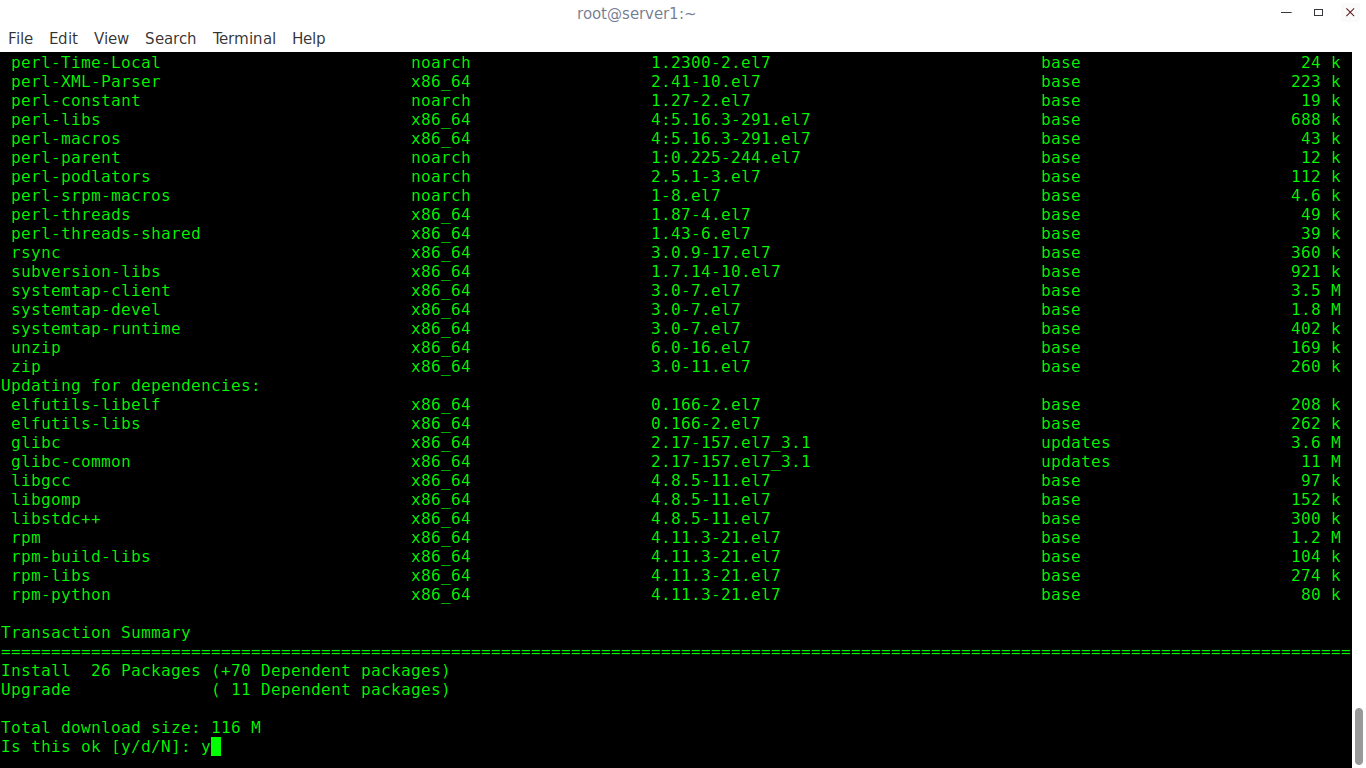
2. Install Development Tools In RHEL, CentOS, Fedora
To install development tools in Fedora, RHEL and its clones such as CentOS, Scientific Linux, run the following commands as root user.
The above command is going to install all necessary developer tools, such as:
- autoconf
- automake
- bison
- byacc
- cscope
- ctags
- diffstat
- doxygen
- elfutils
- flex
- gcc/gcc-c++/gcc-gfortran
- git
- indent
- intltool
- libtool
- patch
- patchutils
- rcs
- subversion
- swig
Install Development Tools In RHEL, CentOS
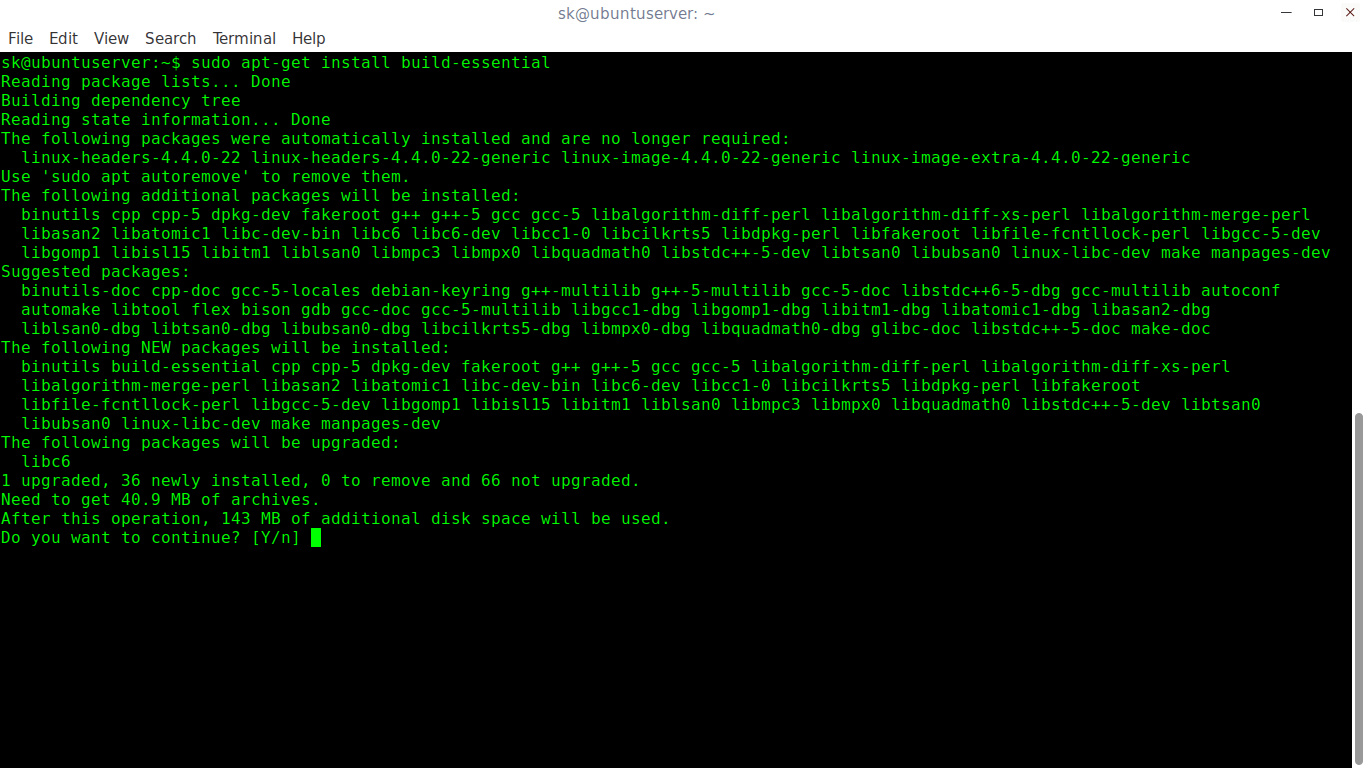
3. Install Development Tools In Debian, Ubuntu and derivatives
To install required developer tools in DEB based systems, run:
This command will all necessary packages to setup the development environment in Debian, Ubuntu and its derivatives.
- binutils
- cpp
- gcc-5-locales
- g++-multilib
- g++-5-multilib
- gcc-5-doc
- gcc-multilib
- autoconf
- automake
- libtool
- flex
- bison
- gdb
- gcc-doc
- gcc-5-multilib
- and many.
Install Development Tools In Debian, Ubuntu
You now have the necessary development tools to develop a software in your Linux box.
If you don’t like this method to install the development tools, there is also a script named “mangi script” available to easily setup development environment in DEB based systems such as Ubuntu, Linux Mint and other Ubuntu derivatives. For more details, refer the following guide.
4. Install Development Tools In openSUSE/SUSE
To setup development environment in openSUSE and SUSE enterprise, run the following commands as sudo or root user:
Verifying Installation
Now, Let us verify the development tools have been installed or not. To do so, run:
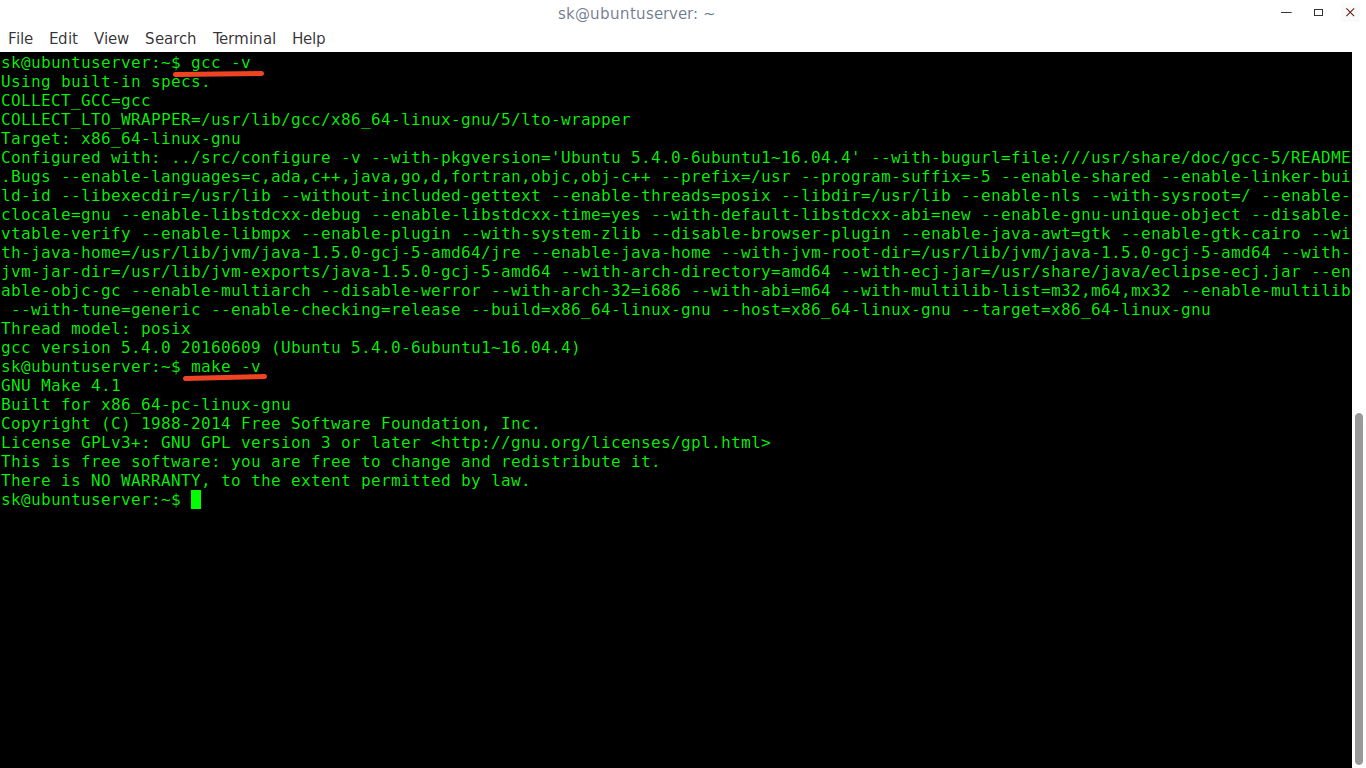
verify if the development tools are installed
As you see in the above output, the development tools have been successfully installed. Start developing your applications!
Источник
How to install the Development and build tools on Ubuntu 20.04?

In this very short post, you will learn how to install a series of development and build tools on Ubuntu 20.04. These tools are essential to perform tasks like installing packages from the source code. Or some programming tasks such as package creation.
If you are an application developer and need to package it for a distribution like Debian or Ubuntu, you need some tools. Some of these tools are considered to be essential for the process.
So, all these tools are contained in the word build-essential . Other important packages will be installed there. Some of them are:
- GCC the GNU C language compiler which is a mainstay for developing various languages and installing programs.
- make which allows us to compile programs from source code.
- G++ the GNU compiler for the C++ language which is widely used in QT applications.
Install the Development and build tools on Ubuntu 20.04
Before we start I want to remind you that in this post we will install the basic tools. In case you want to compile a program from the source code, each one of them has dependencies that you have to fulfill.
On the contrary, if you are going to build packages, you also need other more specific ones according to the distribution.
So, open a terminal and install the build-essential package.
 1.- Installing development and build tools on Ubuntu 20.04
As you can see, this package also installs some necessary dependencies. Don’t worry all these dependencies are more basic package development and build tools.
Some of them may be already installed so you can download the number of packages you need.
When the download and installation is finished, you can check the versions of make, gcc and g++
And so these tools have been installed.
Conclusion
The development and package building tools are very important in Ubuntu 20.04. Since many programs that are in the repositories depend on them and installing them can save us time.
On the other hand, they become quite necessary if we are developers or application packagers.
So, share this post and join our Telegram Channel.
Источник
How to install development tools in Linux
By default Linux system will have required Development Tools & its libraries and doesn’t install all the developer tools such as GNU GCC C/C++ compilers, autoconf, automake, make, etc. which are available in the group.
Development Tools & Libraries are required when you installing packages from source, also it’s required for developers to build packages in Linux system. I have seen most of the distribution had install few Development Tools & its Libraries which is not enough to install/build packages from source.
In this tutorial, we are going to show you, how to install development tools group in popular Linux distributions such as RHEL, CentOS, Fedora, openSUSE, Debian, Ubuntu, Mint, Arch Linux, Manjaro, Mageia, etc.
All the core development packages are bundled with a single group package which can be installed by running appropriate command.
Install Development Tools in RHEL/CentOS
Run the following command to install Development Tools in RHEL/CentOS systems and its clone.
Following Development Tools packages are included in RHEL/CentOS systems.
Installing Development Tools in Fedora
Run the following command to install Development Tools in Fedora system.
- Development Tools : These tools include general development tools such as git and CVS.
- C Development Tools and Libraries : These tools include core development tools such as automake, gcc and debuggers.
Installing Development Tools in Debian base
Run the following command to install Development Tools in Debian based systems and its derivatives such as Ubuntu, Mint, elementray OS, etc.
Installing Development Tools in Arch Linux
Run the following command to install Development Tools in Arch Linux based systems and its derivatives such as Manjaro, Antergos, arpitoryos, etc.
Installing Development Tools in openSUSE
Run the following command to install Development Tools in openSUSE system.
Installing Development Tools in Mageia
Run the following command to install Development Tools in Mageia system.
Источник
Development Tools Installation In Linux

In this article, we are going to see the installation process of development tools in popular Linux distributions such as Arch Linux, CentOS, RHEL, Fedora, Debian, Ubuntu, and openSUSE, etc. These development tools contain all necessary applications, for example, GNU GCC C/C++ compilers, make, debuggers, man pages and others which are required to compile and build new software and packages.
Install Development Tools In Linux
You can install the developer tools either individually, one by one, or all at once. Here, we are going to install all of them at once, which will make things much easier.
1. Arch Linux and derivatives
To install development tools in Arch Linux and its derivatives like Antergos, Manjaro Linux, you just have to run the following commands:
The above commands will install the following package(s) in your Arch-based systems.
To install all tools just press ENTER.
However, If you want to install to a specific package group, simply type its number and press ENTER to continue the installation.
2. RHEL, CentOS, Scientific Linux, Fedora
To install development tools in Fedora, RHEL and its clones such as CentOS, Scientific Linux, you have to run the following commands as root user:
The above command will install the following necessary developer tools:
- autoconf
- automake
- bison
- byacc
- cscope
- ctags
- diffstat
- doxygen
- elfutils
- flex
- gcc/gcc-c++/gcc-gfortran
- git
- indent
- intltool
- libtool
- patch
- patchutils
- rcs
- subversion
- swig
3. Debian, Ubuntu, and derivatives
To install required developer tools in DEB based systems, you have to run the following commands:
This command will install all necessary packages to set up the development environment in Debian, Ubuntu, and its derivatives.
- binutils
- cpp
- gcc-5-locales
- g++-multilib
- g++-5-multilib
- gcc-5-doc
- gcc-multilib
- autoconf
- automake
- libtool
- flex
- bison
- gdb
- gcc-doc
- gcc-5-multilib
- and many.
Finally, you have all the necessary development tools, to begin developing software in your Linux box.
However, If you don’t like this method to install the development tools, there is also a script named “mangi script” available to easily setup development environments in DEB based systems like Ubuntu, Linux Mint and other Ubuntu derivatives. In addition, refer to the following article.
4. Install Development Tools In openSUSE/SUSE
To set up a development environment in openSUSE and SUSE enterprise, you have to run the following commands as root user:
Verifying Installation
At last, let’s verify that the development tools have been installed or not. For this, you have to run the following commands:

As an example, you should get the output as shown in the above image once done with the installation.
So now you have all the necessary tools, to begin software development on your Linux system.
Источник
How to install Development tools on Linux
To install Development tools on Linux
Development tools are required to install on your system if you have planned to build software. It’ s also useful for building packages on your system. Development tools contain few general useful tools like GCC, g++, make, libc6-dev and dpkg-dev packages. In this tutorial, we will see how to install development tools on RedHat based and Debian based Linux operating systems
Installing on Centos 7
This procedure is same throughout all the RedHat based distributions First, update the system repo by using the following command
And then you can install the development tools by using the following command
Now you can verify the information of installed packages by using the following commands
Lets check the version of some of the installed packages
So this is How you install Development tools on major RedHat based Linux distributions
Installing on Linuxmint 18.3
This installation procedure is same throughout all the major Linux Debian based distros Installation First update the system packages
After updating run the following command to install the essential development tools
Now the tools have been installed and you can verify that by checking the version of the installed tools
with this, the method to install Development tools on Linux comes to an end.

Comments ( 0 )
No comments available
Frequently asked questions ( 5 )
Why we need to install Development tool for linux?
Development tools are required to install on your system if you have planned to build software. It’s also useful for building packages on your system. Development tools contain few general us
How can i install the development tools packages for OpenSUSE 42.3 Leap?
You need to follow the below steps to install Development tools for OpenSUSE
zypper addrepo https://download.opensuse.org/repositories/devel:tools/openSUSE_Leap_42.3/devel:tools.repo
How can I get Python 3 on Red Hat Enterprise Linux?
You can get the Python 3 form the link for linux
what is command to install developement tools in linux?
you can install the development tools by using the following command
# yum groupinstall » Development Tools»
how to check the version of some of the installed packages on linux?
check the version of some of the installed packages by below command
= 5 || postCtrl.tagPost[‘tutorials’].current_page» ng-bind-html=»postCtrl.showtype1[‘tutorials’] | unsafe»>
= 5 || postCtrl.tagPost[‘forums’].current_page» ng-bind-html=»postCtrl.showtype1[‘forums’] | unsafe»>
= 5 || postCtrl.tagPost[‘news’].current_page» ng-bind-html=»postCtrl.showtype1[‘news’] | unsafe»>
I just purchased a Lenovo IdeaPad 5; 16:9 resolution, UHD graphics.
Long story short, the display is super harsh and my retinas are melting. Toning down the brightness doesn’t fix the issue. Neither does fussing with the night light/ blue light filter. The backlight is very strong and I feel like the color levels need adjusting, but I have no idea how to go about that. I went to the color profile to see if I could fuss with that, but there I got a bit stuck. The only device listed is the laptop screen itself. The dropdown box reads ‘Automatic- 81YH’ There is no option to create a new profile. It does have the option to delete the exiting profile, but I didn’t know if that would screw things up. Does anyone have some suggestions for me? I’m a desperate Ubuntu novice.
Источник


