- Offline installation of packages
- Contents
- Install from file: pacman -U
- Offline cache
- Local repository
- Generate a list of packages to download
- Download/copy the packages and their dependencies
- Create a repository database just for these packages
- Transfer the packages
- Install the packages
- Restoring online sources
- Links and sources
- Linux install downloaded package
- Install/Uninstall .deb files
- Convert .rpm files to .deb files
- Установка deb пакетов в Ubuntu
- Где взять deb пакеты?
- Установка deb пакетов Ubuntu
- Выводы
- Ubuntu Documentation
- Introduction
- Packages and Package Management
- What is a package?
- Source or Binary?
- Package Dependencies
- Package Managers
- Software Channels/Repositories
- Installing a Package
- Via your web browser
- Via a basic graphical method
- for Ubuntu: «Sofware Centre «
- for Kubuntu : «Add/Remove Programs»
- Via an advanced graphical method
- for Ubuntu/Xubuntu/Edubuntu : Synaptic
- Via a Text Based Methods
- Aptitude — the text-based method
- apt-get — the technical method
- Installing downloaded packages
- Using GDebi to install packages
- Using dpkg to install packages
- Getting a list of recently installed packages
- Automatic updates: Update Manager
- Installing packages without an Internet connection
- Use Keryx
- Use the Synaptic package download script
- Use Offline apt-get update
- Use apt-offline
Offline installation of packages
![]() This article or section needs language, wiki syntax or style improvements. See Help:Style for reference.
This article or section needs language, wiki syntax or style improvements. See Help:Style for reference.![]()
From time to time you might end up with a copy of Arch Linux on an offline computer and want to install packages for it.
Contents
Install from file: pacman -U
The Pacman -U command installs packages from the provided paths, and is probably what you are looking for in casual use cases.
For one package:
For several packages:
Offline cache
You can stuff things into /var/lib/pacman/sync and /var/cache/pacman/pkg to make pacman think it has everything it needs to do searches, updates, and installs. This method is based on byte’s post from this thread.
Download the package databases on a computer with internet access and transfer them to your computer. If needed, change MIRROR to any mirror from the mirror status list.
Following steps will make sure you are working with up-to-date package lists, as if you ran pacman -Sy .
After transferring the *.db files to the offline PC, do the following:
To update a New Arch Linux base system after installation you may enter
Now open that textfile with an editor and delete all lines that are not URLs. Next, bring that list with you to a place where you have internet and either download the listed packages manually or run wget in an empty directory:
Take all the *.pkg.tar.gz files back home, put them in /var/cache/pacman/pkg and finally run
Local repository
Scenario: you have two Arch Linux machines, ‘Al’ (with internet connection) and ‘Bob’ (without internet connection), and you need to install some NVIDIA packages and their dependencies on ‘Bob’. In this example, the wanted packages are nvidia , nvidia-utils , and xf86-video-nouveau , but you want to use a dedicated directory instead of /var/cache/pacman/pkg/ and a dedicated repository called nvidia (instead of the usual core, extra etc. )
Generate a list of packages to download
This can be done on any Arch Linux machine which has up-to-date repository data bases (see above for links to database files); to create the list of links to the required packages, use:
The file nvidia.list will contain links to the listed packages and any others which they depend on which are not already installed on ‘Al’. Unless you have cleared your cache the packages you have installed will be in your cache location. You can check /etc/pacman.conf for the location. It is probably something like /var/cache/pacman/pkg/ .
Download/copy the packages and their dependencies
Obviously this requires an internet connection, so on ‘Al’ create a directory called /path/to/nvidia for the files and run:
Then copy the dependencies you have already installed from the cache. Either find them manually by browsing https://archlinux.org/packages/ or if the total size of all your packages is not too large just copy them all
Create a repository database just for these packages
This can be done on either ‘Al’ or ‘Bob’ using the repo-add command which comes with pacman (from version 3?); first, change to the /path/to/nvidia directory where the packages were downloaded, then create database file called nvidia.db.tar.gz :
Transfer the packages
Now all the packages have been downloaded, you do not need ‘Al’ anymore. Copy the contents of /path/to/nvidia to a the temporary NVIDIA packages cache directory on ‘Bob’. In this example, this folder is called /home/me/nvidia :
Next, pacman must be made aware of this new repository of packages. First copy your current pacman.conf :
Now in /etc/pacman.conf make sure that your SigLevel is set to Never as your repository will not provide signatures
and add the following lines at the bottom of pacman.conf :
You may also need to comment out the other repositories so stale defaults do not cause failed attempts to download from online Now, instruct pacman to synchronize with the dedicated NVIDIA repository we created:
This command finds the nvidia.db.tar.gz file in /home/me/nvidia and expands it to /var/lib/pacman/sync/nvidia to create a database of packages contained in the NVIDIA repository.
Install the packages
Finally install the packages:
Restoring online sources
Should Bob ever be put online we can restore access to the online sources by replacing /etc/pacman.conf with the previously created /etc/pacman.conf.old .
Links and sources
Compiled from the forums, with thanks to Heller_Barbe and byte
Источник
Linux install downloaded package
Although the preferred method of installing programs is via the package managers described in ChapterВ 3, Adding, Removing and Updating Applications, you can also download and install individual package files containing software. There are many different kinds of Linux package files. Most of these are associated with the package managers of specific Linux distributions.
If you find a packaged application that you wish to install, it is recommended that you check if there is a native Kubuntu package of the application available through a package manager, and that you install that version instead. This guarantees that the program is completely compatible with your system. If there is no package available through the package manager, you can install it manually. The installation procedure depends on the type of package file.
Install/Uninstall .deb files
The package files associated with Kubuntu have the .deb suffix because of Kubuntu’s close relation to the Debian GNU/Linux distribution. You can download and install individual .deb files. You will need administrative privileges to do this (see the section called “Root And Sudo”).
To install a .deb file, simply Right click on the .deb file, and choose Kubuntu Package Menu -> Install Package .
Alternatively, you can also install a .deb file by opening a terminal and typing:
To uninstall a .deb file, remove it using Adept , or type:
Convert .rpm files to .deb files
Another type of package files is Red Hat Package Manager Files which have the .rpm suffix. It is not recommended to install these on an Kubuntu system. In almost all cases, a native Kubuntu .deb package is available. However, if absolutely necessary, an .rpm file can be converted to a .deb package using the program alien .
Run the following command in a terminal, with administrative privileges:
Источник
Установка deb пакетов в Ubuntu
Установка новых программ — один из самых важных моментов при работе с вашей системой. Раньше мы уже рассматривали добавление PPA в систему и установку программ из исходников. Но даже в PPA есть далеко не все пакеты, а установка из исходников слишком сложна для новичков.
Нередко возникает необходимость поставить программу, для которой уже есть собранные deb пакеты в интернете. Это может быть какая-нибудь не очень популярная программа или даже драйвера, которые вы скачали и хотите установить на компьютер где нет сети. На компьютере без сети установка программ с флешки ubuntu может стать единственным решением. В этой статье будет рассмотрена установка deb пакетов в ubuntu. Мы рассмотрим где их взять и как установить deb в ubuntu.
Где взять deb пакеты?
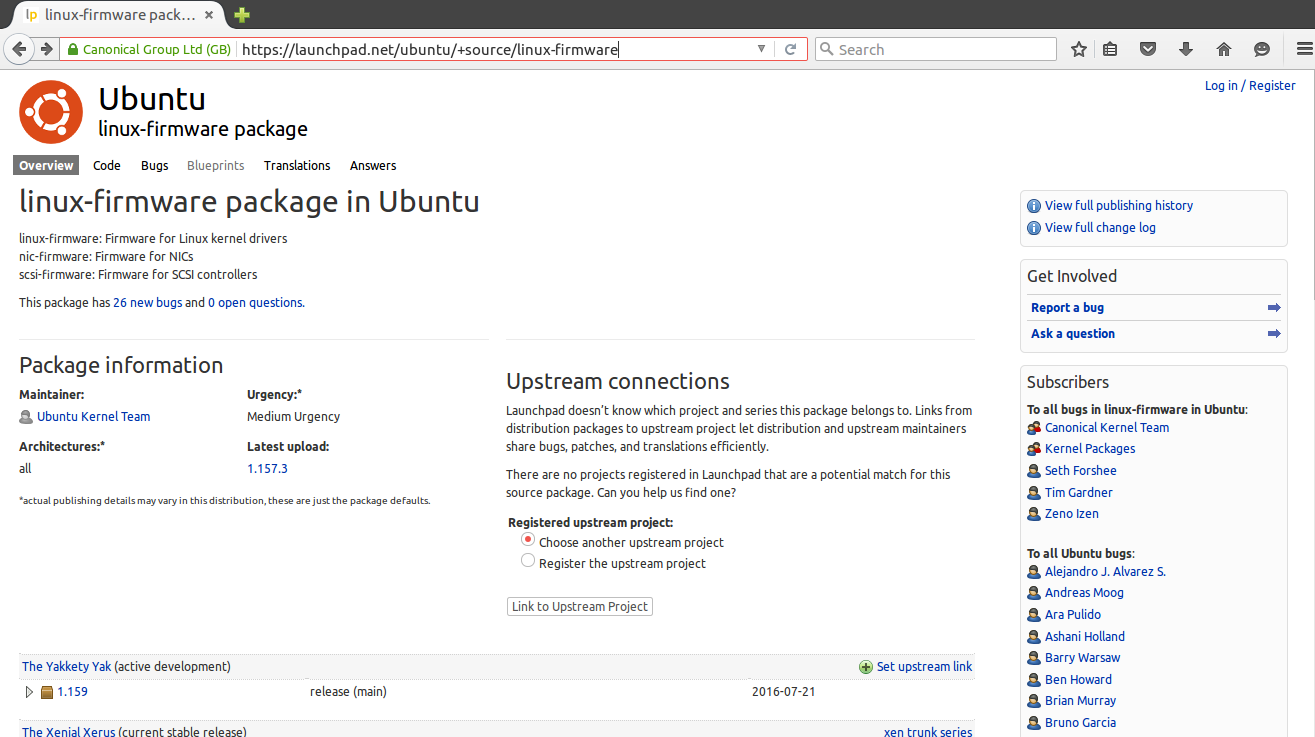
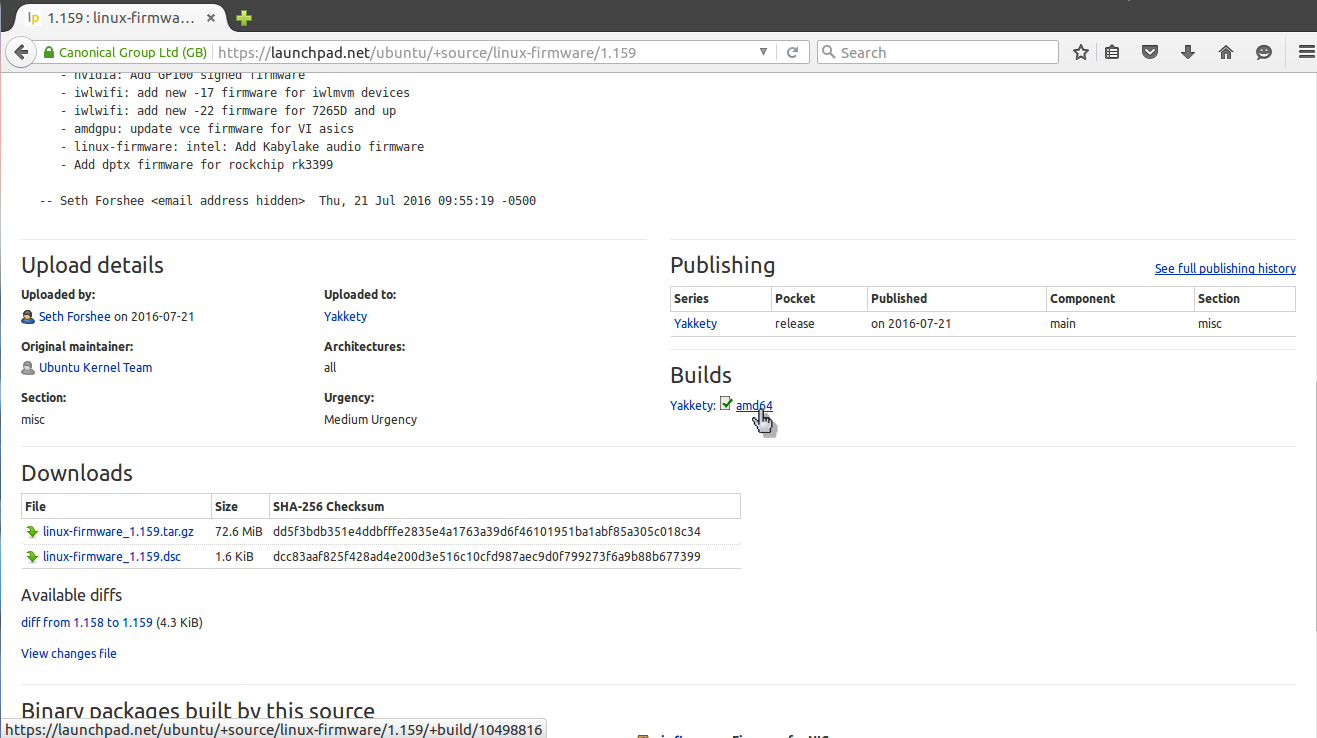
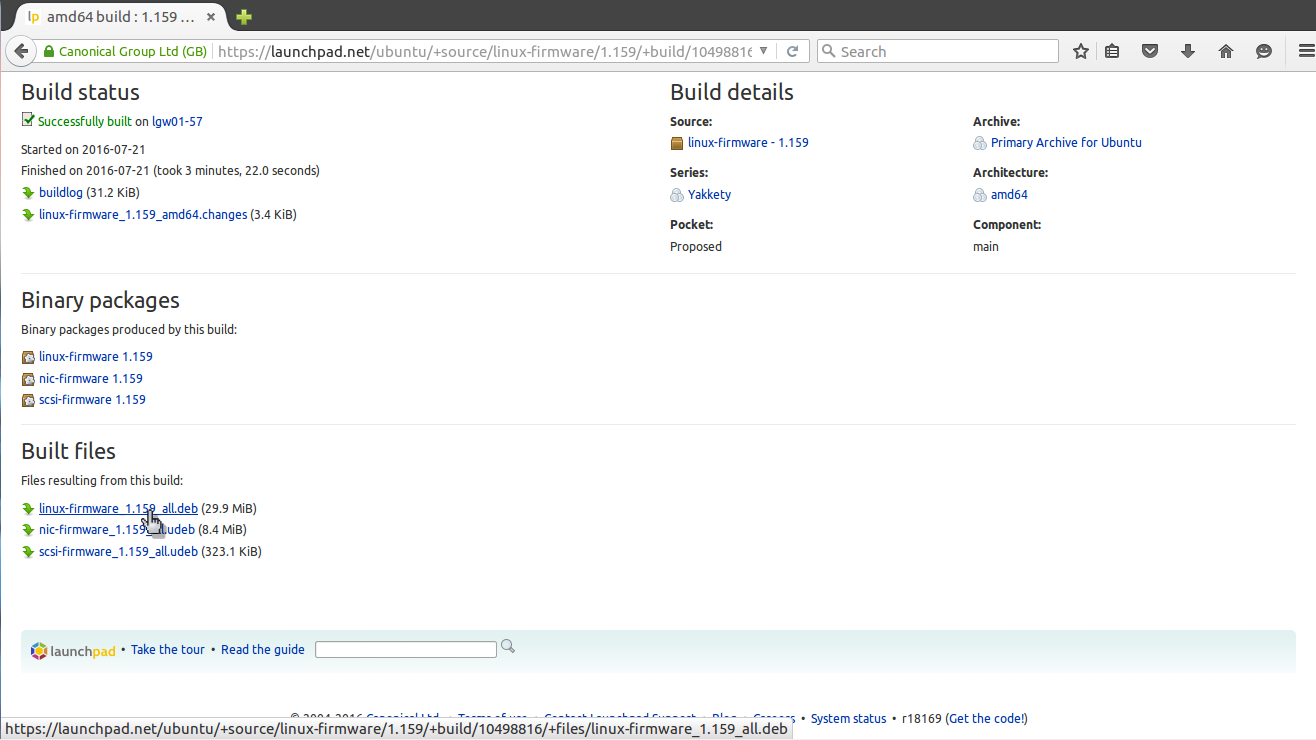
Ответ прост — на просторах интернета. Если это нужная вам программа, то вы уже знаете где взять для ее пакет. В случае с драйверами ситуация немного сложнее. Все программы и драйвера, которые находятся в официальных репозиториях Ubuntu вы можете найти на сайте launchpad.net, это очень удобно, если на машине, где они должны быть установлены нет интернета. Например, ищем linux-firmware и открываем ее страницу на Launchpad, внизу выбираем версию программы:
Дальше выбираем архитектуру:
И осталось получить deb файл для нашей системы:
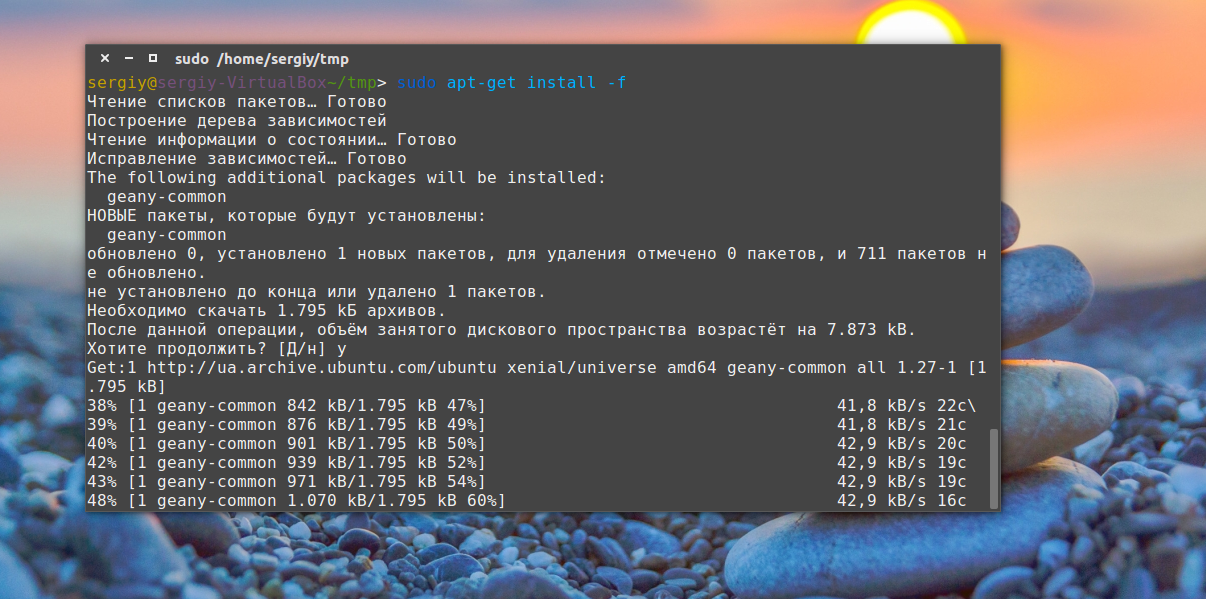
 Если у вас есть другой компьютер с интернетом или вы планируете устанавливать программы потом, а сейчас нужно только скачать deb пакеты, то это можно сделать с помощью apt:
apt download имя_пакета
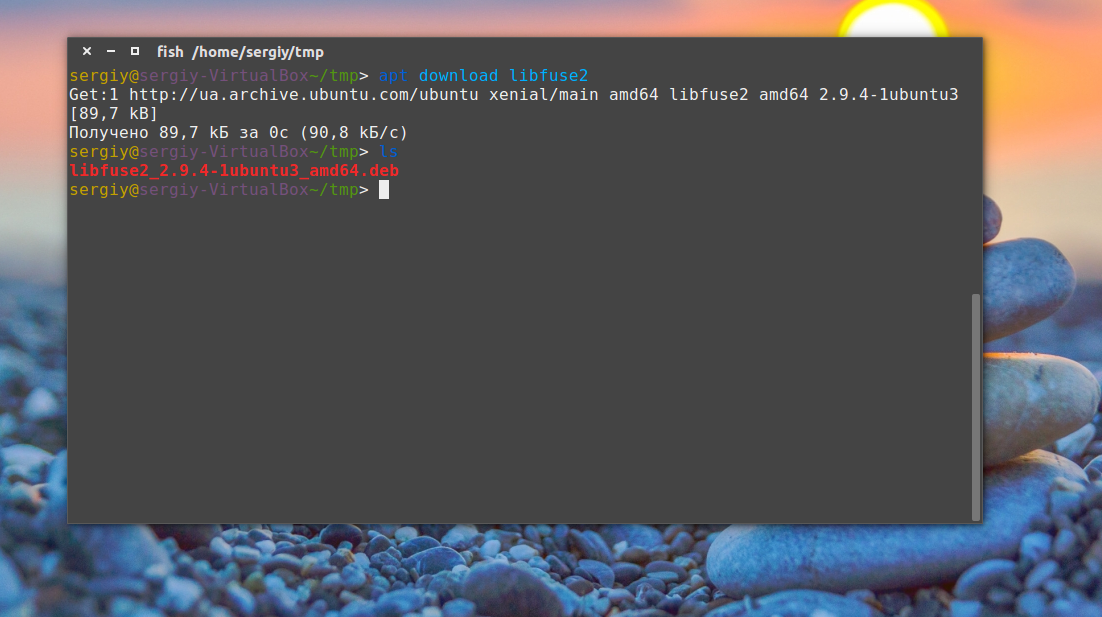
Пакет будет сохранен в текущей папке и дальше вы сможете все без проблем установить. Но будет скачан только сам пакет, без его зависимостей. Зависимости мы можем получить только в системе с интернетом используя команду apt-rdepends:
apt download имя_пакета $(apt-rdepends имя_пакета|grep -v «^ «)
Теперь у вас есть не только пакет, но и все его зависимости.
Установка deb пакетов Ubuntu
Установить Deb пакет Ubuntu не так уж сложно, для этого даже есть несколько утилит. Можно устанавливать как с помощью графического интерфейса, так и в терминале.
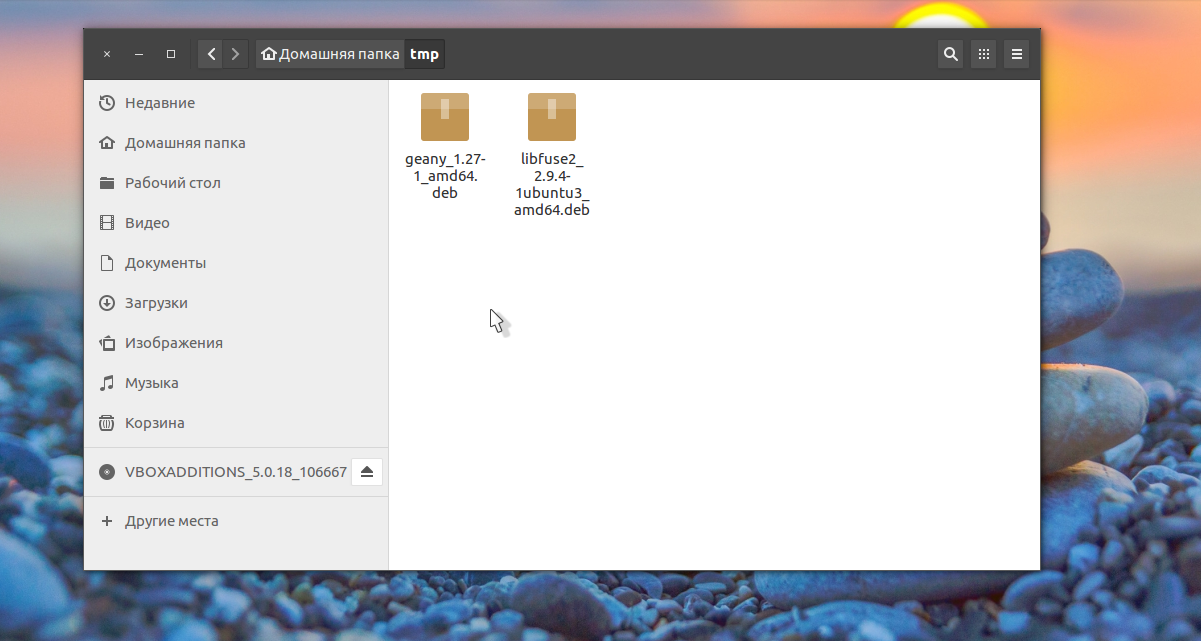
Самый простой способ установки — в графическом интерфейсе, с помощью центра приложений, с него и начнем. Откройте файловый менеджер в папке с пакетом:
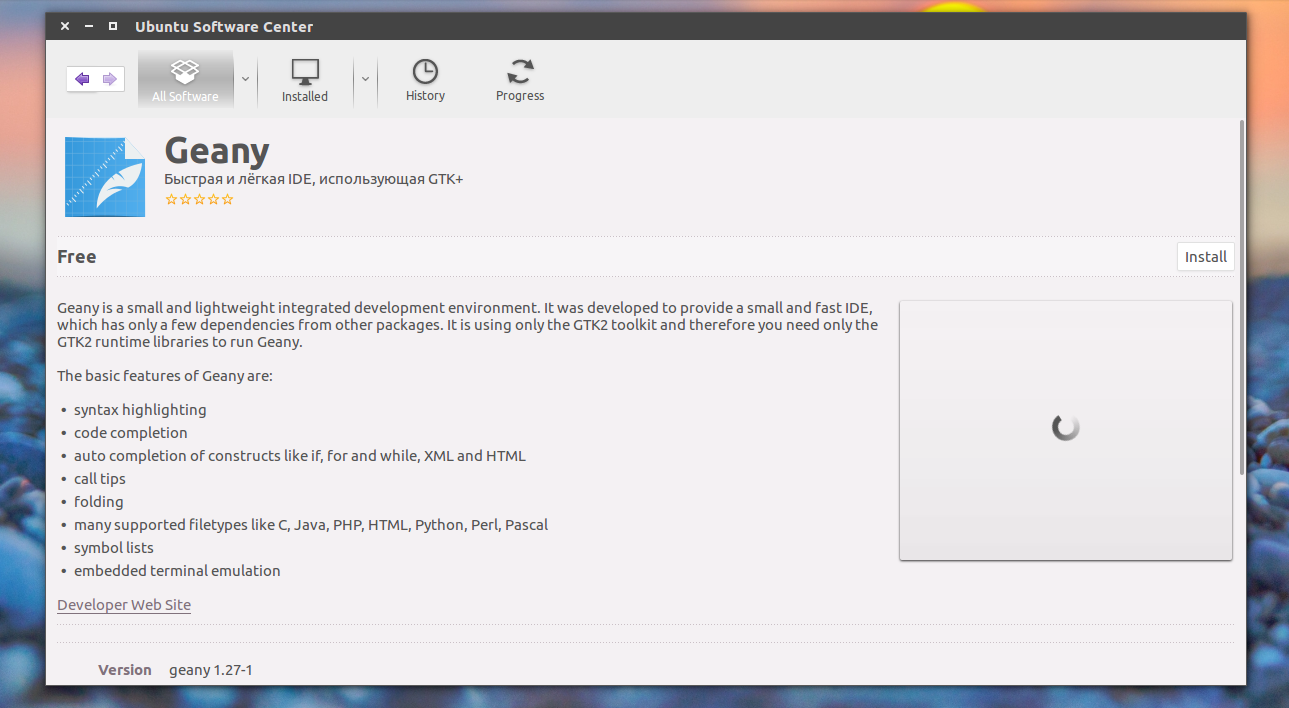
Выполните двойной клик по deb пакету, далее откроется центр приложений, где вы посмотреть информацию о пакете и запустить установку нажав кнопку установить.
Установка программ Ubuntu с помощью центра приложений мне не очень нравится, он обычно очень долго думает и не всегда правильно открывает программу, но можно воспользоваться другой графической утилитой — gdebi. Сначала ее нужно установить:
sudo apt-get install gdebi
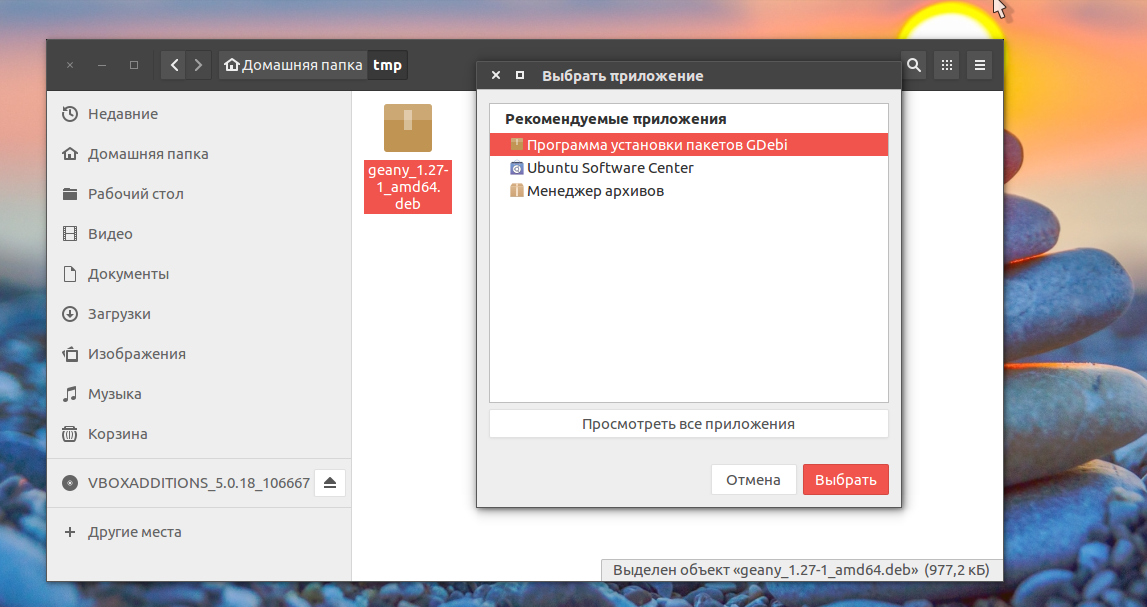
Теперь кликаем правой кнопкой мыши по файлу, выбираем открыть с помощью и gdebi:
Дальше осталось нажать кнопку установить и дождаться завершения установки пакета ubuntu. Программа автоматически установит все зависимости, если есть доступ к сети.

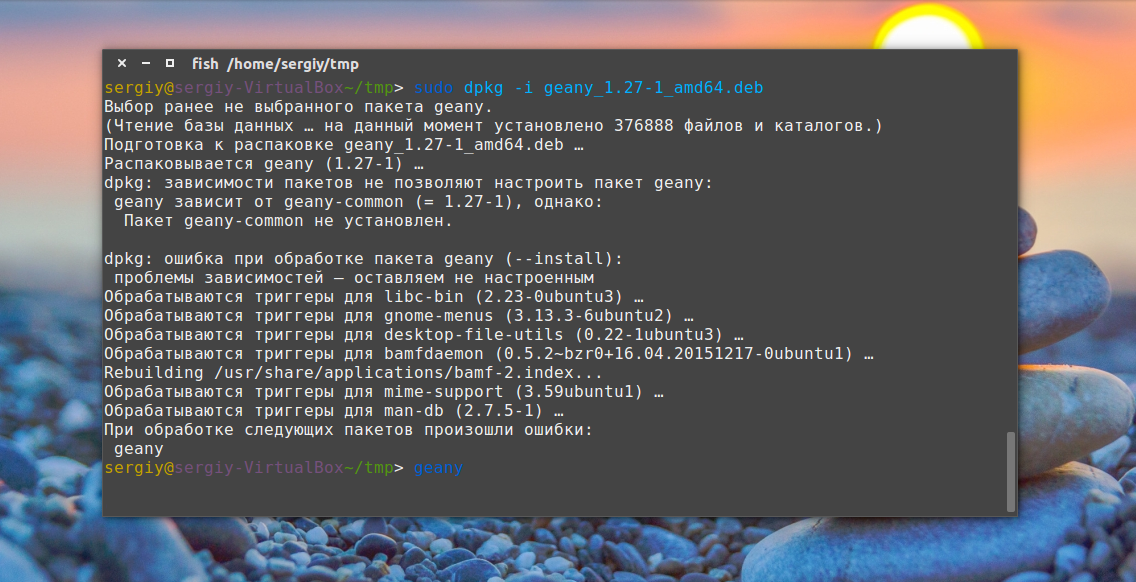
Установка deb из консоли Ubuntu выполняется не намного сложнее. Для этого используется утилита dpkg. Сначала переходим в папку куда был загружен deb пакет:
sudo dpkg -i имя_пакета.deb
Для этой команды доступны символы сокращений, например, можно написать вот так, чтобы установить все deb пакеты из этой директории:
$ sudo dpkg -i *.deb
Программа не умеет разрешать зависимости, даже если есть доступ к сети, она только устанавливает пакет, поэтому для установки зависимостей после установки deb ubuntu выполните:
$ sudo apt-get -f install
Теперь, когда зависимости были загружены, вы можете запускать и использовать программу.
Это не единственный способ установки пакетов ubuntu через терминал, утилиту gdebi тоже можно запустить таким способом:
sudo gdebi имя_пакета.deb
Возможно, вы не знали, но apt тоже умеет устанавливать deb пакеты и даже более чем успешно разрешает зависимости. Только утилите нужно передать полный путь к файлу для установки. Если вы находитесь в папке с deb пакетом выполните:
sudo apt install ./имя_пакета.deb
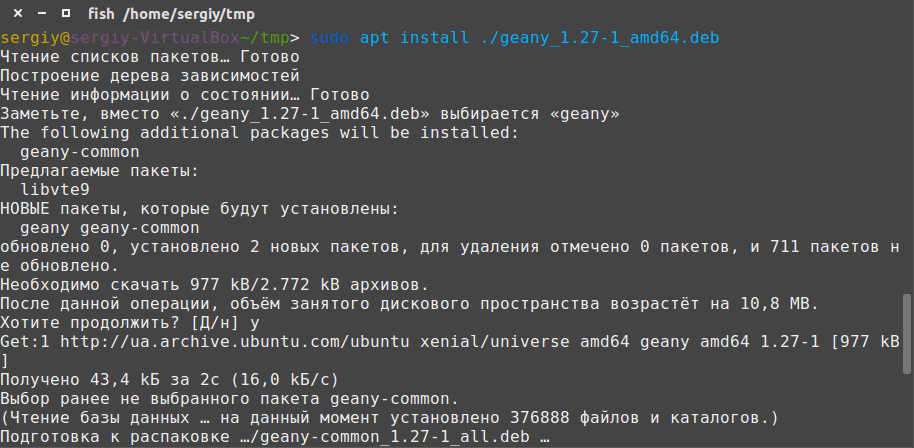
Программа автоматически установит все зависимости и больше ничего не придется выполнять.
Выводы
Вот и все. Теперь установка deb пакетов в Ubuntu не вызовет у вас проблем. Оказывается, есть несколько способов установки программ в ubuntu и все они имеют свои преимущества. Если у вас остались вопросы, спрашивайте в комментариях!
Источник
Ubuntu Documentation
Introduction
Note: The Main page is available in multiple languages.
Installing software in Ubuntu is easy, and this guide will show you how to do it.
By default, many useful programs are already installed when you put Ubuntu onto your computer. However, you may need a particular piece of software that serves a purpose not served by the default applications. You might just want to try an alternative program to one which is already installed. In other words, you need new software.
If you’d like to get some background information on what’s happening when you install software (which can sometimes be technical), read Packages and Package Management. If you just want to get started installing new programs, you can skip straight to Installing a Package.
Packages and Package Management
This section covers the basic concepts of packages and package management. You will learn about what a package is, the differences between different types of package and also how package management works on Ubuntu.
What is a package?
Software is a very broad term, and is generally taken to mean a program which you can run on your computer. However, such programs often need other resources to work. When you install software, thousands of files may be required just to let the program start! When you think that they all have to be put in exactly the right location, and some of those files may need to be changed depending on what type of computer you have, it can all get very complicated. Luckily, Ubuntu can look after this complexity.
Ubuntu uses packages to store everything that a particular program needs to run. A ‘package’, then, is essentially a collection of files bundled into a single file, which can be handled much more easily. In addition to the files required for the program to run, there will be special files called installation scripts, which copy the files to where they are needed (amongst other things).
Source or Binary?
Normally, when someone makes a package for a program, they put all of the source code for the program into that package. Source code is written by programmers and is essentially a list of instructions to a computer which humans are able to read and write. Computers can only understand this code if it is interpreted for them into a form that they can use directly. One such way of interpreting source code for a computer is by translating or compiling it into binary, which computers can understand.
So why don’t the people who make the package (called packagers) just convert it into binary from the start? Well, different computers use different types of binary, so if you make a binary package for one type (like an Intel PC), it won’t work on another (like a PowerPC).
Source packages are simply packages which just include source code, and can generally be used on any type of machine if the code is compiled in the right way. (For information on how to compile and install source packages, see CompilingEasyHowTo).
Binary packages are ones which have been made specifically for one type of computer, or architecture. Ubuntu supports the x86 (i386 or i686), AMD64 and PPC architectures. The correct binary packages will be used automatically, so you don’t have to worry about picking the right ones. To find out which one you are using, open Applications → Accessories → Terminal, type uname -m then hit the enter key.
Package Dependencies
Programs often use some of the same files as each other. Rather than putting these files into each package, a separate package can be installed to provide them for all of the programs that need them. So, to install a program which needs one of these files, the package containing those files must also be installed. When a package depends on another in this way, it is known as a package dependency. By specifying dependencies, packages can be made smaller and simpler, and duplicates of files and programs are mostly removed.
When you install a program, its dependencies must be installed at the same time. Usually, most of the required dependencies will already be installed, but a few extras may be needed, too. So, when you install a package, don’t be surprised if several other packages are installed too — these are just dependencies which are needed for your chosen package to function properly.

An example of dependencies
Package Managers
A package manager is an application which handles the downloading and installation of packages. Ubuntu includes a few package managers by default, and which one you use depends on how advanced the package management tasks are that you want to achieve. Most people will only need to use the most basic package manager, the Add/Remove tool, which is very easy to use.
Software Channels/Repositories
Where can you get packages from?
Ubuntu stores all of its packages in locations called software channels or repositories. A software channel is simply a location which holds packages of similar types, which can be downloaded and installed using a package manager. A package manager will store an index of all of the packages available from a software channel. Sometimes it will ‘re-build’ this index to make sure that it is up to date and knows which packages have been upgraded or added into the channel since it last checked.
There are four Ubuntu software channels for each architecture — Main, Restricted, Universe and Multiverse. Each has a different purpose. By default, only packages from Main and Restricted can be installed. If you would like to install packages from Universe or Multiverse, see the Repositories page for instructions on how to do this.
In addition to the official Ubuntu repositories, it is possible to use third party repositories. Be careful, though — some are not compatible with Ubuntu and using them may cause programs to stop working or may even cause serious damage to your installation. The page http://www.ubuntulinux.nl/source-o-matic (page removed — why) can help you to find extra repositories, and the Repositories page gives instructions on how to enable them.
Installing a Package
This section explains how to install packages using the various tools available in Ubuntu,Xubuntu,Edubuntu and Kubuntu.
Via your web browser
In the Ubuntu Documentation, you will sometimes find sentences like for example:
» To install this software in Ubuntu, install the following package: supertux. «
Click on the name of the package («supertux» in the example):
- if the apturl protocol is enabled on your computer, you will be proposed to install the package called «supertux».
if not, please follow instructions of the AptURL page to enable apturl protocol on your computer.
Via a basic graphical method
Note that some packages can’t be installed via this method, in this case please use another method.
for Ubuntu: «Sofware Centre «
In recent versions of Ubuntu, the «Add/Remove» option in the Applications menu has been replaced by the Ubuntu Software Center.
for Kubuntu : «Add/Remove Programs»
Kubuntu’s new and easy method of installing packages is to use the ‘Add/Remove Programs’ tool. Click K-Menu → Add/Remove Programs to start it.

Add/Remove Programs is a simple graphical way of installing and removing applications in Kubuntu. To launch Add/Remove Programs, choose K Menu → Add/Remove Programs from the desktop menu system.
To install new applications select the category on the left, then check the box of the application you want to install. When finished click Apply, then your chosen programs will be downloaded and installed automatically, as well as installing any additional applications that are required. The default selection is restricted to KDE suite, but GNOME applications can be installed simply by selecting from dropdown menu at the top. Alternatively, if you know the name of the program you want, use the Search tool at the top.
Software from additional repositories may be installed by enabling the Show: Unsupported and Show: proprietary software checkboxes if they are enabled in your repository list. For more information, see the Repositories page.
Once this has finished, click Close.Your new programs are installed, ready to use!
Via an advanced graphical method
for Ubuntu/Xubuntu/Edubuntu : Synaptic
The Synaptic Package Manager offers a more advanced way of installing packages. If you have problems finding a suitable package with the Add/Remove tool, try using the search in Synaptic. This searches all of the packages in the available repositories, even the ones which don’t contain programs.
For details on using Synaptic, see SynapticHowto.
Via a Text Based Methods
Text based methods can be used across Ubuntu, Kubuntu and Xubuntu, but require familiarity with the terminal. When helping users to install packages, you should consider using an AptURL instead of apt-get or aptitude.
Aptitude — the text-based method

Aptitude is a text-based package manager, which must be run from a Terminal. Read the AptitudeSurvivalGuide for more information on how to use Aptitude.
apt-get — the technical method
The apt-get program is a command-line package manager, which should be used if the Add/Remove tool and Synaptic ever run into problems. It provides an advanced interface to APT, the underlying package management system which Ubuntu uses, but is reasonably easy to operate. Power users may find that apt-get is quicker to use and more powerful than the graphical options above.
For details on how to use apt-get, read AptGet/Howto.
Installing downloaded packages
You may wish to install a package you have downloaded from a website, rather than from a software repository. These packages are called .deb files. Because they may have been created for a different Linux distribution, you might find that there’s dependency issues with Ubuntu, meaning that they may be uninstallable.
To find a package which you have previously downloaded using Synaptic, aptitude or apt-get, look in /var/cache/apt/archives
Using GDebi to install packages
GDebi is a simple tool to install .deb files. It has a graphical user interface but can also be used in your terminal. It lets you install local deb packages resolving and installing its dependencies.. It automatically checks packages for their dependencies and will try to download them from the Ubuntu software repositories if possible. You may first need to install GDebi — simply install the gdebi package using one of the package managers listed above, or open a Terminal and type sudo apt-get install gdebi.
Once you have installed GDebi, use the File Browser to find the package you wish to install. Package files will look similar to this:

Double-click the package to open it with GDebi. If all dependencies have been met for the selected package, simply click the ‘Install package’ button to install it. GDebi will warn you if there are unmet dependencies, which means that there’s dependencies that aren’t resolved in the repositories that you’re using.
Using dpkg to install packages
dpkg is a command-line tool used to install packages. To install a package with dpkg, open a Terminal and type the following:
Note: replace directory with the directory in which the package is stored and package_name with the filename of the package.
It is recommended that you read the dpkg manual page before using dpkg, as improper use may break the package management database. To view the manual page for dpkg, open a Terminal and type man dpkg.
Getting a list of recently installed packages
You can use the dpkg logs to discover recently installed packages; this is handy if you want to roll back some recent installations to a previous system state.
More detailed information on this can be found here.
Automatic updates: Update Manager
Ubuntu will automatically notify you when security updates and software upgrades are available. The Ubuntu Update Manager is a simple and easy to use application that helps users to keep their system software updated. Simply click the update icon (which will appear in the notification area), type in your super-user/administrator password and follow the instructions on-screen to download and install the updates.
Keeping up to date is important, as security fixes which protect your computer from harm are delivered in this way.

Installing packages without an Internet connection
Sometimes, an internet connection is unavailable to install programs.
It is possible to install programs without CDs or DVDs onto offline computers, using a simple USB key for example to transfer only the packages you need.
There are several methods to do this:
Use Keryx
Keryx is a portable, cross-platform package manager for APT-based (Ubuntu, Debian) systems. It provides a graphical interface for gathering updates, packages, and dependencies for offline computers. Keryx is free and open source. You can get Keryx here: https://launchpad.net/keryx
Use the Synaptic package download script
Short instructions:
- Launch Synaptic on the offline computer
- Mark the packages you wish to install
Select File->Generate package download script
Launch Synaptic and click on File->Add downloaded packages
Note: If you don’t have access to a PC with GNU/Linux or emulating/virtualizing GNU/Linux (Cygwin, VMware, VirtualBox, Qemu, etc), just open the script with a text editor and enter all the URLs you see in your browser to download the corresponding packages.
If you have all the necessary libraries and/or dependencies, the simplest way is of course to just download the .deb package you need, just as you would with a Windows installer, and double-click the package to install it with GDebi.
Use Offline apt-get update
If you can’t even select the packages on your offline PC because you can’t add the repository / update the package info, try this: AptGet/Offline/Repository
Basically, it consists in creating your own local repository, except that it won’t contain the packages themselves, only the dependency information.
The problem is that when you generate the package download list using this method, it will try to get the packages from your local repository and obviously fail.
The solution is to post-process the script by replacing the URLs with the correct one.
Assuming you created the local repository at «/home/username/repository» and got the different files from «http://archive.ubuntu.com/ubuntu/», this can easily be done with the following command:
or directly without creating a second script:
or simply with any text editor featuring search&replace.
Use apt-offline
apt-offline allows you to easily upgrade or install new packages on your offline PC, by using another online PC.
Источник


