- Install Docker Engine from binaries
- Install daemon and client binaries on Linux
- Prerequisites
- Secure your environment as much as possible
- Install static binaries
- Install client binaries on macOS
- Как установить программу в формате — sh,run,deb,bin,install и linux
- Не понимаете как установить приложения в форматах sh,run,deb,bin,install и linux, читаем материал где все в деталях описано.
- Как устанавливать bin файлы в Linux
- Установка bin файлов в Linux
- Консольный вариант
- Графический вариант
- Installation from binary
- Download
- Verify GPG signature
- Recommended server configuration
- Prepare environment
- Create required directory structure
- Configure Gitea’s working directory
- Copy Gitea binary to global location
- Running Gitea
- 1. Creating a service file to start Gitea automatically (recommended)
- 2. Running from command-line/terminal
- Updating to a new version
- 1. Restarting gitea with systemd (recommended)
- 2. Restarting gitea without systemd
- Troubleshooting
- Old glibc versions
- Running Gitea on another port
- Running Gitea on Raspbian
- Git error after updating to a new version of Gitea
Install Docker Engine from binaries
Estimated reading time: 5 minutes
Note: You may have been redirected to this page because there is no longer a dynamically-linked Docker package for your Linux distribution.
If you want to try Docker or use it in a testing environment, but you’re not on a supported platform, you can try installing from static binaries. If possible, you should use packages built for your operating system, and use your operating system’s package management system to manage Docker installation and upgrades. Be aware that 32-bit static binary archives do not include the Docker daemon.
Static binaries for the Docker daemon binary are only available for Linux (as dockerd ). Static binaries for the Docker client are available for Linux and macOS (as docker ).
This topic discusses binary installation for both Linux and macOS:
Install daemon and client binaries on Linux
Prerequisites
Before attempting to install Docker from binaries, be sure your host machine meets the prerequisites:
- A 64-bit installation
- Version 3.10 or higher of the Linux kernel. The latest version of the kernel available for your platform is recommended.
- iptables version 1.4 or higher
- git version 1.7 or higher
- A ps executable, usually provided by procps or a similar package.
- XZ Utils 4.9 or higher
- A properly mounted cgroupfs hierarchy; a single, all-encompassing cgroup mount point is not sufficient. See Github issues #2683, #3485, #4568).
Secure your environment as much as possible
OS considerations
Enable SELinux or AppArmor if possible.
It is recommended to use AppArmor or SELinux if your Linux distribution supports either of the two. This helps improve security and blocks certain types of exploits. Review the documentation for your Linux distribution for instructions for enabling and configuring AppArmor or SELinux.
If either of the security mechanisms is enabled, do not disable it as a work-around to make Docker or its containers run. Instead, configure it correctly to fix any problems.
Docker daemon considerations
Enable seccomp security profiles if possible. See Enabling seccomp for Docker.
Enable user namespaces if possible. See the Daemon user namespace options.
Install static binaries
Download the static binary archive. Go to https://download.docker.com/linux/static/stable/ (or change stable to nightly or test ), choose your hardware platform, and download the .tgz file relating to the version of Docker Engine you want to install.
Extract the archive using the tar utility. The dockerd and docker binaries are extracted.
Optional: Move the binaries to a directory on your executable path, such as /usr/bin/ . If you skip this step, you must provide the path to the executable when you invoke docker or dockerd commands.
Start the Docker daemon:
If you need to start the daemon with additional options, modify the above command accordingly or create and edit the file /etc/docker/daemon.json to add the custom configuration options.
Verify that Docker is installed correctly by running the hello-world image.
This command downloads a test image and runs it in a container. When the container runs, it prints a message and exits.
Install client binaries on macOS
The macOS binary includes the Docker client only. It does not include the dockerd daemon.
Download the static binary archive. Go to https://download.docker.com/mac/static/stable/x86_64/, (or change stable to nightly or test ), and download the .tgz file relating to the version of Docker Engine you want to install.
Extract the archive using the tar utility. The docker binary is extracted.
Clear the extended attributes to allow it run.
In case executing docker/docker you get the error message: вЂdocker’ is damaged and cannot be opened. You should move it to the bin.
Apple takes care about our security. Hence, we need to remove the security mechanism preventing us running the executable.
Now, when you run the following command, you can see the Docker CLI usage instructions:
Optional: Move the binary to a directory on your executable path, such as /usr/local/bin/ . If you skip this step, you must provide the path to the executable when you invoke docker or dockerd commands.
Verify that Docker is installed correctly by running the hello-world image. The value of is a hostname or IP address running the Docker daemon and accessible to the client.
This command downloads a test image and runs it in a container. When the container runs, it prints a message and exits.
Источник
Как установить программу в формате — sh,run,deb,bin,install и linux
Не понимаете как установить приложения в форматах sh,run,deb,bin,install и linux, читаем материал где все в деталях описано.

- 1. Установка программы в формате sh, я с данным форматом регулярно сталкиваюсь, часто это бывают скрипты автоматизированной установки либо программы либо сборки сервера итд, в скрипте прописаны все пункты, что ставить и какие пакеты итд. Все пошагово и далее все собирается воедино и выходит готовое приложение.
Для установки данных форматов приложений, нам как всегда требуется консоль то есть Терминал, без которого очень трудно представить установку программ подобных форматов.
Что нужно сделать для установки программы в формате sh? первым делом перейдите в директорию(папку) куда вы загружаете(скачиваете) приложения, обычно это папка «Загрузки», откройте терминал(Ctrl+Alt+T), далее выполните следующие команды:
Лично по своему опыту, я с форматов sh ставил лишь(мини вебмани и еще скрипт был один, сборка сервера уже и забыл название, в общем для wine). Если вам ничего не говорит слово Wine и вы не понимаете, что это такое, ознакомьтесь с материалом — Изучаем Wine, основы для начинающих.

- 2. Установка приложений в формате run, немного таких я встречал. Обычно это драйвера для видеокарты, в большей части случаев.
Устанавливается аналогичным методом как и sh:

- 3. Установка программ в формате deb, приложения в подобном формате вы будете видеть часто если вы работаете в одной из систем семейства Debian. Как установить deb файлы, я уже описывал в материале — Как установить пакет формата deb и куда делся exe.
Но так же еще есть вариант установки через терминал, как я ранее писал, первым делом перейдите в папку где лежит ваш файл, далее откройте терминал(Ctrl+Alt+T), и выполните следующую команду:
После начнется установка, в большей части у вас просто запросится разрешение на установку, ввести пароль администратора и нажать клавишу Enter и начнется установка программы.

- 4. Установка программ в формате bin, в данном формате я устанавливал несколько приложений, это драйвера для Java скачанные с официального сайта производителя и установка приложения «Cisco Packet Tracer» для модулирования сетей.
Установка приложения в формате bin, очень похожа на установку приложений в форматах(sh,run,linux и install), откройте терминал, аналогично не забываем перейти в директорию в которой находится данный файл, как перейти, я уже описывал в выше.
Перешли в нужную директорию, далее выполните следующие команды:
После запуска установки, от вас будет запрошен лишь пароль администратора и как вариант как это было у меня — «(press any to enter)«, нажать любую клавишу для продолжения установки, ну и возможно на следующем шаге еще ввести Y(yes). На некоторых этапах установки приложений в данном формате это требуется.

- 5. Установка программ в формате install и linux, ничем практически не отличается от(sh,run и bin). В формате install, я в сети наблюдаю регулярно приложения. Как вариант, я в последнее время где-то месяц назад, скачивал для тестирования антивирус Nod Eset для Linux, там приложение было не в форматах deb либо run, а именно в формате linux.
Установка аналогично очень проста, переходим в директорию в которой лежит наш скачанный файл и выполняем следующие команды:
После начнется установка в которой вам придется просто нажимать на кнопочки — «Я согласен и тому подобные».
Источник
Как устанавливать bin файлы в Linux
Не смотря, на то, что большинство программ в операционной системе Linux (в моем случае Ubuntu) можно установить из Центра приложений, тем самым обеспечивая совместимость с системой, иногда вам может понадобится установить новую версию программы или наоборот, старую, которой может не оказаться в списке.
Такие программы чаще всего распространяются, в формате .bin также известные как бинарные файлы. Бывает, что они запакованы в архив, а иногда как исполняемые файлы. Установка bin linux, может быть произведена через терминал либо же через графический интерфейс. Рассмотрим оба варианта.
Установка bin файлов в Linux
Консольный вариант
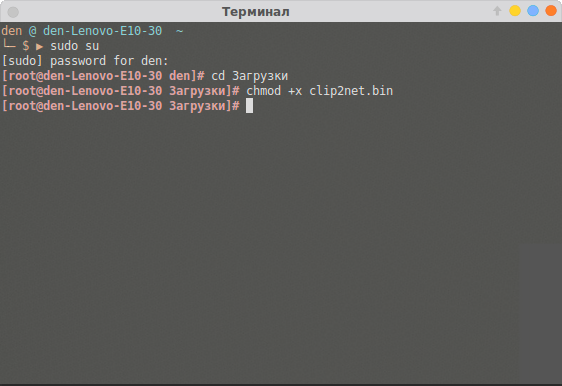
1. Для начала в файловом менеджере, нужно найти наш бинарник.
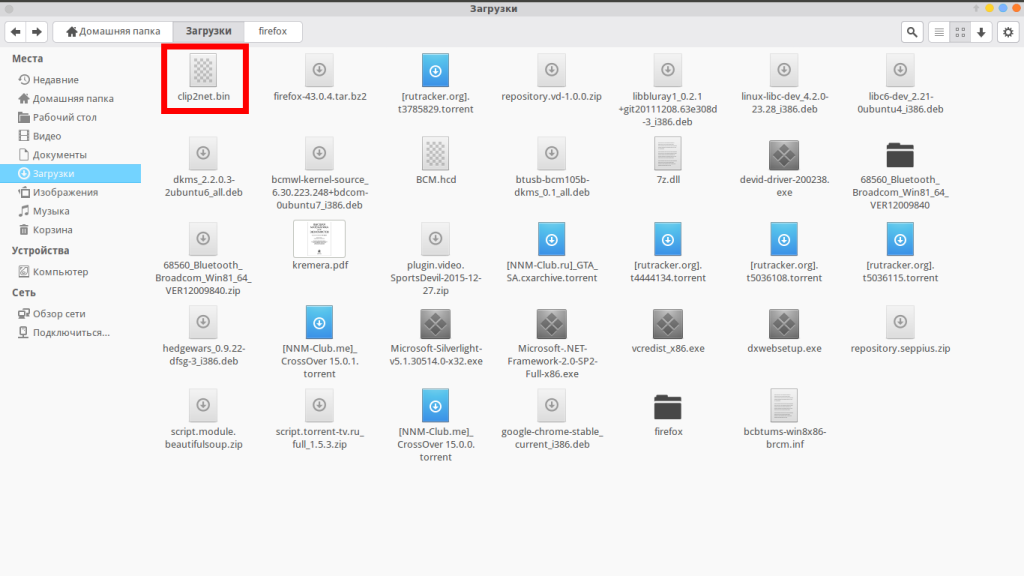
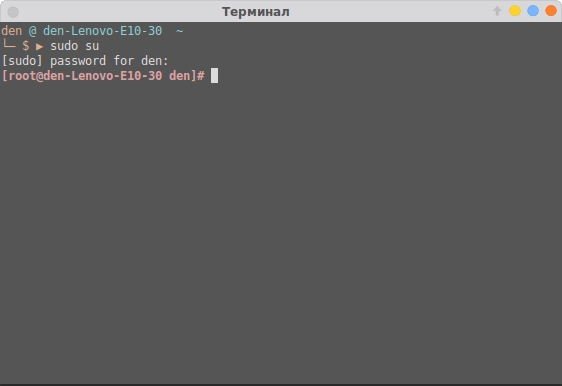
2. Откроем терминал, сочетанием клавиш Ctrl+Alt+T.
3. Зайдем в режим суперпользователя (под рутом). Для этого введем следующую команду в терминале:
Затем нужно ввести пароль.
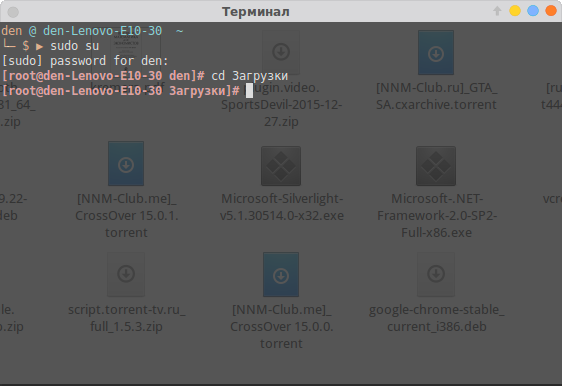
4. Теперь, в терминале нам нужно зайти в ту директорию, где расположен наш бинарник. В моем случае это будет так:
5. Дайте права на выполнение файла .bin, командой:
chmod +x thefile.bin
В моем случае это выглядит так:
chmod +x clip2net.bin
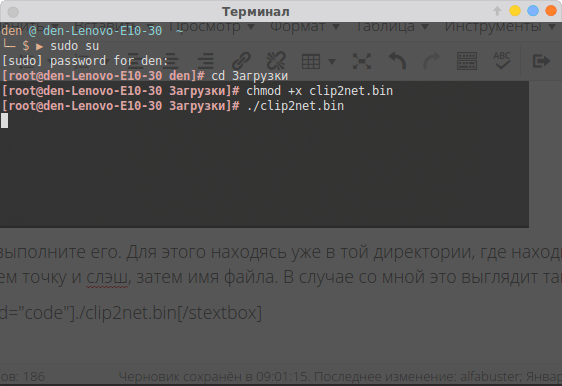
6. Теперь выполните его. Для этого находясь уже в той директории, где находится бинарный файл введем точку и слэш, затем имя файла. В случае со мной это выглядит так:
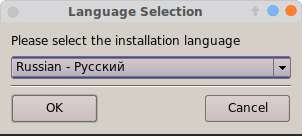
7. После этой команды, установщик программы запустился и спрашивает меня на каком языке я хотел бы установить bin файл в linux.
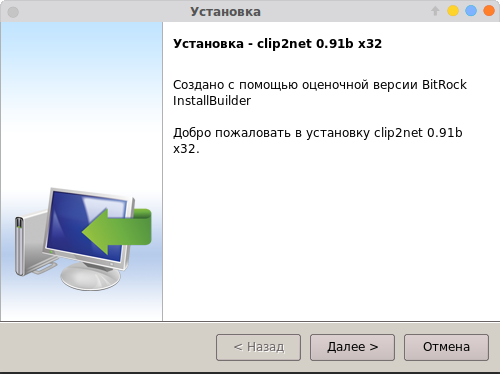
8. Далее устанавливаем программу как обычно это делается в ОС Windows.
Графический вариант
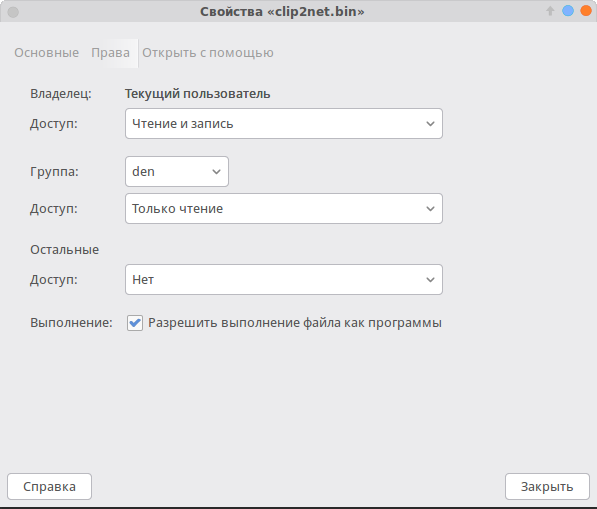
Он ненамного проще, но для новичков, которые недавно перешли с Windows будет понятнее. Первые 3 пункта из консольного варианта все же придется выполнить. Затем нужно выбрать файл, нажать правой кнопкой мыши, выбрать пункт «свойства». На вкладке права, нужно поставить галочку напротив пункта «Разрешить выполнение файла как программы».
Закрываем окно. И перетаскиваем этот файл в терминал, запущенный от суперпользователя, имя файла и путь уже впишутся автоматически, остается лишь нажать на кнопку «Enter». Далее, вы можете установить bin файл, как и в первом варианте. На этом все.
Источник
Installation from binary
All downloads come with SQLite, MySQL and PostgreSQL support, and are built with embedded assets. This can be different for older releases.
Table of Contents
Download
Choose the file matching the destination platform from the downloads page, copy the URL and replace the URL within the commands below:
Verify GPG signature
Gitea signs all binaries with a GPG key to prevent against unwanted modification of binaries. To validate the binary, download the signature file which ends in .asc for the binary you downloaded and use the gpg command line tool.
Look for the text Good signature from «Teabot » to assert a good binary, despite warnings like This key is not certified with a trusted signature! .
Recommended server configuration
NOTE: Many of the following directories can be configured using Environment Variables as well! Of note, configuring GITEA_WORK_DIR will tell Gitea where to base its working directory, as well as ease installation.
Prepare environment
Check that Git is installed on the server. If it is not, install it first.
Create user to run Gitea (ex. git )
Create required directory structure
NOTE: /etc/gitea is temporary set with write rights for user git so that Web installer could write configuration file. After installation is done, it is recommended to set rights to read-only using:
If you don’t want the web installer to be able to write the config file at all, it is also possible to make the config file read-only for the gitea user (owner/group root:git , mode 0640 ), and set INSTALL_LOCK = true . In that case all database configuration details must be set beforehand in the config file, as well as the SECRET_KEY and INTERNAL_TOKEN values. See the command line documentation for information on using gitea generate secret INTERNAL_TOKEN .
Configure Gitea’s working directory
NOTE: If you plan on running Gitea as a Linux service, you can skip this step as the service file allows you to set WorkingDirectory . Otherwise, consider setting this environment variable (semi-)permanently so that Gitea consistently uses the correct working directory.
Copy Gitea binary to global location
Running Gitea
After the above steps, two options to run Gitea are:
1. Creating a service file to start Gitea automatically (recommended)
See how to create Linux service
2. Running from command-line/terminal
Updating to a new version
You can update to a new version of Gitea by stopping Gitea, replacing the binary at /usr/local/bin/gitea and restarting the instance. The binary file name should not be changed during the update to avoid problems in existing repositories.
It is recommended you do a backup before updating your installation.
If you have carried out the installation steps as described above, the binary should have the generic name gitea . Do not change this, i.e. to include the version number.
1. Restarting gitea with systemd (recommended)
As explained before, we recommend to use systemd as service manager. In this case systemctl restart gitea should be enough.
2. Restarting gitea without systemd
To restart your gitea instance, we recommend to use SIGHUP signal. If you know your gitea PID use kill -1 $GITEA_PID otherwise you can use killall -1 gitea or pkill -1 gitea
To gracefully stop the gitea instance, a simple kill $GITEA_PID or killall gitea is enough.
NOTE: We don’t recommend to use SIGKILL signal (know also as -9 ), you may be forcefully stopping some of Gitea internal tasks and it will not gracefully stop (tasks in queues, indexers processes, etc.)
See below for troubleshooting instructions to repair broken repositories after an update of your Gitea version.
Troubleshooting
Old glibc versions
Older Linux distributions (such as Debian 7 and CentOS 6) may not be able to load the Gitea binary, usually producing an error such as ./gitea: /lib/x86_64-linux-gnu/libc.so.6: version `GLIBC\_2.14′ not found (required by ./gitea) . This is due to the integrated SQLite support in the binaries provided by dl.gitea.io. In this situation, it is usually possible to install from source without sqlite support.
Running Gitea on another port
For errors like 702 runWeb()] [E] Failed to start server: listen tcp 0.0.0.0:3000: bind: address already in use Gitea needs to be started on another free port. This is possible using ./gitea web -p $PORT . It’s possible another instance of Gitea is already running.
Running Gitea on Raspbian
As of v1.8, there is a problem with the arm7 version of Gitea and it doesn’t run on Raspberry Pi and similar devices.
It is therefore recommended to switch to the arm6 version which has been tested and shown to work on Raspberry Pi and similar devices.
Git error after updating to a new version of Gitea
If the binary file name has been changed during the update to a new version of Gitea, git hooks in existing repositories will not work any more. In that case, a git error will be displayed when pushing to the repository.
The [. ] part of the error message will contain the path to your previous Gitea binary.
To solve this, go to the admin options and run the task Resynchronize pre-receive, update and post-receive hooks of all repositories to update all hooks to contain the new binary path. Please note that this overwrite all git hooks including ones with customizations made.
If you aren’t using the built-in to Gitea SSH server you will also need to re-write the authorized key file by running the Update the ‘.ssh/authorized_keys’ file with Gitea SSH keys. task in the admin options.
Copyright © 2021 The Gitea Authors. All rights reserved. Made with and Hugo.
Источник


