- How to Install & Uninstall a list of Packages from a file
- Method-1 : How to install a list of packages from a file in Linux?
- Method-2 : How to install a list of packages from a file in Linux
- Method-3 : How to install list of packages from a file in Ubuntu?
- Method-4 : How to install list of packages from a file in Ubuntu?
- Wrapping Up
- Offline installation of packages
- Contents
- Install from file: pacman -U
- Offline cache
- Local repository
- Generate a list of packages to download
- Download/copy the packages and their dependencies
- Create a repository database just for these packages
- Transfer the packages
- Install the packages
- Restoring online sources
- Links and sources
- How to Install Packages from Source on Linux
- First things first
- Installing from source with build-dep
- The magic of configure
- Using Git
- And there you go
How to Install & Uninstall a list of Packages from a file
In some case you may need to install a list of packages from one server to another.
For example, you have installed 15 packages on Server-A, and those packages needs to be installed on Server-B, Server-C, etc.
We can manually install all the packages but it’s time consuming process. It can be done for one or two servers, what if you have say 10 servers? Isn’t that time consuming?
Don’t worry we are here to help you out in this situation. We will show you four methods in this article to overcome this situation.
I hope this will help you to fix your issue. I have tested these commands on CentOS7 and Ubuntu 18.04 systems. Hope this will work with other distributions too. Make sure to replace the distribution official package manager command depending on your OS.
(Navigate to this article if you want to check list of installed packages in Linux system)
Example: if you would like to create a package list from RHEL based system then use the following steps. Do the same for other distributions too:
Method-1 : How to install a list of packages from a file in Linux?
Create a file and add the list of packages that you want to install.
For testing purpose, we are going to add only the below three packages into the file:
Simply run the following apt command to install the packages in a single shot from a file in Ubuntu/Debian systems:
For removal, use the same format with appropriate option as show below:
Use the following yum command to install/uninstall listed packages from a file on RHEL based systems, such as CentOS, RHEL (Redhat) and OEL (Oracle Enterprise Linux):
Use the following dnf command to install/uninstall listed packages from a file on Fedora, CentOS 8 & RHEL 8 systems:
Use the following zypper command to install/uninstall listed packages from a file on openSUSE system:
Use the following pacman command to install/uninstall listed packages from a file on Arch Linux based systems such as Manjaro, etc.
Method-2 : How to install a list of packages from a file in Linux
I prefer to go with this method because this is very simple and straightforward.
Use the following ‘apt’ command to install/uninstall listed packages from a file on Debian based systems such as Debian, Ubuntu and Linux Mint.
Use the following ‘yum‘ command to install/uninstall listed packages from a file on RHEL based systems such as CentOS, RHEL (Redhat) and OEL (Oracle Enterprise Linux):
Use the following ‘dnf‘ command to install/uninstall listed packages from a file on Fedora, RHEL 8 & CentOS 8 systems:
Use the following ‘zypper‘ command to install/uninstall listed packages from a file on openSUSE system:
Use the following ‘pacman‘ command to install/uninstall listed packages from a file on Arch Linux based systems such as Manjaro and Antergos system:
Method-3 : How to install list of packages from a file in Ubuntu?
Alternatively, we can use the “For Loop” command to achieve this.
To install the packages in bulk, use the below format to run a “For Loop” in a single line:
To install the packages in bulk using a shell script, use the following “For Loop”:
Set an executable permission to bulk-package-install.sh file:
Finally, run the below script to achieve this:
Method-4 : How to install list of packages from a file in Ubuntu?
Use the “While Loop” command to achieve this.
To install the packages in bulk, use the below format to run a “While Loop” on a single line:
To install packages in bulk with a shell script, use the “While Loop” in the following way:
Set an executable permission to bulk-package-install.sh file:
Finally, run the script to achieve this:
Wrapping Up
In this guide, we have shown you several examples to Install & Uninstall a list of Packages from a file
If you have any questions or feedback, feel free to comment below, and we will get back to you as soon as we can. Happy learning!
Источник
Offline installation of packages
![]() This article or section needs language, wiki syntax or style improvements. See Help:Style for reference.
This article or section needs language, wiki syntax or style improvements. See Help:Style for reference.![]()
From time to time you might end up with a copy of Arch Linux on an offline computer and want to install packages for it.
Contents
Install from file: pacman -U
The Pacman -U command installs packages from the provided paths, and is probably what you are looking for in casual use cases.
For one package:
For several packages:
Offline cache
You can stuff things into /var/lib/pacman/sync and /var/cache/pacman/pkg to make pacman think it has everything it needs to do searches, updates, and installs. This method is based on byte’s post from this thread.
Download the package databases on a computer with internet access and transfer them to your computer. If needed, change MIRROR to any mirror from the mirror status list.
Following steps will make sure you are working with up-to-date package lists, as if you ran pacman -Sy .
After transferring the *.db files to the offline PC, do the following:
To update a New Arch Linux base system after installation you may enter
Now open that textfile with an editor and delete all lines that are not URLs. Next, bring that list with you to a place where you have internet and either download the listed packages manually or run wget in an empty directory:
Take all the *.pkg.tar.gz files back home, put them in /var/cache/pacman/pkg and finally run
Local repository
Scenario: you have two Arch Linux machines, ‘Al’ (with internet connection) and ‘Bob’ (without internet connection), and you need to install some NVIDIA packages and their dependencies on ‘Bob’. In this example, the wanted packages are nvidia , nvidia-utils , and xf86-video-nouveau , but you want to use a dedicated directory instead of /var/cache/pacman/pkg/ and a dedicated repository called nvidia (instead of the usual core, extra etc. )
Generate a list of packages to download
This can be done on any Arch Linux machine which has up-to-date repository data bases (see above for links to database files); to create the list of links to the required packages, use:
The file nvidia.list will contain links to the listed packages and any others which they depend on which are not already installed on ‘Al’. Unless you have cleared your cache the packages you have installed will be in your cache location. You can check /etc/pacman.conf for the location. It is probably something like /var/cache/pacman/pkg/ .
Download/copy the packages and their dependencies
Obviously this requires an internet connection, so on ‘Al’ create a directory called /path/to/nvidia for the files and run:
Then copy the dependencies you have already installed from the cache. Either find them manually by browsing https://archlinux.org/packages/ or if the total size of all your packages is not too large just copy them all
Create a repository database just for these packages
This can be done on either ‘Al’ or ‘Bob’ using the repo-add command which comes with pacman (from version 3?); first, change to the /path/to/nvidia directory where the packages were downloaded, then create database file called nvidia.db.tar.gz :
Transfer the packages
Now all the packages have been downloaded, you do not need ‘Al’ anymore. Copy the contents of /path/to/nvidia to a the temporary NVIDIA packages cache directory on ‘Bob’. In this example, this folder is called /home/me/nvidia :
Next, pacman must be made aware of this new repository of packages. First copy your current pacman.conf :
Now in /etc/pacman.conf make sure that your SigLevel is set to Never as your repository will not provide signatures
and add the following lines at the bottom of pacman.conf :
You may also need to comment out the other repositories so stale defaults do not cause failed attempts to download from online Now, instruct pacman to synchronize with the dedicated NVIDIA repository we created:
This command finds the nvidia.db.tar.gz file in /home/me/nvidia and expands it to /var/lib/pacman/sync/nvidia to create a database of packages contained in the NVIDIA repository.
Install the packages
Finally install the packages:
Restoring online sources
Should Bob ever be put online we can restore access to the online sources by replacing /etc/pacman.conf with the previously created /etc/pacman.conf.old .
Links and sources
Compiled from the forums, with thanks to Heller_Barbe and byte
Источник
How to Install Packages from Source on Linux
Most modern Linux distributions enjoy standard repositories that include most of the software you’ll need to successfully run your Linux server or desktop. Should a package come up missing, more than likely you’ll find a repository you can add, so that the installation can be managed with the built-in package manager. This should be considered a best practice. Why? Because it’s important for the integrity of the platform to ensure the package manager is aware of installed software. When that is the case, packages can easily be updated (to fix vulnerabilities and the like). Another reason to install from repositories is that dependencies are easily met. When installing from source, you can sometimes find yourself trapped in a convoluted dependency nightmare.
Fortunately, repositories have become so inclusive, that it is rare you will ever need to install a package by any other means. However, you may find, on occasion, a reason to install from source. Reasons could include:
A package that is not found in any repository
A package developed in-house
You need to install a package with custom dependencies or options
When you do have to install from source, there are certain things you will need to know. Let’s walk through the process of installing Audacity from source on Ubuntu 16.10 (with the help of build-dep ). Although this can be easily installed from repositories, it serves as a fine illustration for installing from source.
First things first
Installing from source used to be very common and also quite simple. You would download the source file, unpack it (with either zip or tar), change into the newly created directory, and then issue the commands:
That still works for applications built with autoconf/automake. As long as your distribution met the necessary dependencies (which were almost always outlined in a README file within the source), the package would install and could be used. Although some source installations are still that simple, things are now a bit more complicated.
Another glitch in the modern system is that Ubuntu doesn’t ship with all the necessary tools to build from source. To solve that issue, you must first install autoconf with the command:
Depending upon which version of Ubuntu you installed, you may even have to install the build-essential and build-dep packages (which includes the gcc/g++ compilers and libraries as well as a few other necessary utilities). These two packages can be installed with the command:
For the likes of Fedora, a similar installation would be:
The above command would install the yum-builddep package.
Installing from source with build-dep
One way to install from source, but avoid the dependency nightmare, is to first work with the build-dep tool. Say you want to install audacity using build-dep ; the first thing you must do is uncomment the deb-src listings in /etc/apt/sources.list . Open that file in your favorite editor and then uncomment out the two deb-src listings, by removing the leading # characters ( Figure 1 ).
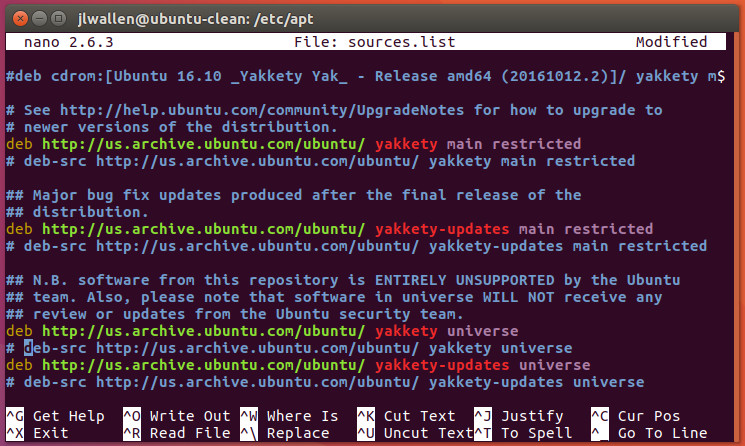 Figure 1: Configuring apt so it can use build-dep.
Save and close that file. Now run sudo apt-get update to update apt. Once that is done, you’re ready to build Audacity from source. Here’s what you must do. The first step is to use apt to install the necessary dependencies for Audacity. This is taken care of with the command:
Allow that command to finish. The next step is to download the source package with the command:
In your current working directory, you should see a new directory called audacity-XXX (where XXX is the release number). Change into that directory. At this point, you can now issue the old tried and true:
Audacity should now be installed and ready to use.
If the installation fails, you might have to revert to using the dpkg tool like so:
The options above are as follows:
b – build binary
uc – do not sign the .changes file
us – do not sign the source package
Why might a source package fail to install? Beyond not having all of the necessary dependencies, the answer very well might lie in the ./configure command.
The magic of configure
That configure command does have some magic hidden within. Most often you can run the ./configure command without any arguments. However, there are times you might want (or be required) to issue the command such that it configures the software to meet certain needs. Fortunately, the make tool can help us here. If you issue the command ./configure –help (from within the application source directory you’ve downloaded), you will be presented with a list of configuration options that can be used ( Figure 2 ), specific to that package.
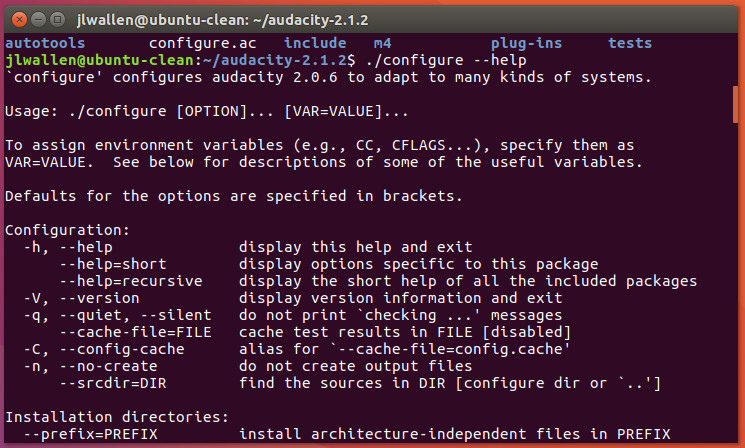 Figure 2: Options available for the source installation of Audacity.
These options can sometimes mean the difference between an application installing or not. Every application you attempt to install will display different options for the ./configure command, so make sure to issue ./configure –help before issuing ./config . Possible configuration options include:
–prefix=PREFIX (install architecture-independent files in a non-standard location such as –prefix=/opt )
–build=BUILD (configure for a specific system architecture)
–host=HOST (the architecture of the system you want the file to run on, so you can compile the application on one machine and run it on another)
–disable-FEATURE (this allows you to disable specific features of an application)
–enable-FEATURE (this allows you to enable specific features of an application)
–with-PACKAGE=yes (use a specific PACKAGE)
–without-PACKAGE (do not use a specific PACKAGE)
As I mentioned, every software to be installed will offer different configuration options. Once you’ve decided on your options, you would then run the ./configure command (with all options). Once the configure script completes, follow it up with make and then make install to complete the installation.
Using Git
Let’s walk through another example, this time with the help of Git. As Ubuntu doesn’t ship with Git installed, we’ll first have to install it with the command:
Once this is installed, let’s pull down the source for the Clementine audio player with the command:
With the source downloaded, change into the newly added directory with the command cd Clementine . At this point, run the following commands to build the player from source:
That’s it. You should now have a working install of Clementine (so long as you’ve met the necessary dependencies). If the installation complains about dependencies, you can scan back through the output to find out what all needs to be installed. In the case of Clementine, you could always pick up the dependencies with the command:
And there you go
That, my friends, is your introduction to installing from source. You might now not only have a better understanding as to how such an installation is handled, but why so many opt to bypass installing from source, and go straight to their distribution’s package manager. Dependency nightmares and a lack of consistency in steps helps to make the likes of apt , dpkg, yum, zypper, and dnf all the more appealing.
Yes, installing from source offers far more flexibility, but that flexibility comes at the price of simplicity.
Learn more about Linux through the free “Introduction to Linux” course from The Linux Foundation and edX.
Источник


