- Как скачать и установить Python 3 на Ubuntu 18.04 (Linux)
- Как проверить текущую версию Python
- Как установить Python 3 на Linux через apt-get
- Как установить Python 3 на Linux из архива
- Ошибки, которые могут возникнуть при установке
- 1. Zipimport.zipimporterror
- 2. No module named ‘_ctypes’
- Как обновить команду python3 до последней версии
- Заключение
- How To Install Python 3 and Set Up a Programming Environment on an Ubuntu 20.04 Server
- Introduction
- Prerequisites
- Step 1 — Setting Up Python 3
- Step 2 — Setting Up a Virtual Environment
- Step 3 — Creating a “Hello, World” Program
- Conclusion
- Пакет: python3-dev (3.6.5-3)
- Ссылки для python3-dev
- Ресурсы Ubuntu:
- Сопровождающий:
- Original Maintainers (usually from Debian):
- Внешние ресурсы:
- Подобные пакеты:
- header files and a static library for Python (default)
- Другие пакеты, относящиеся к python3-dev
- Загрузка python3-dev
Как скачать и установить Python 3 на Ubuntu 18.04 (Linux)
В этой статье мы скачаем и установим последнюю версию Python 3 на Ubuntu. Затем убедимся, что python установлен корректно, рассмотрим популярные ошибки и их решения.
Все команды выполнялись в Ubuntu 18.04 LTS, но эта статья поможет установить python на Ubuntu 16.04, Debian, Mint и другие Linux-системы.
Мы используем командную строку Ubuntu — Терминал, для работы. Вы можете открыть Терминал через поиск или комбинацию клавиш Ctrl+Alt+T.
Как проверить текущую версию Python
Проверка текущей версии программного обеспечения не только помогает вам получить номер версии этого программного обеспечения, установленного в вашей системе, но и проверяет, действительно ли программное обеспечение установлено в вашей системе.
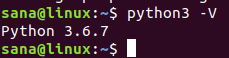
Мы сделаем то же самое для Python, выполнив следующую команду в нашем терминале:
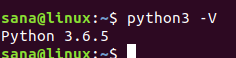
Версия будет отображаться, как показано в приведенном выше выводе. Число зависит от того, когда вы обновили систему.
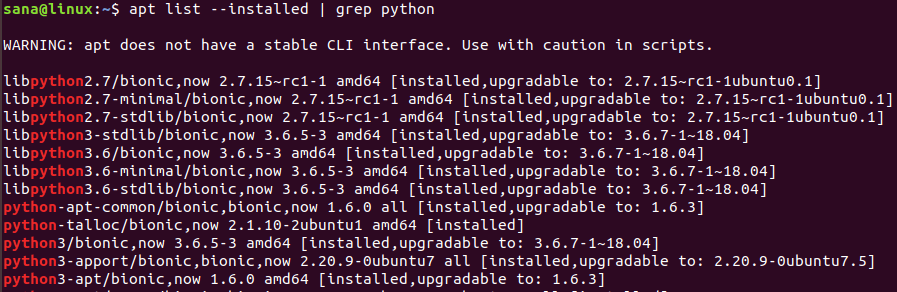
У вас также может быть несколько версий Python, установленных в вашей системе. Следующая команда выведет список всех версий Python, которые есть в вашей системе:
Как установить Python 3 на Linux через apt-get
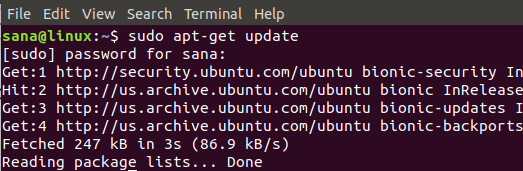
Установка Python 3 на Ubuntu с помощью команды apt-get довольно просто. Во-первых, вам необходимо обновить репозиторий системы, чтобы можно было установить последнюю доступную версию без проблем совместимости. Для этого выполните команду от имени администратора:
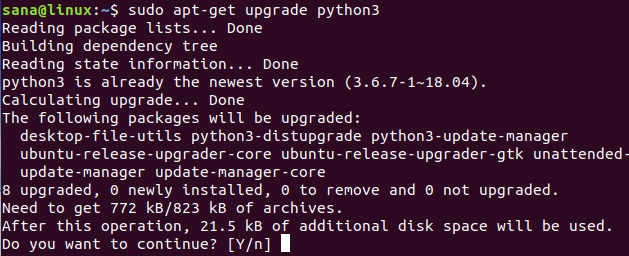
Так как Python уже установлен в нашей системе (это мы проверили в предыдущем разделе), нам нужно обновить его до последней версии следующим образом:
Система может попросить вас ввести пароль для прав sudo , поскольку только авторизованный пользователь может добавлять / удалять и обновлять программное обеспечение в Ubuntu.
Система также запросит подтверждение обновления. Введите Y , а затем нажмите Enter, чтобы продолжить.
Так вы обновили Python до последней доступной версии. Проверьте:
Если Python не установлен, вы можете установить его с правами sudo используя команду apt-get :
Как установить Python 3 на Linux из архива
Сайт Python.org содержит список всех выпусков Python по этой ссылке:
https://www.python.org/downloads/source/
Поэтому, если вы решите установить Python вручную, можете скачать python любой сборки c официального сайта. На сайте также есть последние версии, которые вы не загрузите с помощью команды apt-get .
На момент подготовки материала Python-3.7.1 последняя доступная версия, поэтому мы скачаем его файл .tgz с помощью следующей команды:
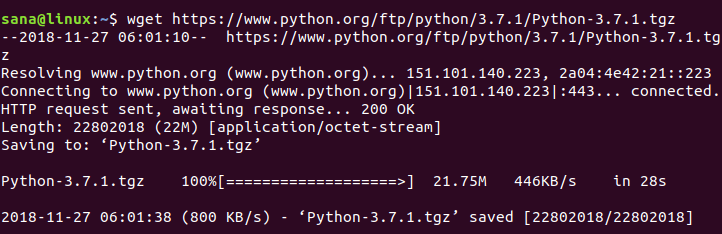
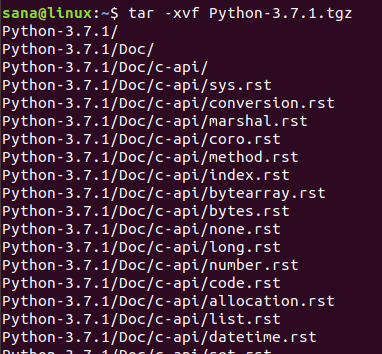
Когда архив с ptyhon будет скачан, выполните следующую команду, чтобы извлечь файлы:
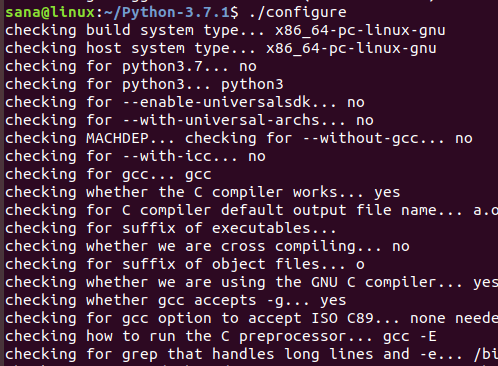
После того, как файлы извлечены, нужно запустить C-программу «configure». Для этого вам необходимо установить компилятор языка программирования C — gcc в вашу Linux-систему. Если он не предустановлен, установите его с помощью следующей команды:
Измените текущую директорию на Python-3.7.1 или на ту версию python, которую вы скачали и извлекли:
Теперь используйте следующую команду, чтобы запустить скрипт конфигурации:
Теперь пришло время установить Python.
Если вы не можете запустить команду make , установите make с помощью следующей команды:
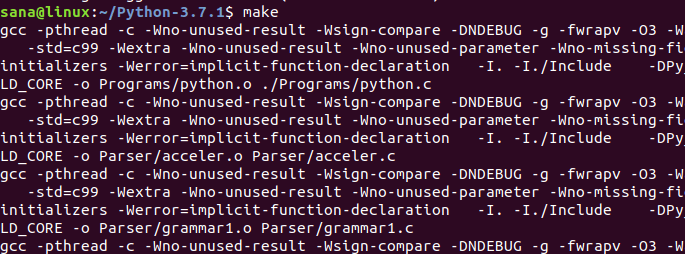
Запустите следующую команду для установки языка программирования Python:
Скачанная версия Python с официального сайта установлена в вашей Linux-системе.
Ошибки, которые могут возникнуть при установке
1. Zipimport.zipimporterror
Когда вы запускаете команду sudo make install , можете столкнуться со следующей ошибкой:

Это значит, что нужно установить пакет с именем zlib1g-dev , так как он, возможно, вам не был нужен раньше.
Решение:
Выполните следующую команду с правами sudo, чтобы установить отсутствующий пакет zlib1g-dev :
Затем повторите команду для завершения установки Python:
2. No module named ‘_ctypes’
Это ошибка появляется также при запуске команды sudo make install :

Это значит, что нужно установить пакет с именем libffi-dev , так как он, возможно, вам не был нужен раньше.
Решение:
Выполните следующую команду с правами sudo, чтобы установить отсутствующий пакет libffi-dev :
Затем повторите команду для завершения установки Python:
Как обновить команду python3 до последней версии
Перед установкой Python вручную из архива номер версии нашей установки Python был 3.6.7
Когда я проверил номер версии python3.7 , он дает следующий вывод:
Обновите версию python для команды python3 следующей командой:
Теперь команда python3 работает с последней версией Python в моей системе (3.7.1).

Заключение
В большинстве версий Ubuntu уже установлены Python и Pip3, но после прочтения этой статьи вы узнали, как загрузить и обновить их до последних версий.
Источник
How To Install Python 3 and Set Up a Programming Environment on an Ubuntu 20.04 Server
Last Validated on August 20, 2021 Originally Published on April 24, 2020
Not using Ubuntu 20.04?
Choose a different version or distribution.
Introduction
The Python programming language is an increasingly popular choice for both beginners and experienced developers. Flexible and versatile, Python has strengths in scripting, automation, data analysis, machine learning, and back-end development. First published in 1991 with a name inspired by the British comedy group Monty Python, the development team wanted to make Python a language that was fun to use.
This tutorial will get your Ubuntu 20.04 server set up with a Python 3 programming environment. Programming on a server has many advantages and supports collaboration across development projects. The general principles of this tutorial will apply to any distribution of Debian Linux.
Prerequisites
In order to complete this tutorial, you should have a non-root user with sudo privileges on an Ubuntu 20.04 server. To learn how to achieve this setup, follow our initial server setup guide.
If you’re not already familiar with a terminal environment, you may find the article “An Introduction to the Linux Terminal” useful for becoming better oriented with the terminal.
With your server and user set up, you are ready to begin.
Step 1 — Setting Up Python 3
Ubuntu 20.04 and other versions of Debian Linux ship with Python 3 pre-installed. To make sure that our versions are up-to-date, let’s update and upgrade the system with the apt command to work with Ubuntu’s Advanced Packaging Tool:
The -y flag will confirm that we are agreeing for all items to be installed, but depending on your version of Linux, you may need to confirm additional prompts as your system updates and upgrades.
Once the process is complete, we can check the version of Python 3 that is installed in the system by typing:
You’ll receive output in the terminal window that will let you know the version number. While this number may vary, the output will be similar to this:
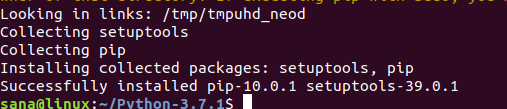
To manage software packages for Python, let’s install pip, a tool that will install and manage programming packages we may want to use in our development projects. You can learn more about modules or packages that you can install with pip by reading “How To Import Modules in Python 3.”
Python packages can be installed by typing:
Here, package_name can refer to any Python package or library, such as Django for web development or NumPy for scientific computing. So if you would like to install NumPy, you can do so with the command pip3 install numpy .
There are a few more packages and development tools to install to ensure that we have a robust setup for our programming environment:
Once Python is set up, and pip and other tools are installed, we can set up a virtual environment for our development projects.
Step 2 — Setting Up a Virtual Environment
Virtual environments enable you to have an isolated space on your server for Python projects, ensuring that each of your projects can have its own set of dependencies that won’t disrupt any of your other projects.
Setting up a programming environment provides greater control over Python projects and over how different versions of packages are handled. This is especially important when working with third-party packages.
You can set up as many Python programming environments as you would like. Each environment is basically a directory or folder on your server that has a few scripts in it to make it act as an environment.
While there are a few ways to achieve a programming environment in Python, we’ll be using the venv module here, which is part of the standard Python 3 library. Let’s install venv by typing:
With this installed, we are ready to create environments. Let’s either choose which directory we would like to put our Python programming environments in, or create a new directory with mkdir , as in:
Once you are in the directory where you would like the environments to live, you can create an environment by running the following command:
Essentially, pyvenv sets up a new directory that contains a few items which we can view with the ls command:
Together, these files work to make sure that your projects are isolated from the broader context of your server, so that system files and project files don’t mix. This is good practice for version control and to ensure that each of your projects has access to the particular packages that it needs. Python Wheels, a built-package format for Python that can speed up your software production by reducing the number of times you need to compile, will be in the Ubuntu 20.04 share directory.
To use this environment, you need to activate it, which you can achieve by typing the following command that calls the activate script:
Your command prompt will now be prefixed with the name of your environment, in this case it is called my_env . Depending on what version of Debian Linux you are running, your prefix may appear somewhat differently, but the name of your environment in parentheses should be the first thing you see on your line:
This prefix lets us know that the environment my_env is currently active, meaning that when we create programs here they will use only this particular environment’s settings and packages.
Note: Within the virtual environment, you can use the command python instead of python3 , and pip instead of pip3 if you would prefer. If you use Python 3 on your machine outside of an environment, you will need to use the python3 and pip3 commands exclusively.
After following these steps, your virtual environment is ready to use.
Step 3 — Creating a “Hello, World” Program
Now that we have our virtual environment set up, let’s create a traditional “Hello, World!” program. This will let us test our environment and provides us with the opportunity to become more familiar with Python if we aren’t already.
To do this, we’ll open up a command-line text editor such as nano and create a new file:
Once the text file opens up in the terminal window we’ll type out our program:
Exit nano by typing the CTRL and X keys, and when prompted to save the file press y .
Once you exit out of nano and return to your shell, let’s run the program:
The hello.py program that you created should cause your terminal to produce the following output:
To leave the environment, type the command deactivate and you will return to your original directory.
Conclusion
Congratulations! At this point you have a Python 3 programming environment set up on your Ubuntu Linux server and you can now begin a coding project!
If you are using a local machine rather than a server, refer to the tutorial that is relevant to your operating system in our “How To Install and Set Up a Local Programming Environment for Python 3” series.
With your server ready for software development, you can continue to learn more about coding in Python by reading our free How To Code in Python 3 eBook, or consulting our Python tutorials.
Источник
Пакет: python3-dev (3.6.5-3)
Ссылки для python3-dev
Ресурсы Ubuntu:
Сопровождающий:
Please consider filing a bug or asking a question via Launchpad before contacting the maintainer directly.
Original Maintainers (usually from Debian):
- Matthias Klose
- Piotr Ożarowski
- Scott Kitterman
It should generally not be necessary for users to contact the original maintainer.
Внешние ресурсы:
Подобные пакеты:
header files and a static library for Python (default)
Другие пакеты, относящиеся к python3-dev
|
|
|
|
- dep: dh-python Debian helper tools for packaging Python libraries and applications
- dep: libpython3-dev (= 3.6.5-3) header files and a static library for Python (default)
- dep: python3 (= 3.6.5-3) interactive high-level object-oriented language (default python3 version)
- dep: python3-distutils (>= 3.6.5-2
) distutils package for Python 3.x
dep: python3.6-dev (>= 3.6.5-2) Header files and a static library for Python (v3.6)
Загрузка python3-dev
| Архитектура | Размер пакета | В установленном виде | Файлы |
|---|---|---|---|
| amd64 | 1,3 Кб | 17,0 Кб | [список файлов] |
| arm64 | 1,3 Кб | 17,0 Кб | [список файлов] |
| armhf | 1,3 Кб | 17,0 Кб | [список файлов] |
| i386 | 1,3 Кб | 17,0 Кб | [список файлов] |
| ppc64el | 1,3 Кб | 17,0 Кб | [список файлов] |
| s390x | 1,3 Кб | 17,0 Кб | [список файлов] |
This page is also available in the following languages:
Авторские права © 2021 Canonical Ltd.; См. условия лицензии. Ubuntu это торговый знак компании Canonical Ltd. Об этом сайте.
Источник


