- How to install libraries manually in Linux
- Statically
- Dynamically
- Install a library manually
- Библиотеки в Ubuntu
- Что такое библиотеки
- Установка библиотек в Ubuntu
- Управление библиотеками в Linux
- Выводы
- Shared libraries with GCC on Linux
- Step 1: Compiling with Position Independent Code
- Step 2: Creating a shared library from an object file
- Step 3: Linking with a shared library
- Telling GCC where to find the shared library
- Step 4: Making the library available at runtime
- Using LD_LIBRARY_PATH
- Using rpath
- rpath vs. LD_LIBRARY_PATH
- Using ldconfig to modify ld.so
How to install libraries manually in Linux
Shared libraries relies heavily on concept of libraries. These are the collection of software that are re used by other programs. This avoids having to rewrite the code for functions that are used repeatedly.
Software libraries can be linked in two ways:
Statically
These are compiled together with a program to produce a single piece of executable code. this can have advantage of producing executable code that runs quickly. However this disadvantage is that the resulting code tends to be long and so uses large amount of system resources.
Dynamically
These are also shared libraries and are loaded into memory as they are needed. This means that the code compiled with dynamically linked libraries has a smaller memory footprint then if it were linked statically.
Shared libraries are frequently updated. Installing new libraries means that you need to maintain the software that depends on these libraries. We do this in order to avoid or resolve dependencies and conflicts.
To list the shared libraries
Install a library manually
To install a library file you need to copy the file inside /usr/lib and then run ldconfig (as root). It will install any new library in that directory
ldconfig creates the necessary links and cache to the most recent shared libraries found in the directories specified on the command line, in the file /etc/ld.so.conf , and in the trusted directories ( /lib and /usr/lib ). The cache is used by the run-time linker, ld.so or ld-linux.so . ldconfig checks the header and filenames of the libraries it encounters when determining which versions should have their links updated.
ldconfig will attempt to deduce the type of ELF libs (i.e., libc5 or libc6/glibc ) based on what C libs, if any, the library was linked against.
You can add the path using the below command (path has to be added instead of /usr/lib followed by a colon “:”)
For Red Hat Linux
For HP-UX (Unix)
For making these changes permanent add these path in .bash_profile you must set environment (PATH) variable permanently in Linux
Источник
Библиотеки в Ubuntu
Как вы знаете каждая программа, установленная на вашем компьютере, состоит из нескольких частей. Это непосредственно исполняемый файл, который вы запускаете через терминал, а также библиотеки с набором функций, которые может использовать программа.
Все, без исключения, программы используют библиотеки. Даже если это ваша программа и у нее нет своих библиотек, она использует стандартную библиотеку языка программирования С.
В этой статье мы подробно рассмотрим что такое библиотеки Ubuntu, как их устанавливать, где брать и что делать если библиотека установлена, а программа говорит что ее нет. Мы не будем трогать создание библиотек, это совсем не наша тема. Как обычно, начнем с теории.
Что такое библиотеки
Библиотеки в Linux содержат наборы функций или если сказать проще алгоритмов или действий для решения определенных задач. Например, если программе нужно вывести строку на экран она не начинает сама закрашивать нужные пиксели, а просто обращается к отвечающей за это функции из библиотеки, то же самое если программе нужно прочитать содержимое файла, она не работает с секторами жесткого диска, ей достаточно вызвать функцию из стандартной библиотеки с (libc.so) и передать ей в параметрах имя нужного файла, а библиотека уже вернет ей запрашиваемые данные.
На самом деле, такая структура реализации программного обеспечения очень выгодна, поскольку достаточно написать алгоритм лишь один раз и его смогут использовать все программы просто загружая библиотеку.
Не нужно думать что библиотеки есть только в Linux, в Windows они тоже есть, только имеют другой формат и расширение dll. В Linux же все библиотеки находятся в папах /lib/, /usr/lib, /usr/local/lib или для 64 битных систем также появляется папка lib64 во всех этих подкаталогах, для библиотек специфичных для этой архитектуры. Библиотека имеет расширение .so и ее название начинается со слова lib. Например, libfuse.so, libc.so.
Дальше, после расширения файла .so идет номер версии библиотеки. Номер версии меняется всякий раз, когда разработчики вносят в нее изменения ломающие совместимость со всеми рассчитанными на нее программами. В таком случае в системе будут уже две библиотеки и каждая программа будет использовать правильную версию. Например, glibc.so.6 и glibc.so.5.
Если интересно можно даже посмотреть какие библиотеки и каких версий, использует та или иная программа, например:
linux-vdso.so.1 (0x00007ffd99167000)
libmount.so.1 => /usr/lib64/libmount.so.1 (0x00007f0f6beb0000)
libc.so.6 => /lib64/libc.so.6 (0x00007f0f6bb08000)
libblkid.so.1 => /usr/lib64/libblkid.so.1 (0x00007f0f6b8c8000)
libselinux.so.1 => /lib64/libselinux.so.1 (0x00007f0f6b6a4000)
/lib64/ld-linux-x86-64.so.2 (0x000055aca8227000)
libuuid.so.1 => /usr/lib64/libuuid.so.1 (0x00007f0f6b49f000)
libpcre.so.1 => /usr/lib64/libpcre.so.1 (0x00007f0f6b238000)
libdl.so.2 => /lib64/libdl.so.2 (0x00007f0f6b034000)
libpthread.so.0 => /lib64/libpthread.so.0 (0x00007f0f6ae17000)
Также эта информация может быть полезна при создании портативных версий программ. А теперь давайте рассмотрим как устанавливаются библиотеки в Ubuntu.
Установка библиотек в Ubuntu
Обычно, если вы используете менеджер пакетов вашего дистрибутива для установки новых программ, то библиотеки устанавливаются автоматически. Но если вы хотите собрать программу из исходников или запустить 32 битную программу на 64 битной системе могут начаться проблемы. Например, при запуске или компиляции программы вы получаете ошибку:
error while loading shared libraries: xxxx.so.0
cannot open shared object file no such file or directory
Обычно, в Ubuntu имена пакетов библиотек соответствуют имени нужной библиотеки. Поэтому чтобы определить точное имя в большинстве случаев достаточно воспользоваться поиском по базе пакетов:
apt search libfuse

Как видите, найдено два варианта библиотеки, libfuse2 и libfuse-dev.
Если библиотека нужна обычной программе и ее не нужно собирать из исходников, то будет достаточно установить библиотеку ubuntu без префикса dev. Например:
sudo apt install libfuse2
Если же вам нужно собрать приложение из исходников, то кроме обычной библиотеки понадобятся заголовочные файлы, в которых содержится описание реализованных в библиотеке функций. Такие пакеты имеют приставку dev, например, libfuse-dev, тогда нужно устанавливать этот пакет, а он уже в зависимостях потянет и обычную библиотеку, если она еще не установлена:
sudo apt install libfuse-dev
Много проблем может вызвать ситуация, когда вам нужно запустить 32 битную программу в 64 битной системе. Например, если вы установили 64 битную версию библиотеки, а программа все равно говорит о том, что не может ее найти, возможно это 32 битная программа и ей необходима именно 32 библиотека. Если программа не устанавливается с помощью пакетного менеджера, вам тоже придется устанавливать библиотеки вручную.
Посмотреть разрядность бинарника можно с помощью утилиты file:
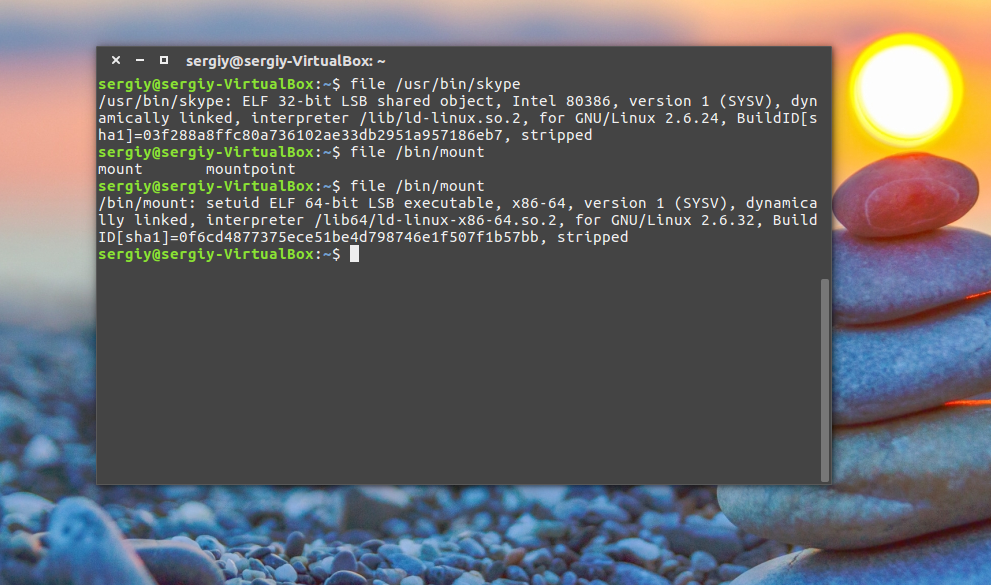
На скриншоте показаны два варианта вывода программы, для 32 бит, в нашем случае Skype и для 64 — mount.
Для того чтобы установить библиотеку Ubuntu с архитектурой i386 сначала необходимо добавить поддержку архитектуры i386 в dpkg:
sudo dpkg —add-architecture i386
Затем обновляем наши репозитории:
sudo apt update
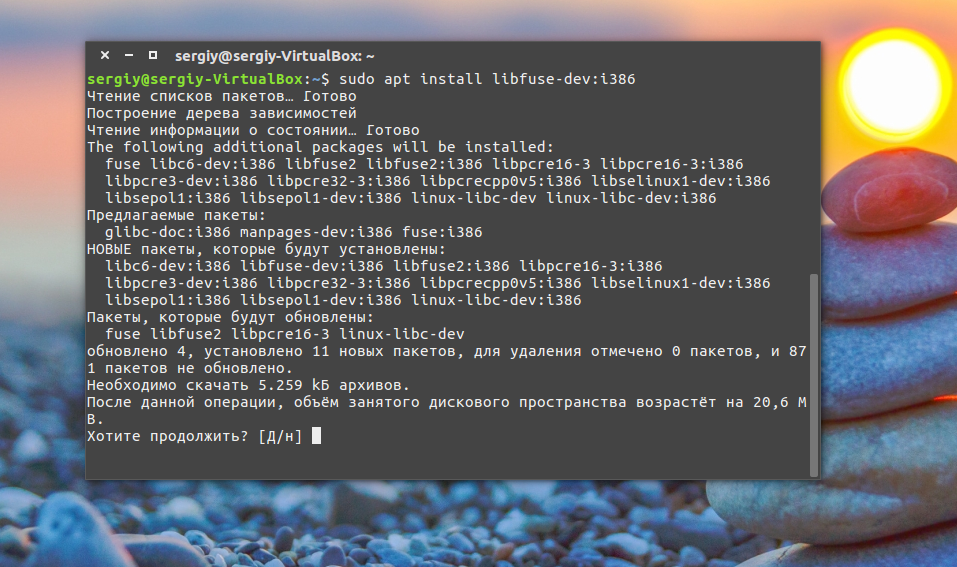
А во время установки нужной вам библиотеки теперь необходимо указать архитектуру через двоеточие после имени пакета:
sudo apt install libfuse-dev:i386
Если вы уверенны, что библиотека установлена, но программа все равно говорит, что такой библиотеки нет, то возможно, ей просто нужна другая версия библиотеки. Например, в системе есть libudev.so.0, а программе нужна libudev.so.0.1. Такое случается, если вы попытаетесь установить пакет для другого дистрибутива, особенно в Red Hat системах. Если в репозиториях нет нужной версии библиотеки, то скорее всего, они одинаковы, и можно просто создать символическую ссылку:
ln -s /lib/libudev.so.0 /lib/libudev.so.0.1
Затем программа найдет нужную библиотеку.
Управление библиотеками в Linux
Установка библиотек ubuntu уже рассмотрена, но хотелось бы упомянуть еще пару моментов. Как я сказал, библиотеки ubuntu размещаются в определенных каталогах, но расположение библиотек можно настроить.
Перед тем как библиотека будет подключена к программе, ее должна найти в системе специальная программа — менеджер библиотек. Он берет адреса библиотек из файла /etc/ld.cache, а этот файл формируется утилитой ldconfig, на основе файлов конфигурации /etc/ld.so.conf.
В этом файле перечислены все пути к библиотекам. Если вы хотите добавить свою папку для библиотек просто добавьте ее в этот файл:
Затем обновите кэш просто выполнив:
Теперь ваша библиотека может быть загружена программой, например, вы можете добавить путь /opt/lib или даже /home/user/lib. И система будет нормально грузить оттуда библиотеки.
Посмотреть какие библиотеки находятся в кеше ld.cache можно командой:
Также мы можем проверить находится ли там определенная библиотека:
ldconfig -p | grep libjpeg

Еще один способ указать программе где нужно искать библиотеки — это переменная LD_LIBRARY_PATH. Например:
Теперь программы, запускаемые в этом терминале, кроме стандартных путей поиска библиотек, будут использовать и указанную папку.
Выводы
Вот и все. Теперь вы знаете как работают библиотеки Ubuntu, как выполняется установка библиотек Ubuntu и делать так, чтобы программа видела нужную ей библиотеку. У новичков это может вызвать очень много головной боли, но теперь вы знаете что делать и избежите многих ошибок. Если у вас остались вопросы, пишите в комментариях!
Источник
Shared libraries with GCC on Linux
Libraries are an indispensable tool for any programmer. They are pre-existing code that is compiled and ready for you to use. They often provide generic functionality, like linked lists or binary trees that can hold any data, or specific functionality like an interface to a database server such as MySQL.
Most larger software projects will contain several components, some of which you may find use for later on in some other project, or that you just want to separate out for organizational purposes. When you have a reusable or logically distinct set of functions, it is helpful to build a library from it so that you do not have to copy the source code into your current project and recompile it all the time — and so you can keep different modules of your program disjoint and change one without affecting others. Once it is been written and tested, you can safely reuse it over and over again, saving the time and hassle of building it into your project every time.
Building static libraries is fairly simple, and since we rarely get questions on them, I will not cover them. I will stick with shared libraries, which seem to be more confusing for most people.
Before we get started, it might help to get a quick rundown of everything that happens from source code to running program:
- C Preprocessor: This stage processes all the preprocessor directives. Basically, any line that starts with a #, such as #define and #include.
- Compilation Proper: Once the source file has been preprocessed, the result is then compiled. Since many people refer to the entire build process as compilation, this stage is often referred to as compilation proper. This stage turns a .c file into an .o (object) file.
- Linking: Here is where all of the object files and any libraries are linked together to make your final program. Note that for static libraries, the actual library is placed in your final program, while for shared libraries, only a reference to the library is placed inside. Now you have a complete program that is ready to run. You launch it from the shell, and the program is handed off to the loader.
- Loading: This stage happens when your program starts up. Your program is scanned for references to shared libraries. Any references found are resolved and the libraries are mapped into your program.
Steps 3 and 4 are where the magic (and confusion) happens with shared libraries.
Now, on to our (very simple) example.
foo.h defines the interface to our library, a single function, foo(). foo.c contains the implementation of that function, and main.c is a driver program that uses our library.
For the purposes of this example, everything will happen in /home/username/foo
Step 1: Compiling with Position Independent Code
We need to compile our library source code into position-independent code (PIC): 1
Step 2: Creating a shared library from an object file
Now we need to actually turn this object file into a shared library. We will call it libfoo.so:
Step 3: Linking with a shared library
As you can see, that was actually pretty easy. We have a shared library. Let us compile our main.c and link it with libfoo. We will call our final program test. Note that the -lfoo option is not looking for foo.o, but libfoo.so. GCC assumes that all libraries start with lib and end with .so or .a (.so is for shared object or shared libraries, and .a is for archive, or statically linked libraries).
Telling GCC where to find the shared library
Uh-oh! The linker does not know where to find libfoo. GCC has a list of places it looks by default, but our directory is not in that list. 2 We need to tell GCC where to find libfoo.so. We will do that with the -L option. In this example, we will use the current directory, /home/username/foo:
Step 4: Making the library available at runtime
Good, no errors. Now let us run our program:
Oh no! The loader cannot find the shared library. 3 We did not install it in a standard location, so we need to give the loader a little help. We have a couple of options: we can use the environment variable LD_LIBRARY_PATH for this, or rpath. Let us take a look first at LD_LIBRARY_PATH:
Using LD_LIBRARY_PATH
There is nothing in there. Let us fix that by prepending our working directory to the existing LD_LIBRARY_PATH:
What happened? Our directory is in LD_LIBRARY_PATH, but we did not export it. In Linux, if you do not export the changes to an environment variable, they will not be inherited by the child processes. The loader and our test program did not inherit the changes we made. Thankfully, the fix is easy:
Good, it worked! LD_LIBRARY_PATH is great for quick tests and for systems on which you do not have admin privileges. As a downside, however, exporting the LD_LIBRARY_PATH variable means it may cause problems with other programs you run that also rely on LD_LIBRARY_PATH if you do not reset it to its previous state when you are done.
Using rpath
Now let s try rpath (first we will clear LD_LIBRARY_PATH to ensure it is rpath that is finding our library). Rpath, or the run path, is a way of embedding the location of shared libraries in the executable itself, instead of relying on default locations or environment variables. We do this during the linking stage. Notice the lengthy “-Wl,-rpath=/home/username/foo” option. The -Wl portion sends comma-separated options to the linker, so we tell it to send the -rpath option to the linker with our working directory.
Excellent, it worked. The rpath method is great because each program gets to list its shared library locations independently, so there are no issues with different programs looking in the wrong paths like there were for LD_LIBRARY_PATH.
rpath vs. LD_LIBRARY_PATH
There are a few downsides to rpath, however. First, it requires that shared libraries be installed in a fixed location so that all users of your program will have access to those libraries in those locations. That means less flexibility in system configuration. Second, if that library refers to a NFS mount or other network drive, you may experience undesirable delays — or worse — on program startup.
Using ldconfig to modify ld.so
What if we want to install our library so everybody on the system can use it? For that, you will need admin privileges. You will need this for two reasons: first, to put the library in a standard location, probably /usr/lib or /usr/local/lib, which normal users do not have write access to. Second, you will need to modify the ld.so config file and cache. As root, do the following:
Now the file is in a standard location, with correct permissions, readable by everybody. We need to tell the loader it is available for use, so let us update the cache:
That should create a link to our shared library and update the cache so it is available for immediate use. Let us double check:
Now our library is installed. Before we test it, we have to clean up a few things:
Clear our LD_LIBRARY_PATH once more, just in case:
Re-link our executable. Notice we do not need the -L option since our library is stored in a default location and we are not using the rpath option:
Let us make sure we are using the /usr/lib instance of our library using ldd:
Good, now let us run it:
That about wraps it up. We have covered how to build a shared library, how to link with it, and how to resolve the most common loader issues with shared libraries — as well as the positives and negatives of different approaches.
- It looks in the DT_RPATH section of the executable, unless there is a DT_RUNPATH section.
- It looks in LD_LIBRARY_PATH. This is skipped if the executable is setuid/setgid for security reasons.
- It looks in the DT_RUNPATH section of the executable unless the setuid/setgid bits are set (for security reasons).
- It looks in the cache file /etc/ld/so/cache (disabled with the -z nodeflib linker option).
- It looks in the default directories /lib then /usr/lib (disabled with the -z nodeflib linker option).
What is position independent code? PIC is code that works no matter where in memory it is placed. Because several different programs can all use one instance of your shared library, the library cannot store things at fixed addresses, since the location of that library in memory will vary from program to program. ↩
GCC first searches for libraries in /usr/local/lib, then in /usr/lib. Following that, it searches for libraries in the directories specified by the -L parameter, in the order specified on the command line. ↩
Источник


