- Установка Tor
- Содержание
- Установка Tor
- Настройка
- Проверка
- Получение нового НИМа (смена конечной ноды Tor)
- Работа с onion-ресурсами
- Настройки браузеров для работы с onion-ресурсами
- Mozilla Firefox
- Chromium/Google Chrome
- Использование pac-файла для упрощения доступа к onion-ресурсам
- Обход блокировки Tor
- Обфускация трафика
- Использование мостов
- Использование Tor через IPv6
- Linux install tor service
- 2. Install obfs4proxy
- 3. Edit your Tor config file, usually located at /etc/tor/torrc and replace its content with:
- 4. Restart Tor
- 5. Monitor your logs
- 6. Final notes
- Ethical hacking and penetration testing
- InfoSec, IT, Kali Linux, BlackArch
- How to manage Tor service on Linux
- How to install Tor on Linux
- How to start the Tor service
- How to start the tor service without switching to the background
- Tor Settings Files
- Configure Tor Logs
- How to view Tor logs
- How to start the Tor service with options
- How to use the Tor service on Linux
- Tor troubleshooting
- Could not bind to 127.0.0.1:9050: Address already in use. Is Tor already running?
- Directory /var/lib/tor cannot be read: Permission denied
- /var/lib/tor is not owned by this user
Установка Tor
Содержание
Tor — система, позволяющая устанавливать анонимное сетевое соединение, защищённое от прослушивания. Рассматривается как анонимная сеть, предоставляющая передачу данных в зашифрованном виде.
В статье будет рассмотрена работа через Tor с обычными браузерами, что не гарантирует анонимность. Если вы хотите большей безопасности, установите Tor согласно данной официальной инструкции.
Установка Tor
Устанавливаем необходимые пакеты.
При необходимости получения последней версии Tor (к примеру, для обфускации трафика) нужно установить пакеты из официальных репозиториев согласно данной инструкции.
Настройка
Бэкап базовой и новая конфигурация для privoxy:
Вставляем следующее и сохраняем:
Настроим Tor в браузере.
Использовать torbutton для свежих версий firefox не рекомендуется (torbutton предназначен для версий firefox, включаемых в состав tor browser bundle). Скачать torbutton можно по следующим ссылкам:
Для быстрого переключения в любом браузере можно использовать любое дополнение, предназначенное для переключения прокси (proxy switcher).
Хочу отметить, что для Google Chrome единственным работоспособным расширением оказалось Proxy SwitchySharp.
Проверка
В настройках прокси (перечень дополнений для переключения прокси дан в предыдущем разделе) указываем следующие параметры:
Данная конфигурация будет действовать при использовании настроек, указанных в статье.
Переключаем прокси в браузере.
Проверяем, видит ли нас Большой Брат:
При использовании иных программ (к примеру, Pidgin) в их настройках нужно установить прокси по протоколу socks 4a или 5.0 с указанными выше настройками.
Получение нового НИМа (смена конечной ноды Tor)
Зачастую Tor используется в качестве обычного прокси. Если вас не устроила текущая выходная нода, ее легко менять с помощью скрипта.
Задаем пароль new_tor_password для доступа к Tor по telnet и получаем в ответ его хэш в виде строки 16:47015F09825889D86059FF44D9562496912AC67CD0EB93DAA25427F194:
Затем дополняем конфиг Tor
Остается создать скрипт со следующим содержимым (обратите внимание, ваш пароль хранится в скрипте в открытом виде!):
дать ему права на выполнение и запускать при необходимости.
Работа с onion-ресурсами
Внутри сети Tor доступны ресурсы в псевдо-доменной зоне .onion. Список данных ресурсов можно увидеть здесь (возможно, для доступа к данной информации вам потребуется соединение через Tor, поскольку ваш провайдер может блокировать данный сайт).
Настройки браузеров для работы с onion-ресурсами
Mozilla Firefox
Заходим в about:config, ищем параметр network.proxy.socks_remote_dns и выставляем его значение в true .
Chromium/Google Chrome
Заходим в Настройки, выбираем «Показать дополнительные настройки» и в разделе «Личные данные» делаем пункт «Предсказывать сетевые действия для ускорения загрузки страниц» неактивным.
Использование pac-файла для упрощения доступа к onion-ресурсам
С помощью pac-файла можно настроить доступ к определенным доменным именам с помощью конкретных прокси (для доступа к onion-сайту вам не придется вручную переключать прокси). Пример конфигурации такого файла для совместного использования *.i2p и *.onion приведен ниже.
Обход блокировки Tor
В связи с последними изменениями в законодательстве Российской Федерации и Республики Беларусь возможно блокирование Tor провайдерами. Два основных метода — это блокирование известных IP-адресов узлов Tor (этому противодействует использование непубличных адресов — мостов) и глубокий анализ трафика (в связи с чем рекомендуется обфусцировать трафик). Также можно использовать Tor через IPv6.
Здесь нужно отметить, что Tor Bundle, скачиваемый с официального сайта, предоставляет более удобный механизм работы с обфускацией и мостами, чем представленный ниже в этом руководстве.
Обфускация трафика
Нам нужно обновить Tor до последней stable-версии из официального репозитория и установить утилиту для обфускации (проверяйте на официальном сайте torproject.org информацию о наиболее актуальных утилитах обфускации: чем новее утилита, тем сложнее расшифровать ваш трафик). Актуальной на момент конца 2016-го года является утилита obfs4proxy. Ищем нужный нам пакет в репозиториях Ubuntu:
Если его там не окажется, установим его из репозиториев Torproject:
Добавляем в конец файла следующую строку:
И обновляем информацию о репозиториях:
После этого заменяем содержимое файла /etc/tor/torrc следующим
Если при перезапуске Tor в логе
вы увидели подобное:
, не пугайтесь — obfs4proxy не был перезапущен и удерживает требуемый порт, все будет работать.
Чтобы убедиться в правильности работы настроенного Tor, проверьте содержимое /var/log/tor/log на наличие следующих строк:
Использование мостов
Мосты мы будем использовать при настроенной обфускации трафика (смотри предыдущий пункт). Чтобы получить мосты, заходим сюда либо отправляем на адрес bridges@bridges.torproject.org письмо с темой get transport obfs4 и ждем в ответ список из трех адресов следующего вида:
После этого остается изменить файл /etc/tor/torrc следующим образом: добавить в начало данные адреса в следующем формате:
Использование Tor через IPv6
Установим IPv4-IPv6 туннель Miredo:
Теперь мы можем работать с IPv6. Остается небольшой шаг для настройки Tor. Если вы используете Tor Browser, вам нужно зайти в подкаталог /path/to/tor/tor-browser_en-US/Browser/TorBrowser/Data/Tor/ и отредактировать файл torrc. Смело удаляйте все содержимое конфига и вставляйте туда единственную строку:
Остальное содержимое конфига Tor при запуске дополнит самостоятельно. Произведенная нами настройка запретит Tor’у подключаться к IPv4-адресам, которые могут блокироваться вашим провайдером. Здесь стоит отметить, что что в будущем могут блокироваться и IPv6-адреса, но на данный момент ни в России, ни в Беларуси этого не происходит. Если вы под Linux используете установленный пакет Tor, приведите свой конфиг /etc/tor/torrc к примерно такому виду:
Заметьте, при использовании IPv6 можно по-прежнему обфусцировать трафик.
Как будет работать Tor при наших настройках? Первой из трех узлов в цепи Tor станет поддерживающая IPv6 нода, доступ к которой не заблокирован. Выходной останется IPv4-нода.
© 2012 Ubuntu-ru — Русскоязычное сообщество Ubuntu Linux.
© 2012 Canonical Ltd. Ubuntu и Canonical являются зарегистрированными торговыми знаками Canonical Ltd.
Источник
Linux install tor service
Get the latest version of Tor. If you’re on Debian stable, sudo apt-get install tor should give you the latest stable version of Tor.
- Note: Ubuntu users need to get it from Tor repository. Please seeDownload instructions for Ubuntu.
2. Install obfs4proxy
On Debian, the obfs4proxy package is available in unstable, testing, and stable. On Ubuntu, bionic, cosmic, disco, eoan, and focal have the package. If you’re running any of them, sudo apt-get install obfs4proxy should work.
3. Edit your Tor config file, usually located at /etc/tor/torrc and replace its content with:
Don’t forget to change the ORPort , ServerTransportListenAddr , ContactInfo , and Nickname options.
If you decide to use a fixed obfs4 port smaller than 1024 (for example 80 or 443), you will need to give obfs4 CAP_NET_BIND_SERVICE capabilities to bind the port with a non-root user:
sudo setcap cap_net_bind_service=+ep /usr/bin/obfs4proxy
To work around systemd hardening, you will also need to set NoNewPrivileges=no in /lib/systemd/system/tor@default.service and /lib/systemd/system/tor@.service and then run systemctl daemon-reload . For more details, see ticket 18356.
Note that both Tor’s OR port and its obfs4 port must be reachable. If your bridge is behind a firewall or NAT, make sure to open both ports. You can use our reachability test to see if your obfs4 port is reachable from the Internet.
4. Restart Tor
sudo systemctl restart tor
5. Monitor your logs
To confirm your bridge is running with no issues, you should see something like this (usually in /var/log/tor/log or /var/log/syslog ):
6. Final notes
If you are having trouble setting up your bridge, have a look at our help section. If your bridge is now running, check out the post-install notes.
Источник
Ethical hacking and penetration testing
InfoSec, IT, Kali Linux, BlackArch
How to manage Tor service on Linux
How to install Tor on Linux
The Tor package is available on most Linux distributions and can be installed from standard repositories.
Tor installation on Debian, Linux Mint, Ubuntu, Kali Linux and their derivatives:
Tor installation on Arch Linux, BlackArch and their derivatives:
To run Tor, no configuration is required – the program already has default values for options. However, you can change many of Tor’s operating parameters using the command line options and directives in the configuration file.
How to start the Tor service
To start use the command:
To check the status:

To add the Tor service to startup so that it starts every time the computer is booting:
To stop the Tor service:
To remove from startup:
How to start the tor service without switching to the background
The tor launch methods shown above turn it into a daemon – that is, a process that runs in the background and is detached from the console.
If you want the Tor service not to go into the background, for example, for debugging, and so that it can be closed with CTRL+c, then start the Tor service as follows in Debian and its derivatives:
On Arch Linux, BlackArch, and derivatives, the startup is done like this:
In fact, tor does not require superuser privileges. But for the service to work, it needs files and directories (/var/lib/tor) the permissions to which are closed to all users (even root) and which belong to the debian-tor or tor user (the username depends on the distribution). For this reason, sudo is used with the -u option, followed by the name of the user on whose behalf the command is executed.
Example of running tor without demonization:
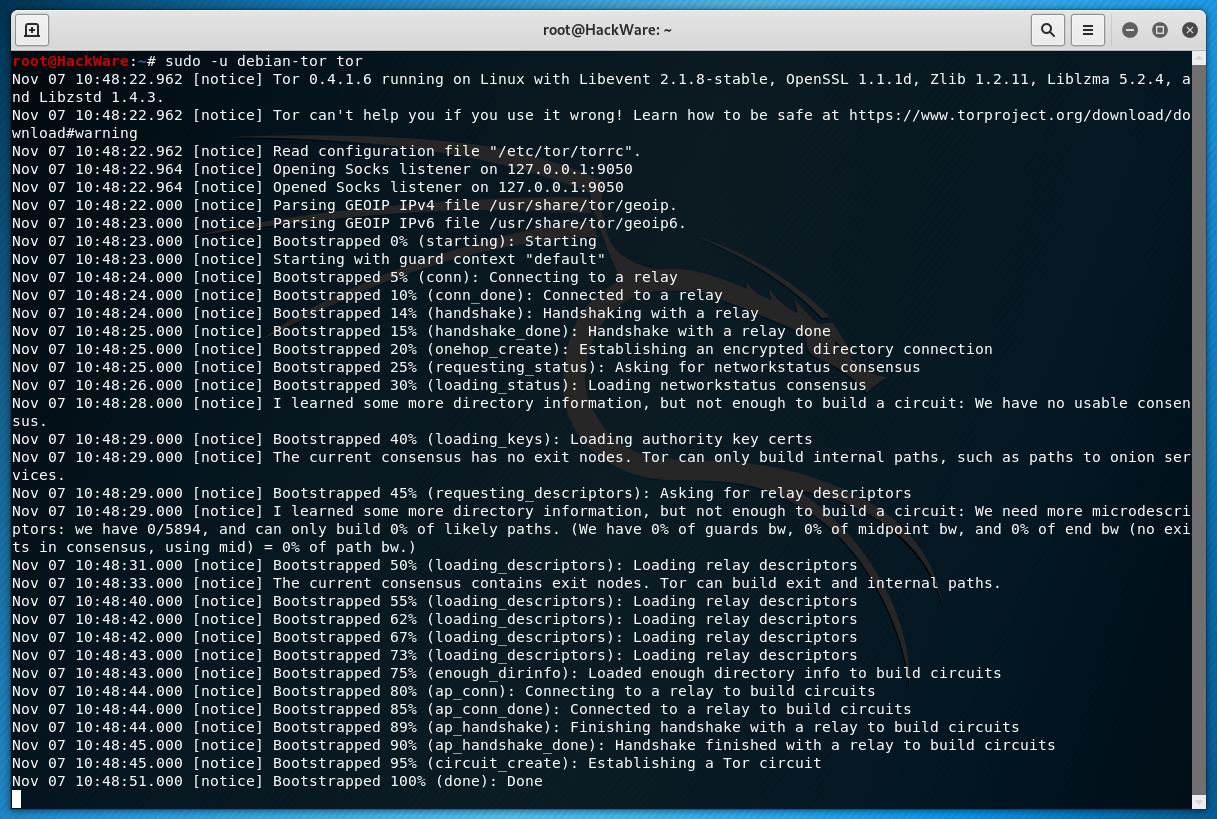
Lines containing the word Bootstrapped indicate the progress of connecting to the Tor network. When everything is ready for traffic exchange with the Internet through the Tor network, it will display:
Tor Settings Files
The main configuration file for the Tor service is /etc/tor/torrc. This file contains only comments, that is, by default it does not set any settings. Tor has default configuration for all settings. For this reason, the file is optional – if it is missing, the Tor service will still start.
If the file /etc/tor/torrc is not found, an attempt will be made to find the file $HOME/.torrc. If there is no such file either, then Tor will simply continue to launch.
There is another configuration file with default settings: /etc/tor/torrc-defaults. The idea is that it should contain default options that can be overwritten with /etc/tor/torrc or $HOME/.torrc. But in practice, this file does not even come with the Tor package.
Next, consider a few options related to configuration files. These options can be specified when the service starts via the tor file.
—verify-config
Checking the Tor configuration file for correctness.
The launch depends on the tor username on the system:
-f FILE
Specifies a new configuration file containing further Tor configuration options. If you specify — (dash), then the options will be read from standard input. By default, /etc/tor/torrc or, if this file is not found, then $HOME/.torrc).
—allow-missing-torrc
Do not require the configuration file specified by the -f option to exist if you can access the default torrc).
—defaults-torrc FILE
Specifies the file in which to search for default values for the Tor options. The contents of this file are overwritten with the usual configuration files and options from the command line (by default /etc/tor/torrc-defaults).
—ignore-missing-torrc
Indicates that Tor should process the missing torrc file as if it were empty. Normally, Tor does this because there are no default torrc files, but not for files specified on the command line.
Configure Tor Logs
Tor logs are configured in the configuration file using the Log directive. This directive consists of three components:
SEVERITY_ LEVEL can be: debug, info, notice, warn and err. It is permissible to specify ranges of the form:
As SOURCE_OUTPUT can be:
- stderr – standard error output
- stdout – standard output
- syslog – system log (Unix only)
- file FILE_NAME – save the log to a file
For example, to output notice level messages to standard output, you would write this:
To display messages from the info level to the err level in the tor.log file, you need to write the following directive to the configuration file:
The Log directive can be specified several times.
How to view Tor logs
You can view Tor logs in various ways, one of the options is:
Please note that if you have Debian or a release from this distribution, then in the previous and next you need to specify the debian-tor user instead of tor, for example:
For example, to display the last 100 entries:
You can also view Tor events using:
How to start the Tor service with options
Tor has many options that have default values. These values can be changed in the Tor configuration files, which are discussed in the next article.
You can start Tor service on the command line with the options used in the configuration file, for this, use a command of the form:
Since in most cases you need to start the service as a debian-tor or tor user, the commands should look something like this (for Debian and derivatives):
On Arch Linux, BlackArch, and derivatives, the startup is done like this:
An example of starting the Tor service with options for replacing their values from the configuration file:
If the VALUE for an OPTION consists of more than one word, or includes special characters, then it must be enclosed in quotation marks, for example:
See the next article for rules for rewriting or adding option values.
How to use the Tor service on Linux
After starting the Tor service on your computer, the SOCKS proxy becomes available. If you do not know what it is, then it is recommended that you read the article ‘Proxy types, how to use proxy, how to check the quality of proxies’.
This proxy is available on the IP address and port localhost:9050.
About how to configure proxies in Linux, see here.
Remember that some programs have their own proxy settings and may ignore system-wide settings:

Remember that you must specify localhost as the IP address, and 9050 as the port number.
Many programs can work directly with SOCKS4 and SOCKS5:
Compare with the output:
If the program supports only HTTP/HTTPS proxies, but does not know how to work with SOCKS, then use the Privoxy or ProxyChains-NG program as a mediator.
Tor troubleshooting
Could not bind to 127.0.0.1:9050: Address already in use. Is Tor already running?
If you encounter «Could not bind to …: Address already in use.» Errors, for example:
This means that the ports that Tor is trying to listen to are already binded by another process, possibly another running instance of Tor. To correct this situation, stop another instance of the tor service or find a program that occupies this port.
Directory /var/lib/tor cannot be read: Permission denied
occurs when the tor process does not have sufficient permissions to access the /var/lib/tor folder. You must start the tor process on behalf of the corresponding debian-tor or tor user as follows:
/var/lib/tor is not owned by this user
If such errors occur:
This means that you run Tor as root, and you need to run as debian-tor or tor user as follows:
Источник


