- Just another network blog
- Saturday, September 28, 2013
- IPSec в Linux с использованием Strongswan
- 12 comments:
- Linux IPSec site to site VPN(Virtual Private Network) configuration using openswan
- Initial configuration of VPN servers
- Openswan IPSec VPN configuration in Linux
- Shared secret authetication in Openswan IPSec
- rsasig authentication on openswan ipsec
Just another network blog
Saturday, September 28, 2013
IPSec в Linux с использованием Strongswan

- Установка и первоначальная настройка системы
- Настройка простого туннеля Linux-Linux
- Настройка туннеля Site — to — site между двумя Linux -маршрутизаторами
]# yum install strongswan
]# echo 1 > /proc/sys/net/ipv4/ip_forward

]# openssl rand -base64 48
# ipsec reload Paris-London
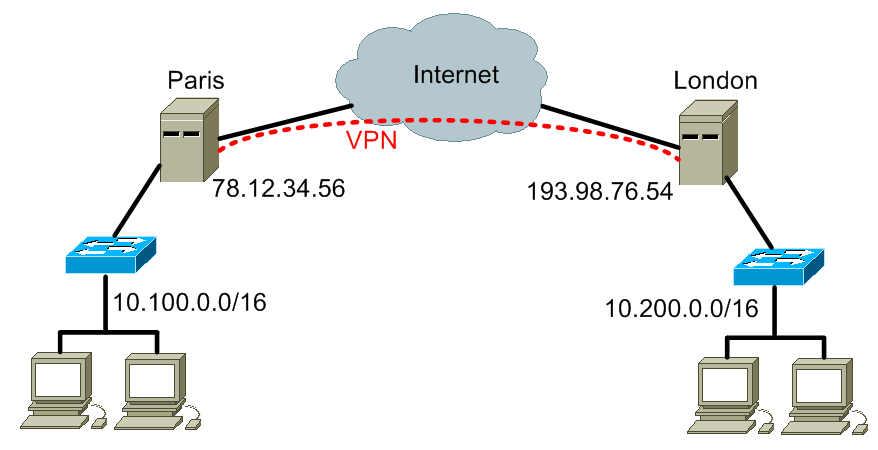

# tcpdump -i eth1 host 78.12.34.56
12 comments:
![]()
очень классно спасибо
![]()
Согласен все понятно описано. Но в моем случае не получается разобраться с файлом ipsec.conf
Видимо из за opkg. Толи не полноценный ipsec. Пока не понял.
![]()
Подскажите, pls, вот Вы рассмотрели net2net и host2host. Я использую удаленный сервер для безопасного выхода в интернет нескольким roadwarriors, т.е. у меня в конфиге leftsubnet=0.0.0.0 для 2х профилей: смартфонов и Win7 (ноутбук). Соответственно, я как-то не вполне понимаю, как мне заглянуть смартфоном в бук. Т.е. roadwarrior2roadwarrior как организовать, учитывая, что каждый из этих самых бойцов смотрит в интернет ч/з данный VPN?
это вам, батенька, надо клиентский VPN настривать, например PPTP, L2TP. второй настраивается сходым образом на практически этом же ПО, первый намного проще, установка одного пакета и пару строчек в конф-файлы добавить, ерунда. даный же способ может работать только с публичными адресами. с динамическими — никак.
![]()
«Папа, а ты сейчас с кем разговаривал?» 🙂
1. Я не сетевой администратор
2. Я даже не программист
Я настроил IKEv2 на всех клиентах и вполне успешно хожу в нет хоть откуда (уже протестил), а вот с этими самыми динамическими адресами вот просто не понимаю как поступать. Хоть тькните, pls, как действовать. Т.е. я понимаю чисто умозрительно, что надо какие-то маршруты прокладывать, но всвязи с пп. 1 и 2 не понимаю как.
![]()
наверное, надо бы уточнить, что у меня в коннектах left=%any, right=%any, leftsubnet=0.0.0.0/0, leftid=ServerPubicIP, rightsourceip=192.168.2.100/29
Соответственно, в statusall показываются соединения
ServerPrivateIP[ServerPublicIP]. ClientPublicIP[userID]
надо вот примерно так и будет счастье 🙂
у меня там где-то в About me адрес скайпа есть, если что.
http://habrahabr.ru/company/FastVPS/blog/205162/
![]()
Прежде всего, большое спасибо за советы!
Но, похоже, что я рою не туда: предполагал заглядывать смартфон ноутбук в пределах одной сети с помощью соответствующего ПО, но это ПО, похоже, устанавливает собственный туннель до сервисов изготовителя с собственными правилами (в Windows установилась доп. сеть с IP 169. ). Наверное, поэтому я и не вижу в сетевом окружении Windows смартфон при малейших движениях в сторону от одной сети Wi-Fi или если вижу, то не могу добраться до ресурсов (ошибка 80070035). Но при этом, замечу, смартфон в бук ходит из удаленной сети легко. Прямо не знаю, может правильнее плюнуть и обмениваться контентом ч/з облако?
![]()
«route (назначение мне осталось непонятно, используется крайне редко)».
А зря не разобрался, очень важное значение, закрывает потенциальную дыру в безопасности.
![]()
Здравствуйте, cпасибо, очень доступно написано.
Если я настрою вариант Linux-Linux и добавлю в конфиги параметры ike и esp, то туннель станет зашифрованным?
Если я попробую проделать те же действия на только что установленную Linux Ubuntu, нужно ли будет установить какие-нибудь дополнительные пакеты? Или при установке strongswan все необходимые пакеты установятся автоматически?
а DMVPN за nat-ом настраивать не пробовали? у меня что то не получается
![]()
VarangaOfficial — варанга в аптеках — проверенные и достоверные факты. Воспользовавшись данным ресурсом, вы сможете узнать полную, всеисчерпывающую информацию об этом лекарственном средстве. Лично увидеть данные о проведенных клинических исследований, прочитать отзывы реальных пациентов и врачей, использующих крем в своей лечебной практике. Ознакомиться с инструкцией по использованию, прочитать особенности и методы работы комплекса, осмыслить, почему крем Варанга настолько эффективен, где нужно покупать сертифицированный, оригинальный препарат и, как не нарваться на фальсификат. Мы очень тщательно проверяем размещаемые данные. Предоставляем нашим пользователям сведения, которые были взяты исключительно из подлинных источников. Если вы нашли признаки появления грибкового заболевани или уже довольно продолжительное время, без ощутимых результатов стараетесь излечиться от этого коварного недуга, у нас на сайте вы найдете простой и быстрый способ решения проблемы. Присоединяетесь и живите здоровой полноценной жизнью. Мы собрали ответы на все вопросы на одном информационном ресурсе.
Источник
Linux IPSec site to site VPN(Virtual Private Network) configuration using openswan


If you have a Linux machine and a couple of trained experts who can work on it, then you can achieve your required architecture setup almost free of cost. A Linux machine can power your web based applications and can outperform most of the proprietary applications available, if configured in the correct manner. In this blog post we will be discussing configuration of a very widely used technology called as VPN.
A Linux machine can be configured as a router, that routes traffic inside and outside of your infrastructure. If you are interested in understanding how a Linux router does a NAT(Network Address Translation), then i will recommend you to read the below blog post.
Most of the companies these days have operational branches in geographically different locations, which needs inter connectivity between each other. However interconnection between these geographically isolated offices or branches can only be done through internet, which is an insecure medium. Internet is an insecure medium simply because there are many network devices that comes in between you and your destination, who can easily read your communication. And the interesting part is that you cannot reach your destination through internet, bypassing these interconnecting networks and devices.
However you can send your information in such a way that only the destination host can open it and read it. There are encryption technologies that are involved in protecting your communication that travels through the wire. Different technologies can be used to encrypt your communication. One of them is called as IPSec(Internet Protocol Security). For understanding IPSec and its working, you can refer the below link.
There are other technologies as well that protect data communication over wire, some of them are mentioned below.
However we cannot reliably use them for our purpose of interconnecting two branch offices which are geographically isolated through internet. We can achieve this interconnection with the help of something called as VPN (Virtual Private Networks) . VPN is a very useful technology that is widely deployed in organizations that require secure remote access to remote network.
Some noteworthy points about Virtual Private Networks are mentioned below.
- Interconnecting of two private networks through internet
- Security of communication traffic with the help of encryption
- Access to internal network from outside
We will be configuring our VPN connectivity with the help of IPSec(A technology used to encrypt traffic at network layer. In other words an entire IP packet is encrypted for security). IPSec is used for authentication as well as encryption of the complete communication that happens between two hosts on the internet. As IPSec works in network layer, traffic generated by all applications are by default encrypted and sent, hence there is no modification required to be done on the existing application to make it compatible with IPSec.
We will be using one such IPSec implementation in Linux for creating a tunnel between two private networks through the internet. There was a project called as Free-Swan, which was the first implementation of IPSec on Linux, but due to some reason, the project did not last long(the last version of free-swan was released at 2004 ). However the same code base was used to continue another IPSec project called OpenSwan. We will be using OpenSwan for making a secure VPN tunnel. Openswan IPSec package is released under GNU GPL licence, and is available for all linux distributions.
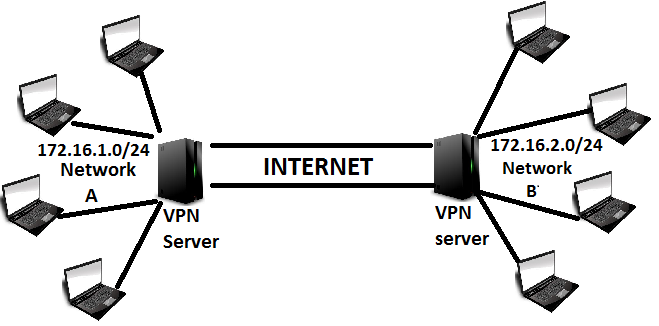
In the above shown figure i have tried to depict, the VPN setup that we will be configuring now. There are two networks showin in the above diagram.
Network A: 172.16.1.0/24
Network B: 172.16.2.0/24
These two networks are geographically isolated from each other(and of course they are private network addresses and cannot be routed through internet to communicate with each other.). We will be interconnecting these two networks together, so that the hosts on network A can communicate with hosts on network B just like they communicate to any local network.
For making this work we will be having two VPN servers. These two VPN server’s will be running ISPec application openswan. This kind of a setup is called as gateway to gateway or sometimes site to site VPN.
We will have two VPN servers (one for network A and one for network B). Both of them will need a public internet IP address, to communicate with each other through the internet. Also these two VPN server’s will be doing a Source Network Address Translation of their respective internal hosts, while they access the other network behind VPN.
Initial configuration of VPN servers
We need to configure some basic settings on both the VPN servers (VPN server on network A and B). This configuration is very much necessary for clients on both the networks to reach the other network, as well as proper working of routing.
The first step is to configure IP forwarding. The name itself suggests that it is used to forward packets destined for other hosts. It is basically done when you need to make a linux machine act as a router. In our case of establishing a VPN tunnel between two networks, both the VPN servers will be acting as a router to reach the network on the other side. Hence we need to enable it.
IP forwarding can be enabled in Linux by the below command on the fly.
If you see the above command, we have modified a file on /proc file system. Anything that resides on /proc is temporary, and does not persist after a reboot. Hence we need to make our ip forwarding permanent. This can be done by modifying sysctl.conf file.
open the /etc/sysctl.conf file and edit the below line and make it 1 instead of 0.
To make that change in sysctl effective, you can run the below command.
Please do not forget to enable ip forwarding on both the VPN server’s.
Let’s add some Iptables rule that will modify the source IP address of a packet before that packet is send out. This is very much useful because this helps in modifying the source ip of the packet. On network A VPN server enter the below command.
The above command on network A VPN server will modify the source address of a packet originating from 172.16.1.0/24 network to its own outgoing interface(which will be a public IP address).
On the VPN server on the other side, apply the same above command with the source address of 172.16.2.0/24 (its iternal network)
Now we are set to install and configure openswan ipsec server on both the VPN servers.
Openswan IPSec VPN configuration in Linux
Openswan ipsec tunnels allows you to authenticate the traffic going through the tunnel in two methods. The two methods are mentioned below.
We will see both the configuration one by one. Lets see shared secret for encryption in openswan ipsec first.
Shared secret authetication in Openswan IPSec
Creating a tunnel between two seperate networks using openswan shared secret is the easiest and fast method. For this to work properly we will begin with installing openswan on the linux machine (the package is available for almost all linux distributions.). You can use the system package manage for installing openswan.
The below yum command can be used to install openswan in linux. I am using a centos/red hat distribution of linux for this illustration. However you can achieve the same result in any distribution without much modification.
After the installation is complete you will get a file called as /etc/ipsec.conf.
Now the second step is configure our ipsec.conf file, where we will mention our remote VPN server public IP, remote subnet, subnet available on this side etc.
Let’s see an example configuration of ipsec.conf file.
Let’s understand some important fields shown in the above /etc/ipsec.conf configuration file.
protostack:On Linux, there are two IPSec stacks, NETKEY and KLIPS. KLIPS is currently the more stable one, the one which is easier to use. NETKEY on the other hand, is quite a new stack, but due to various reasons, KLIPS was not allowed to be included in the Linux kernel by default, where as NETKEY is.
nat_traversal: IPSec works by encrypting packets at the network level, in other words an entire IP packet is encrypted along with its headers, and sometimes a new header is attached if you are masquerading IP packets.Inorder to enable IPSec packet to go through NAT devices, we need to enable this option by setting it to the value of «yes«.
virtual_private: The way NAT-T(nat traversal) works is that a client proposes a connection that has its non-NAT’ed IP address as part of the proposal. This can cause problems if the server you are connecting to is using the same IP range internally. Say that IPSec server connects you to 192.168.0.0/24 and your client is on 192.168.0.101/32 behind some public IP a.b.c.d, then where do packets go for 192.168.0.101? The client side or the server side?. The best method is to add all private subnet except those ranges used by the server.
conn: This is the first argument that mentions the name of the connection. You can give any name as you wish, this is simply for identifying the tunnels .
authby: how the two security gateways should authenticate each other; acceptable values are secret(shared secret which will be same on both the vpn server) or rsasig
type: the type of the connection; currently the accepted values are tunnel, signifying a host-to-host, host-to-subnet, or subnet-to-subnet tunnel; transport, signifying host-to-host transport mode.
left: The ip address of the local IPsec server
leftid: how the left participant should be identified for authentication; defaults to left . Can be an IP address or a fully-qualified domain name
leftsubnet: What are the subnet that will be reachable through this tunnel, on this side of the tunnel
rightsubnet: the subnet that can be reached through this tunnel, on the other end (basically private subnet behind the ipsec server at the other end)
An important fact to note about leftsubnet & rightsubnet is that, we can modify it and provide multiple subnet by using leftsubnets & rightsubnets instead if we want multiple subnet to be made reachable through this tunnel. Simply adding routes on both the sides without adding the subnet will not make the hosts reachable. Let’s take an example.
Now if this configuration file(/etc/ipsec.conf) is configured properly with all the proper required fields (left, right, left subnet, right subnet, secret, virtual_private etc), the second file that we need to pay attention to is /etc/ipsec.secrets
An example of ipsec.secret file is shown below.
Or if you want to further simply the process of ipsec.secrets, then you can use one single password for all the ipsec tunnels by the following method.
But remember only one fact that for tunnel to work with preshared key passwords should be same on both vpn servers.
Now we need to have the exact same configuration on the other side VPN server (with the required changes in left, right, leftsubnet, rightsubnet, leftid, rightid)
To make the concept clear the value of right on the other vpn server must be the value of left on this VPN server. Also the ipsec.secrets file needs to configured properly(the password on the servers must be same).
Now once the configuration is perfect, restart the ipsec service on both the sides. Your tunnel must work flawlessly if you did not make any configuration mistake. You can check the tunnel by pinging any ip on the remote subnet.
rsasig authentication on openswan ipsec
Now as discussed before, lets see the second method that can be used for authentication of our IPSec. We will create rsa keys on both the vpn servers first then we will see the ipsec.conf file.
You can create an rsa key for your vpn server by the following command.
The above command should create a 2048 key for your VPN server inside ipsec.secrets file.
Run the same command on the other side VPN server. So now you have two rsa keys of 2048 bit size on both the servers. Now comes the main part of configuring ipsec.conf file.
An example configuration file with rsasig authentication is shown below.
Do the exact same configuration on both the servers and you are done.
Now restart ipsec service on both the servers, to make the tunnel active. As suggested before you can try pinging the remote subnet to test the connection status.
In our «initial configuration for VPN servers» section we made some config changes inside our VPN servers. That was maily for routing purpose, which will enable routing for client machines on both the networks to reach each others.
So on client machines inside 172.16.1.0/24 (network A shown in our example) we need to add a route which will allow them to reach the other 172.16.2.0/24 network.
Same kind of route for reaching network A must be added on the clients inside network B.
Источник


