- Design Windows Forms
- Create Windows Forms projects
- Create and edit Windows Forms
- Install JetBrains Rider
- Prerequisites
- Install using the Toolbox App
- Install the Toolbox App
- Install the Toolbox App
- Install the Toolbox App
- Standalone installation
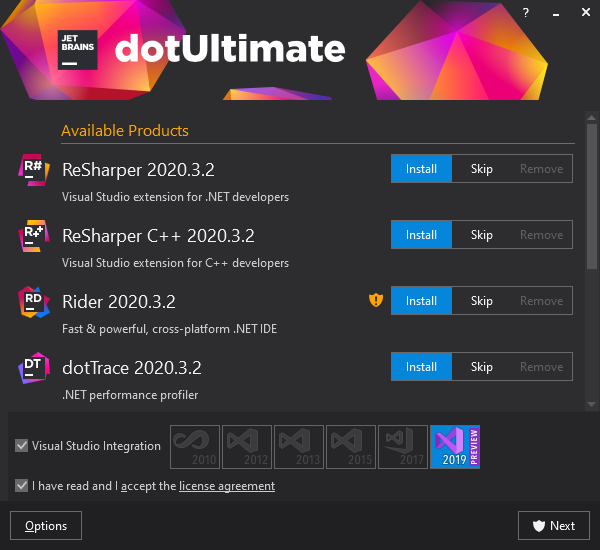
- Installation with dotUltimate installer
- Silent installation on Windows
- Silent configuration file
- Install as a snap package on Linux
- Developing Windows Forms Applications in Rider 2019.1
- Using the Windows Forms Designer
- Creating related projects and files
- Error Handling when Forms are Broken
- JetBrains Rider C# | Windows Form UI [closed]
- 3 Answers 3
Design Windows Forms
Since Windows Forms designer relies on and integrates with Windows-specific components, it is available only on Windows. Currently it is only working for C# projects.
If your project includes Windows Forms, you can use JetBrains Rider’s visual Windows Forms designer and also create new Windows Forms projects.
Create Windows Forms projects
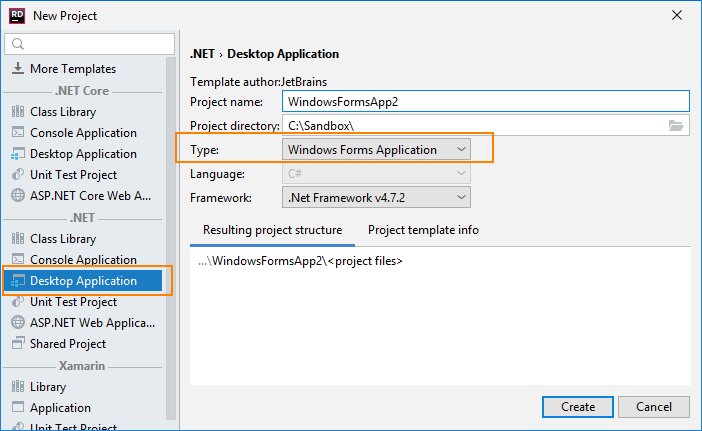
You can create a new project in a new solution using File | New. or add a new project to the existing solution by right-clicking the solution or solution folder node in the Solution Explorer, and choosing Add | New Project .
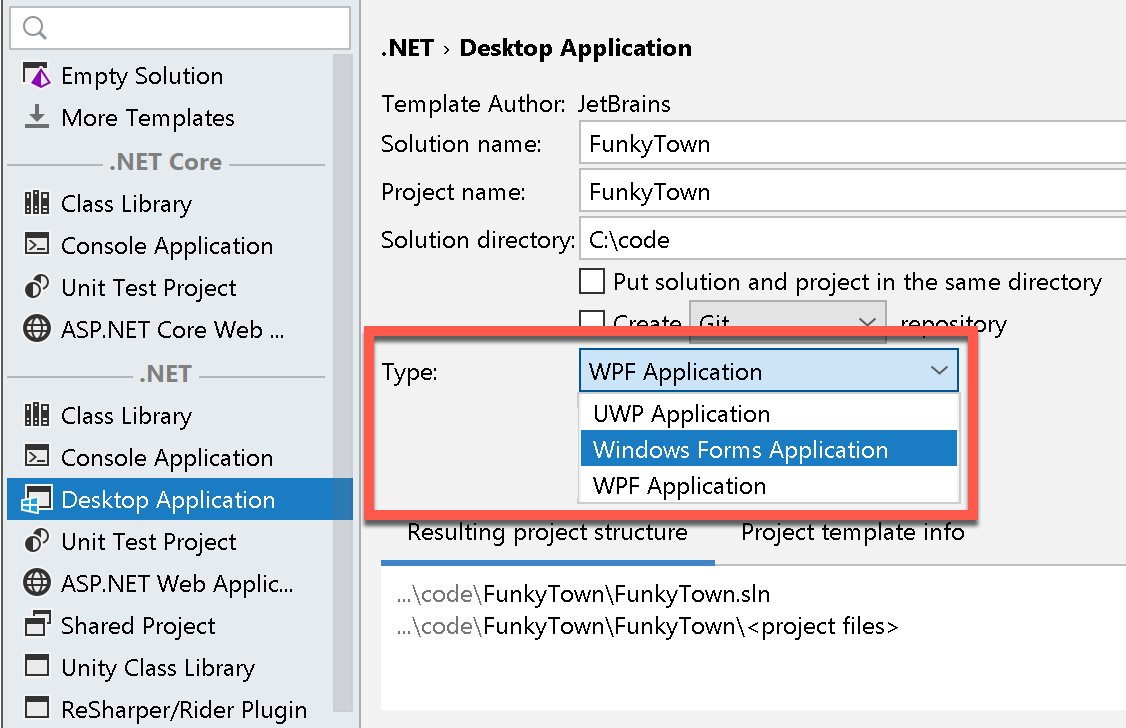
Choose Desktop Application project template and then Desktop Application as the project type.
Create and edit Windows Forms
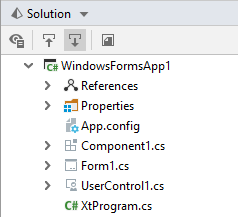
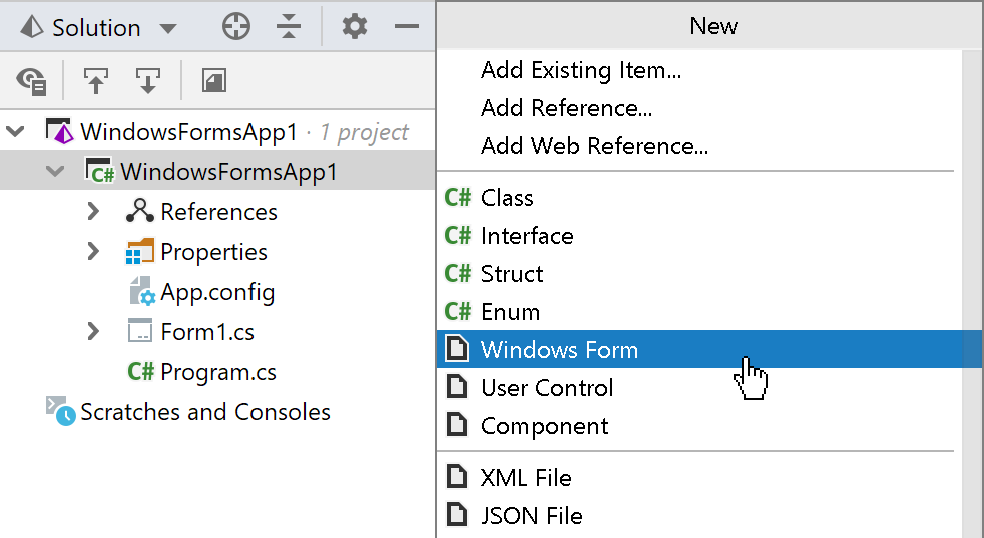
You can add Windows Forms items in any project which have a reference to System.Windows.Forms . To add a new Windows Form item, right-click the project in the Solution Explorer and choose Add . You will be then able to select one of the Windows Forms templates — Windows Form , User Control , or Component . Windows Forms items are displayed with the corresponding icons in the Solution Explorer tree:
When you double-click a Windows Form item, it opens in a new editor tab and additionally opens the Designer Toolbox window. Use the Designer and Code tabs at the bottom of the editor to switch between the visual designer and code editor views.
If you close the Designer Toolbox window, choose View | Tool Windows | Designer Toolbox from the menu to open it.
When working in the designer view, you can select the desired component in the Designer Toolbox and then without dragging it , draw a rectangle area on the canvas where the component should be added.
To edit a component added to the canvas, select it with a click, and then:
Use its adorners to move and resize it.
Use the property grid and the event list to manipulate available properties like Text , Items , and Fonts , and subscribe to available events.
Double-click the component to add a default event handler. For example, it will add the Click event handler for a button.
Use Ctrl+X , Ctrl+C , paste Ctrl+V shortcuts to cut, copy, and paste components within the canvas and also between multiple Windows Forms items.
Install JetBrains Rider
JetBrains Rider is a cross-platform IDE that provides consistent experience on the Windows, macOS, and Linux operating systems.
Prerequisites
Install using the Toolbox App
The JetBrains Toolbox App is the recommended tool to install JetBrains products. Use it to install and manage different products or several versions of the same product, including Early Access Program (EAP) releases, update and roll back when necessary, and easily remove any tool. The Toolbox App maintains a list of all your projects to quickly open any project in the right IDE and version.
Install the Toolbox App
Download the installer .exe from the Toolbox App web page.
Run the installer and follow the wizard steps.
After you run the Toolbox App, click its icon in the notification area and select which product and version you want to install.
Log in to your JetBrains Account from the Toolbox App and it will automatically activate the available licenses for any IDE that you install.
Install the Toolbox App
Download the disk image .dmg from the Toolbox App web page.
There are separate disk images for Intel and Apple Silicon processors.
Mount the image and drag the JetBrains Toolbox app to the Applications folder.
After you run the Toolbox App, click its icon in the main menu and select which product and version you want to install.
Log in to your JetBrains Account from the Toolbox App and it will automatically activate the available licenses for any IDE that you install.
Install the Toolbox App
Download the tarball .tar.gz from the Toolbox App web page.
Extract the tarball to a directory that supports file execution.
For example, if the downloaded version is 1.17.7391, you can extract it to the recommended /opt directory using the following command:
Execute the jetbrains-toolbox binary from the extracted directory to run the Toolbox App and select which product and version you want to install. After you run the Toolbox App for the first time, it will automatically add the Toolbox App icon to the main menu.
Log in to your JetBrains Account from the Toolbox App and it will automatically activate the available licenses for any IDE that you install.
You can use this shell script that automatically downloads the tarball with the latest version of the Toolbox App, extracts it to the recommended /opt directory, and creates a symbolic link in the /usr/local/bin directory.
Standalone installation
Install JetBrains Rider manually to manage the location of every instance and all the configuration files. For example, if you have a policy that requires specific install locations.
Run the installer and follow the wizard steps.
On the Installation Options step, you can configure the following:
Create a desktop shortcut for the launcher relevant to your operating system.
Add the directory with JetBrains Rider command-line launchers to the PATH environment variable to be able to run them from any working directory in the Command Prompt.
Add an item Open Folder as Project to the system context menu (when you right-click a folder).
Associate specific file extensions with JetBrains Rider to open them with a double-click.
To run JetBrains Rider, find it in the Windows Start menu or use the desktop shortcut. You can also run the launcher batch script or executable in the installation directory under bin .
There are separate disk images for Intel and Apple Silicon processors.
Mount the image and drag the JetBrains Rider app to the Applications folder.
Run the JetBrains Rider app from the Applications directory, Launchpad, or Spotlight.
Extract the tarball to a directory that supports file execution.
For example, to extract it to the recommended /opt directory, run the following command:
Do not extract the tarball over an existing installation to avoid conflicts. Always extract it to a clean directory.
Execute the Rider.sh script from the extracted directory to run JetBrains Rider.
To create a desktop entry, do one of the following:
On the Welcome screen, click Configure | Create Desktop Entry
From the main menu, click Tools | Create Desktop Entry
When you run JetBrains Rider for the first time, some steps are required to complete the installation, customize your instance, and start working with the IDE.
For information about the location of the default IDE directories with user-specific files, see Default IDE directories.
Installation with dotUltimate installer
If you have the dotUltimate license, which includes all JetBrains tools for .NET development, such as ReSharper, dotTrace, dotMemory, and dotCover, you can download the dotUltimate installer and use it to set up Rider as well as all other .NET tools.
Silent installation on Windows
Silent installation is performed without any user interface. It can be used by network administrators to install JetBrains Rider on a number of machines and avoid interrupting other users.
To perform silent install, run the installer with the following switches:
/S : Enable silent install
/CONFIG : Specify the path to the silent configuration file
/D : Specify the path to the installation directory
This parameter must be the last in the command line and it should not contain any quotes even if the path contains blank spaces.
To check for issues during the installation process, add the /LOG switch with the log file path and name between the /S and /D parameters. The installer will generate the specified log file. For example:
Silent configuration file
You can download the default silent configuration file for JetBrains Rider at https://download.jetbrains.com/rider/silent.config
The silent configuration file defines the options for installing JetBrains Rider. With the default options, silent installation is performed only for the current user: mode=user . If you want to install JetBrains Rider for all users, change the value of the installation mode option to mode=admin and run the installer as an administrator.
The default silent configuration file is unique for each JetBrains product. You can modify it to enable or disable various installation options as necessary.
It is possible to perform silent installation without the configuration file. In this case, omit the /CONFIG switch and run the installer as an administrator. Without the silent configuration file, the installer will ignore all additional options: it will not create desktop shortcuts, add associations, or update the PATH variable. However, it will still create a shortcut in the Start menu under JetBrains .
Install as a snap package on Linux
You can install JetBrains Rider as a self-contained snap package. Since snaps update automatically, your JetBrains Rider installation will always be up to date.
To use snaps, install and run the snapd service as described in the installation guide.
On Ubuntu 16.04 LTS and later, this service is pre-installed.
JetBrains Rider is distributed via two channels:
The stable channel includes only stable versions. To install the latest stable release of JetBrains Rider, run the following command:
The —classic option is required because the JetBrains Rider snap requires full access to the system, like a traditionally packaged application.
The edge channel includes EAP builds. To install the latest EAP build of JetBrains Rider, run the following command:
When the snap is installed, you can launch it by running the rider command.
To list all installed snaps, you can run sudo snap list . For information about other snap commands, see the Snapcraft documentation.
Developing Windows Forms Applications in Rider 2019.1
With Rider 2019.1 EAP (and the stable release coming very soon!), we deliver another major feature right to your front door. With nearly 300 votes, the Windows Forms Designer was one of the highest voted features that got implemented for this release. Since the designer relies on and integrates with Windows-specific components, it’s available only on Windows systems. We’re excited to tell you more about how it works, so let’s open up a Windows Forms project and dive right in!
Using the Windows Forms Designer
After opening (or creating) a Windows Forms project, we can open a form in the editor. This will show us the actual Designer View that displays the form or user control (1) we’re working with. From the Property Grid on the left-hand side (2), we can manipulate available properties like Text, Items, and Fonts, and we can also subscribe to events for double-clicks, mouse hovers and so on. On the right-hand side, the Designer Toolbox provides a list of components that can be added to the form (4). At the bottom, we can find navigation tabs to switch between the designer view and the code behind (3):

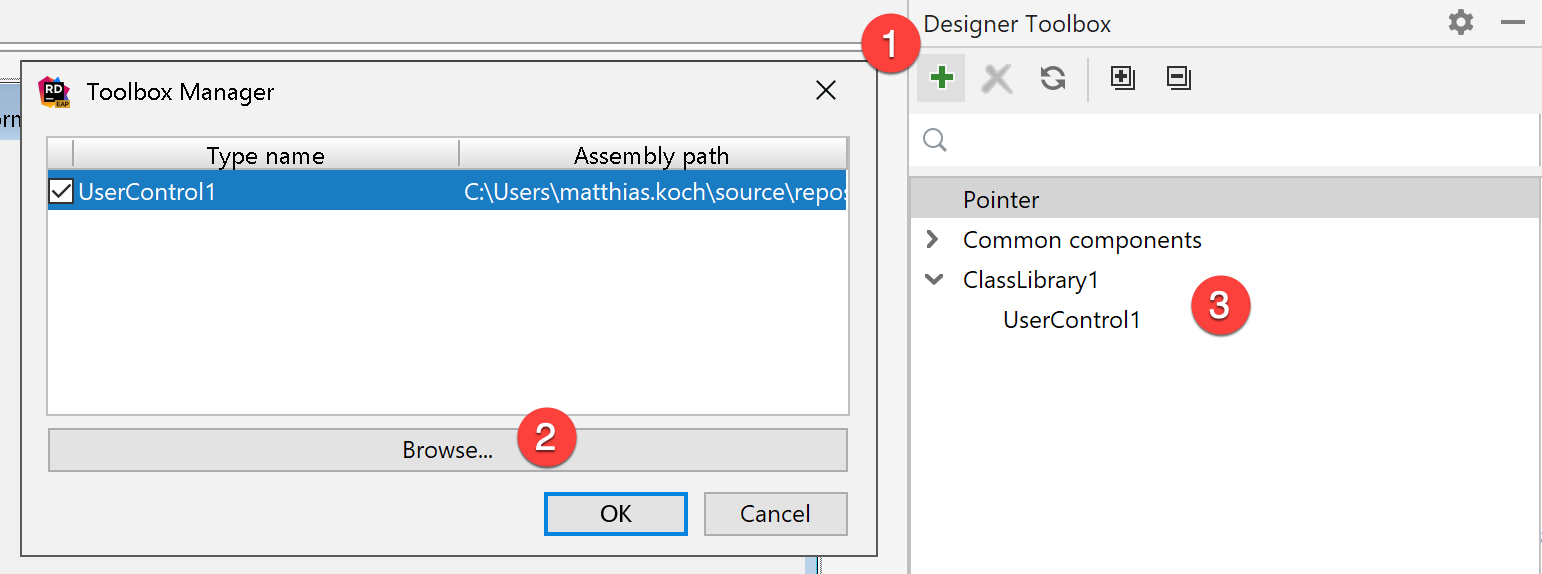
Besides framework controls, we can also add our own controls to the Designer Toolbox. After clicking on the Assembly List Configuration (1), we will find a dialog to browse for assemblies containing the controls (2). The selected controls are then listed in the Designer Toolbox list view as well (3):
Creating related projects and files
Rider also ships with project and file templates related to Windows Forms development. When creating a new project, we can now also select the new Desktop Application project template, which further allows to select between UWP, Windows Forms, and WPF as the UI technology:
When adding a new file, the list of templates will include the Windows Form, User Control and Component file template:
Note that these templates will only appear in projects that have a reference added to System.Windows.Forms .
Error Handling when Forms are Broken
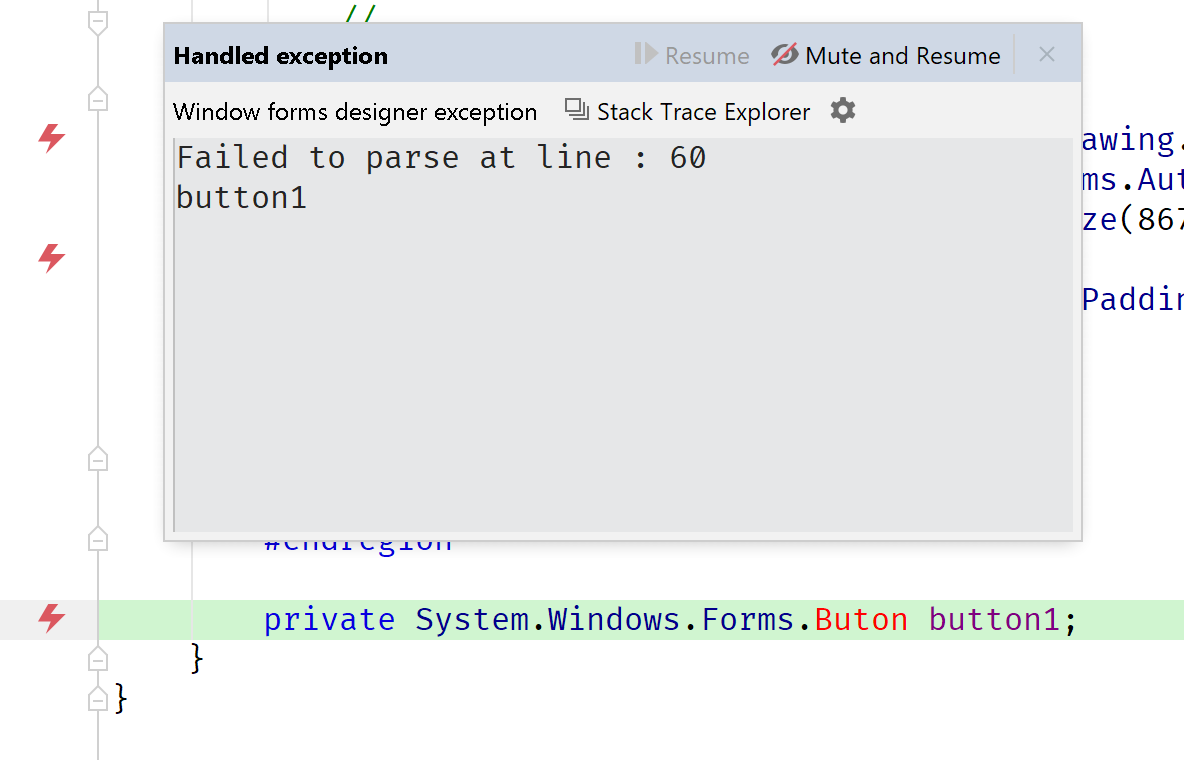
Things do not always go perfect, and if we have to manually edit our designer files, we might break our code. When loading a broken form, Rider will jump to the designer code and highlight the parts that couldn’t be parsed:
One question that remains: does Rider support Windows Forms for .NET Core 3.0 preview? Not yet. We do have a tracking issue which you can subscribe to and/or add comments.
We hope this will make a lot of developers happier. As always, please don’t hesitate to give us some feedback! Is there anything we can further improve? Download Rider 2019.1 EAP now and let us know your thoughts!
JetBrains Rider C# | Windows Form UI [closed]
Want to improve this question? Update the question so it’s on-topic for Stack Overflow.
Closed 3 years ago .
I’ve developed a console application using Rider IDE by JetBrains.
What I wanted to know is if there’s a way of build an UI using Rider IDE? Or a plugin which creates the basic setup for an app with UI?
3 Answers 3
Q: Are you also developing a GUI designer like in Visual Studio for WinForms, WPF etc? A: Yes, we’re looking at how we can support at least previewing WinForms/WPF/Xamarin Forms. We’re not sure we’re going to make it for the first release though.
JetBrains already published the answer,
Generally speaking, they can easily support that on Windows (as open source IDE SharpDevelop already supports that). But it would be a less useful feature as Rider targets cross platform developers.

I’m not using Rider myself, but quickly browsing for its current state on UI designers, it doesn’t seem to have any, especially not for Windows Forms / WinForms. It would only let you create a UI by writing the code for setting up the windows and controls manually.
Given that WinForms has not been under any serious development since more than a decade now by Microsoft itself and that it’s a «dead» technology nowadays with WPF / UWP being the new «technology to use» on the Windows platform, it’s doubtful JetBrains will ever care about implementing something like a designer for WinForms in their Java-based IDE, if it’s possible at all.
If you really want to develop WinForms applications, you should go for Visual Studio. It has the best designer for it out there IMHO, and even that one is horrible. The «best» you could do is to design only the WinForms Form s and Control s in Visual Studio Community 2017 (which is free), and write the remaining code in Rider, copying over the designed Form or Control classes or creating a project/solution sharing folders.
It does not look like Rider supports designers for any other Windows / Microsoft technology like WPF / UWP aswell. WPF does have a more code-friendly approach to generate a user interface with declarative XAML, but the missing IDE support for generating the code-behind and unavailable IntelliSense support could make make that a frustrating if not impossible task.
A third party, cross-platform UI framework based on NuGet packages and .NET Core could be Avalonia. The project tries to recreate WPF from scratch with open source implementations. It also only offers an extension for Visual Studio for a visual designer, but as with WPF, the UI can be written in XAML, and loading it is done more transparently with a few manual lines of code, which seems more doable if you’re missing first-class IDE support.


