- Как установить заголовочные файлы ядра в Linux
- Установка заголовочных файлов ядра в Debian, Ubuntu или Linux Mint
- Установка заголовочных файлов ядра в Fedora, CentOS или RHEL
- Невозможно найти пакет linux-kernel-devel
- 1 ответ
- Linux kernel devel package
- About
- Linux Kernel-Devel Fault
- Available Languages
- Download Options
- Contents
- Overview
- Applicability
- Operating Systems
- Connector Versions
- RHEL Linux
- Causes
- Resolution
- Procedure
- Ubuntu Linux
- Causes
- Resolution
- what is the linux-kernel-devel equivalent in 12.04.2 LTS 3.5.0?
- 4 Answers 4
- Executive Summary
- Full Explanation
- Related Packages
- If You Still Have Trouble
Как установить заголовочные файлы ядра в Linux
Когда вы компилируете драйвер устройства как модуль ядра, вам необходимы установленные заголовочные файлы ядра. Также они требуются, если вы собираете пользовательское приложение, которое взаимодействует напрямую с ядром. При установке заголовочных файлов ядра, необходимо убедиться, что их версия совпадает с версией ядра установленного в системе.
Если версия вашего ядра не менялась после установки дистрибутива, или вы обновляли его с использованием системного менеджера пакетов (то есть apt-get, aptitude или yum) из системных репозиториев, то заголовочные файлы вы также можете установить с помощью пакетного менеджера. Однако если вы скачивали исходный код ядра и компилировали его самостоятельно, то заголовочные файлы необходимо устанавливать с помощью команды make.
Здесь мы предполагаем, что ваше ядро установлено из основного системного репозитория вашего дистрибутива, и вы хотите установить соответствующие заголовочные файлы ядра.
Установка заголовочных файлов ядра в Debian, Ubuntu или Linux Mint
Если вы не компилировали ядро вручную, то можете установить соответствующие заголовочные файлы ядра с помощью команды apt-get.
Сначала проверьте, не установлены ли уже требуемые заголовочные файлы с помощью команды:
Теперь установите заголовочные файлы, как показано ниже.
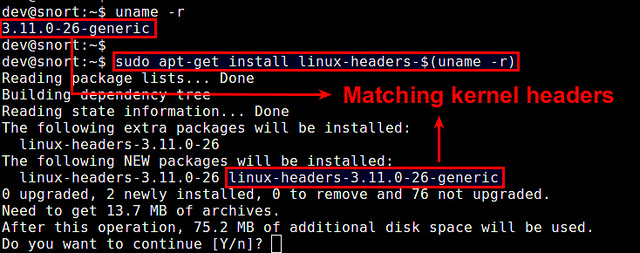
Проверьте, что установка прошла успешно.
По умолчанию в Debian, Ubuntu или Linux Mint заголовочные файлы находятся в /usr/src.
Установка заголовочных файлов ядра в Fedora, CentOS или RHEL
Если вы не обновляли ядро вручную, то можете установить соответствующие заголовочные файлы ядра с помощью команды yum.
Сначала проверьте, не установлены ли уже требуемые заголовочные файлы. По умолчанию заголовочные файлы ядра расположены в /usr/src/kernels/.
Если подходящих заголовочных файлов не установлено, вы можете установить их с помощью команды yum. Она автоматически найдет подходящий пакет.
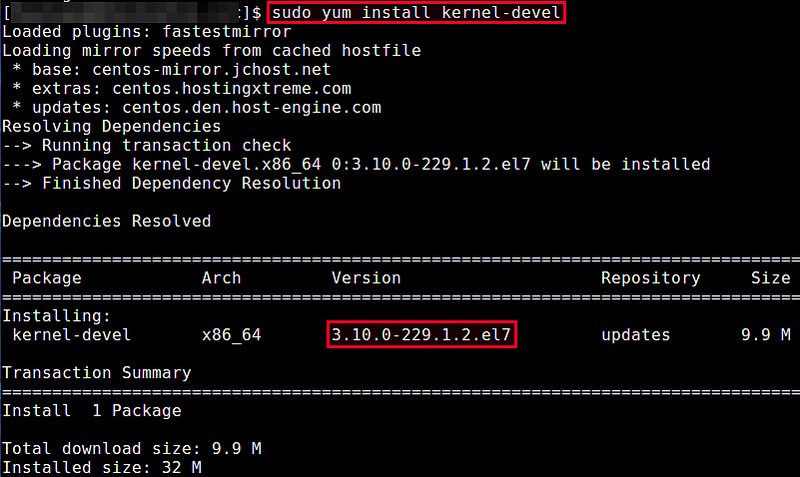
Если заголовочные файлы ядра, установленные с помощью вышеприведенной команды, не соответствуют установленному в системе ядре, значит оно устарело. В этом случае обновите ядро системы до последней версии с помощью приведенной ниже команды. После обновления необходимо перезагрузить систему.
Теперь проверьте, что установлены заголовочные файлы соответствующей версии с помощью команды:
Источник
Невозможно найти пакет linux-kernel-devel
Я уверен, что есть три другие ссылки, которые сообщают о той же проблеме, я получаю
Я перехожу по этой ссылке, чтобы скомпилировать свое собственное ядро
Инструменты, которые вам понадобятся Для начала вам необходимо установить несколько пакетов. Точные команды для установки этих пакетов зависят от того, какую версию вы используете:
sudo apt-get install linux-kernel-devel fakeroot kernel-wedge build-essential
Когда я пробую вышеупомянутые пакеты, fakroot, kernel-wedge, build-essentail кажутся доступными для терминала, за исключением linux-kernel-devel.
Я пытаюсь установить Hardy на свою Ubuntu 12.04.3 LTS, пока я пытался
Я даже попытался изменить исходный список и добавил строку юниверса в строку ниже.
Что мне здесь не хватает? Почему Ubuntu не может найти пакет? Я подключен к Интернету.
1 ответ
Этот конкретный пакет не упакован в Ubuntu 10.04 и выше. Если вы пытаетесь скомпилировать собственное ядро, правильный способ получить необходимые компоненты в Ubuntu 10.04 и более поздних версиях — выполнить следующие команды:
Hardy — это совершенно другая версия Ubuntu, и ее нельзя установить на другую версию. Если вам нужна Ubuntu 8.04 (Hardy Heron), вам нужно найти ее копию онлайн, скачать ее, а затем записать на CD или DVD.
Тем не менее, 8.04 давно не работает, и мы рекомендуем использовать более новую версию Ubuntu.
Источник
Linux kernel devel package
A modern Linux kernel kernel development environment featuring integrated debugging based on vscode and libvirtd.

Kernel development can be an extremely difficult environment to create an efficient workflow for. If you do not already have a preferred Linux kernel development workflow (based on your favorite editor such as vim or emacs ), these instructions are for you. If you already have a preferred workflow based on another tool, you may still find value in the libvirtd-related content presented here.
Configuring vscode to use libvirtd (using UEFI direct kernel boot) allows for building the kernel as one would build any other vscode project, and simple debugging by pressing F5 as one would debug any other C/C++ vscode project. Stack frames, threads, variable introspection, and breakpoints are all presented to the user with an easy-to-use GUI. Hardware breakpoints are used by default as the debugging infrastructure uses GDB under the hood.
- Add initramfs instructions
- Debug edge-cases where breakpoints fail
- Create a root filesystem VM image and place it somewhere owned by your user (any location / distribution will do, and more efficient solutions than this one likely exist)
- Clone the linux source tree and place it somewhere
- Configure the kernel source using your favorite method. An example .config is provided which will work with the above virt-builder image, but the most important things which need to be enabled are the virtio block device / network driver, and EFISTUB output
Create a libvirtd session VM (session VMs are owned by your user, system VMs are owned by root; see this post for details) which uses UEFI direct kernel boot pointed at the built kernel bzImage. An example configuration is presented here:
- (Optional) Ensure that libvirtd has a system network you can bridge to, then set the session VM to use the virbr0 bridged adapter for networking ( virt-manager has an excellent GUI that can do this)
- Ensure you have the vscode C/C++ extension, then create the vscode configuration in your kernel source tree
- Open vscode to your kernel development directory to test that everything works properly
- ctrl+shift+b should trigger a make of the kernel
- F5 should boot the VM, wait a moment for QEMU’s gdbserver to connect, then begin displaying the console in a pane
- At any point, pressing F6 should pause and allow introspection of state in the debugger tab
About
A modern Linux kernel kernel development environment featuring integrated debugging based on vscode and libvirtd
Источник
Linux Kernel-Devel Fault
Available Languages
Download Options
Contents
Overview
On Red Hat Enterprise Linux (RHEL) 8 and variants, as well as Amazon Linux 2 running on a 4.19 or newer system kernel, the Cisco Secure Endpoint Linux connector will not be able to monitor file moves or enable Device Flow Correlation (network monitoring) when the kernel-devel package is missing for the currently running kernel. The connector will raise fault ID 11 » Required kernel-devel package is missing» in this situation. For Ubuntu Linux this fault may be raised when the linux-headers package is missing.
Starting with RHEL 8 and Amazon Linux 2 kernel 4.19 or newer the connector will use eBPF modules for realtime file system and network monitoring. The eBPF modules replace the Linux Kernel Modules used when running on RHEL 6, RHEL 7, and Amazon Linux 2 kernel 4.14 or earlier. For Ubuntu 20.04 and later eBPF modules are native.
For widest compatibility the connector will automatically compile the eBPF modules used by the connector before loading and running them on the system. This compilation requires that kernel development header files corresponding to the currently running kernel be installed. When realtime filesystem and network monitoring is enabled the connector will compile the eBPF modules each time the connector is started, or in realtime when these features are enabled as part of a policy update.
Applicability
The fault will typically be raised after a fresh Secure Endpoint Linux connector install or after updating the system kernel.
Operating Systems
- RHEL/CentOS/Oracle Linux 8
- Ubuntu 20.04
- Amazon Linux 2
Connector Versions
RHEL Linux
The kernel-devel package installs the needed kernel development header files in the /usr/src/kernels directory, organized according to their kernel version.
Causes
The kernel-devel package required for realtime filesystem and network activity monitoring is missing and the connector policy has either ‘Monitor File Copies and Moves’ or ‘Enable Device Flow Correlation’ enabled.
Resolution
Install the `kernel-devel` package matching the currently running kernel.
Alternatively, in the rare situation that realtime filesystem and network monitoring is not needed then this fault can be cleared by disabling both ‘Monitor File Copies and Moves’ and ‘Enable Device Flow Correlation’ in the policy. Note that the connector will not be providing realtime protection of the system when these features are disabled.
Procedure
To install the kernel-devel package corresponding to the currently running kernel, run the following.
The connector should recover and clear the fault within a minute. If the fault does not clear within one minute then manually restart the connector. The fault should then be cleared within one minute after the restart.
NOTE: If the above command fails with an error «No match for argument» then it’s possible that the current kernel version is no longer supported and the OS maintainer has removed the package from the dnf repository. In this case the needed kernel-devel .rpm package can be manually downloaded from the vendor’s OS archives and then manually installed, or the kernel can be updated to a supported version and the above command tried again.
As an example, if using CentosOS and updating the kernel to a version supported by the distribution is not possible, old kernel-devel .rpm packages for CentOS can be manually downloaded from http://vault.centos.org. The name of the file to download is given by the output from the following bash command.
Once downloaded, the kernel-devel package can be installed by running the following bash command in the directory where the downloaded .rpm file is saved.
Ubuntu Linux
The linux-headers package installs the needed header files in the /usr/src directory, organized according to their kernel version.
Causes
The linux-headers package required for realtime filesystem and network activity monitoring is missing and the connector policy has either ‘Monitor File Copies and Moves’ or ‘Enable Device Flow Correlation’ enabled.
Resolution
On Ubuntu the linux-headers package can be installed with the following command:
Источник
what is the linux-kernel-devel equivalent in 12.04.2 LTS 3.5.0?
apologies for the noob question, but when I try to
I get the following:
I have tried the following:
with no joy. any suggestions?
4 Answers 4
Executive Summary
You probably want to install the package called linux-headers-generic .
If running uname -r gives you something other than generic after the version number, substitute that for generic in linux-headers-generic . (This might be server or generic-pae on some installations of some Ubuntu releases, and there are a few other occasional kernel «flavors.»)
Since you most likely needs this so that you can build a driver (which might be automated, you might not be «building it yourself»), it’s a good idea to install build-essential too to make it so you’ll probably have all the necessary tools.
Full Explanation
To the best of my knowledge, no operating system has a package called Linux-kernel-devel . This is for two reasons:
- Package names starting with capital letters are extremely rare, for any Unix-like OS.
- GNU/Linux operating systems typically name their kernel-related packages so that the names contain the word kernel or the word linux, but not both. (On Ubuntu, it’s the word linux.)
It’s common for kernel-related packages on systems that use the Red Hat Package Manager ( rpm ) and related utilities to have kernel in the name of their packages. For example, Mageia has a number of packages whose names start with kernel and end in devel . These packages almost always (on Mageia and any OS that has them) provide the header files needed to build drivers from source for use with the kernel. They may also provide related utilities to facilitate. These packages:
- do not provide the full source code of the kernel. That’s provided by other packages.
- do not provide a pre-compiled, usable kernel. That’s provided by other packages.
- do not provide a compiler or most other purpose build tools. Those, too, are provided by other packages.
In Ubuntu, as can be seen in the list here, the packages that provide kernel headers have names that start with linux-headers . Usually the correct package to install is linux-headers-generic . However, to be sure of what package to install to get headers that correspond to your currently running kernel, run:
You’ll get output that looks something like:
That is, you’ll have a version number (which will include . characters and usually at least one — ), followed by a — , followed by one or more words indicating which kind of kernel you are running.
If you just want the headers for the specific version you happen to be running now, you could install the package whose name is linux-headers-* where * is replaced by the full output of uname -r . For example, on my system, I could run:
I could even automate it:
These approaches are equivalent, but they are not usually the best way to go.
Instead, you usually will want to install the metapackage that always provides the newest kernel headers as an update (by perpetually depending on whatever header package is newest). This parallels the way your compiled, running kernel is installed and gets updated. To do that, look just at the part of uname -r ‘s output after the version number. That is, if uname -r gives you 3.5.0-36-generic , take just the generic part.
Then install the package called linux-headers-* where * is replaced by that part. So, on my system, it would be linux-headers-generic and one way I could install it would be to run:
For most people it is linux-headers-generic , but depending on what Ubuntu release you’re running, what architecture and type of device you’re running it on, and how it is installed and configured, other possibilities include generic-pae , highbank , omap , server , and virtual .
Related Packages
Header files facilitate developing and compiling/building software that uses facilities provided by the software whose header files are being used. The most common reason you might need kernel headers is if you are going to build a driver (a kernel module) from source code. Some applications, like VMware and VirtualBox, will sometimes require this, and will automate the build themselves.
In addition to header files, to build software a compiler and other tools are needed. To maximize the likelihood that you have the necessary tools, it’s a good idea to install the build-essential package also.
It’s uncommon for anyone to need the actual full kernel source code (unless, of course, you’re planning on building your kernel from source). But if you do need that, you’ll have to install another package too. In Ubuntu the package for full kernel source code is called linux-source . (This is in keeping with the Debian/Ubuntu convention of naming packages that provide substantive parts of the Linux kernel linux rather than kernel .)
If You Still Have Trouble
If you try to install any of these packages but experience problems, and you want help, then you will have to include the complete and exact text from the Terminal, including the lines where you typed commands. The best way to provide this is by editing your question, but if it is too long, you can paste it somewhere like http://paste.ubuntu.com and provide us with the URL where we can access it.
If you comment on this question, I’ll be notified. You can edit your question and also comment here to call attention to the information you’ve provided in your question. (Important information is best kept in questions and answers.) Good luck!
Источник


