- Как установить заголовочные файлы ядра в Linux
- Установка заголовочных файлов ядра в Debian, Ubuntu или Linux Mint
- Установка заголовочных файлов ядра в Fedora, CentOS или RHEL
- Fedora Linux Install Linux Kernel Headers And Developer Files
- How to Install Kernel Headers in CentOS 7
- Install Kernel Headers in CentOS 7
- If You Appreciate What We Do Here On TecMint, You Should Consider:
- Building a Custom Kernel
- Get the Dependencies
- Secure boot
- Building a Kernel from the Fedora dist-git
- Building a non-debugging kernel
- Enabling configuration options
- Building a kernel from the exploded git trees
- Building a vanilla upstream kernel
- Getting the Sources
- Applying patches
- Configuring the kernel
- Starting from an installed kernel configuration
- Starting from dist-git
- Changing the configuration
- Building the kernel
- Installing the kernel
- Rebuilding
- Cleaning up
Как установить заголовочные файлы ядра в Linux
Когда вы компилируете драйвер устройства как модуль ядра, вам необходимы установленные заголовочные файлы ядра. Также они требуются, если вы собираете пользовательское приложение, которое взаимодействует напрямую с ядром. При установке заголовочных файлов ядра, необходимо убедиться, что их версия совпадает с версией ядра установленного в системе.
Если версия вашего ядра не менялась после установки дистрибутива, или вы обновляли его с использованием системного менеджера пакетов (то есть apt-get, aptitude или yum) из системных репозиториев, то заголовочные файлы вы также можете установить с помощью пакетного менеджера. Однако если вы скачивали исходный код ядра и компилировали его самостоятельно, то заголовочные файлы необходимо устанавливать с помощью команды make.
Здесь мы предполагаем, что ваше ядро установлено из основного системного репозитория вашего дистрибутива, и вы хотите установить соответствующие заголовочные файлы ядра.
Установка заголовочных файлов ядра в Debian, Ubuntu или Linux Mint
Если вы не компилировали ядро вручную, то можете установить соответствующие заголовочные файлы ядра с помощью команды apt-get.
Сначала проверьте, не установлены ли уже требуемые заголовочные файлы с помощью команды:
Теперь установите заголовочные файлы, как показано ниже.
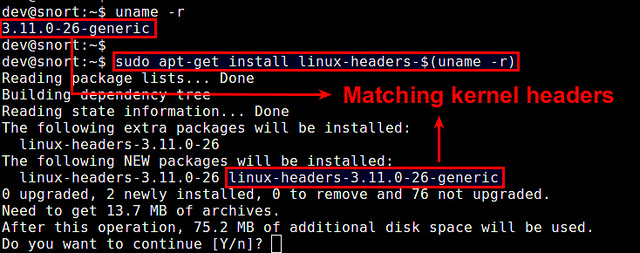
Проверьте, что установка прошла успешно.
По умолчанию в Debian, Ubuntu или Linux Mint заголовочные файлы находятся в /usr/src.
Установка заголовочных файлов ядра в Fedora, CentOS или RHEL
Если вы не обновляли ядро вручную, то можете установить соответствующие заголовочные файлы ядра с помощью команды yum.
Сначала проверьте, не установлены ли уже требуемые заголовочные файлы. По умолчанию заголовочные файлы ядра расположены в /usr/src/kernels/.
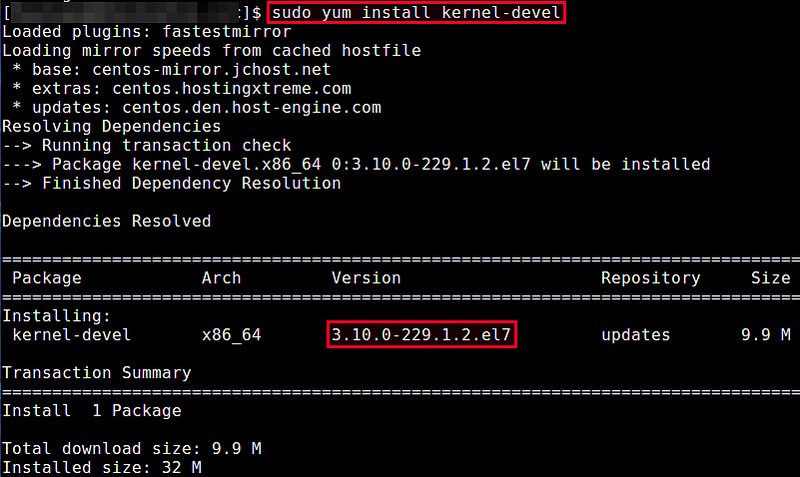
Если подходящих заголовочных файлов не установлено, вы можете установить их с помощью команды yum. Она автоматически найдет подходящий пакет.
Если заголовочные файлы ядра, установленные с помощью вышеприведенной команды, не соответствуют установленному в системе ядре, значит оно устарело. В этом случае обновите ядро системы до последней версии с помощью приведенной ниже команды. После обновления необходимо перезагрузить систему.
Теперь проверьте, что установлены заголовочные файлы соответствующей версии с помощью команды:
Источник
Fedora Linux Install Linux Kernel Headers And Developer Files
I ‘m trying to install vmware-tools but Fedora Linux v12 prompting for kernel headers. How do I install kernel headers under Fedora Linux?
You need to install the following two packages:
- kernel-devel : Development package for building kernel modules to match the kernel.
- kernel-headers : Header files for the Linux kernel for use by glibc.
Type the following command as root user to install required packages:
# yum -y install kernel-devel kernel-headers
Once installed type the following command to configure vmware-tools client package:
# vmware-config-tools.pl
- No ads and tracking
- In-depth guides for developers and sysadmins at Opensourceflare✨
- Join my Patreon to support independent content creators and start reading latest guides:
- How to set up Redis sentinel cluster on Ubuntu or Debian Linux
- How To Set Up SSH Keys With YubiKey as two-factor authentication (U2F/FIDO2)
- How to set up Mariadb Galera cluster on Ubuntu or Debian Linux
- A podman tutorial for beginners – part I (run Linux containers without Docker and in daemonless mode)
- How to protect Linux against rogue USB devices using USBGuard
Join Patreon ➔
🐧 Get the latest tutorials on Linux, Open Source & DevOps via
Источник
How to Install Kernel Headers in CentOS 7
When you compile a custom kernel module such as a device driver on a CentOS system, you need to have kernel header files installed on the system, which include the C header files for the Linux kernel. Kernel header files provide different kinds of function and structure definitions required when installing or compiling any code that interfaces with the kernel.
When you install Kernel Headers, make sure it matches with the currently installed kernel version on the system. If your Kernel version comes with the default distribution installation or you have upgraded your Kernel using yum package manager from system base repositories, then you must install matching kernel headers using package manager only. If you’ve compiled Kernel from sources, you can install kernel headers from sources only.
In this article, we will explain how to install Kernel Headers in CentOS/RHEL 7 and Fedora distributions using default package manager.
Install Kernel Headers in CentOS 7
First confirm that the matching kernel headers are already installed under /usr/src/kernels/ location on your system using following commands.
![]() Check Kernel Headers in CentOS 7
Check Kernel Headers in CentOS 7
If no matching kernel headers are located in the /usr/src/kernels/ directory, go ahead and install kernel headers, which is provided by the kernel-devel package that can be installed using default package manager as shown.
![]() Install Kernel Headers in CentOS 7
Install Kernel Headers in CentOS 7
After installing the kernel-devel package, you can find all the kernel headers files in /usr/src/kernels directory using following command.
Note on a VPS (for instance a Linode VPS), a kernel may have a customized version name, in such scenario, you have to identify the kernel version manually and check the installed kernel header files using following commands.
![]() Check Kernel Version in CentOS 7
Check Kernel Version in CentOS 7
Sample Output
In addition, if you need header files for the Linux kernel for use by glibc, install the kernel-header package using following command.
Now you are good to go with compiling your own or existing kernel modules for software such as VirtualBox and many more.
That’s it! In this article, we have explained how to install kernel-devel and kernel-header packages in CentOS/RHEL 7 and Fedora systems. Remember that before you can compile kernel modules such as device driver on a Linux system, you should have necessary kernel header files installed. If you have queries, please use the comment form below to reach us.
If You Appreciate What We Do Here On TecMint, You Should Consider:
TecMint is the fastest growing and most trusted community site for any kind of Linux Articles, Guides and Books on the web. Millions of people visit TecMint! to search or browse the thousands of published articles available FREELY to all.
If you like what you are reading, please consider buying us a coffee ( or 2 ) as a token of appreciation.

We are thankful for your never ending support.
Источник
Building a Custom Kernel
This page has been converted from the Fedora Project Wiki and cleaned up for publishing here on the Fedora Docs Portal, but it has not yet been reviewed for technical accuracy. This means any information on this page may be outdated or inaccurate. Reviews for technical accuracy are greatly appreciated. If you want to help, see the README file in the source repository for instructions.
This document provides instructions for advanced users who want to rebuild the kernel from some source.
When building or running a custom kernel, one should not expect support from the Fedora kernel team.
Some common reasons to build a custom kernel are:
To apply patches for testing that they either generated or obtained from another source
To reconfigure the existing kernel
To learn more about the kernel and kernel development
Get the Dependencies
The easiest way to install all the build dependencies for the kernel is to use the Fedora kernel spec file:
If you want to use make xconfig , you’ll need some additional packages:
Secure boot
Make sure you add the user doing the build to /etc/pesign/users and run the authorize user script:
Create a new Machine Owner Key (MOK) to import to UEFI:
Import the new certificate into your UEFI database:
| You will be asked to authorize the import at next boot. |
Create a PKCS #12 key file:
You can then import the certificate and key into the nss database:
Once the certificate and key are imported into your nss database, you can build the kernel with the selected key by adding %define pe_signing_cert to the kernel.spec file or calling rpmbuild directly with the —define «pe_signing_cert » flag.
| While bugzilla bug #1651020 is open you might need to edit the line that starts with %pesign in the kernel spec file and substitute it with pesign -c % |
It’s also recommended that you install ccache , which can help speed up rebuilds:
Building a Kernel from the Fedora dist-git
The kernel, like any other Fedora package, has a branch per Fedora release. rawhide corresponds to Rawhide and each version of Fedora has a branch called f . For example, to build a Fedora 28 kernel, you would first need to check out that branch with:
Check out the branch for which you would like to build a kernel ( rawhide corresponds to Rawhide):
To avoid conflicts with existing kernels, you can set a custom buildid by changing # define buildid .local to %define buildid . in kernel.spec .
Make whatever changes or customizations you need.
Install the new kernel:
Building a non-debugging kernel
Most Rawhide kernels are built with debugging enabled by default. To make a kernel with debugging options disabled, you can follow the above instructions, but before you run fedpkg local , disable the debugging options with:
Enabling configuration options
If there are configuration options that need to be adjusted for your build, you can add changes in the kernel-local file. These changes will get picked up when you build.
Building a kernel from the exploded git trees
Fedora keeps a git tree containing Fedora patches applied on top of the vanilla sources.
You can now build the kernel following regular kernel instructions. This tree is useful for generating patches that can be applied to the kernel.spec.
Building a vanilla upstream kernel
Sometimes a Fedora developer may ask you to try building and installing an upstream kernel (possibly with a patch added) for testing. If there are multiple iterations, it may be quicker for you to do this than for the developer to turn around several RPMs.
There is an effort underway for packaging vanilla kernels. See if this meets your needs first
Getting the Sources
Clone the kernel tree from kernel.org. If you don’t know what tree you need, you should get Linus’ tree:
You may also want the stable tree (4.y.z releases), which you can add with:
Applying patches
To apply patch files, you can use git-am:
Configuring the kernel
If the developer has pointed you at a specific config file to use, save it in the linux directory with the filename .config
Otherwise, you’ll need to pick a configuration file to start from. The Linux kernel has thousands of configuration options, so you don’t want to start from scratch unless you know what you’re doing.
Starting from an installed kernel configuration
If you want to tweak the configuration of a kernel you already have installed, you can start with its configuration which is stored in /boot/. For example, to start with the configuration of the currently running kernel:
Starting from dist-git
If you want to use the configuration for a kernel you do not have installed, you can get the configuration from the Fedora dist-git repository. For example, to start with the latest Rawhide configuration:
Changing the configuration
There are several ways to change the configuration. You can run make help and look at the Configuration targets for the full list, but make menuconfig is a good place to start. You can also just edit the .config file directly.
One configuration option you may want to set is CONFIG_MODULE_COMPRESS, which compresses the modules (with gzip by default) when installing them. Without this setting, the modules can be very large.
Building the kernel
Once you’ve configured the kernel, you’re ready to build it. Before you do so, you’ll want to change the EXTRAVERSION in the Makefile to something you’ll recognize later. For example, if it reads EXTRAVERSION = -rc5 change it to EXTRAVERSION = -rc5-dave :
Now you’re ready to build the kernel:
Installing the kernel
Installing the kernel is as simple as:
Rebuilding
If you have been asked to try several different things, the procedure once you have already built the tree once is mostly the same. Running make clean is recommended between builds. This will leave the .config in place, so you can skip that step above and proceed straight to the make bzImage part of the steps above. Because we installed ccache in the first step, subsequent builds may go a lot faster as the compiler hits files that haven’t changed since the last time it built them.
Cleaning up
Once you have tested the kernel, and you’ve booted back to one of your kernels installed from an RPM, you can clean up the files that the above procedure installed.
When running the following commands, be sure to get the kernel version correct!
Because you changed EXTRAVERSION in the Makefile to add a ‘tag’, all the files it installed will have this as part of the filename. So you should be able to use wildcards to delete them safely using commands similar to those below (just replace ‘dave’ with whatever tag you chose):
Finally, you will need to remove the kernel as an option to your bootloader. This will change from architecture to architecture. For x86, (as root), edit /boot/grub2/grub.cfg or /boot/efi/EFI/fedora/grub.cfg if you have EFI enabled and delete the four lines relating to your kernel (They should be easy to spot, they’ll be the ones with your tag). They’ll look something like:
All Fedora Documentation content available under CC BY-SA 4.0 or, when specifically noted, under another accepted free and open content license.
Источник


