- 6 Different Ways to List Hard Drives in Linux
- Listing Hard Drives in Linux
- 2. fdisk
- 3. lsblk
- 4. cfdisk
- 5. parted
- 6. sfdisk
- Смотрим список дисков Linux
- Как посмотреть список дисков в Linux
- Посмотреть список дисков в GUI
- Выводы
- how to list all hard disks in linux from command line
- lsblk
- blkid
- fdisk
- parted
- /proc/ file
- lsscsi
6 Different Ways to List Hard Drives in Linux
There are several ways to list all the hard drives present in a system through Linux command lines.
Keep in mind a hard drive could be physically connected, virtually connected or even emulated (for example: when you use storage devices such as EMC, Sun or IBM).
Here are some different commands which can list the hard drives, keep in mind there are others but these are probably the most commonly used and easy to get the job done.
Listing Hard Drives in Linux
Please note that some of these commands are actually disk partitioning tools and listing disk partition is one of their features.
Let’s see what commands you can use to show disk info in Linux.
The df command in Linux is probably one of the most commonly used. It lists the actual “disk space usage” and it can give you information about what hard disks (or current disk space) is being used in the entire system.
The most common way to use it is with the -h argument which means “human readable” (because we are not machines, right?):
As you can see, the first column is the current logic name (or the name you can find it within your system), the second column is how big is each of them, the third column is how much is currently used (in bytes), the fourth column is how much is currently available in each for usage (in bytes), the fifth column is how much is used (in %) and the sixth and last column is where is it physically mounted in your Linux system.

2. fdisk
fdisk is another common option among sysops. It currently lists the different partitions (which is related to hard drives as a hard drive can be divided into several partitions) in your system.
This will return the entire amount of space (in GB or MB), the entire amount of bytes and the entire amount of sectors per each partition and as a summary, it also gives you the start and end sectors, the amount of disk space (in Bytes) and the type of partition.
Tip: Usually a SATA disk is labelled with sd.
3. lsblk
This one is a little more sophisticated but gets the job done as it lists all block devices. It will give you a very simple list of all devices:
It is probably more visual than the others as it even shows the partitions per each disk in a visual way (like the sda in the example above). It also gives information about the total size per each partition and disk and the physical location for each. This is very commonly used when you need to mount things to be used (like a USB stick or similar) so you can know where is it in order to proceed to mount it.
4. cfdisk
cfdisk is probably the most advanced one in GUI (Graphical User Interface), as it is absolutely visual and interactive. It allows at first to list all disks/partitions in your system but it also allows you to manage them by selecting them and then applying actions such as “Delete”, “Resize”, “Type” (to change partition Type) and “Write” changes done to partitions.
 cfdisk example
It also gives you very friendly information about each partition and disk as it gives you where does each partition cylinders start and ends, amount of sectors used by each one and the full size of each one with its type. It won’t give you for example how much is used or free to use.
5. parted
This one is similar to previous ones mentioned, it lists all partitions and allows to manage them. Its main difference is that it also informs you the brand and model of your hard disks and even the type of connectivity used in it (scsi, sata, etc) and total disk size.
6. sfdisk
This is very similar to fdisk, however sfdisk allows you to see both physical and logical volumes and also gives you a “summary” of the actual physical volumes’ partitions with the cylinders (start and end), sectors, size and type.
Probably the “s” is for “super”, as it is a fdisk with super powers:
These commands should allow you to at least see what logical volumes, partitions and hard drives you have in your system and make use of this information for whatever reason you need it, being this just to know more or manipulate any of these.
Most of these commands also give you managing capabilities to modify and manipulate partitions at your will, so make sure to use them with responsibility.
If you like checking system information, do read the article about getting processor information in Linux command line.
If you have any questions or suggestions, do let me know in the comment section.
Источник
Смотрим список дисков Linux
Linux отображает подключённые жёсткие диски иначе, чем Windows. В операционной системе от Microsoft мы привыкли к тому, что у нас есть диск C, D, E, и нам не нужно задумываться о реальных именах разделов и жёстких дисков. Все диски размещены в проводнике и очень просто доступны.
В Linux такой возможности нет, как и нет такой абстракции. Диски и разделы именуются как есть, и вы будете иметь дело именно с этими именами. В этой статье мы разберём, как посмотреть список дисков Linux.
Как посмотреть список дисков в Linux
В Linux все отображается в файловом виде, в том числе и устройства. Все подключённые к операционной системе Linux устройства размещаются в каталоге /dev/ здесь вы найдете микрофоны, камеры, жёсткие диски, флешки, одним словом, все внешние и внутренние устройства.
Жёсткие диски имеют особенные названия. В зависимости от интерфейса, через который подключён жёсткий диск, название может начинаться на:
- sd — устройство, подключённое по SCSI;
- hd — устройство ATA;
- vd — виртуальное устройство;
- mmcblk — обозначаются флешки, подключённые через картридер;
В наше время большинство блочных устройств Linux подключаются через интерфейс SCSI. Сюда входят жёсткие диски, USB-флешки, даже ATA-диски теперь тоже подключаются к SCSI через специальный переходник. Поэтому в большинстве случаев вы будете иметь дело именно с дисками sd.
Третья буква в имени диска означает его порядковый номер в системе. Используется алфавитная система. Например sda — первый диск, sdb — второй диск, sdc — третий и так далее. Дальше следует цифра — это номер раздела на диске — sda1, sda2.
Самый простой способ увидеть все подключённые диски — это посмотреть содержимое каталога /dev/ и отфильтровать устройства sd:


Как видите, в моей системе сейчас есть только один диск и два раздела. Дальше мы можем посмотреть, куда примонтирован каждый из разделов:

Здесь, кроме дисков, будут отображаться различные специальные файловые системы: procfs, sysfs, tmpfs, cgroup и так далее. Однако все эти команды не помогут нам получить доступ к информации о дисках. Поэтому нам понадобится кое-что другое. Посмотреть подключённые диски с выводом информации о размере и свободном пространстве можно с помощью утилиты df:

Здесь отображается уже подробная информация. Но вы можете узнать ещё больше с помощью команды lsblk:
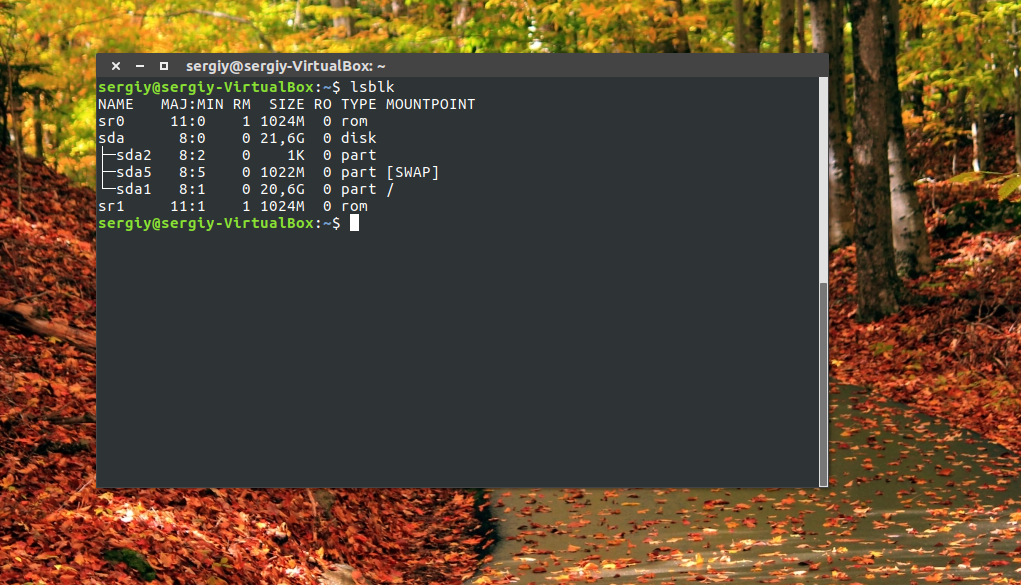
В этом случае список примонтированных дисков Linux включает ещё и информацию о точке монтирования, типе раздела (диск, раздел, привод) и его мажорном и минорном номере, по которым можно понять, что это за устройство. Если вам нужна информация о размере, то лучше использовать fdisk:

Это все утилиты, которыми вы можете воспользоваться, чтобы просмотреть список дисков Linux. Но есть ещё и графические утилиты.
Посмотреть список дисков в GUI
Во-первых, если к компьютеру подключено несколько дисков, то вы сможете их увидеть на левой панели файлового менеджера Nautilus или Dolphin. Там будет отображаться список подключенных устройств Linux, их метки и размер:

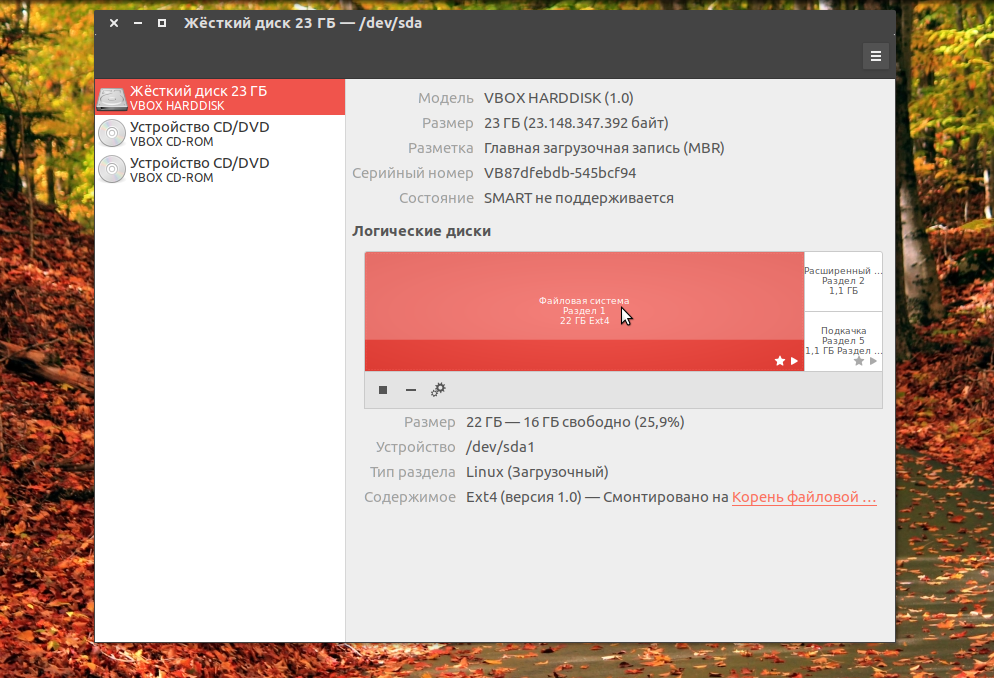
В Gnome есть программа Disks, которая позволяет настраивать поведение дисков, она же может отображать список подключенных устройств к системе. Вы можете найти её в главном меню:

Утилита отображает всю доступную информацию о дисках и разделах на них, вы можете даже посмотреть информацию о состоянии smart. Список дисков находится на панели слева, а справа разделы на этом диске:
Ещё одна утилита, которую вы можете использовать, чтобы посмотреть список жёстких дисков Linux — это Gparted. Это редактор разделов для Linux, но вы можете посмотреть подключнёные диски и структуру каждого из них. Раскрывающийся список вы найдёте в верхнем правом углу:

А в основной части окна программы отображается список разделов.
Выводы
В этой статье мы разобрали несколько способов посмотреть список примонтированных дисков Linux. Каждый из них может понадобиться в различных ситуациях. Если у вас остались вопросы, спрашивайте в комментариях!
Источник
how to list all hard disks in linux from command line
Hard Disk, Hard Drive, Disk Drive or Hard Disk Drive are all names for a data storage device (hardware device) for storing and retrieving digital information usually in a computer. A computer can have multiple hard disks attached to it, both internal and external.
Now these hard disks can be further divided to multiple logical containers in order to host different file systems or to keep file systems/files separate. These are called partitions and they can then mounted independently with out affecting the other disks and partitions. At a high level abstraction, you can view partition as separate disks as well.
Hard disks on a system are detected and/or identified by various device drivers in the kernel and then assigned an unique device id at boot time, enabling it to be mounted and read later (yeah, this is an over simplification of how it all works but it should suffice for this post). We will see later in the post how you can list disks that have been identified by the system.
The hard disks can be differentiated based on the interface used to interact with them. Some of the commonly used types of disk are SCSI (Small Computer System Interface), ATA or IDE (Advanced Technology Attachment), SATA (Serial ATA), SAS (Serial Attached SCSI) among others. As I mentioned, the physical hard disk is assigned an unique id at startup. This can configured (using udev among others) so that you can assign it pretty much id, but usually most systems follow some universally accepted conventions when naming devices.
By convention, the IDE disks use the device id prefixed with hd and the SCSI (and SATA) disks prefix their device id with sd. So, an IDE disk would be located at /dev/hd(*). eg: /dev/hda, /dev/hdb etc. Similarly, the SCSI disks would be /dev/sda, /dev/sdb etc or in general of the format /dev/sd(*).
There are several different commands that you can use in a Linux environment to list disks that have been mounted on the system.
The df command is primarily intended to report file system disk space usage. It is still a good utility to print out the disks that are available to the system, although it prints filesystems rather than disks per se.
You can use the -h or –human-readable option with df to print out the disk usage in a human readable format. Look for file systems that identify as /dev/sda, /dev/sdb or /dev/hda to identify the disks.
lsblk
The lsblk command is to list block devices. It reads the data from udev database along with sysfs file system to print a report on all available or specified block devices. Block devices abstracts the actual hardware characteristics of any physical device and allows you to interact with it using a buffered interface.
The lsblk command with out any argument will print out the block devices in a tree format. Again look for names, such as sda, sdb etc. The top level denotes the disk and the first level children represent the partitions with in the block.
The are several useful command line options that can be used with lsblk command. The -d or –nodeps will print out the device and not the partitions. The -S or –scsi will output only the SCSI devices.
Another commonly used utility is lshw, which can print out detailed information about your hardware. Again it might not be default in some distros even though it is a system application.
bash$ lshw -class disk
The above command will list all disks on the system. You can also specify the storage class if you want to print out the storage controllers as well. You can further reduce the verbosity of the output by using the -short option
bash$ lshw -class disk -class storage -short
blkid
The previously mentioned lsblk command is a better and recommended option that the blkid command. I include it here just for the sake of completeness.
blkid will print out several different attributes about the block devices. You can usually make out the disks and partitions from the output just as with lsblk.
fdisk
fdisk is a popular command mostly used to manipulate the partition table. You can use it to list all partitions from the partition table and find the devices that are available. The –list or -l command line option will print out all the known partitions from all devices.
You are probably looking for something like this in the output.
Disk /dev/sda: 149.1 GiB, 160041885696 bytes, 312581808 sectors
Units: sectors of 1 * 512 = 512 bytes
Sector size (logical/physical): 512 bytes / 512 bytes
I/O size (minimum/optimal): 512 bytes / 512 bytes
Disklabel type: dos
Disk identifier: 0xa461a461
Disk /dev/sdb: 111.8 GiB, 120034123776 bytes, 234441648 sectors
Units: sectors of 1 * 512 = 512 bytes
Sector size (logical/physical): 512 bytes / 512 bytes
I/O size (minimum/optimal): 512 bytes / 512 bytes
Disklabel type: dos
Disk identifier: 0x00000000
There are couple of other partition table manipulation tools built on top of fdisk, with more options and features. sfdisk and cfdisk are two such examples. They might not however be installed in most distros.
parted
Along the lines of fdisk, parted is another partition table manipulation utility. Again you can use the –list or -l command line option to print out the devices or disks and all its info. I like the default output of parted better than fdisk, but then that is subjective.
Model: ATA ST3160815AS (scsi)
Disk /dev/sda: 160GB
Sector size (logical/physical): 512B/512B
Partition Table: msdos
Disk Flags:
/proc/ file
Another rudimentary way is to print out the contents of the /proc/partitions/ folder. This will print out all known devices and partitions in the system. By this time you should be able to differentiate between the disk and partitions, i assume.
bash$ cat /proc/partitions
Look for minor ‘0’ or name that conforms to the /dev/sda format.
lsscsi
If you know that you have only SCSI devices or only need the information about SCSI disks, then you can use the lsscsi command. This utility might not be installed on some distros by default.
As the command name suggests, it prints out all information about the SCSI devices on the system.
No matter what distribution you are on, you should be able to list disks on your system using at least one of the commands listed above.
Источник


