- How to List All Virtual Hosts in Apache Web Server
- If You Appreciate What We Do Here On TecMint, You Should Consider:
- Файл hosts в Linux
- Разрешение доменных имён в Linux
- Настройка файла hosts в Linux
- Выводы
- Finding All Hosts On the LAN From Linux / Windows Workstation
- Linux / UNIX one liner to ping all hosts on the LAN
- A Note About Windows Workstation
How to List All Virtual Hosts in Apache Web Server
Apache virtual host configuration allows you to run multiple websites on the same server, that means you can run more than one website on the same Apache web server. You simply create a new virtual host configuration for each of your websites and restart the Apache configuration to start serving the website.
On Debian/Ubuntu, the recent version of Apache configuration files for all virtual hosts are stored in the /etc/apache2/sites-available/ directory. So, it makes really difficult to go through all of these virtual host configuration files to fix any configuration errors.
To make things easier, in this article we will show you how to list all enabled apache virtual hosts on a web server using a single command on the terminal. This method will also help you to see a few other useful apache configurations.
This is practically helpful in a scenario where you are assisting a company to fix their web server issues remotely, yet you do not know their current apache web server configurations, in regards to virtual hosts.
It will help ease searching for the virtual host of a specific website in the apache config files and assist in troubleshooting any apache issues, where you’ll, in most cases start with checking of the currently enabled virtual hosts before looking into the logs.
To list all enabled virtual hosts on the web server, run the following command in a terminal.
You will get a list of all configured virtual hosts as well as another important apache/httpd server configurations.
From the above output, we can clearly see which ports and IP addresses are configured for each website. We will also see each website virtual host configuration file and their location.
This comes very helpful, when you are troubleshooting or fixing any apache virtual host configuration errors or you simply want to see a list of all enabled virtual host summary on a web server.
That’s all! You might also find these following related articles on Apache web server.
If you have any questions relating to Apache HTTP server, use the comment form below to reach us.
If You Appreciate What We Do Here On TecMint, You Should Consider:
TecMint is the fastest growing and most trusted community site for any kind of Linux Articles, Guides and Books on the web. Millions of people visit TecMint! to search or browse the thousands of published articles available FREELY to all.
If you like what you are reading, please consider buying us a coffee ( or 2 ) as a token of appreciation.

We are thankful for your never ending support.
Источник
Файл hosts в Linux
Система доменных имен DNS используется для определения, какой IP принадлежит к нужному домену в сети интернет. Когда какой-либо программе понадобится обратиться к сайту по его доменному имени, операционная система отправляет к DNS-серверу запрос, чтобы узнать, по какому IP ей дальше передавать пакеты. Но так происходит не всегда. Например, когда мы обращаемся к домену localhost, то всегда запрос отправляется нашему локальному компьютеру.
Всему причиной файл hosts. Если вы раньше пользовались Windows, то, наверное, уже слышали о таком файле. Там чаще всего он использовался для того, чтобы быстро заблокировать доступ к какому-либо ресурсу. Но применение его гораздо шире. В этой статье мы рассмотрим, как настроить файл hosts в Linux, а также какие возможности он нам предоставляет.
Разрешение доменных имён в Linux
Прежде чем мы перейдём к самому файлу hosts, нужно разобраться, как происходит поиск IP-адреса для доменного имени в Linux. Я говорил, что операционная система сразу же отправляет запрос DNS-серверу, но это не совсем так. Существует определённый порядок поиска, согласно которому он выполняется. Этот порядок установлен в конфигурационном файле /etc/nsswitch.conf
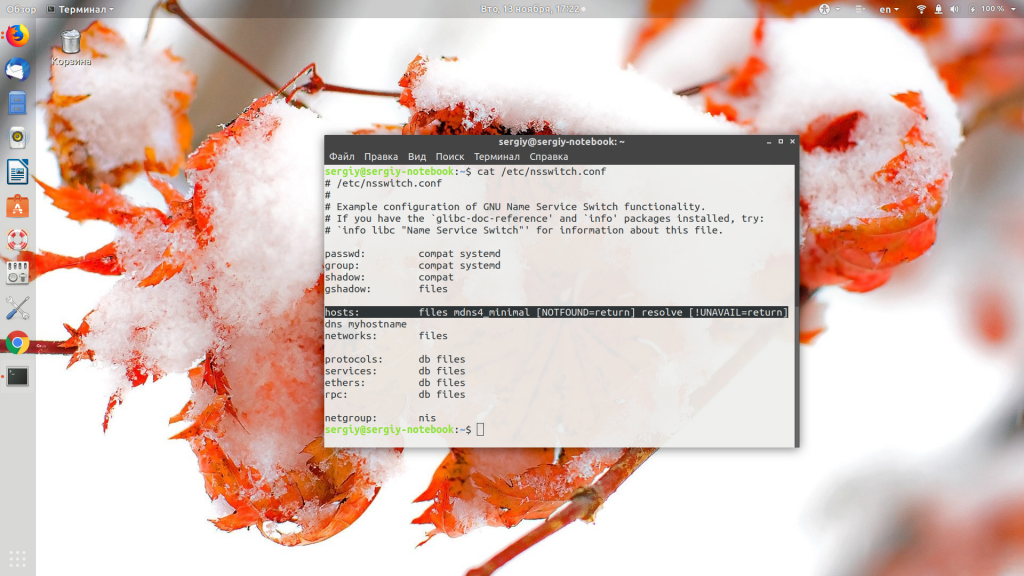
Здесь нас интересует строчка hosts. В ней в порядке очередности записаны службы, которые используются для поиска IP-адреса для доменного имени. Пункт files означает использование файла /etc/hosts, а dns — сервиса доменных имён интернета. Если files расположена перед hosts, это означает, что сначала система попытается найти домен в /etc/hosts, а уже потом по DNS. По умолчанию дело обстоит именно так.
Настройка файла hosts в Linux
Нужный нам файл находится в директории /etc/. Для его открытия можно использовать любой текстовый редактор как в командной строке, так и в графическом интерфейсе, только открывать его нужно с правами суперпользователя. Например, с помощью vim:
sudo vi /etc/hosts
sudo gedit /etc/hosts
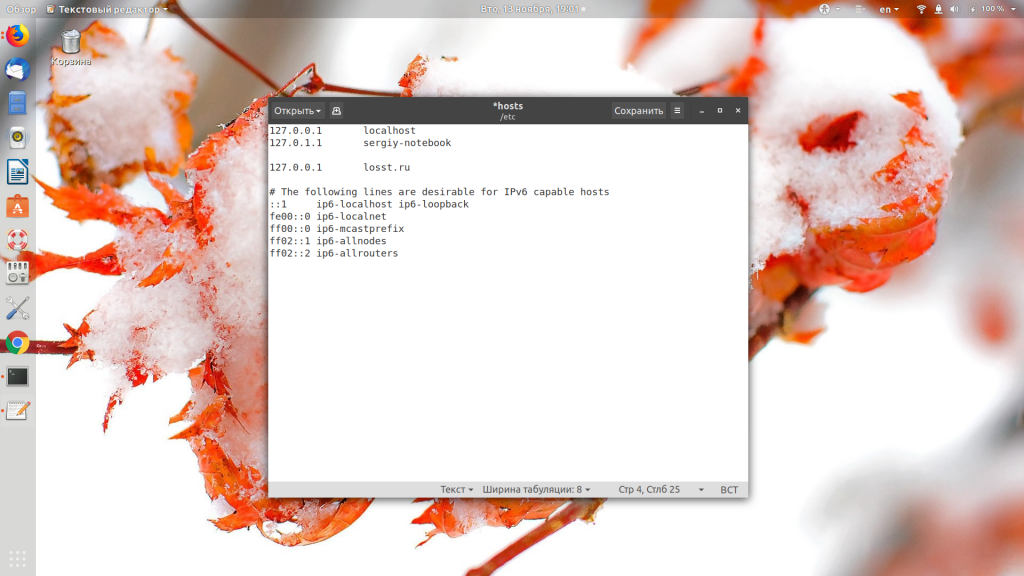
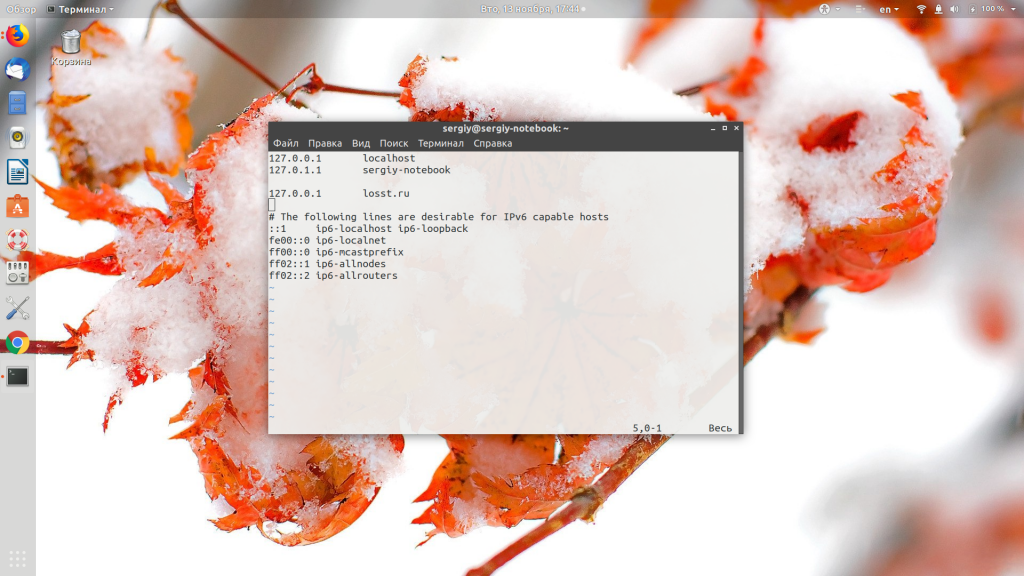
Синтаксис файла довольно простой. В нём находится несколько строчек с доменными именами и IP-адресами, которые нужно для них использовать. Каждая из них выглядит вот так:
ip_адрес домен алиас
Обычно первая же строчка создаёт правило для перенаправления всех запросов к домену localhost на локальный IP-адрес — 127.0.0.1:
Также в этом файле по умолчанию размещаются перенаправления для имени вашего компьютера и для IPv6-адресов. Вы можете создать свои настройки для любого нужного домена. Для этого нужно добавить строчку в конец файла. Например, направим все запросы к домену losst.ru на ip 127.0.0.1:
Обратите внимание, что здесь указывается только домен, без протокола. Префикс http или https указывать не нужно, иначе ничего работать не будет. А вот для поддомена www нужно создавать отдельную запись или записывать его в виде алиаса. Например:
127.0.0.1 losst.ru www.losst.ru

Теперь при запросе домена losst.ru будет открываться наш локальный IP. Чтобы вернуть доступ к оригинальному ресурсу, достаточно убрать добавленную строчку. Но вы можете использовать не только локальный адрес, но и любой другой. Это очень удобно, если вы только зарегистрировали домен и доменная зона ещё не успела обновиться, а вы уже хотите работать с новым сайтом. Просто добавьте данные в /etc/hosts и работайте как обычно.
Выводы
В этой небольшой статье мы разобрали, как выполняется настройка DNS через файл hosts Linux. Как видите, с его помощью вы можете блокировать доступ к нежелательным ресурсам, например, к которым программы не должны получить доступ, а также использовать его в работе веб-мастера.
Источник
Finding All Hosts On the LAN From Linux / Windows Workstation
Q. How do I find out if all host computers on the LAN are alive or dead from a Linux or Windows XP computer? My network subnet range is 192.168.1.0/24 and I’m using dual boot Debian Linux / XP SP2 computer.
A. You can use normal ping command and shell script loop statement to print the list of all LAN computers from a shell prompt.
Linux / UNIX one liner to ping all hosts on the LAN
Type the following command, enter:
$ for ip in $(seq 1 254); do ping -c 1 192.168.1.$ip>/dev/null; [ $? -eq 0 ] && echo «192.168.1.$ip UP» || : ; done
Output:
- No ads and tracking
- In-depth guides for developers and sysadmins at Opensourceflare✨
- Join my Patreon to support independent content creators and start reading latest guides:
- How to set up Redis sentinel cluster on Ubuntu or Debian Linux
- How To Set Up SSH Keys With YubiKey as two-factor authentication (U2F/FIDO2)
- How to set up Mariadb Galera cluster on Ubuntu or Debian Linux
- A podman tutorial for beginners – part I (run Linux containers without Docker and in daemonless mode)
- How to protect Linux against rogue USB devices using USBGuard
Join Patreon ➔
A Note About Windows Workstation
If you are using Windows 2000 / XP / Vista, try something as follows at DOS / NT command prompt (Start > Run > CMD > Enter key):
c:> for /L %I in (1,1,254) DO ping -w 30 -n1 192.168.1.%I | find «Reply»
Read cmd.exe help page and batch scripting documentation for more information.
🐧 Get the latest tutorials on Linux, Open Source & DevOps via
| Category | List of Unix and Linux commands |
|---|---|
| Documentation | help • mandb • man • pinfo |
| Disk space analyzers | df • duf • ncdu • pydf |
| File Management | cat • cp • less • mkdir • more • tree |
| Firewall | Alpine Awall • CentOS 8 • OpenSUSE • RHEL 8 • Ubuntu 16.04 • Ubuntu 18.04 • Ubuntu 20.04 |
| Linux Desktop Apps | Skype • Spotify • VLC 3 |
| Modern utilities | bat • exa |
| Network Utilities | NetHogs • dig • host • ip • nmap |
| OpenVPN | CentOS 7 • CentOS 8 • Debian 10 • Debian 8/9 • Ubuntu 18.04 • Ubuntu 20.04 |
| Package Manager | apk • apt |
| Processes Management | bg • chroot • cron • disown • fg • glances • gtop • jobs • killall • kill • pidof • pstree • pwdx • time • vtop |
| Searching | ag • grep • whereis • which |
| Shell builtins | compgen • echo • printf |
| Text processing | cut • rev |
| User Information | groups • id • lastcomm • last • lid/libuser-lid • logname • members • users • whoami • who • w |
| WireGuard VPN | Alpine • CentOS 8 • Debian 10 • Firewall • Ubuntu 20.04 |
Comments on this entry are closed.
You would probably use
«for ip in $(perl -e ‘$,=»\n»; print 0 .. 8;’) ; do ping -c 1 192.168.1.$ip>/dev/null; [ $? -eq 0 ] && echo «192.168.1.$ip UP» || : ; done»
on non GNU/Linux system, as seq does not exist on Solaris and OSX.
Ups, this is nicer, and faster.
for ip in $(perl -e ‘$,=»\n»; print 1 .. 254;’) ; do ping -t 1 -c 1 192.168.1.$ip>/dev/null; [ $? -eq 0 ] && echo «192.168.1.$ip UP» || : ; done
I’ve added a 1 sec. timeout on ping.
Looping in Perl just to print a sequence of numbers is really braindead.
Do you know fping ?
$ sudo apt-get install fping
$ fping -a -g 192.168.1.0/24 2> /dev/null
@Casper,
Thanks for sharing perl only code.
@Richard,
Sure, fping was covered some time ago..
I generally just use this “ping -b 192.168.1.255” Which broadcasts a ping to the whole network at once.
What about Windows machines with MS firewall which default forbid ICMP replay ?
Maybe must use ARP cache after ping
If a host on your local network won’t answer on a ping request you could try arping, which does an arp request.
arping 192.168.1.1
ARPING 192.168.1.1 from 192.168.1.226 eth0
Unicast reply from 192.168.1.1 [00:01:02:xx:xx:xx] 0.668ms
Another method is simply using nmap:
nmap -sP 192.168.1.0/24
Something wrong with prev. comment… ( char)
for (( ip=1 ; ip /dev/null; [ $? -eq 0 ] && echo «192.168.1.$ip UP» || : ; done
another option is installing arpwatch.
wont this command do .
this checks all the computers whose ip address are in the range of 10.0.0.1 to 10.0.0.125 and displays only those which are ON and connected to the network !
Matthias, thumbs up for the nmap solution.
Even faster (produces a little bit of confusing output in the beginning but it does the job fast):
for ip in $(perl -e ‘$,=»\n»; print 1 .. 254;’) ; do ping -t 1 -c 1 192.168.146.$ip > /dev/null && echo «192.168.146.$ip UP» >> hosts.log || : & sleep 0.02; done; sleep 1;cat hosts.log;rm hosts.log
this is awesome
can anyone tell how to see the network address and system names in up in lan in linux..
i liked the nmap solution best as well, thanks Matthias for that.
check out the space after the n parameter: for /L %I in (1,1,254) DO ping -w 30 -n 1 192.168.1.%I | find “Reply”
smbtree -SN |grep \\\\ |cut -f2 |cut -d”\\” -f3
will give a list of netbios host responding on broadcast address
(smbtree is part of the samba suite)
+1, much quicker way to found out what’s on your network.
Very nice, all that. Thanks guys!
Here’s a batchfile i made that pings any range of adresses:
@echo off & For /L %%i in (%4,1,255) do @ping -n 1 %1.%2.%3.%%i | find “Received = 0” >nul & if errorlevel 1 @echo %1.%2.%3.%%i
most of the code is to tidy the output up. Save as PINGER.bat
Type:
PINGER 192 168 0 0
**without** the dots to find the range 192.168.0.0 to 192.168.0.255
or any other address PINGER 145 233 2 0 etc
cheers
How would you do this on a Mac? I tried it and got the error -bash: seq: command not found
Just don’t buy a mac :p
Thanks for ‘nast -m’ tip (3 years later 😉 ) – liked it best.
@ lina – check out casper’s comment regarding non-Linux systems
Using cygwin on Windows, this did not work as expected.
It produced
192.168.1.1 UP
…
192.168.1.100 UP
…
for every IP address.
Problem is, this network is 192.168.2.1, not 192.168.1.1
Further investigation:
ping 192.168.2.1 produced a response from an IP from the ISP.
Know and Test what you are doing!
Hi, i cant find all hosts by nmap -sP 10.6.0.0/24
I know that router Mikrotik has got IP address 10.6.0.1, hi can i found with nmap ALL hosts at subnet? Which mode of nmap I have to use for this?
Could you help me, please? Thanks a lot.
I tested four proposed solutions on the same lan within the same hour :
1- for ip in $(seq 1 254); do ping -c 1 192.168.1.$ip>/dev/null; [ $? -eq 0 ] && echo “192.168.1.$ip UP” || : ; done
*** 26 hosts ***
2- nmap -sP 192.168.1.0/24
*** 18 hosts ***
3- nast -m -i eth0
*** 32 hosts (31 if I exclude the broadcast address) ***
4- arp-scan -l -I eth0
*** 35 hosts (32 if I exclude the lan address, the broadcast address and a duplicate host address of a vmware VM which is not discovered by the other tools) ***
My prefered tool is arp-scan, for several reasons :
1- It finds the max of hosts,
2- It is the faster (flash speed),
3- It provides additional information about the NIC when possible.
Thanks for this very interesting topic and the comments.
for /L %x in (1,1,254) do @ping 192.168.122.%x -w 100 -n 1 | find “Reply”
Could please abybody get me some clue how to identify what is on the following ip addresses got by sudo arp -a command:
? (192.168.1.207) at on eth1
? (192.168.1.1) at 00:22:3f:ad:c4:be [ether] on eth1
? (192.168.1.51) at on eth1
? (192.168.1.204) at on eth1
? (192.168.1.254) at on eth1
? (192.168.1.151) at on eth1
? (192.168.1.48) at on eth1
? (192.168.1.98) at on eth1
? (192.168.1.251) at on eth1
? (192.168.1.45) at on eth1
? (192.168.1.198) at on eth1
? (192.168.1.95) at on eth1
? (192.168.1.145) at on eth1
? (192.168.1.86) at on eth1
? (192.168.1.33) at on eth1
? (192.168.1.186) at on eth1
? (192.168.1.83) at on eth1
? (192.168.1.236) at on eth1
? (192.168.1.133) at on eth1
? (192.168.1.30) at on eth1
? (192.168.1.183) at on eth1
? (192.168.1.130) at on eth1
? (192.168.1.77) at on eth1
? (192.168.1.127) at on eth1
? (192.168.1.74) at on eth1
? (192.168.1.227) at on eth1
? (192.168.1.238) at on eth1
? (192.168.1.135) at on eth1
? (192.168.1.29) at on eth1
? (192.168.1.26) at on eth1
? (192.168.1.179) at on eth1
? (192.168.1.229) at on eth1
? (192.168.1.126) at on eth1
? (192.168.1.23) at on eth1
? (192.168.1.176) at on eth1
? (192.168.1.20) at on eth1
? (192.168.1.173) at on eth1
? (192.168.1.220) at on eth1
? (192.168.1.167) at on eth1
Thanks in advance,
M.
@masuch: looks like you have a netgear router attached at 192.168.1.1 (based on the mac address). and no other machines attached.
Yes, it is netgear – how can I recognize according to MAC address what device is it ?
Could you please share some documentation ?
Thanks,
Regards,
masuch
In linux, this would be faster
echo 192.168.1.<1..254>|xargs -n1 -P0 ping -c1|grep “bytes from”
#!/bin/bash
for ip in 192.168.0.<1..254>; do
ping -c 1 -W 1 $ip | grep “64 bytes” &
done
0,5 Second whit first Post 😉
nmap -sn ip/subnet
like if subnet mask is 255.255.254.0, and your ip is 192.168.1.3
then: nmap -sn 192.168.1.0/23
how to check which are all systems connected in lan
Really awesome. Alternative easy to use is nmap.
I think the first example should be updated to make use of Bash’s brace expansion, for which this is a textbook use case… Following is an outline of various network browsing/scanning utilities and their associated time.
One of the examples was cut off… should have been
Источник


