- Linux: Find out what kernel drivers (modules) are loaded
- lsmod command
- Get more information about the driver
- Ubuntu Documentation
- What are loadable modules (drivers) ?
- Using loadable modules
- Blacklisting Modules
- Драйверы устройств в Linux
- Часть 17: Взаимодействие с модулями
- Глобальные переменные и функции
- Параметры модуля
- Подведем итог
- How to Load and Unload Kernel Modules in Linux
- List All Loaded Kernel Modules in Linux
- How to Load and Unload (Remove) Kernel Modules in Linux
- How to Manage Kernel Modules Using modprobe Command
- If You Appreciate What We Do Here On TecMint, You Should Consider:
Linux: Find out what kernel drivers (modules) are loaded

lsmod command
You need to use lsmod command to show the status of modules in the Linux Kernel. Simply type the lsmod at a shell prompt to list all loaded modules:
$ lsmod
Sample outputs:
Get more information about the driver
To get more information about specific driver use modinfo command. The syntax is:
modinfo < driver-name >
To see information about a Linux Kernel module called e1000, enter:
$ modinfo e1000
Sample outputs:
- No ads and tracking
- In-depth guides for developers and sysadmins at Opensourceflare✨
- Join my Patreon to support independent content creators and start reading latest guides:
- How to set up Redis sentinel cluster on Ubuntu or Debian Linux
- How To Set Up SSH Keys With YubiKey as two-factor authentication (U2F/FIDO2)
- How to set up Mariadb Galera cluster on Ubuntu or Debian Linux
- A podman tutorial for beginners – part I (run Linux containers without Docker and in daemonless mode)
- How to protect Linux against rogue USB devices using USBGuard
Join Patreon ➔
See modinfo and lsmod man pages for more info.
🐧 Get the latest tutorials on Linux, Open Source & DevOps via
Источник
Ubuntu Documentation
What are loadable modules (drivers) ?
Essentially, modules are to Linux as drivers are to Windows.
Unlike Windows drivers, which are usually supplied by the hardware manufacturer, most modules come supplied with each Linux distribution.
The Linux kernel can be extended to have additional capabilities in two basic ways:
- Recompilation of the kernel with new capabilities permanently «compiled-in» and subsequent booting to the new kernel;
- Building of a kernel with loadable modules for occasional use. In order to use these modules’ features, the modules must be added to the kernel- this can be done either automatically or manually. When a module is no longer wanted, it may be removed from the custom kernel manually or it can disappear automatically.
During kernel configuration and building, features specified with a ‘y’ will have the necessary software to support those features as part of the kernel (the features will be «compiled into» the kernel and will consume memory permanently). If a feature is specified with an ‘m’ then the feature will be a loadable module that may be loaded and unloaded at will (and will use memory only if the module is loaded). If an ‘n’ is specified, then the feature will not be enabled in the kernel at all and will not be available.
Using loadable modules
The file /etc/modules configures which loadable modules are automatically loaded. Here is a sample:
Changing /etc/modules: Let’s say your eepro100 Ethernet device breaks and you buy a new Ethernet card that uses the tulip driver. In this case, the relevant line in /etc/modules file should be changed to:
In most cases, when you reboot with your new Ethernet card, Ubuntu’s configuration manager should automatically notice a new Ethernet card is installed, and change the /etc/modules file for you.
To view a list of loadable kernel modules on a system, as well as their status, run:
To see a list of the module files:
To load a module, and any modules that it depends on, use modprobe:
To remove a loaded module, use rmmod:
To view information about a module, use modinfo:
Blacklisting Modules
For various reasons it may be desirable to stop a module from loading. In this case a module can be blacklisted in /etc/modprobe.d/blacklist
for example the line
should be added to prevent the ‘e100’ module (one of many Ethernet modules) from loading.
Sometimes it is needed to update the drivers cache after editing the blacklist.conf file. To do this, run:
Loadable_Modules (последним исправлял пользователь nohappiness 2014-03-11 01:05:53)
The material on this wiki is available under a free license, see Copyright / License for details
You can contribute to this wiki, see Wiki Guide for details
Источник
Драйверы устройств в Linux
Часть 17: Взаимодействие с модулями
В этой статье, которая является частью серии статей о драйверах устройств в Linux, демонстрируются различные варианты взаимодействия с модулями Linux.
Поскольку Светлана и Пагс перешли к работе над своим заключительным в этом семестре проектом по драйверам Linux, им пришлось вплотную заняться некоторыми самыми интересными вопросами их технического исследования. Это, в основном, вопросы, связанные с различными способами взаимодействия с модулями Linux (динамически загружаемыми и выгружаемыми драйверами), например, с получением доступа к переменным модуля, вызовом функций модуля и передача в модуль параметров.
Глобальные переменные и функции
Достаточно важен вопрос, связанный с доступом к переменным и функциями модуля извне модуля. Просто можно сделать их глобальными, объявить их в заголовке как extern, добавить заголовок и получить к ним доступ, разве этого не достаточно? Все это просто в рамках обычной парадигмы разработки приложений, но при разработке ядра, несмотря на рекомендации делать все по умолчанию статически, всегда будут случаи, когда могут потребоваться нестатические глобальные переменные.
Простым примером может стать драйвер, переключающийся между несколькими файлами, с функцией (функциями), находящейся в одном файле и вызываемой из другого файла. Сейчас для того, чтобы даже в такой ситуации избежать какой-нибудь коллизии в пространстве имен ядра, каждый модуль должен находиться в своем собственном пространстве имен. И мы знаем, что одновременно нельзя загружать два модуля с одним и тем же именем. Таким образом, можно достигнуть полного отсутствия коллизий. Но это также значит, что ничего, что есть внутри модуля, нельзя даже в том случае, если мы этого захотим, использовать в ядре в качестве глобальных переменных. И именно для таких случаев в заголовочном файле
определяются следующие макросы:
- EXPORT_SYMBOL(sym)
- EXPORT_SYMBOL_GPL(sym)
- EXPORT_SYMBOL_GPL_FUTURE(sym)
Каждый из них экспортирует символьную переменную в качестве своих параметров, дополнительно помещая ее по умолчанию в одну из собственных секций _gpl или _gpl_future . Таким образом, для конкретной символьной переменной следует использовать только один из этих макросов, причем независимо от того, будет ли эта символьная переменная именем переменной или именем функции. Это продемонстрировано в следующем фрагменте кода ( our_glob_syms.c ):
Для каждой экспортируемой символьной переменной также есть соответствующая структура, которая для того, чтобы к ней был глобальный доступ, размещается в (каждой из следующих) таблице символов ядра ( __ksymtab ), таблице строк ядра ( __kstrtab ) и в таблице контрольных сумм CRC ядра ( __kcrctab ).
На рис.1 показан фрагмент директория /proc/kallsyms до и после загрузки модуля our_glob_syms.ko , который компилировался с использованием обычного файла Makefile , предназначенного для драйверов.
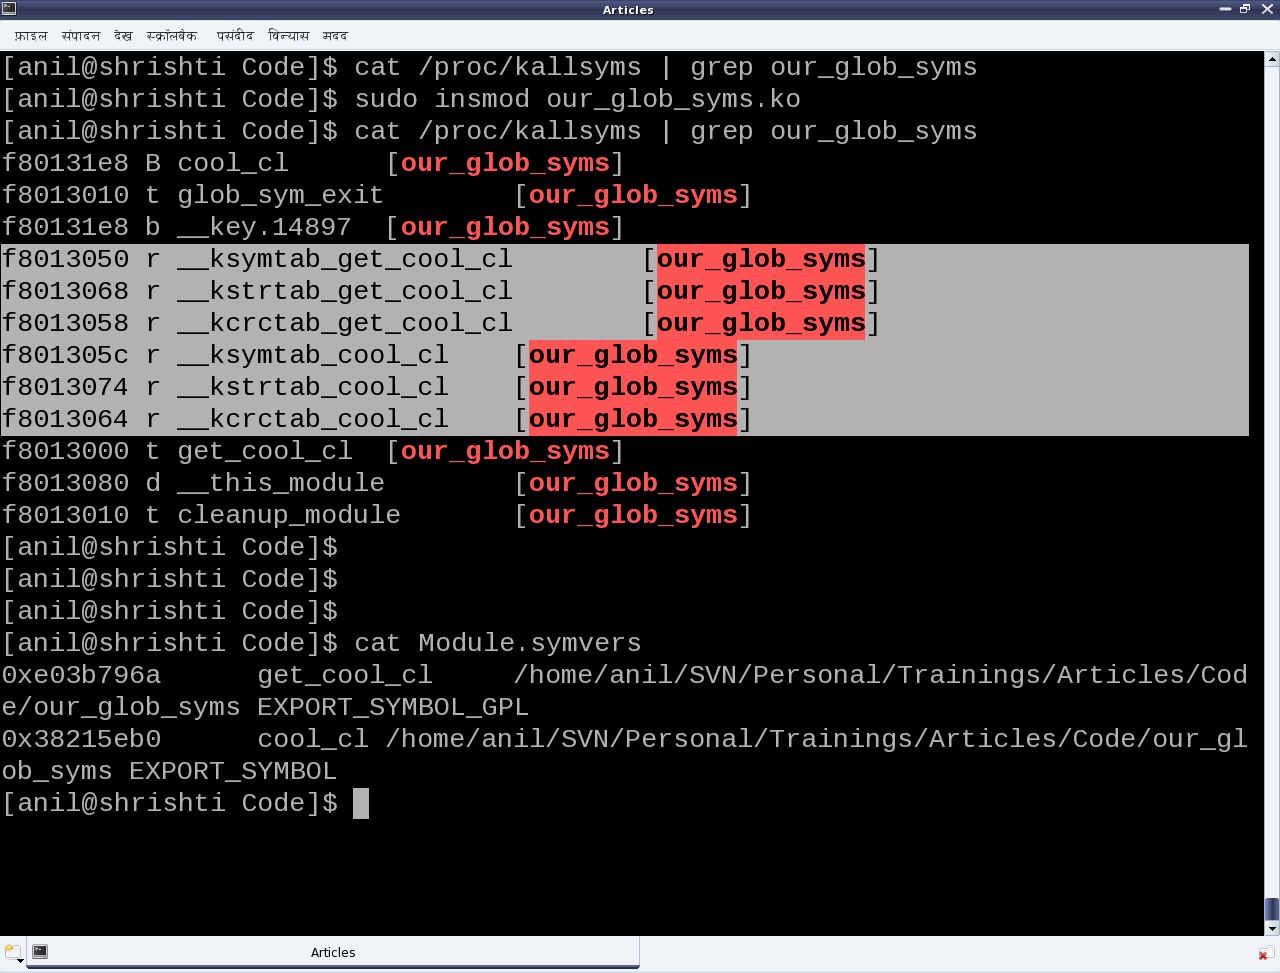
Рис.1: Наш модуль глобальных символьных переменных
В следующем коде показан вспомогательный заголовочный файл ( our_glob_syms.h ), который должен добавляться в модули, использующие экспортные символьные переменные ool_cl и get_cool_cl :
На рис.1 также показан файл Module.symvers , который был сгенерирован при компиляции модуля our_glob_syms . В нем находится различная информация, касающаяся всех экспортируемых символьных переменных конкретного директория. Возможно, что кроме того, что в модули, в которых используются экспортируемые символы, следует добавить приведенный выше заголовочный файл, также необходимо, чтобы в директории, в котором собираются эти модули, присутствовал файл Module.symvers .
Обратите внимание, что в заголовочном файле
, используемом в приводимых выше примерах, добавляются объявления и определения для разнообразных классов, о чем уже ранее упоминалось в более раннем обсуждении символьных драйверов
Параметры модуля
Зная о том, как аргументы командной строки передаются в приложение, было бы естественно спросить, можно ли что-то подобное сделать с модулем — и ответом будет: да, это возможно. Параметры можно передать в модуль при его загрузке, например, с помощью команды insmod . Интересно, что в отличие от аргументов командной строки, указываемых для приложения, параметры для модуля можно будет впоследствии изменить, если получить доступ к sysfs .
Параметры модуля настаиваются с помощью следующего макроса (определяется в
Здесь name является именем параметра, type является типом параметра, а с помощью perm задаются права доступа к файлу sysfs , соответствующему данному параметру. Поддерживаются значения следующих типов: byte, short, ushort, int, uint, long, ulong, charp (символьный указатель), bool и invbool (инвертированный Boolean).
В следующем коде модуля ( module_param.c ) продемонстрировано использование в модуле параметра:
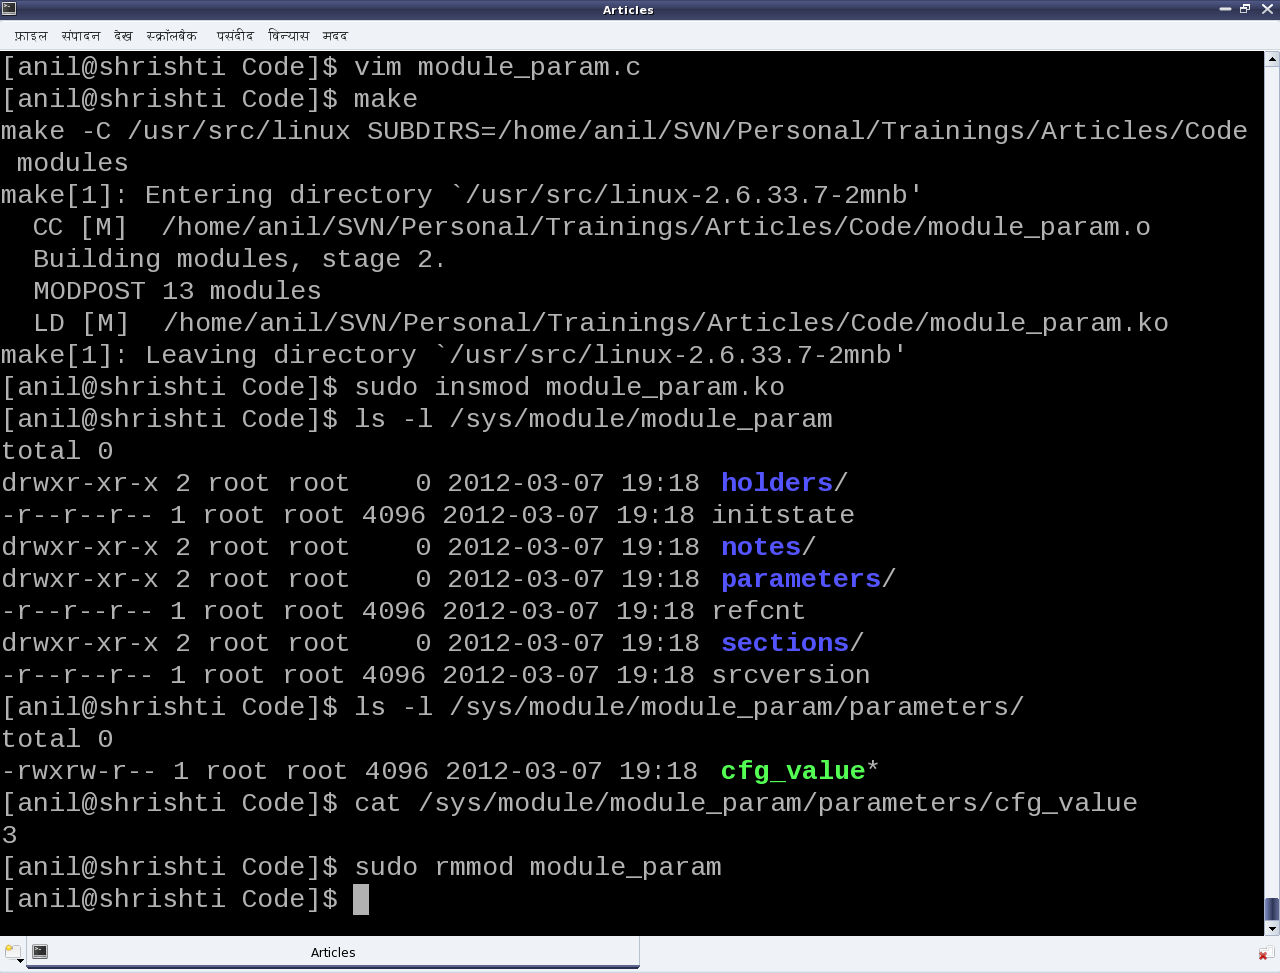
Рис.2: Эксперименты с параметром модуля
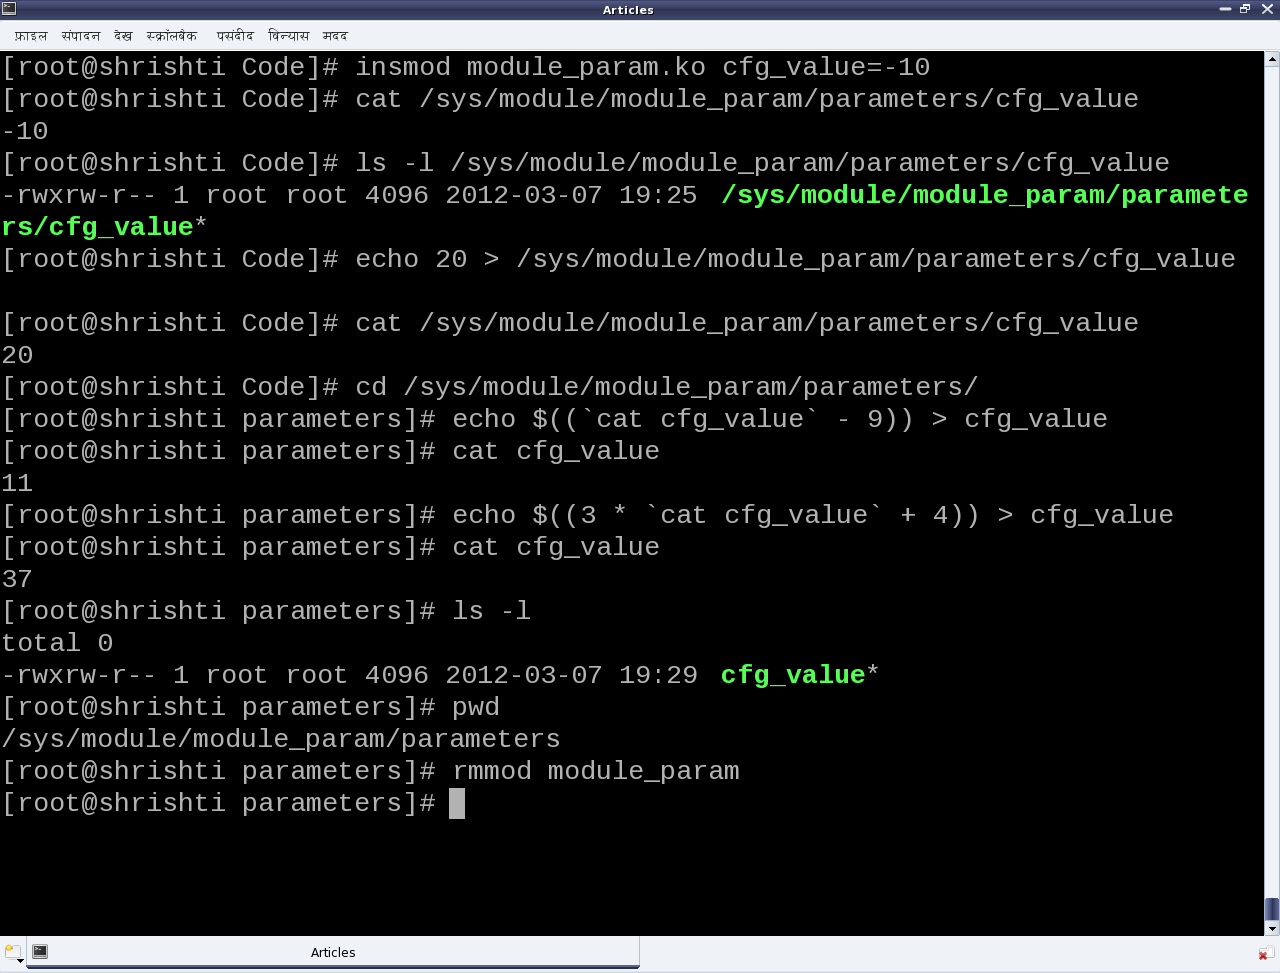
Рис.3: Эксперименты с параметром модуля (в роли пользователя root)
Обратите внимание, что прежде, чем настраивать параметр, необходимо определить переменную с тем же самым именем и совместимым типом данных. Затем выполните следующие действия и поэкспериментируйте так, как это показано на рис.2 и 3:
- Соберите драйвер (файл module_param.ko ) — используйте для этого обычный файл Makefile , предназначенный для драйверов.
- Загрузите драйвер с помощью команды insmod (с параметрами и без параметров)
- Проведете эксперименты с соответствующими записями в /sys
- И, наконец, выгрузите драйвер с помощью команды rmmod
Обратите внимание на следующее:
- Когда команда insmod запускается без параметров, то значением, используемым по умолчанию, станет начальное значение (равное 3) переменной cfg_value .
- Для файла параметров cfg_value модуля module_param , находящегося в /sys/module/ , установлены права доступа 0764, что означает rwx — для пользователя, rw- — для группы и r— — для всех остальных.
- Посмотрите результат работы команды dmesg/tail для всех данных, выдаваемых операцией печати printk в каждой из команд insmod и rmmod
- Попытайтесь в роли обычного пользователя (не имеющего прав доступа root) сделать запись в файл /sys/module/module_param/parameters/cfg_value
Подведем итог
Благодаря последним полученным знаниям у наших двух героев достаточно хорошее представление о драйверах в Linux, и они готовы начать работу над завершающим проектом семестра. Есть предположения о теме, которой будет посвящен их проект? Подсказка: они выбрали одну из самых сложных тем, связанную с драйверами в Linux. Давайте в следующей статье посмотрим, как они с ней справятся.
Источник
How to Load and Unload Kernel Modules in Linux
A kernel module is a program which can loaded into or unloaded from the kernel upon demand, without necessarily recompiling it (the kernel) or rebooting the system, and is intended to enhance the functionality of the kernel.
In general software terms, modules are more or less like plugins to a software such as WordPress. Plugins provide means to extend software functionality, without them, developers would have to build a single massive software with all functionalities integrated in a package. If new functionalities are needed, they would have to be added in new versions of a software.
Likewise without modules, the kernel would have to be built with all functionalities integrated directly into the kernel image. This would mean having bigger kernels, and system administrators would need to recompile the kernel every time a new functionality is needed.
A simple example of a module is a device driver – which enables the kernel to access a hardware component/device connected to the system.
List All Loaded Kernel Modules in Linux
In Linux, all modules end with the .ko extension, and they are normally loaded automatically as the hardware is detected at system boot. However a system administrator can manage the modules using certain commands.
To list all currently loaded modules in Linux, we can use the lsmod (list modules) command which reads the contents of /proc/modules like this.
How to Load and Unload (Remove) Kernel Modules in Linux
To load a kernel module, we can use the insmod (insert module) command. Here, we have to specify the full path of the module. The command below will insert the speedstep-lib.ko module.
To unload a kernel module, we use the rmmod (remove module) command. The following example will unload or remove the speedstep-lib.ko module.
How to Manage Kernel Modules Using modprobe Command
modprobe is an intelligent command for listing, inserting as well as removing modules from the kernel. It searches in the module directory /lib/modules/$(uname -r) for all the modules and related files, but excludes alternative configuration files in the /etc/modprobe.d directory.
Here, you don’t need the absolute path of a module; this is the advantage of using modprobe over the previous commands.
To insert a module, simply provide its name as follows.
To remove a module, use the -r flag like this.
Note: Under modprobe, automatic underscore conversion is performed, so there is no difference between _ and – while entering module names.
For more usage info and options, read through the modprobe man page.
Do not forget to check out:
That’s all for now! Do you have any useful ideas, that you wanted us to add to this guide or queries, use the feedback form below to drop them to us.
If You Appreciate What We Do Here On TecMint, You Should Consider:
TecMint is the fastest growing and most trusted community site for any kind of Linux Articles, Guides and Books on the web. Millions of people visit TecMint! to search or browse the thousands of published articles available FREELY to all.
If you like what you are reading, please consider buying us a coffee ( or 2 ) as a token of appreciation.

We are thankful for your never ending support.
Источник


