- Автоматическая блокировка экрана в GNU/Linux
- Введение
- Подготовка
- Настройка
- Three ways to lock your Ubuntu screen
- Method 1: Through the Settings Panel
- Method 2: Through keyboard shortcut
- Method 3: Through the command line
- Karim Buzdar
- How can I lock the screen using the new lockscreen from the command line?
- How do I lock the desktop screen via command line?
- 7 Answers 7
- How do I lock the screen from a terminal? [duplicate]
- 11 Answers 11
Автоматическая блокировка экрана в GNU/Linux
Часто ли уходя за очередной чашечкой кофе или выйдя из кабинета/офиса совершить личный звонок, ты ловишь себя на мысли что забыл заблокировать экран своего компьютера? А на компьютере в это время осталась открытая переписка в Skype/почте или еще хуже — сессия root’а в консоли? В результате ты стараешься вернуться к своему компьютеру как можно быстрее, чтобы добрые коллеги не успели поставить фоном рабочего стола обои с Черным Властелином.
В данной статье приведу пример решения этой проблемы с блокировкой экрана, которое поможет закрыть доступ к рабочему столу в тот момент когда ты отойдешь от компьютера.
Введение
Опишу вкратце предлагаемое решение, для понимания того что мы будем сейчас делать. Сделаем так что операционная система будет сама, средствами Bluetooth, проверять как далеко находится пользователь, и в случае «недосягаемости» будет автоматически блокировать экран. Процесс снятия блокировки останется на совести пользователя, и будет заключаться в вводе пароля, который используется в его учетной записи. Автоматически снимать блокировку довольно рискованная затея поэтому данный сценарий рассматривать не будем. По уровню сложности данная статья ориентирована на продвинутых пользователей Linux, т.к. некоторые этапы настройки будут описаны без лишних деталей, полагаясь на очевидность, чтобы не уходить в сторону от основной освещаемой темы.
Подготовка
Для начала необходимо убедиться что наш компьютер и мобильный телефон поддерживают технологию Bluetooth. Если с мобильным телефон проблем не должно возникнуть, т.к. большинство современных аппаратов имеют поддержку «синего зуба», то с компьютером вполне могут. Не буду подробно рассказывать как настроить Bluetooth в разных дистрибутивах Linux, а просто опишу основные этапы настройки поддержки оного, при условии что аппаратная часть включает в себя необходимые компоненты, на примере Gentoo.
Основные этапы настройки поддержки Bluetooth в Linux
- Включить в BIOS поддержку Bluetooth, если это контролируется отдельным параметром, например как на ноутбуках Lenovo
- Определить какой bluetooth-контроллер используется в конфигурации компьютера:
- Включить в ядре поддержку подсистемы Bluetooth и необходимый драйвер для вашего контроллера:
- Сохранить конфигурацию, установить обновленное ядро и его модули, после чего перезагрузить систему для загрузки с новым ядром
- Установить пакет Bluez (с поддержкой test-programs), который будет выполнять работу на программном уровне. В пакетной базе Gentoo он выглядит так:
- Под пользователем с правами root-а запустить демон bluetooth и добавить его в автозагрузку системы:
- Проверить что bluetooth-устройство определилось и готово к работе:
На этом подготовка завершена, переходим к следующему этапу.
Настройка
В данном разделе будет вся суть решения, а именно мы настроим сопряжение между мобильным телефоном и компьютером. После чего в операционной системе подготовим скрипт проверки доступности телефона по каналу Bluetooth, который будет вызываться каждую минуту средствами демона-планировщика Cron. Приступим.
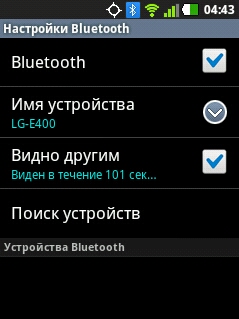
- Включить bluetooth на телефоне и настроить его видимость для остальных участников сети:

- На стороне компьютера запустить сканирование сети bluetooth, в результате чего мы определим адрес нашего мобильного телефона (можно подсмотреть на самом телефоне):
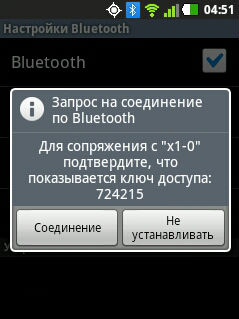
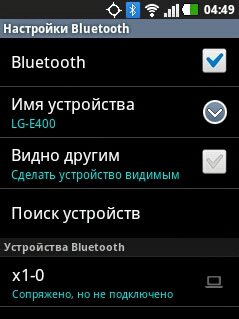
- Настроить сопряжение, на телефоне принять входящее подключение:
- Добавить адрес мобильного телефона в список доверенных устройств:
- Проверить доступность телефона с компьютера по bluetooth:
- Отключить видимость в настройках bluetooth мобильного телефона, если это не произошло автоматически:
- Подготовить скрипт, который будет проверять доступность телефона и в случае недоступности блокировать экран:
В моем случае:
= 00:AA:70:31:9A:19
= не root-пользователь, под которым запускаются X и вся остальная основная работа в системе
= я использую пакет gnome-extra/gnome-screensaver из окружения Gnome без всей остальной среды, поэтому команда блокировки экрана выглядит так — gnome-screensaver-command —lock - Выполнить тестовую проверку под root-ом при включенном на телефоне bluetooth
- Отключить bluetooth на телефоне и повторно выполнить проверку, тоже с правами root-а
- Добавить ежеминутное правило в crontab:Если пугают такие правила в crontab, то можно проверку вынести в отдельный скрипт в каталоге /usr/local/sbin, c более хитрыми проверками, который потом указать в правиле crontab.
На этом настройка и проверка завершены.
Источник
Three ways to lock your Ubuntu screen
When you have to take a break from work but do not want to end your current session, locking your computer screen is the way out. You can, of course, shut down your system and start it again when you are back, but that means you have to save all your work and open all in the same state when you need to. Why opt for this second option when your system allows you to temporarily lock your system so that unauthorized people can not access it.
In this article, we will explain three methods to lock your Ubuntu screen; through the UI, through the keyboard shortcut, and through the command line.
We have run the commands and procedures mentioned in this article on a Ubuntu 18.04 LTS system.
Method 1: Through the Settings Panel
The UI based method to lock your Ubuntu screen is through the Settings Panel that can be accessed from the top bar of your Ubuntu desktop.
Click on the downward arrow located at the top right corner of your Ubuntu screen. This is the panel that will appear:

This panel gives you quick graphical access to many configurable system settings. You can lock your computer screen through the Lock icon, which by default is the second last icon located at the bottom on Ubuntu 18.04. As soon as you click on this icon, your computer screen will be locked.
Method 2: Through keyboard shortcut
All Ubuntu systems come with some predefined keyboard shortcuts that you can utilize in order to perform some basic system functions. Since screen locking is also a frequent operation, there is a shortcut for that too. In Ubuntu 18.04, you can use the Super+L shortcut to lock your computer screen. The Super key in the Windows button on your keyboard.
In previous versions of Ubuntu, you could use the Ctrl+Alt+L shortcut for this purpose.
You can easily view all the keyboard shortcuts from the system Settings utility.
The simplest way to access these settings is through the system Dash or the application launcher search bar as follows:

Enter relevant keywords to access keyboard shortcuts in this bar and then click the appropriate search result. Advertisement
This will open the Settings>Devices>Keyboard view as follows:

Here you can view the list of all the predefined shortcuts, edit one by clicking on it, and also create new custom shortcuts for your ease of use.
Method 3: Through the command line
There is a utility called Gnome Screensaver that lets you lock your Ubuntu screen through the command line.
Open your Ubuntu command line, the Terminal, either through the application launcher search or the Ctrl+Alt+T shortcut.
Then enter the following command as sudo in order to install the Gnome Screensaver utility:

Please note that only an authorized user can add/remove, and configure software on Ubuntu. Enter the password for sudo and the software will be installed on your system.
You can then use the following command in order to lock your Ubuntu screen:

These were the ways through which you can ensure the security of your system while you are away by locking your Ubuntu screen.
Karim Buzdar
About the Author: Karim Buzdar holds a degree in telecommunication engineering and holds several sysadmin certifications. As an IT engineer and technical author, he writes for various web sites. You can reach Karim on LinkedIn
Источник
How can I lock the screen using the new lockscreen from the command line?
Ubuntu 14.04 introduces a new lockscreen that looks similar to the login screen.
I am still able to lock the screen using the command gnome-screensaver-command —lock (as I always did before), which under 14.04 does lock the screen, but:
- If you are running it from the desktop, it locks the screen using the new lockscreen.
- If you are running it from a virtual console or via SSH, it locks the screen using the old lockscreen.
I’ve also tried using xdg-screensaver lock , but it works in the same way as gnome-screensaver-command —lock does (only uses the new lockscreen when it’s ran from the desktop).
Running light-locker-command —lock didn’t work, as light-locker is not installed.
I guess there must be some differences between running the same command from the desktop and running it via SSH/virtual console, but I was not able to find any difference in the environment variables.
So, my question is: How can I lock the screen using the new Unity lockscreen and not the old lockscreen from the command line?
This question is probably related as it asks for the new command that needs to be used, so here’s another question: Why does running the same lock command give different results?
Note that gnome-screensaver is not being used anymore in 14.04, according to this bug report:
That’s not really a gnome-screensaver bug, that component stopped being used in trusty.
Источник
How do I lock the desktop screen via command line?
How can I lock my desktop screen from the command line?
7 Answers 7
You can lock the computer by running gnome-screensaver-command with the -l flag like so:
However this will only work if you have Gnome Screensaver running for your session (should be — unless you’ve disabled it) you can start that from the commandline with:
If you’re in a different (desktop) session (e.g. virtual console, switched to another login, SSH), specify the display explicitly ( :0 is the default display):
To unlock, use the -d ( —deactivate ) option.
In newer versions of GNOME 3, gnome-screensaver is no more.
The generic solution seems to be
You also can call dbus directly instead (source):
It also seems they have taken away the possibility to unlock the screen from the command line.
gnome-screensaver-command —lock will do it.
Under KDE dm-tool lock will work (for me on Kubuntu 15.04).
Here is a long way of accomplishing it (adding a quicker way below):
to make it even easier to lock, you can add an executable script to an executable path, call it «lock» and then the locking of your screen will be as easy as typing «lock» in cli
Here’s how to do it:
don’t forget to add
/.profile — note the dot at the beginning of the file name one word of caution about this, make sure you add it to the right file. Here is what the .profile says about it:
therefore you want to first check if the above-mentioned files exist in your home directory, you should add it there, if they don’t exist, then add the path to bin to the .profile
append the following at the end:
at this point you can launch the following shortcut from cli
[EDIT] Here is the quick and easy way to do it: add an alias to your
/.bashrc file, which is executed every time a shell is opened, thus ensuring Alias persists:
Источник
How do I lock the screen from a terminal? [duplicate]
I am using Ubuntu 12.04. Is there any way to lock the screen or session from a terminal command or script?


11 Answers 11
The following can also work, if the screensaver is set to lock when activate (see screensaver settings), since the command activates the screensaver:
You can add an alias to the command by editing the file .bashrc (or .bash_aliases ) in your home directory:
and adding the following line:
Then from terminal:
This will activate the alias. From now on, the alias lock in a terminal will have the effect of locking the screen.

In addition to what January said, this also works:
According to the gnome-screensaver-command man page.
For further clarification, here is another question/answer (also by January) which describes the differences between invoking the lock and activating your screensaver:

Starting in Ubuntu 14.04, Unity’s lock screen no longer uses gnome-screensaver. The command gnome-screensaver-command -l will still work in most cases, but see this question for exceptions.
If that command does not work (say, for instance, that gnome-screensaver is not installed), bringing up the proper Unity lock screen (not the greeter where you can switch users) can be done via this command in a terminal:
Источник


