- LSI MegaRAID SAS
- 2. Linux kernel drivers
- 3. Management and reporting tools
- 3.1. megactl
- 3.1.1. Quickstart and output example
- 3.1.2. Periodic checks
- 3.2. megaraid-status
- 3.2.1. About megaraid-status
- 3.2.2. Wrapper output example
- 3.3. megacli
- 3.3.1. About megacli
- 3.3.2. Quickstart and output example
- Create a RAID6 array with megacli
- Read Cache, Write Cache, ReadAhead and Battery
- Rebuilding a disk by hand when it doesn’t occur automatically
- Expand an array over an additionnal disk
- 3.3.3. Periodic checks
- Full documentation
- 3.4. megaclisas-status
- 3.4.1. About megaclisas-status
- 3.4.2. Wrapper output example
- 3.4.3. Nagios integration
- 3.5. About /dev/megaraid_sas_ioctl_node
- 4. SMART
- 5. BIOS upgrade from a Linux system
- Системное администрирование и мониторинг Linux/Windows серверов и видео CDN
- Статьи по настройке и администрированию Windows/Linux систем
- S.M.A.R.T. (часть 1). Мониторинг SCSI дисков под LSI 2108 (megaraid) RAID контроллером
- Немного о HDD интерфейсах
- Мониторинг дисков используя megacli
- Мониторинг дисков используя smartctl
- Мониторинг дисков используя smartd
LSI MegaRAID SAS
MegaRAID SAS is the current high-end RAID controllers series by LSI.
It is fully hardware RAIDs controllers supporting RAID5, at least, with SAS or SATA interfaces.
If you’re a looking for information about MegaRAID SCSI connectors, please look at LSIMegaRAID instead.
All theses card can be used with stock Linux kernel which includes a working driver.
It’s quite new and thus, may be missing in some not-up-to-date distributions.
There is currently no known opensource tool for theses cards.
Some old MegaRAID SAS can be used with megactl, but none of current cards works.
However LSI provide megacli, a proprietary management command line utility which is rather hard to use.
2. Linux kernel drivers
| Driver | Supported cards |
| megaraid_sas | LSI MegaRAID SAS |
megaraid_sas is part of mainstream Linux kernel and should be available in all current distributions.
However, please that most of old distributions won’t have this driver.
If your card use megaraid_mm or megaraid_mbox driver, please look at LSIMegaRAID instead.
Some lspci -nn output examples:
- 02:0e.0 RAID bus controller [0104]: Dell PowerEdge Expandable RAID controller 5 ![1028:0015]
- 01:00.0 RAID bus controller [0104]: LSI Logic / Symbios Logic MegaRAID SAS 1078 (rev 04) [1000:0060]
- 04:0e.0 RAID bus controller [0104]: LSI Logic / Symbios Logic MegaRAID SAS [1000:0411]
- 03:00.0 RAID bus controller [0104]: LSI Logic / Symbios Logic MegaRAID SAS 2108 [Liberator] [1000:0079] (rev 05)
- 10:00.0 RAID bus controller [0104]: LSI Logic / Symbios Logic MegaRAID SAS TB [1000:005b] (rev 01)
- 01:00.0 RAID bus controller [0104]: LSI Logic / Symbios Logic MegaRAID SAS 2008 [Falcon] [1000:0073] (rev 03) Dell PERC H310 Mini
- 01:00.0 RAID bus controller [0104]: LSI Logic / Symbios Logic MegaRAID SAS 2208 [Thunderbolt] [1000:005b] (rev 05) Dell PERC H710 Mini
3. Management and reporting tools
megactl includes a SAS compliant binary named megasasctl. It seems to work on old card but fails with the new one.
If megasasctl doesn’t work for you, you will have to use the proprietary cli utility from LSI: megaclisas.
For managing the card there are no alternatives to megaclisas.
3.1. megactl
Despites megasasctl doesn’t seem to work with recent cards, you should really give it a try.
3.1.1. Quickstart and output example
Print current controller status:
There are several switches which are interresting:
- -H: Only print lines which are not ok.
If nothing is printer, everything is fine - -B: Ignore batttery problems when running -H.
In fact megasasctl can’t define if your controller has a battery or not.
If you don’t have one, use this parameter.
3.1.2. Periodic checks
You can write your own script around megasasctl to check your adapter status health periodically. However, I already did this for you. See megaraid-status below.
3.2. megaraid-status
3.2.1. About megaraid-status
megaraidsas-status is a wrapper script around megactl with periodics checks.
It is available in the packages repository too.
The packages comes with a python wrapper around megasasctl and an initscript that periodic run this wrapper to check status.
It keeps a file with latest status and thus is able to detect RAID status changes and/or brokeness.
It will log a ligne to syslog when something failed and will send you a mail.
Until arrays are healthy again a reminder will be sent each 2 hours.
3.2.2. Wrapper output example
3.3. megacli
3.3.1. About megacli
megacli is a proprietary tool by LSI which can perform both reporting and management for MegaRAID SAS cards.
However it’s really hard to use because it’s use tones of command line parameters and there’s no documentation.
3.3.2. Quickstart and output example
Get all adapters status and config:
Logical drive 0 on adapter 0 status and type:
Display, disable or enable automatic rebuild on adapter 0:
Get and modify rebuild rate:
Show physical disks from first controller:
We can see that disk 32,1 (enclosure slot = 1) is currently rebuilding (firmware state).
Let’s check this operation progress:
Create a RAID6 array with megacli
Let’s assume we have a server with two MegaRAID SAS cards. The first one is already setup but we have just plugged a disk bays on the second card.
List physical disks on second card (only print enclosure and slots numbers):
Now we have all enclosure and slot number. Let’s create the new array:
Read Cache, Write Cache, ReadAhead and Battery
A quick section about performance tunning.
Let’s enable Read Cache, and always cache data:
Enable disks’ cache:
About ReadAhead: this feature will read more stuff and store in the cache, guessing the system may access it soon.
We’re going to enable an enhanced version of readahead: the adaptative one.
With this option, readahead will only be enabled if the controller receive several access to sequencial sectors. If not, it won’t be used to avoid filling cache with randon useless data (in case of randomly accessed sector).
It seems ADRA is deprecated, current megacli binary doesn’t offer this option anymore. Use regular readahead instead:
Now we’re going to enable write cache. Beware of data loss! Write cache should be enabled ONLY if you have a battery pack on your controller.
Let’s check if we have one and if it’s working fine:
Both adapters have one in this server, let’s enable write cache:
But disable it if the battery went broken or discharged:
Now we can check if everythin and fine and reboot the server (not sure if it’s needed):
References (extracted from Dell OpenManage doc):
Read Policy: The read policies indicate whether or not the controller should read sequential sectors of the logical drive when seeking data.
- Read-Ahead. When using read-ahead policy, the controller reads sequential sectors of the logical drive when seeking data. Read-ahead policy may improve system performance if the data is actually written to sequential sectors of the logical drive.
- No-Read-Ahead. Selecting no-read-ahead policy indicates that the controller should not use read-ahead policy.
- Adaptive Read-Ahead. When using adaptive read-ahead policy, the controller initiates read-ahead only if the two most recent read requests accessed sequential sectors of the disk. If subsequent read requests access random sectors of the disk, the controller reverts to no-read-ahead policy. The controller continues to evaluate whether read requests are accessing sequential sectors of the disk, and can initiate read-ahead if necessary.
Write Policy: The write policies specify whether the controller sends a write-request completion signal as soon as the data is in the cache or after it has been written to disk.
- Write-Back. When using write-back caching, the controller sends a write-request completion signal as soon as the data is in the controller cache but has not yet been written to disk. Write-back caching may provide improved performance since subsequent read requests can more quickly retrieve data from the controller cache than they could from the disk. Write-back caching also entails a data security risk, however, since a system failure could prevent the data from being written to disk even though the controller has sent a write-request completion signal. In this case, data may be lost. Other applications may also experience problems when taking actions that assume the data is available on the disk.
- Write-Through. When using write-through caching, the controller sends a write-request completion signal only after the data is written to the disk. Write-through caching provides better data security than write-back caching, since the system assumes the data is available only after it has been safely written to the disk.
Cache Policy: The Direct I/O and Cache I/O cache policies apply to reads on a specific virtual disk. These settings do not affect the read-ahead policy. The cache policies are as follows:
- Cache I/O. Specifies that all reads are buffered in cache memory.
- Direct I/O. Specifies that reads are not buffered in cache memory. When using direct I/O, data is transferred to the controller cache and the host system simultaneously during a read request. If a subsequent read request requires data from the same data block, it can be read directly from the controller cache. The direct I/O setting does not override the cache policy settings. Direct I/O is also the default setting.
Rebuilding a disk by hand when it doesn’t occur automatically
I noticed that strange behavior on an IBM controller. Unplugging and pluging back a disk from an array doesn’t make the controller rebuild the array with that disk.
Here is what to do:
The disk drive identified as ![252:4] ([enclosureid:slotnumber]) is currently ‘Unconfigured(bad)’.
Make the drive online again:
The controller will now recognise the disk as being a «foreign» one. It means it has detected some RAID informations on it, and thus, considers it as a disk being part of an array that may be imported into current controller configuration.
We will now ask the controller to scan for foreign configuration and drop it:
The disk should now be available for getting back into the array.
Let’s check it:
We now need to figure out how that disk was identified inside the RAID array:
Here is what’s important here:
Span Reference: 0x01 is the number of the array (strip the 0x0 part).
We can see that Physical Disk: 2 has no information, which means the drive is missing.
Now we have all we need to add the disk back into the array.
Get the disk ![252:4] back into array 1, as disk 2:
And finally start rebuilding:
Expand an array over an additionnal disk
Thanks to a co-worker, I have now a quick howto.
Assuming your new unassigned drive is identified as ![252:3] and you have a RAID5 array identified as L0 (See documentation above to figure out how to find this).
Reconfigure the array to add this new drive:
Check operation progress:
3.3.3. Periodic checks
You can write your own script around megacli to check your adapter status health periodically. However, I already did this for you. See megaclisas-status below.
Full documentation
A complete documentation is attached as PDF here: raw-attachment:megacli_user_guide.pdf
3.4. megaclisas-status
3.4.1. About megaclisas-status
megaclisas-status is a wrapper script around megacli that report summarized RAID status with periodic checks feature.
It is available in the packages repository too.
The packages comes with a python wrapper around megacli and an initscript that periodic run this wrapper to check status.
It keeps a file with latest status and thus is able to detect RAID status changes and/or brokeness.
It will log a ligne to syslog when something failed and will send you a mail.
Until arrays are healthy again a reminder will be sent each 2 hours.
3.4.2. Wrapper output example
Another example (I broke the raid by running «megacli -PDOffline -PhysDrv [32:0] -a0»)
The nagios mode (run with —nagios):
The same example but with missing disk rebuilding (ran «megacli -PDRbld -Start -PhysDrv [32:0] -a0» for this example):
A server with two controllers (old script version output, sorry got no such hardware to get a newer example): The first one with a RAID1 array working fine. A second one with a RAID6 arrays of 7 drives with one offline (the array has just been created so it’s under initialization too).
3.4.3. Nagios integration
The script can be called with —nagios parameter. It will force a single line output and will return exit code 0 if all good, or 2 if at least one thing is wrong. It’s the standard nagios expected return code.
You probably want to run the script through NRPE, define the command like this:
In /etc/nagios/nrpe.d/00_check_raid.cfg
You also need a sudo config file, in /etc/sudoers.d/00-check-raid
Then you can expect such monitoring facilities (centreon on-top centreon-engine in this picture):

3.5. About /dev/megaraid_sas_ioctl_node
All theses tools requires this device node to be created.
It has to be done by hand.
Proprietary tools creates the device node at startup.
I made some wrappers around binaries from megactl package to create the node if it doesn’t exist yet.
4. SMART
Finally I found the way to read SMART through these MegaRAID cards. The first thing you’ll have to do is to list IDs of all your physical disks:
Then you can add this kind of lines to /etc/smartd.conf (don’t forget to comment the DEVICESCAN one):
Please note you need a recent version of smartmontools. 5.38 from Debian Lenny won’t work, 5.39.1+svn3124 from Squeeze does.
5. BIOS upgrade from a Linux system
Dell cards can be flashed using firmware-tools.
See http://linux.dell.com/wiki/index.php/Repository/firmware for more informations.
However this will only work on RedHat, CentOS, SuSE and Fedora. Even Ubuntu is listed in the wikipage, LSI card upgrade is not supported.
We use a Fedora 8 nfsroot booted by PXE to update our Dell’s firmware running Debian.
Michael reported a firmware can be flashed using megacli with the following syntax:
I haven’t done it by myself but I sure it works.
Источник
Системное администрирование и мониторинг Linux/Windows серверов и видео CDN
Статьи по настройке и администрированию Windows/Linux систем
- Полезное
- Карта сайта
- Мой сайт-визитка
- Рубрики
- Linux
- VoIP
- Безопасность
- Видеопотоки
- Системы виртуализации
- Системы мониторинга
- Windows
- Интересное
- Сеть и Интернет
- Linux
- Мета
- Войти
- RSS Feed
S.M.A.R.T. (часть 1). Мониторинг SCSI дисков под LSI 2108 (megaraid) RAID контроллером
 Навожу короткую инструкция по мониторингу физических дисков под хардварным LSI 2108 RAID контроллером. Так же эта инструкция может пригодиться для мониторинга дисков под HP/Compaq Smart Array Controller, Areca SATA[/SAS] RAID controller и другими, используя инструмент smart в сочетании с специализированными программами. Перечень контроллеров, за которыми можно мониторить физические диски используя smartctl наведен здесь.
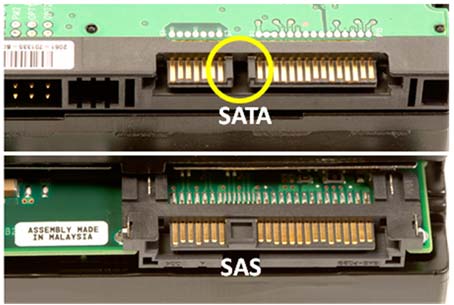
Немного о HDD интерфейсах
Аббревиатуры:
SCSI— Small Computer System Interface
SAS— Serial Attached SCSI
SATA — Serial ATA
ATA — AT Attachment
Чтобы визуально понять как выглядят те, или иные интерфейсы навожу картинки.
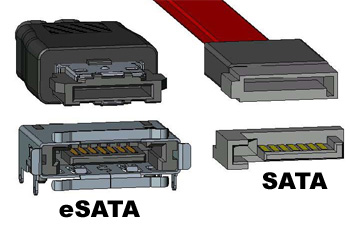

С интерфейсами все понятно, переходим к практике.
Мониторинг дисков используя megacli
Смотрим какие у нас есть диски.
SMC2108 — означает, что у нас Supermicro MC2108 контроллер. Так же можно убедиться, что у нас Megaraid контроллер используя эту команду.
Как видим, у нас LSI SAS MegaRAID контроллер, диски которого можно мониторить используя smartctl или же используя специализированную утилиту megacli. Для начала присмотримся к megacli. В стандартных репозиториях ее нет, но можно скачать с официального сайта и собрать с исходников. Но я рекомендую использовать специальный репозиторий (за который хочу сказать ОГРОМНОЕ спасибо) в котором есть почти весь набор специализированных утилиты под любой тип аппаратных рейдов.
Перечень всех доступных в репозитории утилит наведен здесь
Проверяем на ошибки физический диск megaraid используя megacli.
Как видим, на первом физическом диске есть «Media Error Count: 38». Это означает, что запасные(зарезервированные) сектора для remap(замены) битых секторов диска — закончились. И нужно проводить замену диска.
Так же нужно мониторить следующие параметры используя команду:
Теперь напишем маленький скрипт для мониторинга всех нужных параметров включая BBU.
Данный скрипт проверяет все диски на наличие проблем с прошивкой,состояние рейда,ошибки физических дисков и состояние батареи. Если есть проблема с батареей — код выхода скрипта будет больше 250, если проблемы с остальными устройствами, то будет выведено только количество ошибок. Скрипт запускается без аргументов. Если добавить аргумент log, будет выведено текст с указанием проблемного элемента. Проверяем работу скрипта:
Как видим у нас проблема с батареей (BBU) и ее нужно заменить.
По роботе с magacli есть целая книга-руководство.
Из полезных команд:
Мониторинг дисков используя smartctl
Для этого нам понадобиться тот же megacli, используя который, мы узнаем ID физических дисков и соответствующие им логические носители. Начнем.
Узнаем ID всех физических дисков за мегарейд контроллером ну и номера соответствующих логических дисков.
Расшифрую эту команду:
- -LdPdInfo — получить информацию(Info) по логическим (Ld) и физическим(Pd) устройствам …
- -aALL — … на всех адаптерах
Теперь видно, что у нас три логических(виртуальных) диска в которые входят по несколько физических дисков с соответствующими ID. Посмотрим на сервере, сколько у нас есть дисков:
Все верно, у нас три логических диска в системе. Проводим аналогию с выводом команды megacli:
- Virtual Drive: 0 == /dev/sda и в него входит 4 физических диска с Drive: 1 == /dev/sdb и в него входит 2 физических диска с Drive: 2 == /dev/sdc и в него входит 6 физических дисков с >Теперь нам осталось запустить SMART проверку по каждому с дисков используя собранные данные.
К примеру возьмем первый диск.
Как видим у нас есть 60 ошибок с которыми не смогла справиться система исправления ошибок.
Немного расшифрую выводу ошибок:
Журнал ошибок (если он доступен) отображается в отдельных строках:
- write error counters — ошибки записи
- read error counters — ошибки считывания
- verify error counters (отображаются только когда не нулевое значение) — ошибки выполнения
- non-medium error counter (определенное число) — число восстанавливаемых ошибок отличных от ошибок записи/считывания/выполнения
Так же может выводиться детальное описание последних ошибок с кодом, если устройство его поддерживает(если нет поддержки — выводиться сообщение «Error Events logging not supported»). К примеру:
Каждая из ошибок имеет различные коды. Оригинал описания кодов взято из мануала по SCSI Seagate дискам:
Errors Corrected by ECC, fast [Errors corrected without substantial delay: 00h]. An error correction was applied to get perfect data (a.k.a. ECC on-the-fly). «Without substantial delay» means the correction did not postpone reading of later sectors (e.g. a revolution was not lost). The counter is incremented once for each logical block that requires correction. Two different blocks corrected during the same command are counted as two events.
Errors Corrected by ECC: delayed [Errors corrected with possible delays: 01h]. An error code or algorithm (e.g. ECC, checksum) is applied in order to get perfect data with substantial delay. «With possible delay» means the correction took longer than a sector time so that reading/writing of subsequent sectors was delayed (e.g. a lost revolution). The counter is incremented once for each logical block that requires correction. A block with a double error that is correctable counts as one event and two different blocks corrected during the same command count as two events.
Error corrected by rereads/rewrites [Total (e.g. rewrites and rereads): 02h]. This parameter code specifies the counter counting the number of errors that are corrected by applying retries. This counts errors recovered, not the number of retries. If five retries were required to recover one block of data, the counter increments by one, not five. The counter is incremented once for each logical block that is recovered using retries. If an error is not recoverable while applying retries and is recovered by ECC, it isn’t counted by this counter; it will be counted by the counter specified by parameter code 01h — Errors Corrected With Possible Delays.
Total errors corrected [Total errors corrected: 03h]. This counter counts the total of parameter code errors 00h, 01h and 02h (i.e. error corrected by ECC: fast and delayed plus errors corrected by rereads and rewrites). There is no «double counting» of data errors among these three counters. The sum of all correctable errors can be reached by adding parameter code 01h and 02h errors, not by using this total. [The author does not understand the previous sentence from the Seagate manual.]
Correction algorithm invocations [Total times correction algorithm processed: 04h]. This parameter code specifies the counter that counts the total number of retries, or «times the retry algorithm is invoked». If after five attempts a counter 02h type error is recovered, then five is added to this counter. If three retries are required to get stable ECC syndrome before a counter 01h type error is corrected, then those three retries are also counted here. The number of retries applied to unsuccessfully recover an error (counter 06h type error) are also counted by this counter.
Gigabytes processed [Total bytes processed: 05h]. This parameter code specifies the counter that counts the total number of bytes either successfully or unsuccessfully read, written or verified (depending on the log page) from the drive. If a transfer terminates early because of an unrecoverable error, only the logical blocks up to and including the one with the uncorrected data are counted. [smartmontools divides this counter by 10^9 before displaying it with three digits to the right of the decimal point. This makes this 64 bit counter easier to read.]
Total uncorrected errors [Total uncorrected errors: 06h]. This parameter code specifies the counter that contains the total number of blocks for which an uncorrected data error has occurred.
С всего этого нас интересует параметр Total uncorrected errors который показывает количество не исправленных ошибок. Если это число велико, то нужно запускать long тест и проверить, дополнительно, параметры физического диска в Megaraid контроллере.
Мониторинг дисков используя smartd
Предыдущие способы мониторинга дисков были ручными, т.е. нужно вручную запускать проверку дисков находясь на конкретном сервере, или же настроить систему мониторинга, которая будет использовать написанные выше скрипты для сбора информации о состоянии дисков. Но есть еще один способ мониторинга — это использование демона smartd, который будет отправлять нам письма о проблемных дисках. Детально о настройках демона smartd можно почитать здесь
Для начала добавим демон в автозагрузку.
Источник


