- How To Create a Sudo User on Ubuntu [Quickstart]
- Steps to Create a New Sudo User
- Related Tutorials
- How to Create a New Sudo User on Ubuntu
- Creating a New Sudo User in Ubuntu
- If You Appreciate What We Do Here On TecMint, You Should Consider:
- Как добавить пользователя в Sudoers в Ubuntu
- Добавление пользователя в группу sudo
- Добавление пользователя в файл sudoers
- Выводы
- How To Create a New Sudo-enabled User on Ubuntu 18.04 [Quickstart]
- Introduction
- Step 1 — Logging Into Your Server
- Step 2 — Adding a New User to the System
- Step 3 — Adding the User to the sudo Group
- Step 4 — Testing sudo Access
- Conclusion
- How To Add User To Sudoers & Add User To Sudo Group on Ubuntu
- Steps to Add Sudo User on Ubuntu
- Step 1: Create New User
- Step 2: Add User to Sudo Group
- Step 3: Verify User Belongs to Sudo Group
- Step 4: Verify Sudo Access
How To Create a Sudo User on Ubuntu [Quickstart]
Published on March 28, 2016
Please refer to our Ubuntu 18.04 version of this tutorial instead.
The sudo command provides a mechanism for granting administrator privileges, ordinarily only available to the root user, to normal users. This guide will show you the easiest way to create a new user with sudo access on Ubuntu, without having to modify your server’s sudoers file. If you want to configure sudo for an existing user, simply skip to step 3.
Steps to Create a New Sudo User
Log in to your server as the root user.
Use the adduser command to add a new user to your system.
Be sure to replace username with the user that you want to create.
Set and confirm the new user’s password at the prompt. A strong password is highly recommended!
Follow the prompts to set the new user’s information. It is fine to accept the defaults to leave all of this information blank.
Use the usermod command to add the user to the sudo group.
By default, on Ubuntu, members of the sudo group have sudo privileges.
Test sudo access on new user account
Use the su command to switch to the new user account.
As the new user, verify that you can use sudo by prepending “sudo” to the command that you want to run with superuser privileges.
For example, you can list the contents of the /root directory, which is normally only accessible to the root user.
The first time you use sudo in a session, you will be prompted for the password of the user account. Enter the password to proceed.
If your user is in the proper group and you entered the password correctly, the command that you issued with sudo should run with root privileges.
Related Tutorials
Here is a link to a more detailed user management tutorial:
Источник
How to Create a New Sudo User on Ubuntu
In Linux and other Unix-like systems, the root account has the highest access rights on the system. It is used specifically for system administration purposes.
The root user (sometimes referred to as the superuser) has all rights or permissions (to all files and programs) in all modes (single or multi-user).
Operating a Linux system especially a server using the root account is considered insecure for several reasons. These include among others the risk of damage from accidents (e.g running a command that erases the filesystem), and running system applications with elevated privileges opening the system to security vulnerabilities. Besides the root account is a target for every attacker.
With respect to the above security concerns, it is recommended to use the sudo command to gain root privileges when a system user really needs to. On Ubuntu, the root account is disabled by default and the default account is an administrative account which uses sudo to gain root privileges.
In this short article, we will explain how to create a sudo user on Ubuntu Linux distribution.
Creating a New Sudo User in Ubuntu
1. Log in to your Ubuntu server as the root user.
2. Next, create a new sudo user using the useradd command as shown, where an admin is a username. In the following command, the -m flag means to create the user’s home directory if it doesn’t exist, -s specifies the user’s login shell and -c defines a comment to be stored in the account file.
3. Create a password for the admin user using the passwd utility and confirm the new user’s password. A strong password is highly recommended!
![]() Create New Sudo User in Ubuntu
Create New Sudo User in Ubuntu
4. To enable the user admin to invoke sudo to perform administrative tasks, you need to add the user to the sudo system group using the usermod command as follows, where the -a option means to append user to a supplementary group and -G specifies the group.
5. Now test sudo access on a new user account by switching to admin’s account (enter admin’s account password when prompted).
![]() Switch to Sudo Account
Switch to Sudo Account
6. Once switched to admin user, verify that you can run any administrative task, for example, try to create a directory tree under the / directory by adding sudo to the command.
![]() Run Administrative Commands Using Sudo
Run Administrative Commands Using Sudo
The following are other guides about sudo that you will find useful:
That’s all for now. In this guide, we have shown how to create a sudo user on Ubuntu. For more details about sudo, see “man sudo_root“. Do you have any questions or thoughts to share? If yes, reach us via the feedback form below.
If You Appreciate What We Do Here On TecMint, You Should Consider:
TecMint is the fastest growing and most trusted community site for any kind of Linux Articles, Guides and Books on the web. Millions of people visit TecMint! to search or browse the thousands of published articles available FREELY to all.
If you like what you are reading, please consider buying us a coffee ( or 2 ) as a token of appreciation.

We are thankful for your never ending support.
Источник
Как добавить пользователя в Sudoers в Ubuntu
sudo — это программа командной строки, которая позволяет доверенным пользователям выполнять команды от имени пользователя root или другого пользователя.
В этой статье мы покажем вам два способа предоставить пользователю права sudo. Первый — добавить пользователя в файл sudoers . Этот файл содержит информацию, которая контролирует, каким пользователям и группам предоставлены привилегии sudo, а также уровень этих привилегий.
Второй вариант — добавить пользователя в группу sudo, указанную в файле sudoers . По умолчанию в дистрибутивах на основе Debian, таких как Ubuntu и Linux Mint, членам группы «sudo» предоставляется доступ sudo.
Добавление пользователя в группу sudo
В Ubuntu самый простой способ предоставить пользователю права sudo — это добавить пользователя в группу «sudo». Члены этой группы могут выполнять любую команду как root через sudo и sudo запрос на аутентификацию с помощью своего пароля при использовании sudo .
Мы предполагаем, что пользователь уже существует. Если вы хотите создать нового пользователя, ознакомьтесь с этим руководством.
Чтобы добавить пользователя в группу, выполните команду ниже от имени пользователя root или другого пользователя sudo. Убедитесь, что вы заменили «username» на имя пользователя, которому вы хотите предоставить разрешения.
Предоставления доступа sudo с помощью этого метода достаточно для большинства случаев использования.
Чтобы убедиться, что у пользователя есть привилегии sudo, выполните команду whoami :
Вам будет предложено ввести пароль. Если у пользователя есть доступ к sudo, команда выведет «root»:
Если вы получаете сообщение об ошибке «пользователя нет в файле sudoers», это означает, что у пользователя нет прав sudo.
Добавление пользователя в файл sudoers
/etc/sudoers доступа sudo пользователей и групп определены в /etc/sudoers . Добавление пользователя в этот файл позволяет вам предоставить индивидуальный доступ к командам и настроить собственные политики безопасности.
Вы можете настроить доступ пользователя sudo, изменив файл sudoers или создав новый файл конфигурации в каталоге /etc/sudoers.d . Файлы внутри этого каталога включены в файл sudoers.
Всегда используйте visudo для редактирования файла /etc/sudoers . Эта команда проверяет файл на наличие синтаксических ошибок при его сохранении. Если есть ошибки, файл не сохраняется. Если вы откроете файл в текстовом редакторе, синтаксическая ошибка может привести к потере доступа sudo.
Обычно visudo использует vim для открытия /etc/sudoers . Если у вас нет опыта работы с vim и вы хотите отредактировать файл с помощью nano , измените редактор по умолчанию, запустив:
Допустим, вы хотите разрешить пользователю запускать команды sudo без запроса пароля. Для этого откройте файл /etc/sudoers :
Прокрутите вниз до конца файла и добавьте следующую строку:
Сохраните файл и выйдите из редактора . Не забудьте изменить «имя пользователя» на имя пользователя, которому вы хотите предоставить доступ.
Другой типичный пример — разрешить пользователю запускать только определенные команды через sudo . Например, чтобы разрешить только команды mkdir и rmdir , вы должны использовать:
Вместо редактирования файла sudoers вы можете сделать то же самое, создав новый файл с правилами авторизации в каталоге /etc/sudoers.d . Добавьте то же правило, что и в файл sudoers:
Такой подход делает управление привилегиями sudo более удобным в обслуживании. Имя файла не имеет значения. Обычно имя файла совпадает с именем пользователя.
Выводы
Предоставление доступа sudo пользователю в Ubuntu — простая задача; все, что вам нужно сделать, это добавить пользователя в группу «sudo».
Если у вас есть вопросы, не стесняйтесь оставлять комментарии.
Источник
How To Create a New Sudo-enabled User on Ubuntu 18.04 [Quickstart]
Published on March 23, 2020
Not using Ubuntu 18.04?
Choose a different version or distribution.
Introduction
The sudo command provides a mechanism for granting administrator privileges — ordinarily only available to the root user — to normal users. This guide will show you how to create a new user with sudo access on Ubuntu 18.04, without having to modify your server’s /etc/sudoers file. If you want to configure sudo for an existing user, skip to step 3.
Step 1 — Logging Into Your Server
SSH in to your server as the root user:
Step 2 — Adding a New User to the System
Use the adduser command to add a new user to your system:
Be sure to replace sammy with the user name that you want to create. You will be prompted to create and verify a password for the user:
Next you’ll be asked to fill in some information about the new user. It is fine to accept the defaults and leave all of this information blank:
Step 3 — Adding the User to the sudo Group
Use the usermod command to add the user to the sudo group:
Again, be sure to replace sammy with the username you just added. By default, on Ubuntu, all members of the sudo group have full sudo privileges.
Step 4 — Testing sudo Access
To test that the new sudo permissions are working, first use the su command to switch to the new user account:
As the new user, verify that you can use sudo by prepending sudo to the command that you want to run with superuser privileges:
For example, you can list the contents of the /root directory, which is normally only accessible to the root user:
The first time you use sudo in a session, you will be prompted for the password of that users account. Enter the password to proceed:
Note: This is not asking for the root password! Enter the password of the sudo-enabled user, not a root password.
If your user is in the proper group and you entered the password correctly, the command that you issued with sudo will run with root privileges.
Conclusion
In this quickstart tutorial we created a new user account and added it to the sudo group to enable sudo access. For more detailed information on setting up an Ubuntu 18.04 server, please read our Initial Server Setup with Ubuntu 18.04 tutorial.
Источник
How To Add User To Sudoers & Add User To Sudo Group on Ubuntu
Home » SysAdmin » How To Add User To Sudoers & Add User To Sudo Group on Ubuntu
The sudo command is the preferred means to handle elevated permissions. In supported versions of Ubuntu, using the sudo command will grant elevated permissions for 15 minutes.
Standard user accounts are restricted from performing sensitive tasks, such as viewing the contents of the /root directory. This prevents the accidental use of commands with massive consequences. It also makes it more difficult for intruders to compromise a system. However, sometimes you need to run an administrative command. Sudo – or Super User Do – grants you privileges to run sensitive tasks.
This simple tutorial will show you how to add a new user on Ubuntu and provide sudo access.

- A system running a supported version of Ubuntu
- Access to a root user account or another account with sudo privileges
- Access to a terminal window/command line (Ctrl–Alt–T)
Note: Linux Sudo Command tutorials also available for CentOS and Debian.
Steps to Add Sudo User on Ubuntu
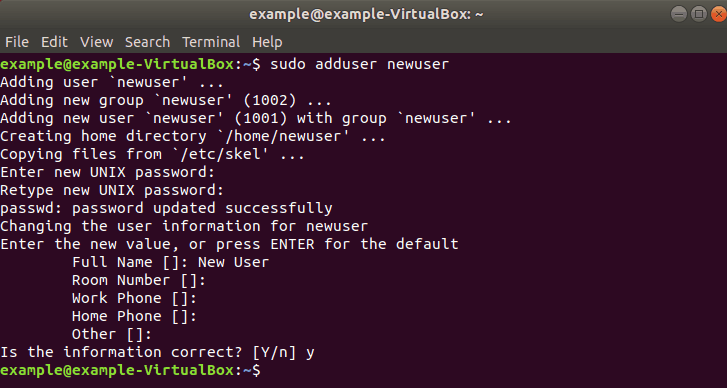
Step 1: Create New User
1. Log into the system with a root user or an account with sudo privileges.
2. Open a terminal window and add a new user with the command:
The adduser command creates a new user, plus a group and home directory for that user.
You may get an error message that you have insufficient privileges. (This typically only happens for non-root users.) Get around it by entering:
3. You can replace newuser with any username you wish. The system will add the new user; then prompt you to enter a password. Enter a great secure password, then retype it to confirm.
4. The system will prompt you to enter additional information about the user. This includes a name, phone numbers, etc. – these fields are optional, and can be skipped by pressing Enter.
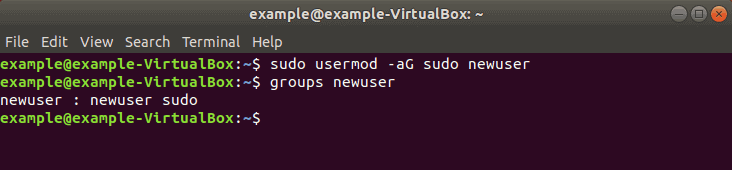
Step 2: Add User to Sudo Group
Most Linux systems, including Ubuntu, have a user group for sudo users. To grant the new user elevated privileges, add them to the sudo group.
In a terminal, enter the command:
Replace newuser with the username that you entered in Step 1.
Again, if you get an error, run the command with sudo as follows:
The -aG option tells the system to append the user to the specified group. (The -a option is only used with G .)
Note: Usermod command is a useful tool for user management. To learn more about its options, refer to our guide How To Use The Usermod Command In Linux.
Step 3: Verify User Belongs to Sudo Group
Enter the following to view the groups a user belongs to:
The system will respond by listing the username and all groups it belongs to, for example: newuser : newuser sudo
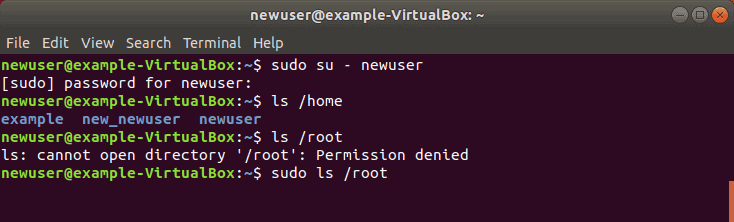
Step 4: Verify Sudo Access
Switch users by entering:
Replace newuser with the username you entered in Step 1. Enter your password when prompted. You can run commands as normal, just by typing them.
However, some commands or locations require elevated privileges. If you try to list the contents of the /root directory, you’ll get an access denied error: ls /root
The command can be executed with:
The system will prompt for your password. Use the same password you set in Step 1. You should now see the contents of the /root directory.
Now you know how to add and create a user with sudo privileges on Ubuntu.
Before sudo, users would log in to their systems with full permissions over the entire system with the su command. This was risky as users could be exploited by tricking them into entering malicious commands. These vulnerabilities were solved by limiting account privileges. However, administrators still had to log out of their account and into an admin account to perform routine tasks.
The sudo command in Ubuntu strikes a balance – protecting user accounts from malicious or inadvertent damage while allowing a privileged user to run administrative tasks. To learn more about the difference between these commands, check out Sudo vs. Su.
Источник


