- 5 commands to check memory usage on Linux
- Memory Usage
- 1. free command
- 2. /proc/meminfo
- 3. vmstat
- 4. top command
- 5. htop
- RAM Information
- Summary
- 66 thoughts on “ 5 commands to check memory usage on Linux ”
- Showing memory usage in Linux by process and user
- There are several commands for checking up on memory usage in a Linux system, and here are some of the better ones.
- Using top
- Using ps
- Using top
- Using ps
- Using ps along with other commands
- Smem – Отчеты о распределении памяти между процессами и пользователями в Linux
- Как установить Smem – инструмент мониторинга памяти в Linux
- На системах RHEL, CentOS и Fedora
- На системах Debian и Ubuntu
- На Linux Mint
- На Arch Linux
- Как использовать Smem
5 commands to check memory usage on Linux
Memory Usage
On linux, there are commands for almost everything, because the gui might not be always available. When working on servers only shell access is available and everything has to be done from these commands. So today we shall be checking the commands that can be used to check memory usage on a linux system. Memory include RAM and swap.
It is often important to check memory usage and memory used per process on servers so that resources do not fall short and users are able to access the server. For example a website. If you are running a webserver, then the server must have enough memory to serve the visitors to the site. If not, the site would become very slow or even go down when there is a traffic spike, simply because memory would fall short. Its just like what happens on your desktop PC.
1. free command
The free command is the most simple and easy to use command to check memory usage on linux. Here is a quick example
The m option displays all data in MBs. The total os 7976 MB is the total amount of RAM installed on the system, that is 8GB. The used column shows the amount of RAM that has been used by linux, in this case around 6.4 GB. The output is pretty self explanatory. The catch over here is the cached and buffers column. The second line tells that 4.6 GB is free. This is the free memory in first line added with the buffers and cached amount of memory.
Linux has the habit of caching lots of things for faster performance, so that memory can be freed and used if needed.
The last line is the swap memory, which in this case is lying entirely free.
2. /proc/meminfo
The next way to check memory usage is to read the /proc/meminfo file. Know that the /proc file system does not contain real files. They are rather virtual files that contain dynamic information about the kernel and the system.
Check the values of MemTotal, MemFree, Buffers, Cached, SwapTotal, SwapFree.
They indicate same values of memory usage as the free command.
3. vmstat
The vmstat command with the s option, lays out the memory usage statistics much like the proc command. Here is an example
The top few lines indicate total memory, free memory etc and so on.
4. top command
The top command is generally used to check memory and cpu usage per process. However it also reports total memory usage and can be used to monitor the total RAM usage. The header on output has the required information. Here is a sample output
Check the KiB Mem and KiB Swap lines on the header. They indicate total, used and free amounts of the memory. The buffer and cache information is present here too, like the free command.
5. htop
Similar to the top command, the htop command also shows memory usage along with various other details.
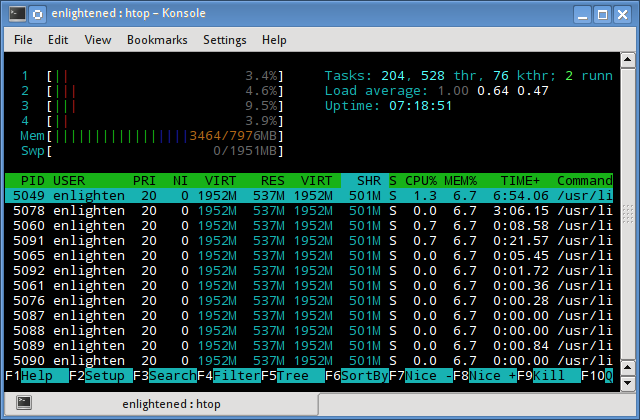
The header on top shows cpu usage along with RAM and swap usage with the corresponding figures.
RAM Information
To find out hardware information about the installed RAM, use the demidecode command. It reports lots of information about the installed RAM memory.
Provided information includes the size (2048MB), type (DDR2) , speed(667 Mhz) etc.
Summary
All the above mentioned commands work from the terminal and do not have a gui. When working on a desktop with a gui, it is much easier to use a GUI tool with graphical output. The most common tools are gnome-system-monitor on gnome and
ksysguard on KDE. Both provide resource usage information about cpu, ram, swap and network bandwidth in a graphical and easy to understand visual output.
A Tech Enthusiast, Blogger, Linux Fan and a Software Developer. Writes about Computer hardware, Linux and Open Source software and coding in Python, Php and Javascript. He can be reached at [email protected] .
66 thoughts on “ 5 commands to check memory usage on Linux ”
You have explained the topic very well. Thanks for sharing a nice article.
Thanks for these commands. It saved a lots of time.
How about explaining what we are looking for? Most people would know these commands. Waste of time.
Please correct the typo in “RAM Information” section. The command for viewing hardware info about RAM is “dmidecode” and not “demidecode”.
And it also requires root privileges.
Источник
Showing memory usage in Linux by process and user
There are several commands for checking up on memory usage in a Linux system, and here are some of the better ones.


There are a lot of tools for looking at memory usage on Linux systems. Some are commonly used commands like free and ps while others are tools like top that allow you to display system performance stats in various ways. In this post, we’ll look at some commands that can be most helpful in identifying the users and processes that are using the most memory.
Here are some that address memory usage by process.
Using top
One of the best commands for looking at memory usage is top. One extremely easy way to see what processes are using the most memory is to start top and then press shift+m to switch the order of the processes shown to rank them by the percentage of memory each is using. Once you’ve entered shift+m, your top output should reorder the task entries to look something like this:
Notice the %MEM ranking. The list will be limited by your window size, but the most significant processes with respect to memory usage will show up at the top of the process list.
Using ps
The ps command includes a column that displays memory usage for each process. To get the most useful display for viewing the top memory users, however, you can pass the ps output from this command to the sort command. Here’s an example that provides a very useful display:
In the example above (truncated for this post), sort is being used with the -r (reverse), the -n (numeric) and the -k (key) options which are telling the command to sort the output in reverse numeric order based on the fourth column (memory usage) in the output from ps. If we first display the heading for the ps output, this is a little easier to see.
If you like this command, you can set it up as an alias with a command like the one below. Don’t forget to add it to your
/.bashrc file if you want to make it permanent.
Here are some commands that reveal memory usage by user.
Using top
Examining memory usage by user is somewhat more complicated because you have to find a way to group all of a user’s processes into a single memory-usage total.
If you want to home in on a single user, top can be used much in the same way that it was used above. Just add a username with the -U option as shown below and press the shift+m keys to order by memory usage:
Using ps
You can also use a ps command to rank an individual user’s processes by memory usage. In this example, we do this by selecting a single user’s processes with a grep command:
Using ps along with other commands
What gets complicated is when you want to compare users’ memory usages with each other. In that case, creating a by-user total and ranking them is a good technique, but it requires a little more work and uses a number of commands. In the script below, we get a list of users with the ps aux | grep -v COMMAND | awk ‘
Output from this script might look like this:
There are a lot of ways to report on memory usage on Linux. Focusing on which processes and users are consuming the most memory can benefit from a few carefully crafted tools and commands.
Sandra Henry-Stocker has been administering Unix systems for more than 30 years. She describes herself as «USL» (Unix as a second language) but remembers enough English to write books and buy groceries. She lives in the mountains in Virginia where, when not working with or writing about Unix, she’s chasing the bears away from her bird feeders.
Источник
Smem – Отчеты о распределении памяти между процессами и пользователями в Linux
И снова здравствуйте. Друзья, хотим поделиться с вами переводом полезного материала о мониторинге использования памяти в Linux. Данный материал подготовлен специально для студентов курса «Администратор Linux».

Управление памятью в вопросах мониторинга ее использования – одна из самых важных областей в вашей Linux системе. В различных дистрибутивах Linux существует великое множество инструментов для мониторинга использования памяти. Работают они тоже по разному, но в этой статье мы рассмотрим установку и использования такого инструмента как smem.
Smem – это инструмент предоставления отчетов в командной строке, который выдает пользователю различные сводки по использованию памяти в системе Linux. В smem есть одна уникальная вещь, которая отличает его от традиционных инструментов мониторинга памяти. Дело в том, что smem сообщает вам PSS (Proportional Set Size), то есть он дает более полноценное представление о распределении памяти между приложениями и библиотеками в настройках виртуальной памяти.
Существующие традиционные инструменты сосредоточена главным образом на считывании RSS (Resident Set Size), т.е. на стандартной мере мониторинга использования памяти в физической схеме памяти, которая тем не менее имеет тенденцию переоценивать использование памяти приложениями.
С другой стороны PSS рационально оценивает использование памяти, определяя справедливое ее распределение между приложениями и библиотеками в схеме виртуальной памяти.
Вы можете обратиться к этому руководству (о PSS и RSS памяти), чтобы понять механизм потребления памяти в системе Linux. А теперь давайте перейдем к рассмотрению некоторых особенностей smem.
Особенности Smem:
- Листинг обзора системы;
- Листинг и фильтрация по процессам, маппингам и пользователям;
- Использование данных из файловой системы /proc;
- Настраиваемые столбцы листинга для нескольких источников данных;
- Конфигурируемые блоки вывода и процентные показатели;
- Простота настройки заголовков и итогов в списках;
- Использование моментальных снимков из зеркал каталогов или сжатых tar файлов;
- Встроенный механизм генерации диаграмм;
- Облегчённый инструмент захвата, используемый во встроенных системах.
Как установить Smem – инструмент мониторинга памяти в Linux
Перед тем, как приступить к установке smem, необходимо убедиться, что ваша система удовлетворяет следующим параметрам:
- Современное ядро (версия от 2.6.27);
- Актуальная версия Python (поддерживается от 2.4);
- Опционально библиотека matplotlib для генерации диаграмм.
Большинство дистрибутивов Linux на сегодняшний день поставляются с последней версией ядра с поддержкой Python 2 или 3, поэтому единственным требованием по сути может быть только установка matplotlib для отрисовки красивых графиков.
На системах RHEL, CentOS и Fedora
Для начала включите репозиторий EPEL (Extra Packages for Enterprise Linux), затем установите следующее:
На системах Debian и Ubuntu
На Linux Mint
На Arch Linux
Как использовать Smem
Чтобы увидеть отчет по использованию памяти системой, всеми пользователями системы, введите следующую команду:
Когда стандартный пользователь запускает smem, то отображается использование памяти процессом, который инициировал этот пользователь. Процессы организованы по возрастанию PSS.
Взгляните на пример вывода для моей системы. Здесь показано использование памяти для процессов, инициированных пользователем aaronkilik:
Есть множество опций, которые вы можете вызвать во время использования smem, например, чтобы просмотреть потребление памяти в масштабах системы, выполните следующую команду:
Также вы можете просмотреть использование памяти маппингами:
У smem есть параметры фильтрации выходных данных. Сейчас мы взглянем на два примера.
Фильтрация вывода по имени пользователя (username) осуществляется вызовом опций -u или —userfilter=»regex» , как в примере ниже:
Чтобы отфильтровать выходные данные по имени процесса, включите опцию -P или —processfilter=»regex» :
Форматирование вывода может быть крайне полезным, поэтому smem предоставляет параметры, которые помогут вам форматировать отчеты об использовании памяти. Далее мы рассмотрим пару примеров.
Чтобы отображать в отчете только необходимые столбцы, используйте -c или –columns , как показано ниже:
Вы можете использовать параметр -p , чтобы выводить отчет об использовании памяти в процентном соотношении:
Следующая команда будет выводить итоговые показатели в конце каждого столбца выходных данных:
Кроме того, есть специальные опции для графических сводок, которые вы также можете использовать. В этой секции мы их и рассмотрим.
Вы можете создать гистограмму процессов и их PSS и RSS значений. В приведенном ниже примере мы создаем гистограмму процессов, принадлежащих пользователю root.
Вы имеете возможность создать круговую диаграмму, отражающую процессы и потребление памяти ими на основе PSS или RSS значений. Команда ниже выводит круговую диаграмму для процессов, принадлежащих пользователю root, отражающую ключевые значения.
— — pie означает метку по имени, а опция -s помогает сортировать по значению PSS.
Существует множество других полей помимо PSS и RSS, используемых для маркировки диаграмм.
Чтобы увидеть справку, просто введите smem -h или обратитесь к документации.
Сейчас мы остановимся в smem на этом этапе. Если вы хотите получше разобраться с этим инструментом, посетите страницу руководства.
Источник


