- Как установить драйвер Nvidia на Linux Mint 20
- Как установить драйвер Nvidia на Linux Mint 20
- Установите драйвер Nvidia на Linux Mint 20 Ulyana
- Шаг 1. Перед запуском приведенного ниже руководства важно убедиться, что ваша система обновлена, выполнив следующие apt команды в терминале:
- Шаг 2. Установка драйвера Nvidia в Linux Mint 20.
- How to Install Nvidia Drivers on Linux Mint [Beginner’s Guide]
- How to Install Nvidia Drivers on Linux Mint: The Easy Way (Recommended)
- Troubleshooting tips
- Install Nvidia Driver Using the Terminal (Special Use-Cases)
- Installing Nvidia Drivers using the .run file from Official Website (Time Consuming/Not Recommended)
- Wrapping Up
- Установка видео драйвера на Linux Mint 19.1
Как установить драйвер Nvidia на Linux Mint 20

Как установить драйвер Nvidia на Linux Mint 20
В этом руководстве мы покажем вам, как установить драйвер Nvidia на Linux Mint 20. Для тех из вас, кто не знал, производительность графических процессоров (GPU) в основном зависит от драйверов. Ubuntu по умолчанию использует видеодрайвер Nouveau с открытым исходным кодом, который имеет ограниченную поддержку и функции по сравнению с проприетарными драйверами Nvidia. Установка драйверов NVIDIA на Ubuntu — простая задача, которую можно выполнить менее чем за минуту. Ubuntu включает инструмент, который может определять модель видеокарты и устанавливать соответствующие драйверы NVIDIA. Кроме того, вы можете загрузить и установить драйверы с сайта NVIDIA.
В этой статье предполагается, что у вас есть хотя бы базовые знания Linux, вы знаете, как использовать оболочку, и, что наиболее важно, вы размещаете свой сайт на собственном VPS. Установка довольно проста и предполагает, что вы работаете с учетной записью root, в противном случае вам может потребоваться добавить ‘ sudo ‘ к командам для получения привилегий root. Я покажу вам пошаговую установку драйвера Nvidia на Linux Mint 20 (Ульяна).
Установите драйвер Nvidia на Linux Mint 20 Ulyana
Шаг 1. Перед запуском приведенного ниже руководства важно убедиться, что ваша система обновлена, выполнив следующие apt команды в терминале:
Шаг 2. Установка драйвера Nvidia в Linux Mint 20.
Теперь определите модель вашей графической карты Nvidia и рекомендуемый драйвер, используя следующие команды:
Чтобы перечислить только драйверы, применимые к вашей системе, вы можете:
Из вышеприведенного вывода можно сделать вывод, что в текущей системе установлена графическая карта NVIDIA GP106 [GeForce GTX 1060 6 ГБ], и рекомендуемый драйвер для установки — Nvidia-390. Если вы согласны с рекомендацией, не стесняйтесь снова использовать команду ubuntu-drivers для установки всех рекомендуемых драйверов:
В качестве альтернативы можно выборочно установить нужный драйвер с помощью команды apt:
После установки вам просто нужно перезагрузить систему или ввести ее в терминал:
Чтобы проверить версию драйвера Nvidia и проверить установку, вы можете ввести следующую команду в терминале:
Поздравляю! Вы успешно установили драйвер Nvidia . Благодарим за использование этого руководства для установки последней версии драйвера Nvidia в системе Linux Mint. Для получения дополнительной помощи или полезной информации мы рекомендуем вам посетить официальный сайт Nvidia .
Источник
How to Install Nvidia Drivers on Linux Mint [Beginner’s Guide]
Last updated March 5, 2021 By Ankush Das 36 Comments
Linux Mint is a fantastic Ubuntu-based Linux distribution that aims to make it easy for newbies to experience Linux by minimizing the learning curve.
Not just limited to being one of the best beginner-friendly Linux distros, it also does a few things better than Ubuntu. Of course, if you’re using Linux Mint like I do, you’re probably already aware of it.
We have many beginner-focused Mint tutorials on It’s FOSS. Recently some readers requested help with Nvidia drivers with Linux Mint and hence I came up with this article.
I have tried to mention different methods with a bit of explaining what’s going on and what you are doing in these steps.
But before that, you should know this:
- Nvidia has two categories of drivers. Open source drivers called Nouveau and proprietary drivers from Nvidia itself.
- Most of the time, Linux distributions install the open source Nouveau driver and you can manually enable the proprietary drivers.
- Graphics drivers are tricky things. For some systems, Nouveau works pretty well while for some it could create issues like blank screen or poor display. You may switch to proprietary drivers in such cases.
- The proprietary driver from Nvidia has different version numbers like 390, 450, 460. The higher the number, the more recent is the driver. I’ll show you how to change between them in this tutorial.
- If you are opting for proprietary drivers, you should go with the latest one unless you encounter some graphics issue. In those cases, opt for an older version of the driver and see if that works fine for you.
Now that you have some familiarity with the terms, let’s see how to go about installing Nvidia drivers on Linux Mint.
How to Install Nvidia Drivers on Linux Mint: The Easy Way (Recommended)
Linux Mint comes baked in with a Driver Manager which easily lets you choose/install a driver that you need for your hardware using the GUI.
By default, you should see the open-source xserver-xorg-video-nouveau driver for Nvidia cards installed, and it works pretty well until you start playing a high-res video or want to play a game on Linux.
So, to get the best possible experience, proprietary drivers should be preferred.
You should get different proprietary driver versions when you launch the Driver Manager as shown in the image below:
Basically, the higher the number, the latest driver it is. At the time of writing this article, driver version 460 was the latest recommendation for my Graphics Card. You just need to select the driver version and hit “Apply Changes“.
Once done, all you need to do is just reboot your system and if the driver works, you should automatically get the best resolution image and the refresh rate depending on your monitor for the display.
For instance, here’s how it looks for me (while it does not detect the correct size of the monitor):
Troubleshooting tips
Depending on your card, the list would appear to be different. So, what driver version should you choose? Here are some pointers for you:
- The latest drivers should ensure compatibility with the latest games and should technically offer better performance overall. Hence, it is the recommended solution.
- If the latest driver causes issues or fails to work, choose the next best offering. For instance, version 460 didn’t work, so I tried applying driver version 450, and it worked!
Initially, in my case (Linux Mint 20.1 with Linux Kernel 5.4), the latest driver 460 version did not work. Technically, it was successfully installed but did not load up every time I booted.
What to do if drivers fail to load at boot
How do you know when it does not work? You will boot up with a low-resolution screen, and you will be unable to tweak the resolution or the refresh rate of the monitor.
It will also inform you about the same in the form of an error:
Fortunately, a solution from Linux Mint’s forum solved it for me. Here’s what you need to do:
1. Access the modules file using the command:
2. You’ll be prompted to authenticate the access with your account password. Once done, you just need to add the following lines at the bottom:
Here’s what it looks like:
etc modules nvidia
If that doesn’t work, you can launch the Driver Manager and opt for another version of Nvidia driver. It’s more of a hit and try.
Install Nvidia Driver Using the Terminal (Special Use-Cases)
For some reasons, if you are not getting the latest drivers for your Graphics Card using the Driver Manager, opting for the terminal method could help.
It may not be the safest way to do it, but I did not have any issues installing the latest Nvidia driver 460 version.
I’ll always recommend sticking to the Driver Manager app unless you have your reasons.
To get started, first you have to check the available drivers for your GPU. Type in the following command to get the list:
Here’s how it looks in my case:
non-free refers to the proprietary drivers and free points at the open-source nouveau Nvidia drivers.
As mentioned above, usually, it is preferred to try installing the recommended driver. In order to do that, you just type in:
If you want something specific, type in:
You just have to replace “450” with the driver version that you want and it will install the driver in the same way that you install an application via the terminal.
Once installed, you just need to restart the system or type it in the terminal:
To check the Nvidia driver version and verify the installation, you can type the following command in the terminal:
Here’s how it may look like:
To remove the driver and its associated dependencies, simply mention the exact version of the driver:
And, simply reboot. It should fallback to use the open-source nouveau driver.
install the open-source driver using the following command and then reboot to revert to the default open-source driver:
Installing Nvidia Drivers using the .run file from Official Website (Time Consuming/Not Recommended)
Unless you want the latest version of the driver from the official website or just want to experiment the process, you can opt to download the file (.run) and install it.
To proceed, you need to first disable the X server and then install the Nvidia driver which could turn out to be troublesome and risky.
You can follow the official documentation if you want to explore this method, but you may not need it at all.
Wrapping Up
While it’s easy to install Nvidia drivers in Linux Mint, occasionally, you might find something that does not work for your hardware.
If one driver version does not work, I’d suggest you to try other available versions for your Graphics Card and stick to the one that works. Unless you’re gaming and want the latest software/hardware compatibility, you don’t really need the latest Nvidia drivers installed.
Feel free to share your experiences with installing Nvidia drivers on Linux Mint in the comments down below.
Like what you read? Please share it with others.
Источник
Установка видео драйвера на Linux Mint 19.1
Для того, чтобы посмотреть какой видеоадаптер и драйвер используется в системе необходимо набрать команду:
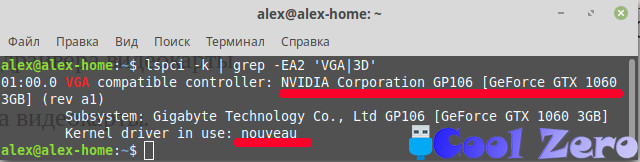 Результат работы команды lspci -k | grep -EA2 ‘VGA|3D’
Видим на компьютере установлена видеокарта NVIDIA Corporation GP106 [GeForce GTX 1060 3GB], но используется драйвер nouveau.
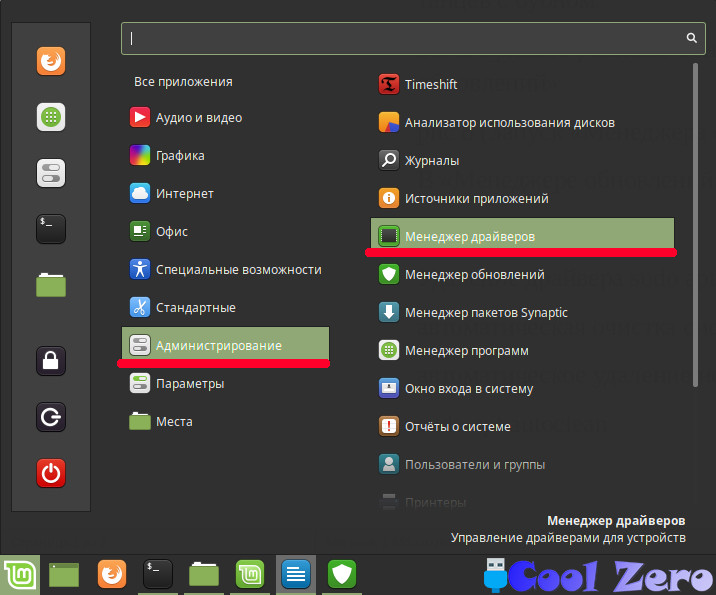
Для установки драйверов необходимо запустить «Менеджер драйверов». Для этого переходим в «Меню» — «Администрирование» — «Менеджер драйверов».
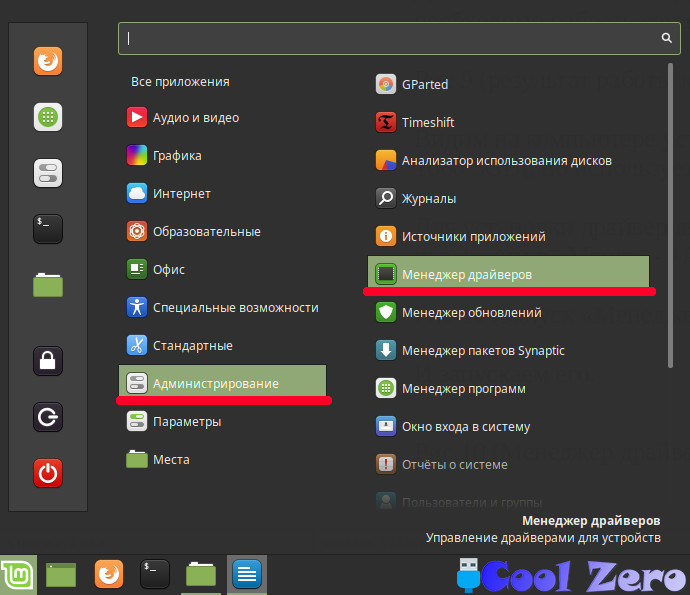 Запуск «Менеджера драйверов»
И запускаем его.
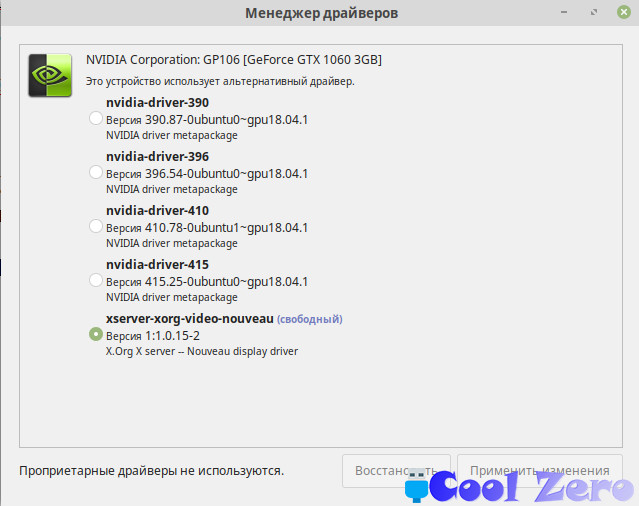
 Менеджер драйверов
По умолчанию используется xserver-xorg-video-nouveau, операционная система сама рекомендует установить драйвер nvidia-driver-390. Посмотрим более свежий драйвер для видеокарты. Для этого необходимо подключить репозиторий PPA (персональный архив пакетов) с графическими драйверами. На данный момент PPA является самым стабильным способом обновления до последней версии проприетарных драйверов Nvidia для Linux Mint. При работе с PPA необходимо быть осторожным не всегда драйвера работают корректно. Опять таки придется воспользоваться хорошей утилитой «Timeshift» и сделать снимок системы.
Для добавления Proprietary GPU Drivers PPA в Linux Mint и обновления источников софта, необходимо воспользоваться следующими командами, которые нужно ввести в терминале.
sudo add-apt-repository ppa:graphics-drivers/ppa
Перезапускаем «Менеджер драйверов». Появились новые драйвера которых не было в системе.
 Менеджер драйверов
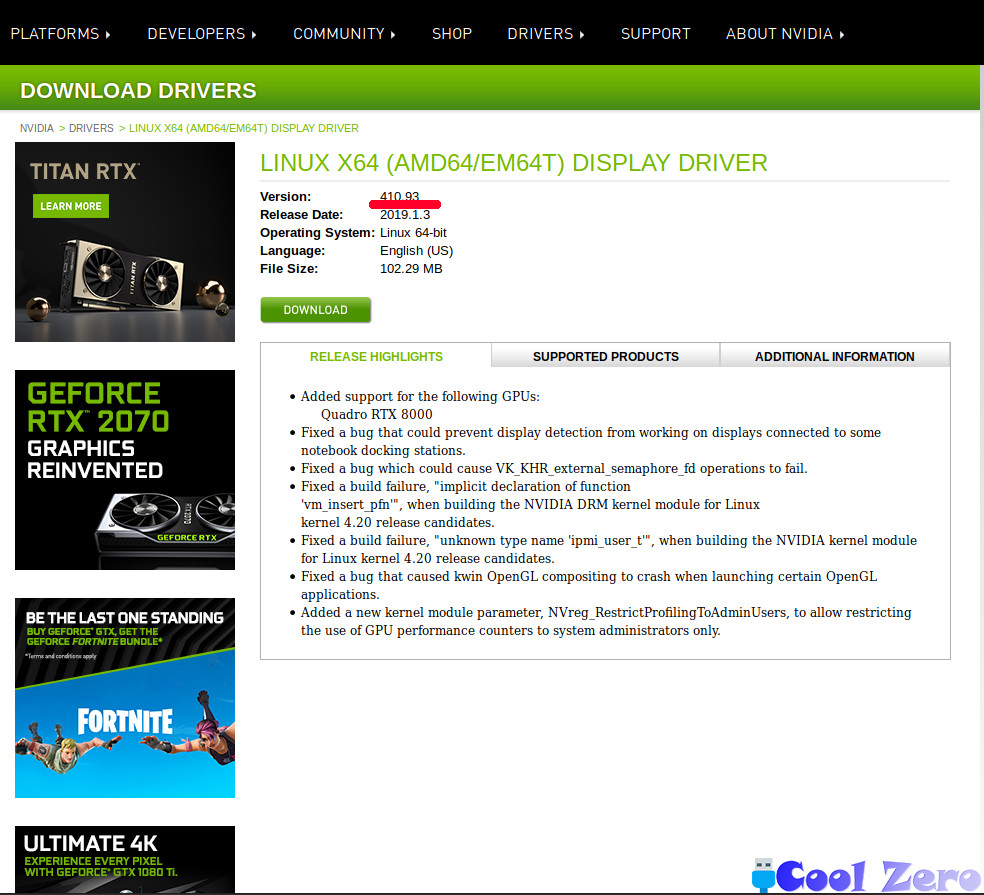
Чтобы не ошибиться с выбором драйвера нужно посмотреть какие драйвера подойдут для видеокарты. Для этого переходим на сайт Nvidia раздел драйвера (//www.nvidia.com/Download/index.aspx?lang=en-us), выбираем модель видеокарты и операционную систему.
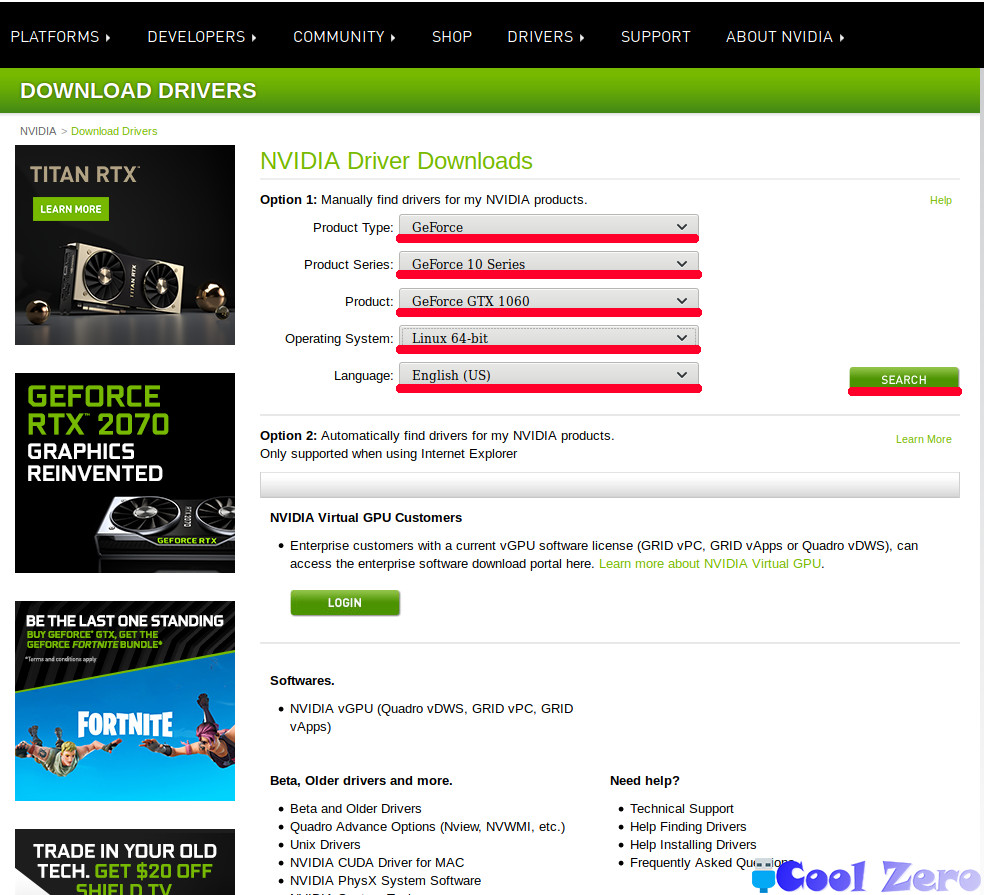 Сайт Nvidia
Нажимаем «Search» и на экране увидим версию драйвера которая по словам производителя подойдет для данной видеокарты.
 Сайт Nvidia — Результаты поиска
Выбираем nvidia-driver-410 и нажимаем «Применить изменения».
 Менеджер драйверов — выбор драйвера
Выбранный драйвер будет загружен и установлен, после чего «Менеджер драйверов» предложит перезагрузить систему. Тут ожидал неприятный сюрприз, данный драйвер отказался работать, по аналогии и другие драйвера тоже не работали. В интернете нашел информацию о том, что ядро Linux версии 4.15 не стабильно работает с некоторыми драйверами видеокарт Nvidia.
Полезная команда для отката драйверов: sudo apt purge nvidia*
Было принято решение обновить ядро. Для этого необходимо запустить «Менеджер обновлений».
 Менеджера обновлений
В «Менеджере обновлений» необходимо выбрать «Вид» — «Обновление ядра Linux». Выйдет предупреждение о том, что необходимо с осторожностью пользоваться данным видом обновления на, что соглашаемся.
 Менеджер обновление — «Обновление ядра Linux»
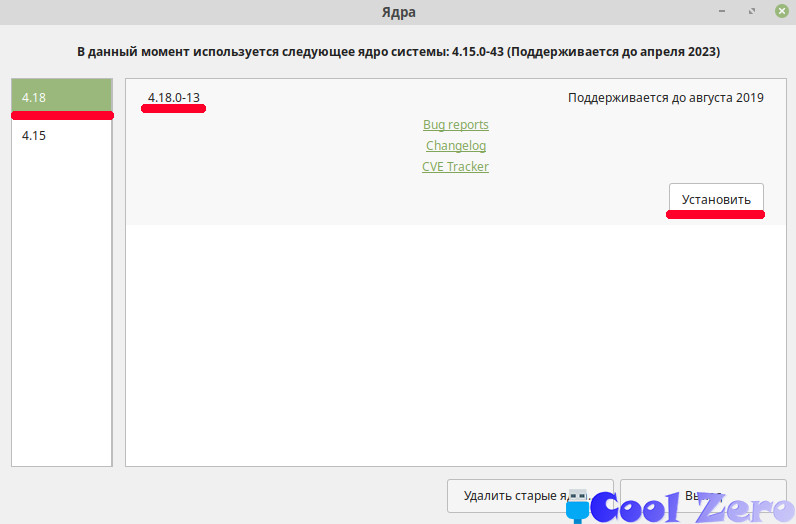
Видим на данный момент используется ядро 4.15.0-43 — выбираем ядро 4.18 и нажимаем установить.
 Менеджер обновление — «Обновление ядра Linux»
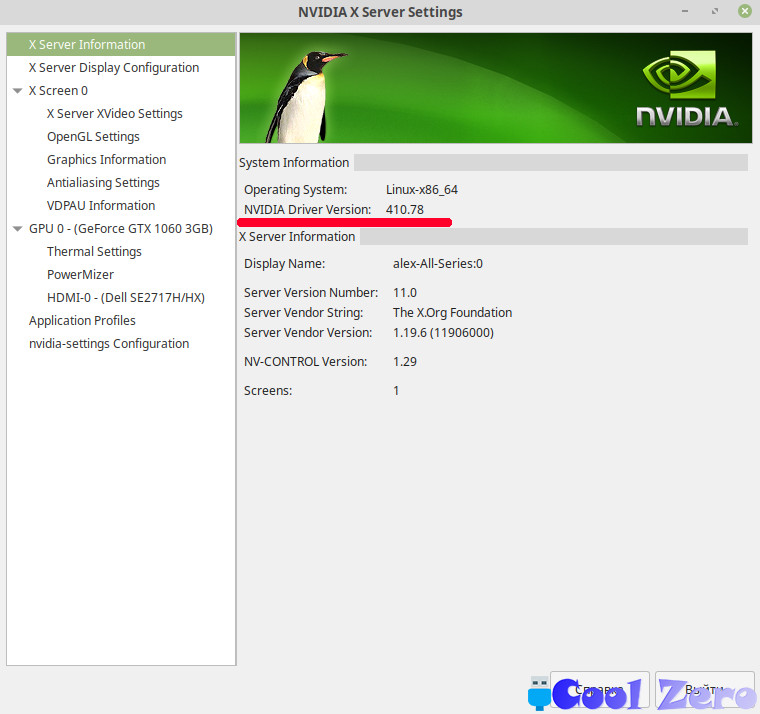
Перезагружаем компьютер, и повторно запускаем менеджер обновлений. Смотрим, что теперь используется ядро системы 4.18.0-13. Повторяем процедуру с драйвера видеокарты. И чудо драйвер видеокарты установился корректно. Чтобы убедиться в этом запускаем «Меню» — «Администрирование» — «NVIDIA X Server Setting» и видим все в порядке.
 NVIDIA X Server Setting
Или в терминале воспользуемся командой:
Вам понравилась статья и есть желание помочь моему проекту, можете пожертвовать на дальнейшее развитие воспользовавшись формой ниже. Или достаточно просто открыть пару баннеров с рекламой, это тоже поможет мне, но и не затруднит Вас.
Источник


