- Установка и настройка оконного менеджера Compiz
- Установка и настройка Compiz
- Создания ярлыков
- Wpilot
- воскресенье, 22 января 2017 г.
- Как включить и настроить compiz в Linux Mint 18.1
- Линукс в школе
- 25 апреля 2016 г.
- Включить оконный менеджер Compiz
- compizomania
- Страницы
- 04 июня 2013
- Как установить Compiz в Linux MInt 15 MATE
- Linux mint compiz настройка
Установка и настройка оконного менеджера Compiz
Compiz это оконный менеджер позволяющий создавать в системе разного рода спецэффекты. Например при закрытии окон они сгорают или при перетаскивании колышутся… Так же Compiz способен разрешить проблему тирринга. Установить Compiz возможно на системы с окружением рабочего стола xfce, mate, lxde. Раньше можно было установить на gnome, пока он не перешел на wayland.
Устанавливать мы будем на debian 10. Но то же самое будет работать и на ubuntu. Нужно будет только установить дополнительно пакет: compizconfig-settings-manager. Чуть ниже приведу два варианта установки для debian и ubuntu. В остальном отличия минимальны. И да, на ubuntu интерфейс программы может немного отличаться. Про установку самого debian 10 написано тут, про настройку тут. А про обновления с debian 9 на debian 10 написано тут. Устанавливать будем через терминал, так как это быстрей и проще чем искать каждый пакет через менеджер приложений.
Установка и настройка Compiz
И так, переходим в терминал и вводим следующую команду:
Ubuntu
Debian


Этой командой мы установим сам compiz и некоторые плагины, которые расширят список эффектов. Когда установка закончится, идем в меню пуск и вводим в поисковой строке слово compiz. Нас интересует: Менеджер настройки CompizConfig.

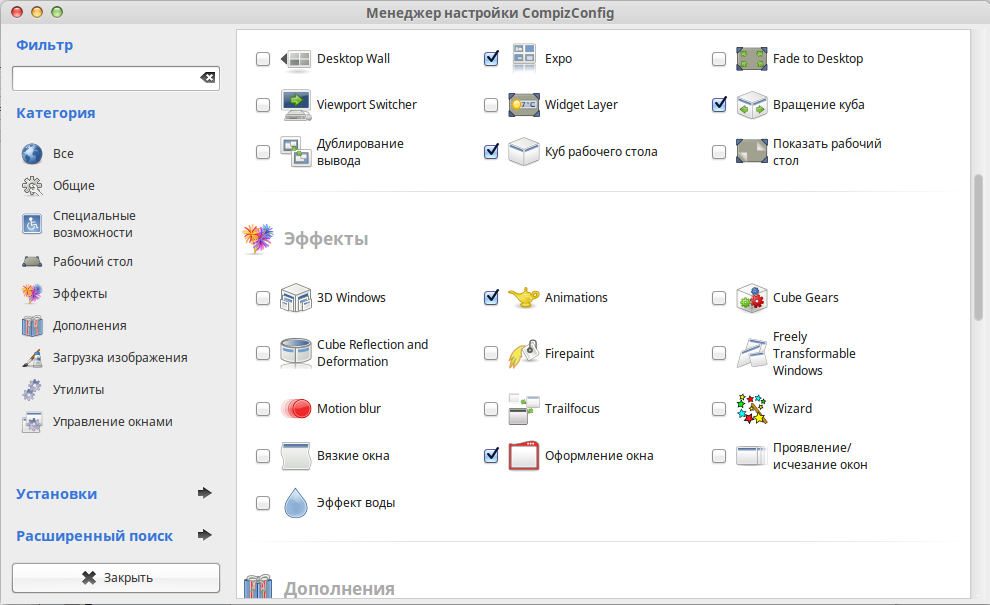
Запускаем его и идем в настройки под названием: Эффекты. Обязательно ставим галочку на пункте: Оформление окна. Так же анимация и анимация дополнительная.

По желанию можно отметить пункты: Вязкие окна, а так же во вкладке: Рабочий стол отметить: Куб рабочего стола.

Теперь можно запустить Compiz. Запускается он в терминале командой:
Возвращаемся к пункту: Анимация, нажимаем на него, и попадаем в настройки. Тут настраиваем как будут везти себя окна при раскрытии, сворачивании и закрытии. Эффекты меняются в строке выделенной синим цветом.

Два раза щелкаем мышкой и появляется список с эффектами, выбираем по своему вкусу. Проходимся по всем вкладкам и настраиваем их.

Создания ярлыков
Теперь можно создать ярлыки запуска и остановки Compiz. Создаются они просто. Нажимаем правой клавишей мыши на рабочем столе операционной системы и выбираем пункт: Создать значок запуска.

Перед нами откроется окно с полями. Тут достаточно заполнить поля: Имя и Команда. В поле имя вписываем: Запуск Compiz, а в поле: Команда

При желании можно задать значок, что бы наша иконка в дальнейшем выделялась. Нажимаем на кнопку создать и на рабочем столе появляется иконка запуска. Запускаем ее и перед нами появится окно где нужно нажать на кнопку: Сделать исполняемым.

Следующим шагом нужно сделать ярлык остановки Compiz. Проделываем то же самое, создаем значок запуска на рабочем столе и заполняем его. Но в строке: Команда нужно указать:

На этом сегодня все. Мы установили и настроили Compiz. Создали для него иконки запуска и остановки. Дальше уже все зависит от ваших предпочтений. Поиграйте с настройками и выберете то что вам по-вкусу.
Источник
Wpilot
воскресенье, 22 января 2017 г.
Как включить и настроить compiz в Linux Mint 18.1
Если вы скачали Linux Mint 18.1 с графической оболочкой MATE то можете увидеть что Compiz установлен и в Control Center вы найдете CompizConfig Settings Manager (Менеджер настройки CompizConfig). Но поиграв с настройками вы обнаружите что эффекты Compiz не работают.

У кого не установлен Compiz выполняем команды в терминале
sudo apt-get install compiz compiz-plugins compizconfig-settings-manager
Далее установим Редактор конфигурации системы и поменяем оконный менеджер
sudo apt-get install dconf-tools
Откройте редактор dconf Editor поочередно открывая вкладки org > mate > desktop > session > required-components в имени windowmanager замените marco на compiz

Настраиваем автоматический запуск Compiz при входе в систему. Открываем Control Center > Startup Applications. В поле Name пишем Compiz а в Command команду compiz —replace
Источник
Линукс в школе
личный опыт внедрения ОС Линукс в образовательный процесс
25 апреля 2016 г.
Включить оконный менеджер Compiz

Для тех кому терминал определил возможность использования Compiz — yes, следующим шагом будет запуск Compiz. Откройте окно Поиск приложений — Alt+F2, введите и выполните команду (нажать Enter или кнопка Запустить):

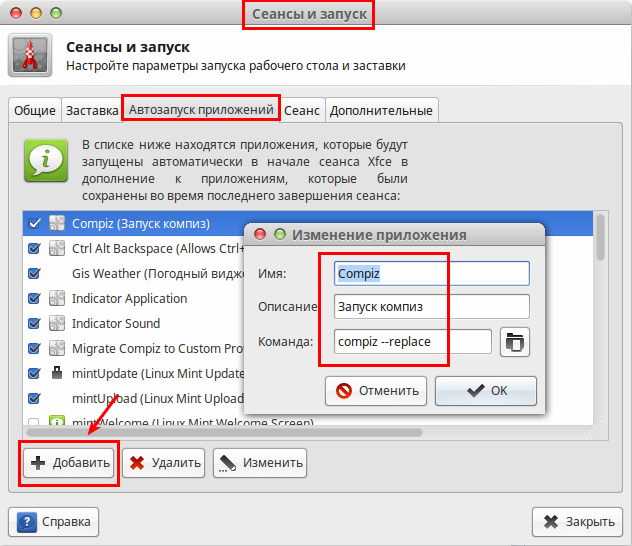
Чтобы Compiz запускался при входе в систему, данную команду необходимо ввести в Автозапуск приложений. Откройте программу Сеансы и запуск, вкладка Автозапуск приложений, нажмите кнопку +Добавить, что низу окна и введите в открывшемся дополнительном окне, как на снимке:
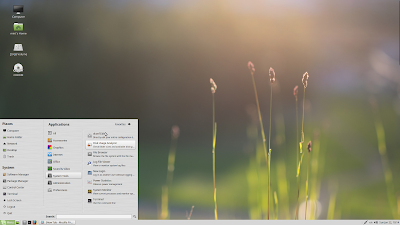
После того как Compiz запущен, вы можете включить дополнительные плагины и различные эффекты в программе Менеджер настройки CompizConfig, которая есть по умолчанию в меню:
Для того чтобы задействовать плагин Куб рабочего стола, прежде всего нужно добавить виртуальные рабочие области. Для этого в Менеджер настройки CompizConfig войдите в Общие настройки, вкладка Размер рабочего стола и выставьте параметры виртуальных размеров: 4 — по горизонтали и 1 — по вертикали, как на снимке:

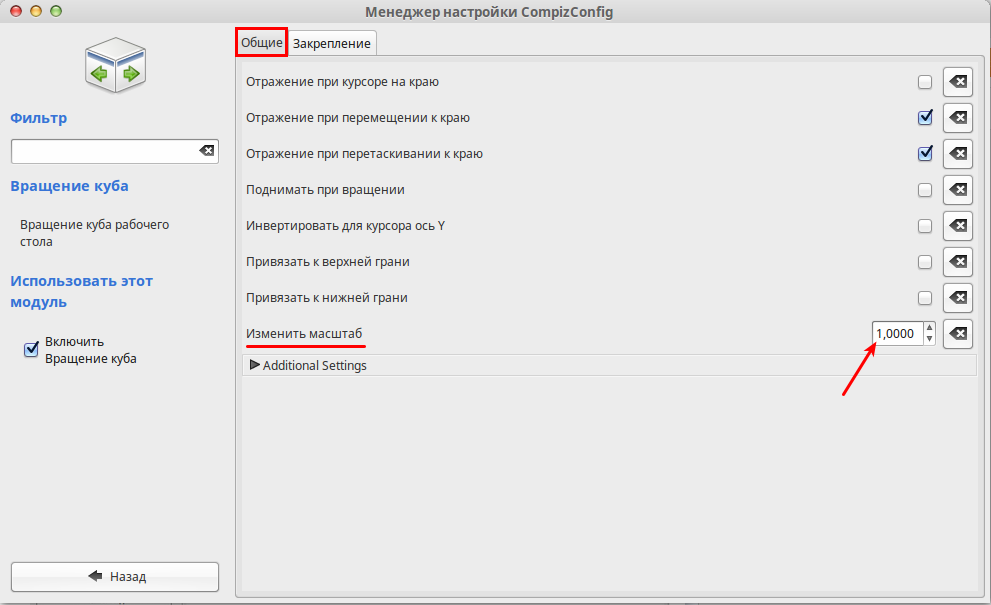
Далее нужно активировать плагин Вращение куба и войти в его настройки для изменения размера вращающегося куба, иначе он будет один к одному с рабочим столом. В параметре Изменить масштаб замените первый ноль на единицу:
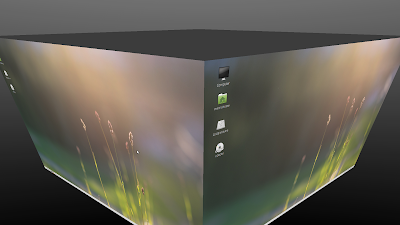
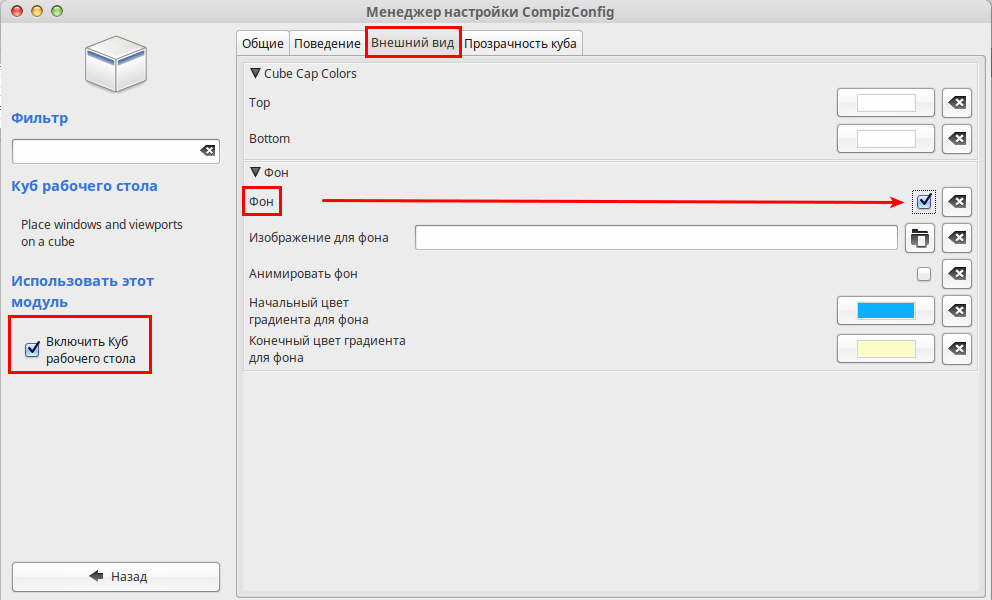
А теперь пробуйте вращать Куб. Одновременно нажмите клавиши Ctrl+Alt+левую кнопку мышки и двигайте мышью в разные стороны (Для ноутбуков одновременно Ctrl+Alt+левую кнопку тачпада и водить пальцем по тачпаду). Куб должен вращаться на чёрном фоне. Для задействования фона с цветовой гаммой по умолчанию, откройте настройки плагина Куб рабочего стола, вкладка Внешний вид и активируйте параметр — Фон:
Вот такой куб получился у меня в системе Linux Mint 17.1 «Rebecca» Xfce:
Источник
compizomania
Азбука в Linux для начинающих и не только. Я знаю только то, что ничего не знаю, но другие не знают и этого. Сократ
Страницы
04 июня 2013
Как установить Compiz в Linux MInt 15 MATE

Для установки оконного менеджера Compiz в рабочее окружение MATE Linux Mint 15 необходимо прежде всего установить пакет Compiz и Менеджер настройки CompizConfig, а также compiz-plugins-extra, если вы захотите в дальнейшем задействовать дополнительные эффекты.
Все эти пакеты есть по умолчанию в Менеджере программ, откуда их можно установить или выполните следующую команду в терминале, которая сделает установку перечисленных пакетов:
apt install compiz compiz-plugins-extra compiz compizconfig-settings-manager
По окончании установки откройте Менеджер настройки CompizConfig: Меню ->Параметры ->Менеджер настройки CompizConfig, где нужно активировать необходимые плагины для корректной работы оконного менеджера, как отмечено на снимках:


Далее необходимо заменить оконный менеджер Marco, который установлен в окружении MATE по умолчанию на Compiz. Для этого нужно установить (если ещё не установлен) Редактор конфигурации системы — dconf-tools, который также имеется по умолчанию в Менеджере программ или выполните команду в терминале:
apt install dconf-tools
Откройте Редактор dconf и прейдите по следующему адресу: org/mate/desktop/session/required-components и в имени windowmanager измените значение с marco на compiz, как показано на снимке:

Или выполните команду в терминале, которая делает то же самое, только быстрее:
gsettings set org.mate.session.required-components windowmanager compiz
Следующим шагом будет запуск Compiz. Откройте окно Выпонить команду Alt+F2, введите и выполните команду:
Чтобы Compiz запускался при входе в систему, данную команду необходимо ввести в Автоматически запускаемые приложения: Меню ->Центр управления ->Запускаемые приложения. В открывшемся окне нажмите кнопку Добавить, в поле Имя введите Compiz, а в поле Команда — compiz —replace:

Чтобы полностью завершить установку Compiz и задействовать его работу, необходимо перезагрузить систему.
Закройте все приложения и выполните команду в терминале:
После очередного входа в систему, вы можете задействовать эффекты Compiz, такие как Куб рабочего стола, Вязкие окна и многие другие. Инструкции по их настройке вы можете посмотреть во вкладке сайта под названием Compiz.
Источник
Linux mint compiz настройка
Thx for the nice tutorial!!
Just successfully made compiz the default window manager again. For my installation (Mint 13 MATE) it is even sufficient to make compiz the default window manager in the MATE conf editor- I didnt even have to add compiz to the startup applications!
BTW: Does anyone know why compiz has been replaced with marco as the default window manager?
Got it all solved.
For those missing title bars, etc. go to ccsm, click ‘Preferences’ towards the bottom, and check ‘Backend’ to see if it is pulling its config from Flat File (mine was, and apparently, that is default.. why? I dunno. )
Change this setting to ‘GSettings Configuration Backend’, which will integrate it to the desktop.
Now on the main screen of ccsm, enable ‘Window Decoration’, ‘Move Window’, ‘Resize Window’, etc.
On compiz —replace, you should have a fully functioning desktop again.
Still looking for the extra effects, if anyone knows how to get them. specifically ‘Cube Deformation and Reflection’.
OK. followed the directions, including activating ‘Window Manager’ under ccsm, AND installing fusion to handle window management.
So far, there is no window management functioning on the system under Compiz. This includes the top bar (close, minimize, etc) as well as being able to drag or resize windows..
Using a fresh install of Mint 14 with Mate (as of like 5 minutes ago + time messing with it), the ccsm that shows up in repo (0.9.8.5), no clue on the fusion version.
Additionally, I cannot seem to find several options that I used to use. specifically Cube Deformation and Reflection, and several other effects plugins. They do not seem to appear at all on SoftWare sources? Am I missing a PPA?
Biggest concern is the Windows Management. without it, I have to go back to Marco. the rest will follow in time.
Yes it works in Mint 14 also. No flickering when turning the cube. 🙂
But I can see another Compiz-problem has appeared on my computer (Acer Aspire One):
The cube gets distorted during the turning. It seems almost like wrinkles at the cube side, or something similar to that.
I can’t find any way to solve it either.. 🙁
Worked in Mate 14 too 🙂
@mpiter
Thanks for your working advice.But Gnome Configuration Editor (gconf-editor), is not installed by default.Must be install separately, and then can be found in System Tools.
I did everything like in this tutorial, but I got problem with compiz. It doesn’t save any options I check.
I am using amd radeon 7770 with additional drivers for it (latest). Could that be a problem?
Thanks
I am having some trouble getting compiz to work. I am new to mint just swiched from using ubuntu.
I followed the above tutorial and nothing happened and I know in ubuntu you sometimes have to log out and back in so I did and then had a flickering screen where I believe compiz and marco?(stock mint manager?) were both running at the same time. I opened a terminal typed compiz —replace and it stops the flickering but my efects do no take place either? I have an nvidia motherbord no graphics card using nvidia recomended drivers. I also followed jse654’s sujestions and they didn’t work unless I didn’t do it right?
pleas help as I am too used to my cube 🙂
Great tutorial. I used it several times for several computers or OS that I tried. I have already given the link to your tutorial in several forums to help people in difficulty with Compiz. Thanks a lot because I would not have thought about replacing marco by compiz in the mateconf-editor.
To change window decoration in Compiz, run the Gnome Configuration Editor. Do not use the Mate Configuration Editor if you run Mate because it will not work. You will find the Editors in the Linux Mint menu «System tools/Configuration Editor». Select the Editor with a grey icon, not the red icon.
In the editor, select «apps/metacity/general/theme» and put any theme value you like for the Window border. For example, I like bit buttons so I choose ClearlooksRE that many people will find ugly but I think it handy.
As you can see, you can build your window border with the variables contained in «apps/metacity/general». For example, I like to have the menu on the left, the Minimize, Maximize, and Close buttons on the right. Furthermore, I like to have the Close button separated from the two others to avoid to accidentally kill a window when I want to maximize it. So I set the «button_layout» variable to «menu:minimize,maximize,spacer,close» without the quotes. Good luck.
A Compiz version without the flickering bug has been provided in a PPA. Unfortunately, a newer Compiz version with the bug back has recently been placed in the Ubuntu software tree. As a consequence, any system update will select the new Compiz version instead of the PPA one. So the solution to get rid of the flickering bug is to add the PPA to the software sources, to force the PPA Compiz version installation, and to block any Compiz update. With the Compiz update blocked, it becomes the user task to manually check when a new Compiz version will be available. Keep the 23th of August in mind, something may come out that day or soon after.
The solution I am going to summarize comes from https://bugs.launchpad.net/ubuntu/+source/compiz/+bug/862430.
sudo add-apt-repository ppa:vanvugt/compiz-preproposed
sudo aptitude update
apt-cache show compiz | grep Version: | awk ‘< print $2 >‘ # to identify
# the name of the preproposed version if you have doubts
sudo aptitude install compiz=1:0.9.7.8-0ubuntu1vvpreproposed2 compiz-core=1:0.9.7.8-0ubuntu1vvpreproposed2 compiz-gnome=1:0.9.7.8-0ubuntu1vvpreproposed2 compiz-plugins=1:0.9.7.8-0ubuntu1vvpreproposed2 compiz-plugins=1:0.9.7.8-0ubuntu1vvpreproposed2 compiz-plugins-default=1:0.9.7.8-0ubuntu1vvpreproposed2 libdecoration0=1:0.9.7.8-0ubuntu1vvpreproposed2
compiz —replace
To block Compiz updates, go into your update manager, right-click each Compiz package, and ask to block the package update. This will update the /etc/linuxmint/mintupdate.ignored file.
If you have an Nvidia card, more bugs will be triggered by the fix, but on my laptop with an Nvidia Quadro FX 1800M, Compiz is pleasant again. I am happier with the PPA version.
The flickering and the rotate with window bugs (SHIFT+CTRL+ALT+[left/right]arrow) are known, fixed, and committed. The fix has not been included in the last Compiz releases because it triggered new bugs. See https://bugs.launchpad.net/ubuntu/+source/compiz/+bug/862430 for the bug description and https://bugs.launchpad.net/compiz/+bugs?field.tag=compiz-r3110-regression for the list of bugs triggered by the fix. The Compiz team decided that too many bugs were generated by the fix to distribute it. Since most of those bugs have already been fixed, they plan to distribute the correction in Compiz 0.9.8 with Ubuntu 12.10. If we are very lucky, the fix might be included in Compiz 0.9.7.10 planned for the 23th of August, but I am not sure whether it will be done before Ubuntu 12.10. The fix is however available in a PPA. I will explain how to install it in another post.
Great tutorial,but I stuck with ‘AgingGorilla’ window boarder. Changes simply not apply. Any solution?
Great:-) I just followed this tutorial and compiz is working flawlessly
Recently it was an Compiz update which I expected much from. However I have to report it didn’t solve the flickering problem at all. 🙁
Great Tutorial. could not have done it without this!
However.
One problem I’m having is that when fade back using expo, the movement of windows from one desktop to another is incredibly glitchy, they may move or not, and sometimes wholes windows disappear. The same is true when I try to move with ctrl-alt-arrow on the desktop wall. Somtimes it works, mostly it is glitchy and the window remains on the previous desktop. With some trial and error I have determined that this can be fixed if the Place Windows is disabled in Compiz. this is a rather unfortunate workaround though, as windows now are placed behind the panel. Any help or suggestions?
Thanks so much!
Hi tux-sven and thank you for a great post (with the help of jse654, and kazztan0325 idea about the icon), it basically works. Since I’m new to Mint, I kind of do not understand why «Gnome Compatibility» does nothing about ALT-F1 and ALT-F2 shortcuts — they still do not work under Compiz.
Another quite annoying thing is about window borders — they do present, but turn in to something not too pleasant to look at.
Do you know any workarounds?
PS After changing window manager to Compiz, I had manually to add ALT-CTRL-T shortcut in order to start Terminal, althought it’s already there in Marco.
PPS It’s fun to set under Desktop Cube — Transparent Cube — Opacity During Rotation to let’s say 50,000.
Install Compiz Fusion Icon and try to manage Window Decorations from there.
Источник


