- ⚙️ 8 способов проверить тактовую частоту процессора на Linux
- 1. Использование lscpu
- 2. Использование Dmesg
- 3. Из файла /proc/cpuinfo
- 4. Использование i7z
- 5. Использование hwinfo
- 6. Использование auto-cpufreq
- 7. Использование dmidecode
- 8. Использование скрипта Inxi
- Заключение
- One thought on “ ⚙️ 8 способов проверить тактовую частоту процессора на Linux ”
- How to find fan speed in Linux for CPU and GPU
- How to find fan speed in Linux
- How to install lm-sensors
- CentOS/RHEL/Oracle Linux
- Fedora Linux
- Debian/Ubuntu/Mint Linux
- OpenSuse/Suse Linux
- Arch Linux
- Setup and configuration
- Display fan speed and other info
- Graphical front-ends
- Other GUI options
- Conclusion
- 9 Commands to Check CPU Information on Linux
- CPU hardware information
- 1. /proc/cpuinfo
- 2. lscpu — display information about the CPU architecture
- 3. hardinfo
- 4. lshw
- 5. nproc
- 6. dmidecode
- 7. cpuid
- 8. inxi
- 9. Hwinfo
- Conclusion
- 15 thoughts on “ 9 Commands to Check CPU Information on Linux ”
- Частота процессора в Linux
- Как узнать частоту процессора Linux
- Управление частотой в Linux
- Выводы
⚙️ 8 способов проверить тактовую частоту процессора на Linux

Тактовая частота процессора определяет, насколько быстро ваш процессор может обрабатывать инструкции каждую секунду.
Он измеряет количество циклов, которое может выполнить ваш процессор, в ГГц или МГц.
Поскольку невозможно увеличить тактовую частоту сверх предела, были введены многоядерные процессоры.
В Linux, чтобы проверить скорость ЦП, вам нужно получить сведения о процессоре, и существуют различные инструменты для получения информации о ЦП.
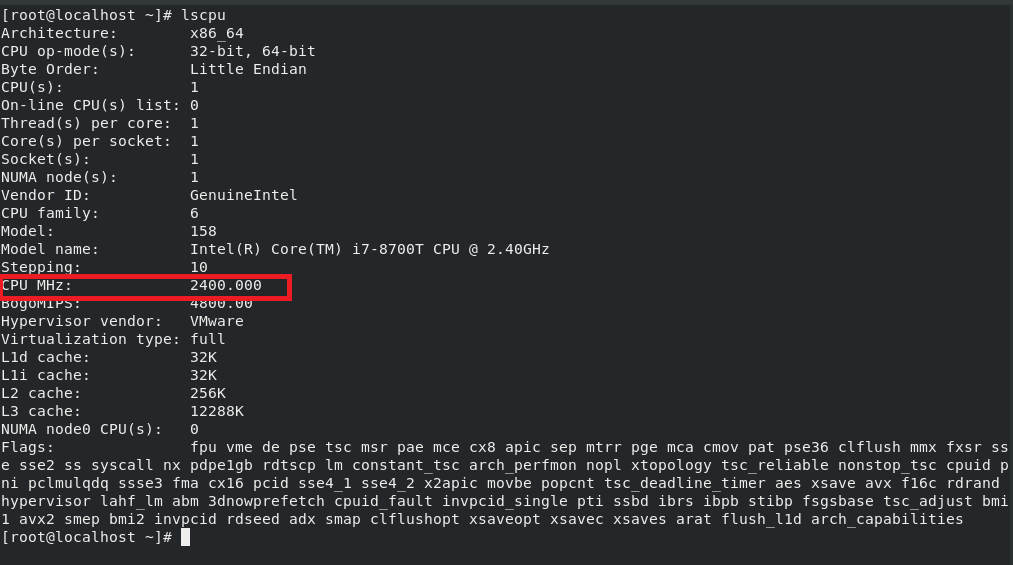
1. Использование lscpu
Lscpu – это команда, используемая в Linux для отображения информации об архитектуре ЦП.
Эта команда является частью пакета util-linux.
Запустите команду lscpu, и в поле «CPU MHz» отобразится скорость процессора:
2. Использование Dmesg
Dmesg – это команда, используемая в Linux для отображения сообщений из кольцевого буфера ядра и выгружаемых в /var/log/messages.
Мы можем отфильтровать вывод Dmesg с помощью команды grep, чтобы узнать скорость процессора:
3. Из файла /proc/cpuinfo
Системный файл /proc/cpuinfo указывает индивидуальную скорость для каждого ядра процессора.
4. Использование i7z
I7z – это специальный инструмент для процессоров на базе Intel i3, i5 и i7 для отображения состояния процессора.
Выполните команду sudo i7z, чтобы получить следующий результат:
5. Использование hwinfo
Команда Hwinfo используется в Linux для вывода подробной информации о каждом устройстве.
Выполните следующую команду, чтобы узнать скорость процессора:
[cope] $ sudo hwinfo –cpu [/code]
6. Использование auto-cpufreq
Auto-cpufreq – это современный инструмент для автоматической оптимизации скорости и мощности процессора на платформе Linux.
Он активно отслеживает состояние батареи ноутбука, использование ЦП и загрузку системы для оптимизации скорости ЦП и энергопотребления.
7. Использование dmidecode
Dmidecode – это команда, используемая в Linux для предоставления подробной информации об аппаратных компонентах системы, таких как процессор, модули DIMM, BIOS и т. д., в удобочитаемом формате.
Чтобы вывести скорость процессора, запустите:
8. Использование скрипта Inxi
Inxi – это многофункциональный и мощный скрипт для вывода информации об оборудовании системы в Linux.
Запустите команду inxi с параметром -C, чтобы вывести информацию о процессоре:
Заключение
В этой статье мы рассмотрели различные команды для получения информации о скорости процессора в ОС Linux.
Пожалуйста, оставьте свой отзыв в разделе комментариев ниже.
One thought on “ ⚙️ 8 способов проверить тактовую частоту процессора на Linux ”
Системный монитор или программа top показывают относительную загруженность центрального процессора. Иногда нужно (или просто хочется) посмотреть частоту CPU в данный момент. В этой заметке я расскажу, как узнать, на какой частоте работает процессор в Linux, а также другие его характеристики, такие как температуру и напряжение.
Источник
How to find fan speed in Linux for CPU and GPU
How to find fan speed in Linux
The procedure to find fan speed on Linux is as follows:
- First, install lm-sensors package using package manager.
- Configure sensors by running sudo sensors-detect command.
- Save the configuration file
- Finally, run sensors command in Linux to see CPU and GPU temperature, including fan speed.
Let us see all commands and examples in details.
How to install lm-sensors
Type commands as per your Linux distro.
CentOS/RHEL/Oracle Linux
Use yum command as follows:
sudo yum install lm_sensors
Sample outputs:
Fedora Linux
Type dnf command:
sudo dnf install lm_sensors
Debian/Ubuntu/Mint Linux
Execute apt command/apt-get command:
sudo apt-get install lm-sensors
OpenSuse/Suse Linux
Type the following zypper command:
sudo zypper in sensors
Sample outputs:
- No ads and tracking
- In-depth guides for developers and sysadmins at Opensourceflare✨
- Join my Patreon to support independent content creators and start reading latest guides:
- How to set up Redis sentinel cluster on Ubuntu or Debian Linux
- How To Set Up SSH Keys With YubiKey as two-factor authentication (U2F/FIDO2)
- How to set up Mariadb Galera cluster on Ubuntu or Debian Linux
- A podman tutorial for beginners – part I (run Linux containers without Docker and in daemonless mode)
- How to protect Linux against rogue USB devices using USBGuard
Join Patreon ➔
Arch Linux
Execute pacman command:
sudo pacman -S lm_sensors
Setup and configuration
Now, that lm-sensors installed, it is time to run sensors-detect command to detect and generate a list of kernel modules.
sudo sensors-detect
Now, hardware probing should start. Hence, press the [Enter] key to all questions to create /etc/sensors3.conf file. This file used to load Linux kernel modules and start service automatically at boot time. Display /etc/sensors3.conf using the cat command:
cat /etc/sensors3.conf
Sample outputs:
Display fan speed and other info
Type:
sensors
You can use the grep command to filter out data:
sensors | grep -i fan
Our final example includes the watch command that displays fan speed on screen:
watch -n1 -d sensors
watch -n1 -d ‘sensors | grep fan’
watch -n1 -d ‘sensors | egrep «fan|temp» | grep -v «0.0»‘
Graphical front-ends
Run sensors command repeatedly, and show info on screen
Using GUI tool to show sensor data such as fan speed, GPU/CPU temp and more in Linux
xsenors in actions showing wifi, gpu, cpu, fan, battary and other info
Other GUI options
- Grab GNOME Sensors Applet
- Download KDE Thermal Monitor (Plasma 5 applet)
- Xfce4 panel plugin
- MATE Sensors Applet
- LXPanel plugin
Conclusion
You learned how to monitor temperatures and fan speed. For more information see lm-sensors home page here.
🐧 Get the latest tutorials on Linux, Open Source & DevOps via
Источник
9 Commands to Check CPU Information on Linux
CPU hardware information
The cpu information includes details about the processor, like the architecture, vendor name, model, number of cores, speed of each core etc.
There are quite a few commands on linux to get those details about the cpu.
In this post we shall take a look at some of the commonly used commands that can be used to get details about the cpu.
1. /proc/cpuinfo
The /proc/cpuinfo file contains details about individual cpu cores.
Output its contents with less or cat.
Every processor or core is listed separately the various details about speed, cache size and model name are included in the description.
To count the number of processing units use grep with wc
To get the actual number of cores, check the core id for unique values
So there are 4 different core ids. This indicates that there are 4 actual cores.
2. lscpu — display information about the CPU architecture
lscpu is a small and quick command that does not need any options. It would simply print the cpu hardware details in a user-friendly format.
3. hardinfo
Hardinfo is a gtk based gui tool that generates reports about various hardware components. But it can also run from the command line only if there is no gui display available.
It would produce a large report about many hardware parts, by reading files from the /proc directory. The cpu information is towards the beginning of the report. The report can also be written to a text file.
Hardinfo also performs a few benchmark tests taking a few minutes before the report is displayed.
4. lshw
The lshw command can display limited information about the cpu. lshw by default shows information about various hardware parts, and the ‘-class’ option can be used to pickup information about a specific hardware part.
The vendor, model and speed of the processor are being shown correctly. However it is not possible to deduce the number of cores on the processor from the above output.
5. nproc
The nproc command just prints out the number of processing units available. Note that the number of processing units might not always be the same as number of cores.
6. dmidecode
The dmidecode command displays some information about the cpu, which includes the socket type, vendor name and various flags.
7. cpuid
The cpuid command fetches CPUID information about Intel and AMD x86 processors.
The program can be installed with apt on ubuntu
And here is sample output
8. inxi
Inxi is a script that uses other programs to generate a well structured easy to read report about various hardware components on the system. Check out the full tutorial on inxi.
Print out cpu/processor related information
To learn more about the inxi command and its usage check out this post:
Inxi is an amazing tool to check hardware information on Linux
9. Hwinfo
The hwinfo command is a hardware information program that can be used to collect details about various hardware components on a Linux system.
It also displays information about the processor. Here is a quick example:
If you don’t use the «—short» option it will display much more information about each cpu core like architecture and processor features.
To learn more about the hwinfo command check this post:
Check hardware information on Linux with hwinfo command
Conclusion
Those were some of the commands to check CPU information on Linux based systems like Ubuntu, Fedora, Debian, CentOS etc.
For some more command examples on checking cpu information check this post:
How to Check Processor and CPU Details on Linux — Command Examples
Most of the commands are command line based and show text output. For a GUI interface use the program called Hardinfo.
It shows hardware details about various components in a easy to use GUI interface.
If you know of any other useful command that can display information about the CPU, let us know in the comments below.
A Tech Enthusiast, Blogger, Linux Fan and a Software Developer. Writes about Computer hardware, Linux and Open Source software and coding in Python, Php and Javascript. He can be reached at [email protected] .
15 thoughts on “ 9 Commands to Check CPU Information on Linux ”
Very nicely explained. I highly recommend it in my articles. thank you.
Thank you for the information, i learn lot in this article. 🙂
Thanks for the Information.
Hi everybody, someone know how to get same information regarding the hardware where I installed a phisical linux ?
Thank you for sharing, it helping lot.
lshw now (DISTRIB_DESCRIPTION=”Linux Mint 17.3 Rosa”) includes a line like below at the bottom of it’s listing:
configuration: cores=4 enabledcores=4 threads=8
How to get the number of real cores, not HiperThreading.
For example, for i7, real cores are 4, but logical are 8. There is some way without root ?
check this post for commands to check the number of real cores.
https://www.binarytides.com/linux-check-processor/
are we still catting into grep?
grep ‘core id’ /proc/cpuinfo
yo Silver Moon, nice write-up bro. absolutelly useful stuff there, though the number of CPUs can be fetched using just ‘grep -c processor /proc/cpuinfo’. take care 🙂
Thank you for the helpful information. You can not look for “unique values” with the “cat /proc/cpuinfo |grep ‘core id’” command on a multiprocessor system. The situation gets even worse with hyperthreading enabled CPU’s.
Источник
Частота процессора в Linux
Если вы уже пытались настраивать частоту Linux, то, наверное уже заметили, что частота процессора сама меняется в зависимости от нагрузки на систему. Операционная система устанавливает лимит минимальной и максимальной частоты, и когда нагрузки нет частота автоматически опускается до минимальной, а при появлении нагрузки подымается назад.
Конечно, в интерфейсе BIOS можно зафиксировать частоту на одном уровне, но в этом нет смысла. С точки зрения баланса производительности и энергопотребления лучше оставить всё как есть. Но правила изменения частоты можно настроить. Для этого используются политики CPU Governor. В этой статье мы рассмотрим как узнать частоту процессора Linux, а также как настроить её изменение.
Как узнать частоту процессора Linux
Узнать текущую частоту процессора можно вместе с другой информацией о нём с помощью утилиты lscpu:

Здесь же выводится максимальная и минимальная частота. Текущую частоту для каждого ядра по отдельности вы можете посмотреть в файле /proc/cpuinfo:

Так можно вывести информацию обо всех ядрах на одном экране:
cat /proc/cpuinfo | grep «cpu MHz»

Утилита lshw тоже выводит текущую и максимальную частоту в секции cpu:

Ну и hwinfo выводит нужную нам информацию. Правда, прежде надо её установить:
sudo apt install hwinfo
hwinfo —short —cpu

Если вы хотите отслеживать как меняется частота со временем используйте hwinfo в сочетании с утилитой watch:
watch hwinfo —short —cpu

Теперь вы знаете как посмотреть частоту процессора Linux, перейдём к управлению.
Управление частотой в Linux
Для управления частотой в операционной системе Linux используются политики CPU Governor. Они определяют как быстро будет изменятся частота при изменении нагрузки. Существует четыре политики:
- powersave — процессор работает на минимальной частоте;
- performance — процессор работает на максимальной частоте;
- ondemand — динамическое изменение частоты, при появлении нагрузки резко устанавливается самая высокая частота, а при снижении нагрузки частота медленно снижается;
- conservative — аналогично ondemand, только частота меняется более плавно;
- userspace — использовать частоту заданную пользователем;
- schedutil — изменение частоты на основе планировщика.
Самый выгодный в данном случае режим — это ondemand, частота повышается при необходимости и опускается если она не нужна. Чтобы посмотреть текущую политику управления частотой вам понадобится утилита cpupower, которую можно установить, установив этот пакет:
sudo apt install linux-tools-generic
Затем посмотрите информацию о процессоре:

Как видите, сейчас для управления частотой используется политика ondemand. Для установки политики используйте команду frequency-set и опцию -g. Например, для performance:
sudo cpupower frequency-set -g performance

Теперь частота гораздо выше, а используемая политика performance. Для того чтобы вручную менять частоту установите политику userspace:
sudo cpupower frequency-set -g userspace
Для установки максимальной частоты используйте опцию -u:
sudo cpupower frequency-set -u 3600Mhz
Для установки минимальной частоты — опцию -d:
sudo cpupower frequency-set -d 2300Mhz
А для изменения текущей частоты процессора — опцию -f:
sudo cpupower frequency-set -f 3500Mhz

Частота всё-равно будет немного колебаться, но эти колебания будут в пределах выбранного диапазона.
Все эти изменения сбрасываются после перезагрузки, поэтому если вы хотите чтобы всё сохранялось, придется создать скрипт с нужными командами и добавить его в автозагрузку.
Если вы любите пользоваться графическим интерфейсом вместо команд, вам понравится утилита cpupower-gui. Она позволяет настроить все необходимые параметры в графическом интерфейсе. Для её установки выполните:
sudo apt install cpupower-gui
Для установки самой последней версии выполните такие команды:
echo ‘deb http://download.opensuse.org/repositories/home:/erigas:/cpupower-gui/xUbuntu_20.04/ /’ | sudo tee /etc/apt/sources.list.d/home:erigas:cpupower-gui.list
curl -fsSL https://download.opensuse.org/repositories/home:erigas:cpupower-gui/xUbuntu_20.04/Release.key | gpg —dearmor | sudo tee /etc/apt/trusted.gpg.d/home:erigas:cpupower-gui.gpg > /dev/null
sudo apt update
sudo apt install cpupower-gui
После завершения установки вы сможете найти программу в главном меню. Её окно выглядит вот так:

Утилита позволяет настроить максимальную и минимальную частоту, а также политику для каждого ядра по отдельности или для всех ядер вместе. Просто выберите нужные значения и нажмите кнопку Apply.
В отличие от консольных команд утилита позволяет устанавливать необходимые вам значения профиля и частоты при старте программы. Для этого в программе есть два профиля Balanced и Performance. Первый использует политику Powersave, а второй — Performance. Для того чтобы выбрать профиль по умолчанию надо отредактировать конфигурационный файл /etc/cpupower_gui.conf:
sudo vi /etc/cpupower_gui.conf

Измените значение параметра Profile на нужное и этот профиль будет выбираться по умолчанию при старте программы, останется только добавить её в автозагрузку. Кроме этих двух профилей можно создавать свои в папке /etc/cpupower_gui.d/. В этой папке уже лежит пример профиля, но рассматривать этот процесс подробнее мы не будем.
Выводы
В этой небольшой статье мы рассмотрели как меняется частота процессора Linux, как её настроить и зачем это необходимо.
Источник


