- Загрузочная USB флешка с Linux Mint
- Создание загрузочной флешки из системы Windows
- Создание агрузочной флешки с Linux Mint с помощью Rufus
- Создание агрузочной флешки с Linux Mint с помощью UNetbootin
- Create the bootable media
- How to make a bootable USB stick
- In Linux Mint
- In Windows, Mac OS, or other Linux distributions
- How to make a bootable DVD
- In Linux
- In Windows
- In Mac OS
- Создание загрузочного носителя
- Как сделать загрузочный USB-накопитель
- В Linux Mint
- В Windows, Mac OS, или других дистрибутивах LInux
- Как сделать загрузочный DVD
- В Linux
- В Windows
- В Mac OS
- Make a bootable flash drive from an ISO image
- How To Install Linux Mint 18 From a USB Flash Drive
- Download the ISO
- Write The ISO to a Flash Drive: Windows Instructions
- Write The ISO to a Flash Drive: Linux and OS X Instructions
- Install From USB Flash Drive To a Computer
- Conclusion
Загрузочная USB флешка с Linux Mint

Загрузочная флешка с Linux Mint может понадобиться для установки системы на компьютер или для знакомства с ней в режиме Live. Для начала, вам необходимо скачать образ Линукс Минт с нашего сайта, а затем выполнить несложную последовательность действий, которая описана в этой статье.
Создание загрузочной флешки из системы Windows
Если у вас на компьютере установлена Windows 7, 8 или 10, то вам необходимо скачать специальную программу. Здесь нужно отталкиваться от конечных целей и куда вы будете устанавливать систему. Если у вас новые компьютеры с UEFI, то нужно скачивать программу Rufus. Если у вас более старое железо, то достаточно будет программы UNetbootin. Давайте рассмотрим нюансы работы с каждой из программ.
Создание агрузочной флешки с Linux Mint с помощью Rufus
Подключите флешку к компьютеру, удалите с нее всю информацию и запустите программу Rufus. Перед вами появится вот такое окно:

Сначала укажите путь к iso образу на вашем жестком диске, а затем выберите схему раздела «GPT для компьютеров с UEFI». Остальные настройки программы можно оставить по умолчанию и нажать на кнопку «старт». Дождитесь окночания записи образа на флешку и закройте окно программы.
Создание агрузочной флешки с Linux Mint с помощью UNetbootin
Программа UNetbootin существует как для системы Windows, так и для Linux Mint. Подключите флешку к компьютеру, удалите с нее всю информацию и запустите программу. Перед вами появится вот такое окно:

Укажите путь к образу Линукс Минт на вашем компьютере и выберите носитель, на который данный образ будет записан. Нажмите на кнопку «ок» и дождитесь окончания записи.
Как видите, записать Linux Mint на флешку очень просто, а чтобы загрузиться с нее, нужно в биосе выставить приоритет загрузки со съемных носителей. Полученная установочная флешка сможет запускаться не только на вашем компьютере, но и на компьютерах ваших друзей и вы сможете познакомить их с нашей замечательной операционной системой. Если у вас возникнут вопросы, то задавайте их на нашем форуме.
Источник
Create the bootable media
The easiest way to install Linux Mint is with a USB stick.
If you cannot boot from USB, you can use a blank DVD.
How to make a bootable USB stick
In Linux Mint
Right-click the ISO file and select Make Bootable USB Stick , or launch Menu ‣ Accessories ‣ USB Image Writer .

Select your USB device and click Write .
In Windows, Mac OS, or other Linux distributions
Download Etcher, install it and run it.

Click Select image and select your ISO file.
Click Select drive and select your USB stick.
How to make a bootable DVD
Optical discs are slow and burning to disc is prone to errors.
To prevent issues, burn at the lowest possible speed.
Burn the content of the ISO onto the DVD, not the ISO file itself. When finished, your DVD should contain directories such as boot and casper , it shouldn’t be an empty DVD containing an .iso file.
In Linux
Install and use xfburn .
In Windows
Right-click the ISO file and select Burn disk image .
To make sure the ISO was burned without any errors, select Verify disc after burning .
In Mac OS
Right-click the ISO file and select Burn Disk Image to Disc .
© Copyright 2017, Linux Mint Revision 11740971 .
Источник
Создание загрузочного носителя
Проще всего установить Linux Mint с USB-накопителя.
Если нет возможности загрузиться с USB, вы можете использовать пустой DVD.
Как сделать загрузочный USB-накопитель
В Linux Mint
Кликните правой клавишей мыши по ISO-файлу и выберите Создание загрузочного USB-накопителя , или запустите Меню –> Стандартные –> Запись образа на USB-накопитель .
Выберите Ваше USB-устройство и нажмите Записать .
В Windows, Mac OS, или других дистрибутивах LInux
Загрузите Etcher, установите и запустите его.
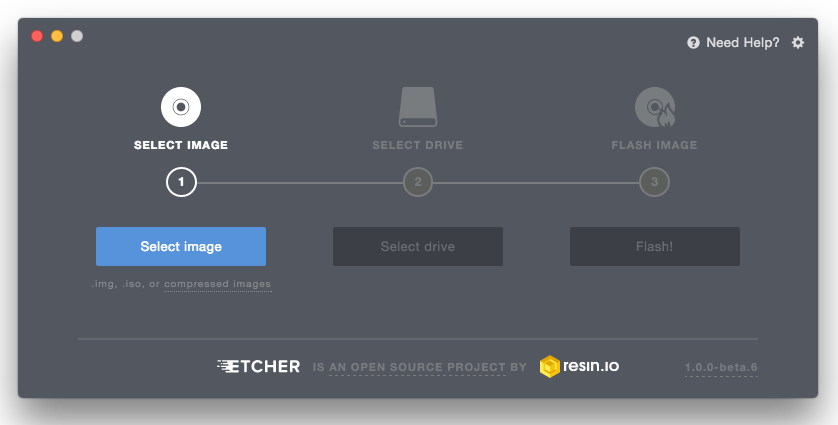
Нажмите Select image и выберите Ваш ISO-файл.
Нажмите Select drive и выберите Ваш USB-накопитель.
Как сделать загрузочный DVD
Оптические диски медленны и запись на диск может сопровождаться ошибками.
Чтоб избежать проблем, записывайте на минимально возможной скорости
Записывайте содержимое ISO на dvd, а не сам ISO-файл. По завершению, Ваш DVD должен содержать директории такие как boot и casper , он не должен быть пустым DVD сожержащим .iso-файл.
В Linux
Установите и используйте xfburn .
В Windows
Кликните правой клавишей мыши на ISO-файле и выберите Записать образ диска .
Чтоб убедиться, что ISO записан без каких-либо ошибок, выберите Проверить диск после записи .
В Mac OS
Кликните правой клавишей мыши на ISO-файле и выберите Записать образ на диск .
© Copyright 2017, Linux Mint Revision 11740971 .
Источник
Make a bootable flash drive from an ISO image

We all know that installing an operating system from a USB drive is much faster than installing from DVD. In this article we will look at several ways to create a bootable USB drive.
Before describing how to create a bootable USB drive read the article How to correctly format the USB stick in Linux Mint. In some cases described below, it is desirable to have already formatted the USB flash drive in FAT32 format.
1. LinuxLive USB Creator (only for Windows users)
If you are a user of the Windows operating system and want to make a bootable USB flash drive with a Linux distribution – this program is for you.
It is very simple, select the USB flash drive, please specify the iso image will be copied, turn on the option to format the USB stick and click on the lightning.
You can download the program on the official developer’s website http://www.linuxliveusb.com/en/download.

Rufus is a utility that helps format and create bootable Flash/Pen/Key drives, memory cards, etc.
Rufus will be especially useful in cases where:
-you need to create a bootable USB disk from a bootable ISO image (Windows, Linux, UEFI, and others)
-need to work on systems that have no OS installed
-you need to flash a BIOS or other firmware from DOS
-you need to run a low-level utility
-Despite its small size, Rufus knows how to do everything!

3. UNetbootin (for Linux, Windows, Mac users)
A very common program. The principle of operation is the same as the previous program. Select the image, select the flash drive, and click OK. For details, see the screenshots below.
Installation latest version into Linux Mint 14/15/16/17/17.1:


4. LiveUSB MultiSystem (for Linux users) -To create a bootable USB flash drive with multiple operating systems (windows or linux) read article Create your LiveUSB MultiBoot very simple in Linux Mint.
5. Either – program to burn the iso image with the distro on a USB flash drive or micro SD card (Windows, MacOS and Linux) read article Either – program to record the iso image on a USB flash drive
6. YUMI – Multiboot USB Creator (for Linux, Windows users)
YUMI (Your Universal Multiboot Integrator), is the successor to our MultibootISOs. It can be used to create a Multiboot USB Flash Drive containing multiple operating systems, antivirus utilities, disc cloning, diagnostic tools, and more. Contrary to MultiBootISOs which used grub to boot ISO files directly from USB, YUMI uses syslinux to boot extracted distributions stored on the USB device, and reverts to using grub toBoot Multiple ISO files from USB, if necessary.
Important Note : YUMI was intended to be used to try to run various “LIVE Linux” Operating Systems from USB. Installing Linux from the YUMI created USB Drive to a Hard Drive is not officially supported. If the installer portion of any Live Linux distro does work, consider it a bonus.
Installation latest version into Linux Mint 14/15/16/17/17.1:
Download DEB package “YUMI for Ubuntu Linux” from website

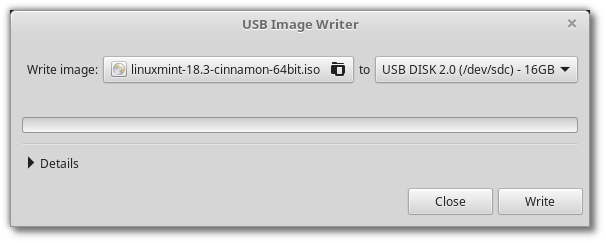
7. USB image writer (for Linux users)
Linux Mint have default utility USB image writer. One time I used this program, but personally I have not always made a bootable USB flash drive.
Locate menu, the program will run. Select the image, select the USB drive and click Write.


Multiboot USB flash drive designed for loading and installing operating systems Windows/Linux and restoration-resuscitation tools directly from the USB drive.
9. WinUSB – Create Windows Usb stick
is a simple tool that allows you to create your own Windows installation on USB stick from an ISO image or DVD disk in Linux Mint.
10. Using the terminal (in my opinion the best 100% of the way)
As is known, the terminal is installed in any Linux distribution by default, so install additional software is not required.
The terminal command to write the iso image, the distribution is as follows:
Where instead of /home/USER/linuxmint.iso you need to specify the path to the iso file. sdb in the end, it’s a stick on which is written the way.
To determine your flash drive, run in terminal:

And if you stick decided differently, change in the command.
To be entered correctly in the command path to the file, open the folder with the file, open next to the terminal and drag the file into the terminal:

Now we are ready to start. I got the command:
The cursor of the terminal is blinking and it seems that nothing happens, but actually being recorded. Wait for the image capture and at the end you should see in the terminal like this:
Источник
How To Install Linux Mint 18 From a USB Flash Drive
Linux Mint is a popular Ubuntu-based Linux Distribution that aims for an easy desktop usage experience, from installation to day-to-day work. There are two Desktop Environment choices, MATE and Cinnamon. Linux Mint 18, code-named «Sarah», was released on June 30, 2016. This article will explain how to get Linux Mint 18 onto a USB Flash Drive (4GB Minimum), using either Linux, Windows, or Mac.
Download the ISO
Obtain the Linux Mint 18 ISO from the Official Download Page. The Cinnamon 64-bit edition is recommended, unless the computer’s CPU is relatively old, made earlier than 2010.
Write The ISO to a Flash Drive: Windows Instructions
Download and run the Universal USB Installer, an open source software for Windows that writes image files to USB Drives.
The process is rather straightforward:
- Choose «Linux Mint» as the Linux distribution
- Pick the Linux Mint ISO that was downloaded
- Show where the Flash Drive is (WARNING: all previous data on the drive will be lost)
After the imaging process is finished, you should now have a bootable flash drive from which you can install Linux Mint.
Write The ISO to a Flash Drive: Linux and OS X Instructions
The flash drive is easy to build on Linux and OS X, since the «dd» tool comes preinstalled with the system, and is a command-line tool.
WARNING: If given the wrong device file in the «of» argument, this has the potential to unintentionally reformat your hard disk.
Run the dd command as root. The usage format:
Install From USB Flash Drive To a Computer
Make sure the computer is turned off, then plug in your flash drive. Turn on the computer and have your computer boot the flash drive. You may need to reconfigure the BIOS or UEFI for this.

When the Flash Drive is loaded, select «Start Linux Mint» from the menu that will appear.

The Linux Mint desktop will load.
Launch the install by double-clicking on «Install Linux Mint».

Choose whatever language you want the installation to be in.

Check this box if you want to be able to play MP3s and other file formats out of the box. This option is made available for users who wish to have no proprietary software on their machines.

«Erase disk and install Linux Mint» should be the choice for beginners who already have backed up important data from the computer. Dual-booting can also be an option if another Operating System is installed on the computer, but is not covered by this tutorial.

Confirm installation type.

Set the timezone and location that Linux Mint should configure for.

If you have custom keyboard layouts, this is where to set the configuration.

Add a personal touch to your machine by adding your personal info and picking out a name for your machine.

Wait for the installation to finish.

After installation has finished, signal the installer to «Restart Now».

Remove the Flash Drive, then press Enter to complete the installation.

After rebooting, the Linux Mint login screen will appear.

Input the password you set during installation.

. and you should now be at your Linux Mint 18 Desktop, with the «Welcome Screen» being shown.
Note: If You Already Have Linux Mint And Wish To Upgrade to 18
The following information are taken from the Linux Mint Release Announcement Page:
- If you are running the BETA, click the refresh button in your Update Manager and apply any outstanding level 1 updates. Note also that samba was removed in the stable release as it negatively impacted boot speed. To remove samba, open a terminal and type “apt purge samba”.
- It will also be possible to upgrade from Linux Mint 17.3. Upgrade instructions will be published next month.
Conclusion
We have created a Linux Mint 18 Installer USB Flash Drive, and have installed the Operating System to a computer. We are now ready to do some computing on our freshly-installed Linux Mint 18 Operating System. Always remember to keep your system updated to the latest software versions to keep it secure and up-to-date. If you are having issues installing, referring to the Release Notes might help you solve the issues.
Источник


