- Create a USB Bootable Linux Mint Flash Drive
- USB Bootable Linux Mint running with Persistence
- How to Create a USB Bootable Linux Mint
- Create A Persistent Storage Live USB With Ubuntu, Linux Mint Or Debian (UEFI, >4GB Persistence Support)
- How to install and use mkusb to create a persistent storage live USB with Ubuntu, Linux Mint or Debian
- Linux Mint Forums
- [Tutorial] Live usb with persistence over 4GB
- [Tutorial] Live usb with persistence over 4GB
- Re: [Tutorial] Live usb with persistence over 4GB
- Re: [Tutorial] Live usb with persistence over 4GB
- Scope of this tutorial
- What is a Hybrid image?
- How to make the USB stick?
- Using mintStick
- Using the Terminal
- Using Microsoft Windows
Create a USB Bootable Linux Mint Flash Drive
Last updated: August 21, 2021
Easily Create a USB Bootable Linux Mint flash drive with persistence. Run Linux Mint from USB and also use it to Install Linux Mint from USB to a Hard Drive. In the following tutorial, I cover one way to use YUMI to create your own Portable version of this distribution from Windows. You can also opt to use a writable casper persistent overlay image for saving and restoring some changes on subsequent boots.
Headed by Clement Lefebvre, Linux Mint is fairly popular. It is based upon Ubuntu or Debian (depending on the version). Key features include a new software manager, new backup tool, streamlined look and feel, and quicker boot times.
USB Bootable Linux Mint running with Persistence

Distribution Website: Project Home Page
Persistent Feature: Yes
Basic Essentials:
- Computer that can boot from USB
- Windows 11, 10, 8, 7 Operating Environment
- Flash Drive
- LinuxMint ISO
- YUMI (Does the USB Bootable Linux Mint conversion)
How to Create a USB Bootable Linux Mint
- Download and launch the YUMI Bootable USB creation software.
- (1) First Select your Flash Drive from the list of devices.
(2) Then Choose Linux Mint from the list of distributions.
(3) Then Browse to your ISO file.
(4) Optionally, set a persistent file size for storing changes, and then click Create. - Once the YUMI script has finished, restart your PC and set your BIOS or Boot Menu to boot from your flash drive. Save your changes, and then reboot.
During the next boot you should be presented with a YUMI Boot Menu that offers an option to run a Live USB Bootable Linux Mint from your flash drive. You can use your flash drive to either Run Linux Mint Live from USB with persistence, or Install Linux Mint from USB to a Hard Drive.
Источник
Create A Persistent Storage Live USB With Ubuntu, Linux Mint Or Debian (UEFI, >4GB Persistence Support)
When you create a regular Linux live USB, you can install software, download files, make changes to the system, and so on, but all of these changes are lost after a reboot. A persistent live USB allows saving any changes you make to the live system, so the they are still present the next time you boot to it.
This article explains creating a persistent live USB with Ubuntu (and flavors like Kubuntu, Xubuntu, Ubuntu MATE, etc.), Linux Mint, Debian or elementary OS (it should work with any Debian or Ubuntu based Linux distribution), using mkusb. You’ll need to be running Ubuntu, Linux Mint or Debian to install mkusb (it seems you may be able to install mkusb on other Linux distributions, but there’s no list of dependencies to install manually, and it may or may not work).
mkusb can create persistent live drives that work in both UEFI and BIOS mode. The persistence storage partition created by mkusb uses casper-rw, so it can have a size of more than 4 GB, unlike some other similar tools.
This tool can not only create persistent storage live USB drives, but also regular bootable live USBs of Linux distributions, wipe a device, and more. The only downside of mkusb is its user interface, which uses Zenity and can be a bit confusing, but other than that the application works great.
A few related articles from Linux Uprising that might interest you:
How to install and use mkusb to create a persistent storage live USB with Ubuntu, Linux Mint or Debian
1. Install mkusb on Ubuntu, Linux Mint or Debian
In Ubuntu, Linux Mint, elementary OS and other Ubuntu-based Linux distributions or flavors, mkusb can be installed by using its official PPA:
For Debian, the mkusb developer recommends using the same Ubuntu PPA. That’s because mkusb is only a series of scripts which don’t depend on specific Ubuntu package versions, so it works on Debian (unlike most PPA repositories). Manually add the mkusb PPA and install this tool in Debian:
You may also install mkusb on other Linux distributions, but the installation may require installing some packages manually, etc. See the mkusb wiki page for how to do this.
2. Launch mkusb from the applications menu. When it starts, the application asks you if it should run the dus version of mkusb (a revamped interface of mkusb), or another version:
In this dialog press YES to continue with the «dus» version.
3. Next, you’ll see a mkusb window that asks to enter your password on top of a terminal window:
Enter your password and press OK to continue. Make sure you don’t close the terminal window, as that’s where mkusb runs the commands required to create a persistent storage, bootable live USB!
4. mkusb will now present a list of options:
Select the first one — Install (make a boot device) -, and press OK to continue.
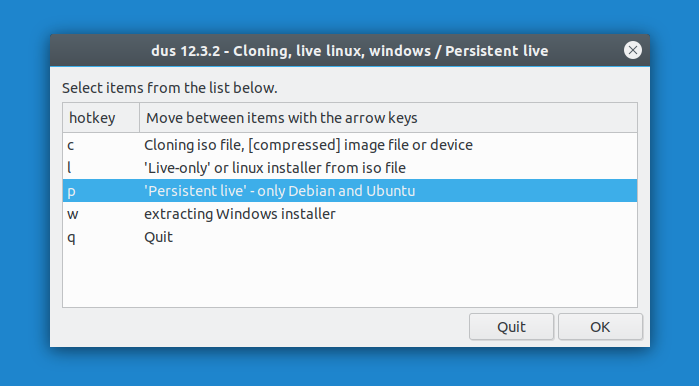
5. Next, another list of options is presented:
To create a persistent storage live USB, click on the third option — ‘Persistent live’ — only Debian and Ubuntu -, and click OK .
6. mkusb will now ask you to select an ISO or IMG file:
Select the Ubuntu (including Kubuntu, Xubuntu, Ubuntu MATE, Lubuntu, Ubuntu Budgie, etc.), Debian or Linux Mint (Cinnamon, MATE or Xfce) image from your filesystem, and click OK to continue.
7. For the next step, mkusb will present a list of storage devices. Make sure to select an USB or some other removable drive in this step, and not your HDD/SSD:
Double check that you’ve selected the correct target device (all data on the selected storage device will be lost!), and click OK to continue.
8. mkusb will now present some persistent live drive settings:
In this dialog you can enable upefi (comes from the package named usb-pack-efi , used by mkusb), in which Grub works in UEFI and BIOS mode. You can also enable the msdos option, which can help with some HP computers that can’t boot with Grub and GPT. Click OK when you’re done.
9. It’s now time to select the percentage of available space for persistence:
This is the space that will be available for the Linux distribution you’re going to install on the USB stick. Drag the slider to the desired persistence percentage and press the OK button. Don’t worry about the size of the persistence partition, mkusb doesn’t have the maximum 4 GB persistent storage limit present in some other bootable USB creators.
The remaining storage space on the USB drive will be used for a new usbdata partition that’s formatted as NTFS, which can be accessed from Linux, Windows and macOS — use this partition to store data on the USB drive that you want to access from other operating systems.
10. In this final step you’ll be presented with a confirmation screen:
If you’re sure you’ve selected the correct storage device and ISO file, you can now proceed to start creating the persistent live USB.
Select the line that says Go (Yes, I want to go ahead) and press the Go button at the bottom of the window. After this, mkusb will start creating the persistent storage Ubuntu, Linux Mint or Debian live USB.
Now boot the new live USB and select one of the Grub menu entries that says «persistence» (there will also be some non-persistence Grub menu items).
Источник
Linux Mint Forums
Welcome to the Linux Mint forums!
[Tutorial] Live usb with persistence over 4GB
[Tutorial] Live usb with persistence over 4GB
Post by Laurent85 » Sat Sep 03, 2016 6:00 pm
Thanks to phd21 who suggested Multisystem as a working alternative.
Follow this tutorial to create a Live usb flash drive with persistence on a separate partition, allowing persistence over the 4GB FAT32 file size limit.
Benefits of persistence and separate partition over full installation:
- persistence not limited to 4GB (on par with full installation)
- compressed Live image, the gain is around 2,6GB disk space, allowing the use of a 8GiB usb flash drive
- non persistent Live session still available, can be handy in some situations
- read only base image, persistence can be reset without reinstalling, boot a Live session to backup your /home data and personal settings, then reformat casper-rw.
Install Multisystem:
Note that for an unknown reason when returning to boot options persistent does not appear but was properly saved.
You can check if necessary:
select Menus tab > GRUB settings > grub.cfg > search for word persistent
Should appear line starting with linux (loop)/casper/vmlinuz persistent .
Done.
Tips:
To launch a Live session from flash drive, on startup from Multisystem screen edit Linux Mint entry and remove persistent parameter.
Nemo automatically mounts casper-rw partition. When persistence in use, casper-rw should not be considered as a removeable media, hence not mounted as is. You can change this behavior in Nemo Preferences > Behavior > unselect Automatically mount removable media.
Use Multisystem to create multi boot usb flash drives.
Multisystem also offers to enable persistence by creating a casper-rw file container up to 4GB on the FAT32 partition.

Re: [Tutorial] Live usb with persistence over 4GB
Post by Spearmint2 » Sun Nov 27, 2016 5:49 am
![]()
Re: [Tutorial] Live usb with persistence over 4GB
Post by phd21 » Mon Jul 24, 2017 7:22 pm
Hi Everyone, «Laurent85», and «Spearmint2»,
Nice tutorial «Laurent85».
I have been making «Persistent» USB flash drive sticks that work well for years in Linux Mint 17.3 and now in Linux Mint 18.1. In fact just a little while ago I created a bootable USB flash drive stick with Linux Mint Cinnamon 18.2 (64-bit) using MultiSystem in Linux Mint 18.1 KDE on a 16gb USB flash drive stick, see screenshot below. In fact, I am running on that right now while writing this reply. Even after installing all the Linux Mint updates, and installing a whole bunch of stuff, I still have 10gb of space left.
FYI: Make sure you have a good USB flash drive stick, check it for errors. I had a lot of trouble recently testing USB sticks because my 8gb USB flash drive stick that I use for testing was wearing out, actually wore out after 3-4 years, and I did not realize it until today.
I have been using «MultiSystem» for most of them, but «Unetbootin» is easy to use and works well for creating «Persistent» USB flash drive sticks with up to 4gb (4000mb) of persistent space. Obviously, I have also been using MultiSystem for creating USB flash drive sticks with over 4gb of «persistent» space.
Источник
Scope of this tutorial
This tutorial only covers Hybrid ISO images.
Starting with the release of Linux Mint 12 KDE RC, Linux Mint switched to Hybrid ISO images.
Previous releases such as Linux Mint 9, 10, 11, or even the main edition of Linux Mint 12 are not covered by this tutorial.
What is a Hybrid image?
Traditionally, tools such as ‘Startup Disk Creator’ or ‘UNetbootin’ were needed to install Linux Mint via USB.
With hybrid images, you can simply write the content of the ISO and make a bootable USB stick which can install Linux Mint by using the ‘dd’ command.
- The resulting USB stick will act exactly like a liveCD/DVD.
- The process is fast and simple
- Hybrid ISOs are still compatible with Unetbootin and Startup Disk Creator
- This method deletes all the data present on the USB drive
- The USB stick isn’t persistent (though you can still use Unetbootin to do this).
How to make the USB stick?
Using mintStick
mintStick is installed by default in Linux Mint.
Launch «USB Image Writer» from the menu, select your ISO image and your USB device and press «Write to device».
Using the Terminal
It is really simple. Go to a Terminal and type:
/Desktop/linuxmint.iso of=/dev/sdx oflag=direct bs=1048576
/Desktop/linuxmint.iso’ is the name and location of your downloaded image (located at the desktop in this example) and ‘/dev/sdx’ is the target USB drive. If your system doesn’t support ‘oflag=direct’, you can just leave it out as it is simply intended to speed up the process a bit.
If you don’t know about the target USB drive path, run this command and figure out your destination drive.
Warning: Make sure to set the correct device path, as this process will delete all data that was on the specified device previously!
Remember, don’t include an integer for the USB drive, e.g. ‘/dev/sdx1’, as it would refer to the existing partition on that drive and not the drive itself.
When the USB has been properly created by ‘dd’, there should be an output similar to this:
/Desktop/ linuxmint.iso of=/dev/sdb oflag=direct bs=1048576
706+1 records in
706+1 records out
740601856 bytes (741 MB) copied, 91.7024 s, 8.1 MB/s
Using Microsoft Windows
From Windows, you can use ‘Pendrive Linux Universal USB Installer’:
Alternatively, you can use ‘Image Writer’, an open source project from Launchpad.
Note: You might need to rename the ISO file and change its extension from .iso to .img for it to be accepted by Image Writer. To do this in Windows you can disable the setting ‘Hide extensions for known file types’ under ‘Folder Options’.
Comments
Thank you very much
Hasn’t worked for me.
Hi!
I’m stuck at a point.
I made a USB of mint 18 to install it on my HP Envy TS u110dx. All worked fine except when I boot from USB and choose to run Linuxmint from grub it just show a black screen and stucks there. I waited for a long time but nothing happened.
Any idea or solution??
can there be an explanation on how to create a live usb using mac.
please
linuxmint-17.2-cinnamon-64bit-rc
## Not Booting from a Non UEFI, Legacy Bios computer . ##
My laptop is lenovo, 4x Intel(R) Core(TM) i5-2410M CPU @ 2.30GHz,
Memory 6GB. I see the tutorial is 3 years old. I guess that everything Clem wrote in the tutorial worked back then, but now with this latest Mint 17.2 RC and a Non Uefi computer it seems that even the dd command completed ok, the computer still doesn’t boot from the USB flash. First of all I am not a programmer, but a gnu/linux beginner(who want to learn more :)) and I thought I should write all the troubleshooting details to save many hours from other beginners time who just want to make a bootable USB flash drive with this release.
Here are the steps i taken: (on Mint 13(64bit) which I have installed now)
-1- on a 4GB USB flash drive I used Gparted to create a msdos Partition Table, and formated with fat32 Filesystem
Device Boot Start End Blocks Id System
/dev/sdb1 2048 7843839 3920896 b W95 FAT32
-2- $ dd if=linuxmint-17.2-cinnamon-64bit-rc.iso of=/dev/sdb
3201856+0 records in
3201856+0 records out
1639350272 bytes (1,6 GB) copied, 595,884 s, 2,8 MB/s
-3- removed the USB flash drive, then plugged it back to check it:
-first with Gparted which said: ‘No partition table found on device dev/sdb’ and ‘File system: unallocated’ ; here is a more detailed information in a print screen http://postimg.org/image/grogzjov9/
-second with: fdisk -l which said:
WARNING: GPT (GUID Partition Table) detected on ‘/dev/sdb’! The util fdisk doesn’t support GPT. Use GNU Parted
Disk /dev/sdb: 4016 MB, 4016046080 bytes
255 heads, 63 sectors/track, 488 cylinders, total 7843840 sectors
Units = sectors of 1 * 512 = 512 bytes
Sector size (logical/physical): 512 bytes / 512 bytes
I/O size (minimum/optimal): 512 bytes / 512 bytes
Disk identifier: 0x3519853a
Device Boot Start End Blocks Id System
/dev/sdb1 * 0 3201855 1600928 0 Empty
/dev/sdb2 59432 63975 2272 ef EFI(FAT-12/16/32)
-4- restarted the computer, and first I tried with the «Multi Boot Menu» which appears on my laptop when i press F12 right after turning on the PC, and after i selected from the Multi Boot Menu, the usb flash drive with Mint17.2, i saw a black screen(waited about 10 minutes while nothing happened on the screen and then I manually restarted); second I tried was modifying the boot order in BIOS, and selected the usb flash drive as the first in order which gave me the screen with GNU Grub v2.00-7ubuntu11 from which i could select: ‘Start Linux Mint 17.2 Cinnamon 64-bit’ , ‘Start Linux Mint 17.2 Cinnamon 64-bit (Compatibility Mode)’ and ‘Check the integrity of the medium’. After pressing the first 2 options, the computer simply restarted immediately and i arrived at the same grub screen.
———
P.S. Success with unetbootin! After the failures above I repeted step 1, and at the step 2, I used unetbootin-linux-608 on the same usb flash drive. At step 3 both Gparted and fdisk reported everything normal(both partition table(msdos) and filesystem(fat32) were the same as before writing to the flash drive). At step 4, it did boot from the flash drive but directly into GRUB 2 command shell(but right before the grub I could see a line for 1 second saying «Secure Boot Not Enabled»). Then at the prompt grub> I typed exit, and after pressing Enter, it finally gave me the Unetbootin menu from which it succesully loaded Mint 17.2 but only when selecting «Start Linux Mint».
thanks so much , but i use universalbootin of a console on win7 machine. I started with a usb key Sandisk with 4 GB of space. I started win universalbootin and a 2 GB of Mint Cinnamon ISO 64 Bit downloaded from linuxdistro site. The procedure start at 14.20 and at 14.23 was ended. at 15.00 mu system was installed (with slow speed of usb key, because none drivers was loaded , but everithing was installed, the system was updated an upgraded so finally I added my favourite apps for comuninication ad graphics manipuliation. Nvidia drivers must be updated because a strange flicking appears on my desktop .Before it , i used Ubuntu 9.04 for many years and it run very best for me.. MY machine wal old , Im thinking to buy a multicpu with Xenon and make a big worstation with SAS disk and a SSD for s.o. . Windows was ejected by my workspace, but i must to use it when one of my friends or client need my support. all of them are so ostinate that they used windows.
Thank a lot for all .
THanks so much for this tutorial. I tried to use UnetBootin, with the result that I didn’t even get a grub menu when booting that usb stick. («Hybrid ISOs are still compatible with Unetbootin..» wasn’t true for my old Mint10 version of UnetBootin). But the fdisk (should clarify -1[L] not -1[one] so more people don’t have the problem PaBlum had) and dd commands worked like a charm.
I know this is late for this page but it also involves a wider issue I hope you can expand on in another feature. I have people telling me that the main differences between running a OS like Puppy or Porteus vs Mint on a flash drive is because they cause less «wear and tear» on the flash drive and are supposedly faster. Can you clarify this, and secondly, if partially true, are there any «tricks» to improve Mint on flash drives like assigning its caches to RAM and so forth?
Thanks for any input on this!
You’re amazing — or you simply don’t live in the same universe as I do.
—Your «fdisk -1» is incomplete. It requires a parameter called , which I can’t guess at. It also says -1 is not a valid option entry.
—My 13(MAYA) contains not a trace of «USB Image Writer». Software Manager installed usb-imagewriter but hid it very nicely. I eventually found that the Terminal just calls the program «ImageWriter». Cute!
—My purchased ver.17 OSDisc never heard of your word «linuxmint». I eventually found that the needed word is isolinux.
A transfer from HDD to stick worked enough to clean the stick, but then quit, promising that more error information would be written to my home directory, which it wasn’t.
So now I’m having trouble finding where I can buy a Windows-7 installation disk! After ten-plus years of struggling with Linux unprofessionalism I’ve had enough.
Thanks for six hours of hacking and frustration.
can this step works with, Linux Mint 16 «Petra» — Cinnamon (32-bit)?
4gb flashdrive is enough?
the above procedure is only for creating a bootable usb stick in order to install Linux Mint?is it possible to fully install Linux Mint on a usb stick in replace of of a bootable cd/dvd?
screenshot of linux mint 14 cinnamon running on MacBook Air Gen 2
I successfully installed linux mint 14 cinnamon on my macbook air gen 2 via a bootable usb stick, here’s how to create the boot stick inside mac osx:
works well but I’m running Ubuntu 10.04 and i have to run imagewriter as root:
«cryptic@whitehouse.gov:
I’m running Windows Vista and want to create a bootable Live USB of mint 13 for which I’ve downloaded the ISO file.
I’ve downloaded «Image Writer» from the link here, but I’m finding it impossible to «Simply run the uitlity» as the readme note says.
Can anyone explain how to use this please?
Thanks. Can’t wait to try this to get mint on the netbook.
@Tuber: to be precise, KB, MB, GB, etc. refer to the metric system (base 10) so 1 MB is 1,000,000 bytes. If you wish to represent a number in an abbreviated base 2, use MiB, GiB, TiB, etc.
The convention of using a single char to represent a unit of measure as you correctly demonstrated in the dd command is a convention specific to the developer, not at all tied to the base if the numbering system.
I have been using that Pendrive Linux tutorial but it drives me crazy because of the lack of «persistence». You appear to have taken care of that problem!
Here are the steps for Mac OS X (similar to the steps using Terminal):
1. First, I used diskutil to reset the USB key to a single partition.
2. Next, I ran the following commands from a terminal window:
# Become root
$ sudo su
Password:
# Lst current drives, to get device name for USB key (in this example, the USB key is /dev/disk1)
sh-3.2# diskutil list
/dev/disk0
#: TYPE NAME SIZE IDENTIFIER
0: GUID_partition_scheme *100.0 GB disk0
1: EFI 209.7 MB disk0s1
2: Apple_HFS Macintosh HD 99.7 GB disk0s2
/dev/disk1
#: TYPE NAME SIZE IDENTIFIER
0: FDisk_partition_scheme *4.0 GB disk1
1: DOS_FAT_32 UNTITLED 1 4.0 GB disk1s1
# If the USB key has a partition from it that is currently mounted, then unmount it.
sh-3.2# diskutil unmount /dev/disk1s1
Volume UNTITLED 1 on disk1s1 unmounted
sh-3.2# ls
linuxmint-13-xfce-dvd-32bit.iso
linuxmint-13-xfce-dvd-64bit.iso
# Write the Linux Mint ISO image to the USB key.
sh-3.2# dd if=./linuxmint-13-xfce-dvd-64bit.iso of=/dev/disk1 bs=1048576
795+0 records in
795+0 records out
833617920 bytes transferred in 490.581580 secs (1699244 bytes/sec)
As an update Please note I was referring to the Binary zip version of Image writer 0.6 and running it under Windows xp. Just download it and unzip then run Select the Linux Mint ISO making sure to rename it to an IMG file. Then select where your USB Drive is and off you go.
This worked perfect for me using an USB on an old Compaq4000 wunning win xp Do note I used win Image Writer. But please note when you go to download do use the binary.zip version 0.6 and make the change from ISO to Img. note the edit.in the file name. Also note I’m using Linux Mint 13 iso
Isn’t bs=1M easier to type? 1024×1024=1048576 bytes, or 1 Megabyte, which can be abbreviated in dd by 1M.
c =1
w =2
b =512
kB=1000
K =1024
MB=1000*1000
M =1024*1024
GB=1000*1000*1000
G =1024*1024*1024
and so on for T, P, E, Z, Y.
For the command below, label -I, that is dash capital i, not l or 1.
See man mkfs.vfat for the manual page and switch details.
Good one. For those who need to reformat their drive when done.
For FAT32 from Linux; sudo mkfs.vfat -n label -I /dev/sdx
(label is what label you want to use)
For those in Windows, a fine program to reformat to FAT32 is RMPrepUSB, you can use the «clean» option first if it gives you issues; http://www.rmprepusb.com/ It is an advanced removable drive prep tool, but also good for formatting.
this is to mugabuga What it did was creat a partion on your usb key what you need to do is delete the partion and refoment your usb key you can do this by useing gparted if you do not have it install go to the termail and type sudo apt-get install gparted
once it is install just find your usb drive:»WARING» DO NOT DELETE OR FORMAT THE WRONG DRIVE» BECAREFUL.
once you do that it should fix your problem i hope this helps.
if you want your usb compatible with windows use ntfs if you just want it compatible with linux use something like ext
i hope this helps.
I used imageWriter and now I can’t seem to figure out how to re-format my USB back to 8GB. It’s current capacity is reading 1.1GBs. Any way to reformat it to it’s correct size?
Do not listen to the guy below me. Win32-Disk-Imager is less confusing and requires less clicks to use than LinuxLiveUSB. It also doesn’t require watching a video to use. Just change the .iso to .img like it says in the tutorial above. Select the USB drive you want to use and the .iso you just renamed to .img and click write. There is no «What the heck is persistent mode? What are the checkboxes in Options for?» Win32DI is just click, click, click, done.
If you use Win32-Disk-Imager it will change the USB drives capacity to that of the .iso you wrote to it. Windows will not recognize it’s full capacity in order to format it properly. If you want to fix this in windows you can use a program called «Bootice»
How to:
Download Bootice 0.9 from the address below.
http://www.softpedia.com/progDownload/Bootice-Download-180137.html
Extract bootice_0.9.rar
Run BOOTICE.EXE
Select the USB you want to restore under «Destination Disk»
Click on «Parts Manage»
Click on «ReFormat USB disk»
Leave «USB-FDD mode» checked and click on «Next»
Select «FAT32» and give it a label if you wish then click «OK»
Click «Yes» to confirm and voila
Now your USB has a new MBR and its full capacity is restored!
The Tutorial above covers everything you need to do in order to get a fully working bootable LiveUSB for LinuxMint12. Don’t waste your time with LinuxLiveUSB if you’re doing this in windows. I will note that whilst the terminal command did create a LiveUSB, my bios would not boot it since the USB wasn’t FAT32. Also, I could not figure out how to use ImageWriter or StartupDiskCreator in Lighthouse64 which is not based on Debian at all. I’m a noob when it comes to compiling source code, nor am I familiar with the terminal commands Lighthouse64 uses. So Win32-Disk-Imager on my Win7 laptop was my best choice.
For a nube, all these options were non-intuitive and missing instruction. However, I found a really great install program called «linux live usb creator.» Here’s the youtube video and the link for download is there. Totally foolproof.
Cool !! very nice this tutorial but how to go back to normal partiton now ?
we must delete partition table, rewrite it and format it in fat32.
@danpe91
‘oflag=direct’ explained above: «you can just leave it out as it is simply intended to speed up the process a bit» ie avoiding the buffer cache, and ‘bs=1048576’ equal to the ‘bs=1k’ it means block(s) is/are 1MB
I’m very new to this, but I used «Startup Disk Creator» (installed with Linux Mint 12) to transfer the .iso of Mint LXDE to a USB flash drive, as I wasn’t getting much joy with the method described above.
The drive appears to be persistent (although I may well be failing to understand what persistence is, of course) — in fact part of the process, the GUI states that it’s creating persistence files (or something similar, this is from memory).
LXDE runs perfectly — with the small exception of my eee PC 901 needing the Esc key pressing on startup to force it to select the USB to boot from. This may also be the reason why the method on this page didn’t work.
Источник


