- Create the bootable media
- How to make a bootable USB stick
- In Linux Mint
- In Windows, Mac OS, or other Linux distributions
- How to make a bootable DVD
- In Linux
- In Windows
- In Mac OS
- How to Create a Bootable Windows 10 USB in Linux Mint
- Step #1: Requirements
- Step #2: Download Windows 10
- Step #3: Back up and format the USB ( 8 GB or bigger)
- Step #4: Creating a Bootable Windows 10 USB in Linux Mint
- 4.1 Create the bootable USB with WoeUSB
- 4.2 Create the bootable USB with Etcher
- 4.3 Create the bootable USB with USB Image Writer
- Bonus Step #1: Test the bootable USB
- Install Linux Mint From USB
- System Requirements For Linux Mint
- How To Install Linux Mint From USB, CD/DVD?
- How to Install Linux Mint 20 [The Simplest Way Possible]
- Install Linux Mint by replacing Windows or any other operating system
- Step 1: Download Linux Mint ISO
- Step 2: Create a live USB of Linux Mint
- Step 3: Boot from the live Linux Mint USB
- Step 4: Install Linux Mint
- Enjoy Linux Mint
- About Abhishek Prakash
Create the bootable media
The easiest way to install Linux Mint is with a USB stick.
If you cannot boot from USB, you can use a blank DVD.
How to make a bootable USB stick
In Linux Mint
Right-click the ISO file and select Make Bootable USB Stick , or launch Menu ‣ Accessories ‣ USB Image Writer .
Select your USB device and click Write .
In Windows, Mac OS, or other Linux distributions
Download Etcher, install it and run it.
Click Select image and select your ISO file.
Click Select drive and select your USB stick.
How to make a bootable DVD
Optical discs are slow and burning to disc is prone to errors.
To prevent issues, burn at the lowest possible speed.
Burn the content of the ISO onto the DVD, not the ISO file itself. When finished, your DVD should contain directories such as boot and casper , it shouldn’t be an empty DVD containing an .iso file.
In Linux
Install and use xfburn .
In Windows
Right-click the ISO file and select Burn disk image .
To make sure the ISO was burned without any errors, select Verify disc after burning .
In Mac OS
Right-click the ISO file and select Burn Disk Image to Disc .
© Copyright 2017, Linux Mint Revision 11740971 .
How to Create a Bootable Windows 10 USB in Linux Mint

This short guide describes all steps required in order to create bootable USB with the latest Windows 10 in Linux Mint. Several different options are described — as the one which is working best is WoeUSB.
Step #1: Requirements
- A 8GB or larger USB stick/flash drive
- Microsoft Windows 10 image
- Linux Mint/Ubuntu machine with admin rights
- Writing program:
- WoeUSB — the only one working fine with the latest November edition of Windows 10
- Etcher — not able to create bootable USB for Windows 10 November with language pack, but working fine for older images.
- USB Image Writer — included by default in Linux Mint Cinnamon
Step #2: Download Windows 10
The first steps is to get the latest Windows 10 from the official website (or any other image if you need a custom image. The official download link for Windows 10 is: Download Windows 10 Disc Image (ISO File). You need to
- select the edition (in this case) and confirm:
- Windows 10 November 2019 Update
- Select the product language
- English and confirm
- The final selection is to chose:
- 64-bit Download
- 32-bit Download
The file will be download for several minutes and it will be something like:
Note 1: In most cases — 64-bit Download should be preferred option unless there is special need for 32-bit version.
Note 2: The link will be valid 24 hours as the warning shows:
Links are valid for 24 hours from time of creation.
Links expire: 1/15/2020 12:37:56 PM UTC
Note 3: On this link Windows FAQ you can find more information about the image, edition and versions.
Step #3: Back up and format the USB ( 8 GB or bigger)
At this step you need to have USB which is 8 GB or more. If you have data on the USB you can do a back up. The size of the Windows Bootable USB will differ depending on the edition, version and the language pack. In my case the size is 5.3 GB.
The USB should be formatted and not in use for the next step — creation of the bootable Windows 10 flash — otherwise errors will appear or the USB will not work.
Step #4: Creating a Bootable Windows 10 USB in Linux Mint
At this step 3 options are available. The one which was working best is WoeUSB (even if error was raised during the flashing).
4.1 Create the bootable USB with WoeUSB
WoeUSB is considered as alternative of Rufus for Windows. For Linux Mint and Ubuntu it can be installed by:
The github repo is: WoeUSB and the Ubuntu package is maintained by: WebUpd8
Once the program is installed you can do:
- Start it from the menu by typing WoeUSB
- From a disk image(iso) — select the downloaded image
- Select the file system — FAT or NTFS — I used NTFS due to error related to FAT
- Select the target device — the USB which you are going to use.
- The USB should be formatted before the installation and should not be in use — otherwise errors might appear!
- Install
Coping files from the source media.
will take some time(for me 50 minutes+).
The writing process could end with error like:
The command «exit 0» failed with exit status «1», program is prematurely aborted
It’s interesting that despite the error the bootable USB with Windows 10 works fine and Windows is installed without any problems.
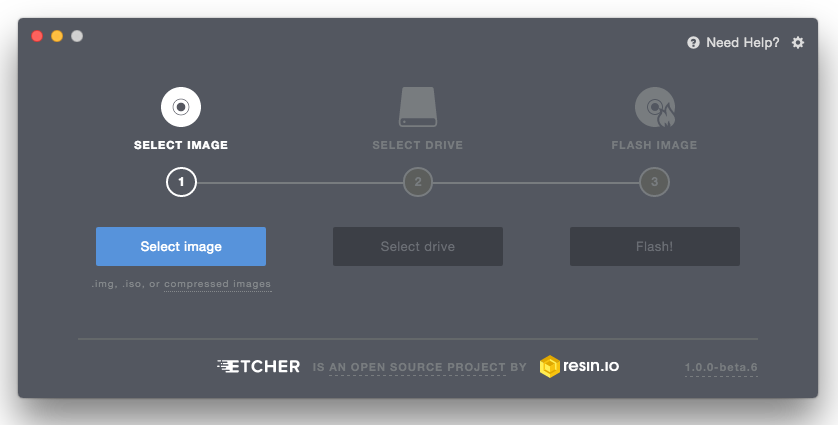
4.2 Create the bootable USB with Etcher
The USB created with Etcher will work on some laptops and mostly for older Windows 10 images. If you face problems with Etcher I recommend to try with WoeUSB. Etcher is good option when you need to create SD cards or USB in Ubuntu and Linux Mint — but for the latest versions of Windows is not working well. You can find more information here: etcher. The process of the creation is simple:
You can download the program from the above site. After that you need to unarchive it and execute it. The rest is to follow the steps described above.
It’s advertised as: Flash OS images to SD cards & USB drives, safely and easily.
**Note: **You have warning in case of writing Windows image. There is also an issue for such cases like: Warn against flashing Windows images
It looks like you are trying to burn a Windows image,
Unlike other images, Windows images require special processing to be made bootable
We suggest you use a tool specially designed for this purpose, such as Rufus..
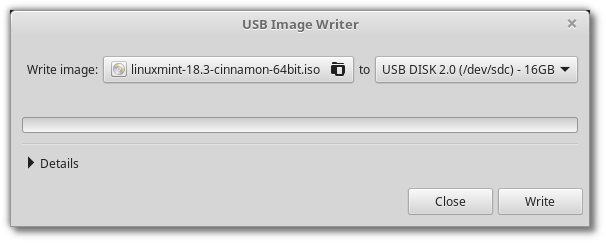
4.3 Create the bootable USB with USB Image Writer
The last option for this step is to open the program called USB Image Writer. This can be done by:
- right click on the downloaded file — Win10_1909_Bulgarian_x64.iso
- Make bootable USB stick
- to — select the USB device to be used( from the right side). On the left site — Write Image — you should see the selected image file.
- Write
The process of writing will take several minutes. And the Windows 10 bootable USB is created in several minutes without additional software or programs.
Bonus Step #1: Test the bootable USB
The last step is to test the bootable USB. This can be done with any laptop or desktop PC. Enter the newly created USB and ensure that USB is part of the boot order. Start or restart the machine. That’s all.
If the USB is not loaded then you can check in the BIOS settings for:
- Ensure Secure Boot is disabled.
- Ensure Legacy mode is enabled.
- Save the UEFI/BIOS changes.
Sometimes it’s needed to shutdown the computer using the power button.
Note: In order to enter the BIOS you can try(it will depends on the laptop brand and model):
- Dell — open BIOS menu for Lenovo, Dell, Acer
- F9 — open boot options for HP
- F8 — open BIOS menu for HP
- F10 — open boot options for Lenovo, Dell, Acer
- F2 — open BIOS menu for Lenovo, Dell, Acer
- Escape — open BIOS menu for HP
For more information you can try to find information specific for you machine/laptop. For example this is what the documentations say for HP:
Note: If you wonder whether you can use the you can use the USB as live Windows 10 USB then the answer is no. Because Windows ISO is only an installer. Mint ISO is an actual bootable operating system with an installer.
Install Linux Mint From USB

Linux Mint is one of the most popular Linux distribution. Mostly advanced Linux users including LinuxAndUbuntu, it is always suggested to start with Linux Mint. So those who are newbies or thinking to use Linux Mint, here is a complete tutorial on how to install Linux Mint from USB and CD/DVD.
Linux Mint has four editions or flavors:
- Linux Mint Cinnamon
- Cinnamon is the own desktop environment of Linux Mint, it’s a fork of Gnome.
- It’s elegant and functional.
- Linux Mint Mate
- Mate is another fork of Gnome, it seems Gnome 2.
- It’s for users that like a classical desktop environment.
- Linux Mint XFCE
- XFCE is a minimalistic and elegant desktop environment.
- It’s better for computers with low resources.
- Linux Mint KDE
- KDE is one of most complete desktop environments.
- It has a lot of functionalities and a good look.
- It’s better for modern computers with the most recent hardware.
System Requirements For Linux Mint
- 512MB RAM (1GB recommended for a comfortable usage).
- 9GB of disk space (20GB recommended).
- 1024×768 resolution (on lower resolutions, press ALT to drag windows with the mouse if they don’t fit in the screen).
- Notes:
- The 64-bit ISO can boot with BIOS or UEFI.
- The 32-bit ISO can only boot with BIOS.
- The 64-bit ISO is recommended for all modern computers (Almost all computers sold in the last 10 years are equipped with 64-bit processors).
How To Install Linux Mint From USB, CD/DVD?
- Go to the Linux Mint download website and choose the better flavor for you, then download it:
- Download Linux Mint


2. Verify your ISO
- From the main mirror download the sha256sum.txt file of the actual version
- https://ftp.heanet.ie/mirrors/linuxmint.com/stable/18/
- In a linux terminal move to the directory of your iso using cd
- Type the command: ‘sha256sum linuxmint.iso’
- Compare that checksum with the one you can find from the “sha256sum.txt” file. If the two checksums are the same, then you know your ISO file is exactly the same as the original.
- Example
- checksum from “sha256sum.txt” file
2. Terminal output

3. If you compare the checksums, they are equals
6. If the checksums don’t match, your ISO file could be damaged
3. Make your installation media
- Burn a Linux Mint Live DVD
- k3b (Linux KDE) – Free
- Brasero (Linux Gnome) – Free
- Nero (Windows) – $$
- Alcohol 120% (Windows) – $$
- Free ISO Burner – Obviously Free: http://www.freeisoburner.com/
- Create a Live USB
- Linux Live USB Creator http://www.linuxliveusb.com/
- UNetbootin https://unetbootin.github.io/
- dd – Linux
- dd if=linuxmint.iso of=/dev/sdx
- Your laptop must be connected to energy
- Your laptop must be connected to internet (ethernet / wireless)
- Linux Mint (Live) has problems with some graphic cards like nvidia because the free drivers don’t have a good performance
5. Boot the installation media
- Configure your BIOS / UEFI to boot from the installation media device
How to Install Linux Mint 20 [The Simplest Way Possible]
Last updated October 29, 2020 By Abhishek Prakash 42 Comments
Undoubtedly, Linux Mint is one of the best Linux distributions for beginners. It is easy to use, doesn’t consume lots of system resource and has tons of software available.
There are various ways to install Linux Mint:
- Install Linux Mint in VirtualBox in Windows like a regular desktop application.
- Install Linux Mint in dual boot mode with Windows keeping both Windows and Linux Mint on the same computer.
- Replace all other operating systems and install Linux Mint as the only OS on your computer.
In this tutorial, I’ll show you how to install Linux Mint removing other operating systems from your computer.
Install Linux Mint by replacing Windows or any other operating system

I am using Linux Mint 20 Cinnamon edition. However, the steps work for other Mint versions and desktop variants like Xfce and MATE. The screenshot might look a little bit different but the steps remain the same.
- A USB of at least 4 GB in size. You may also use a DVD.
- Active internet connection for downloading Linux Mint ISO and live-USB making tool. Internet is not required for installing Linux Mint.
- This is optional but if you have important data on the system where you are going to install Linux Mint, you should copy the files on an external disk.
Minimum system requirements for Linux Mint 20 default Cinnamon edition:
- Minimum 1 GB RAM (2 GB recommended for a comfortable usage).
- Minimum 15 GB of disk space (20 GB recommended).
- Minimum 1024×768 resolution (on lower resolutions, press ALT to drag windows with the mouse if they don’t fit in the screen).
This method of installing Linux Mint formats your entire disk. That means any data present on the system will be wiped out.
For this reason, please save your data on an external USB disk so that you can copy it back after installing Mint.
Step 1: Download Linux Mint ISO
Go to Linux Mint website and download Linux Mint in ISO format. This file is used for creating the installation USB.
You’ll find three variants:
If you do not know about them, go with the default Cinnamon edition. When you click on that, you’ll find various mirror websites and torrent link to download the ISO file.
If you have a good internet connection for downloading 2 GB of file without any issue, use a mirror which is closer to your country of residence (for faster download).
If you do not have a good, consistent internet connection, opt for the torrent version (if you know what torrent is).
 Download Linux Mint
Step 2: Create a live USB of Linux Mint
Now that you have downloaded the ISO, it is time for creating a live USB of Linux Mint.
You’ll need a dedicated software that creates a live USB. There are several such tools available for free. You can use Etcher which is available on Windows, Linux and macOS.
If you are using Windows, you can also use Rufus. In the example here, I have used Rufus.
Download Rufus and run the .exe file and you’ll see a screen like the below image.

You select the ISO. You may confuse over the partitioning scheme. Almost all the computers in last 7 years or so use GPT partitioning scheme. Older computers may use the MBR partitioning. You should check which one your system uses to be sure.
If you choose the incorrect partitioning scheme, you may not be able to Linux Mint. In that case, come back to this step and recreate the USB by choosing the other partitioning scheme.
Step 3: Boot from the live Linux Mint USB
Once you have successfully created the Linux Mint USB, it is time to use it for installing the awesome Linux Mint.
Plug in the live USB of Linux Mint and restart your system. At the boot screen when you see the logo of your computer manufacturer, press F2 or F10 or F12 to enter the BIOS settings.
In here, you should make sure that booting for USB or removable media is on the top of the boot order.
This screen may look different for different manufacturers. You’ll have to find this setting on your own or search the internet.
Make the changes, save and exit.
Step 4: Install Linux Mint
Now you should boot into the live Linux Mint environment. You’ll see a screen like this that gives you a couple of options. Go with the first option.

In a few seconds you’ll be inside the Linux Mint live environment. It may take more time if you have USB 2.
You’ll see a “Install Linux Mint” icon on the desktop. Click on it to start the installation procedure.

It will ask you to choose some basic configurations like language and keyboard layout. Choose the most appropriate ones for your system.

Avoid connecting to internet during installation
I strongly advise NOT connecting to internet while installing Linux Mint. This way the installation is quicker as it does not try downloading updates while installation.
Not connecting to the internet may also save you a few unpleasant surprises. I encountered a “‘grub-efi-amd64-signed’ package failed to install into /target” error and my installation failed. I plugged out the live USB and tried installing it again without connecting to the internet and the error didn’t appear this time.
The next screen is the most important part of Linux Mint installation. You are going to format the entire hard disk and install Linux Mint. Linux Mint will be the only operating system on your computer.
Again, this means that you’ll lose all the data on the disk. Please copy important files on an external disk.
In this method, Linux Mint handles everything on its own. It creates an ESP partition for EFI boot manager of about 500 MB and the rest of the disk is allocated to root partition. The root consists a swapfile for swap usage and your home directory. This is the easiest setup with no extra effort.

You’ll be warned that disk will be formatted. Hit continue and you’ll have to select timezone in the next. You may change it later as well.
After that, you’ll face a screen that asks you to set username and password. Use an easy to remember password because you’ll have to use it all the time.
Things are pretty straightforward from here. You just have to wait for like 5-10 minutes for the installation to complete.


Once the installation finishes, it will ask you to restart the system. Restart it.
When the system turns off, it also asks you to remove the live USB and press enter.
Well, that’s it. You’ll now boot into Linux Mint. Enter your password you had created earlier and you’ll enter Linux Mint to see a welcome screen like this:
 Linux Mint Welcome Screen
Enjoy Linux Mint
Since you just installed it, do read our recommendation of things to do after installing Linux Mint 20.
I hope this tutorial helped you in installing Linux Mint 20 easily. If you face any issues or difficulties or if you have any confusion, feel free to leave a comment below.
Like what you read? Please share it with others.
About Abhishek Prakash
Creator of It’s FOSS. An ardent Linux user & open source promoter. Huge fan of classic detective mysteries ranging from Agatha Christie and Sherlock Holmes to Detective Columbo & Ellery Queen. Also a movie buff with a soft corner for film noir.
Tanman52
I wrote my first program in Fortran, on a mini computer at MTU, Michigan Technological University, Northern Michigan area. Getting a list of square roots. For my first year freshman class
I decided to major in Botany, minor computer science. Like them both.
Then took computer science with a strong push. Wrote code for many years, learned a lot of computer code in many programing languanges, In the 1970s. Wrote many computer programs. Many modeling programs for the engineers and biology majors. Also wrote code for them To model their thesis That is what the masters thesis students needed. Also wrote modeling for word processing needs for them.
Then went to medical school in 1980.
Retired from being a physician. After 37 years. Did some computer programming, but only a small amount.
Now, trying to get back into it. I used Linux in the 1970s and Unix is better said.
So, I loaded in Linux around 6 years back, but no programing, just word processing. I moved up in Linux. v 16, 17, 18, 19, and got a Lenovo laptop from Walmart for $200 and it crahsed it 3 times and it crashed. And got a reboot from Walmart, no charge. No it trashed out completely.
I need to get help with loading in Linux 20
I carried out the final instruction to remove the USB stick and pressed return. However it only booted as far as the grub> menu. What do I need to do to make it boot straight into Linux ?
That grub> menu means the installation had issue. Your grub system cannot see Linux partition. You can try fixing it by booting into live Linux USB again and using Boot Repair program.
If I enter exit at the prompt it carries on and loads Linux. I believe that I just need to add a couple of instructions at the grub> prompt in order to fix it, but I’m not sure what exactly these entries should be.
Well done guide. Setting to GPT versus MBR saved the day as I was getting hard disk failures until I changed it. Turning off the internet link sped things up as well. ASUS K52J I7. Thanks!
Hi, I think harddrive is bad as it will not load windows on Acer laptop. I have Linux on the USB running, but the installs fails… is there a way to get the Linux on the USB to scan and repair the disk? please explain how… thanks


