- Create the bootable media
- How to make a bootable USB stick
- In Linux Mint
- In Windows, Mac OS, or other Linux distributions
- How to make a bootable DVD
- In Linux
- In Windows
- In Mac OS
- Пошаговая установка
- 1. Загрузка дистрибутива
- 2. Запись дистрибутива на USB или CD
- 3. Подготовка раздела диска
- Для Windows
- Для macOS
- 4. Подготовка загрузчика
- macOS
- Windows
- 5. Загрузка Linux с CD или USB
- Для компьютеров с Windows
- Для компьютеров от Apple
- 6. Начало установки
- 7. Разметка диска
- Часть первая
- Часть вторая
- 8. Завершение установки
- Что делать после перезагрузки?
- Install Linux Mint 6 to a Flash Drive in Windows
- How to Install Linux Mint 20 [The Simplest Way Possible]
- Install Linux Mint by replacing Windows or any other operating system
- Step 1: Download Linux Mint ISO
- Step 2: Create a live USB of Linux Mint
- Step 3: Boot from the live Linux Mint USB
- Step 4: Install Linux Mint
- Enjoy Linux Mint
Create the bootable media
The easiest way to install Linux Mint is with a USB stick.
If you cannot boot from USB, you can use a blank DVD.
How to make a bootable USB stick
In Linux Mint
Right-click the ISO file and select Make Bootable USB Stick , or launch Menu ‣ Accessories ‣ USB Image Writer .
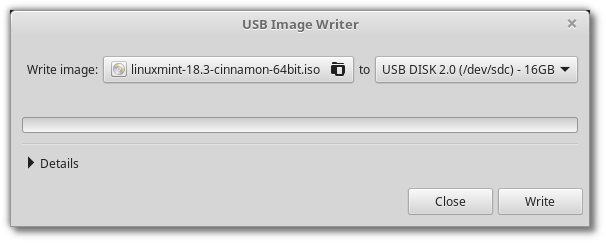
Select your USB device and click Write .
In Windows, Mac OS, or other Linux distributions
Download Etcher, install it and run it.
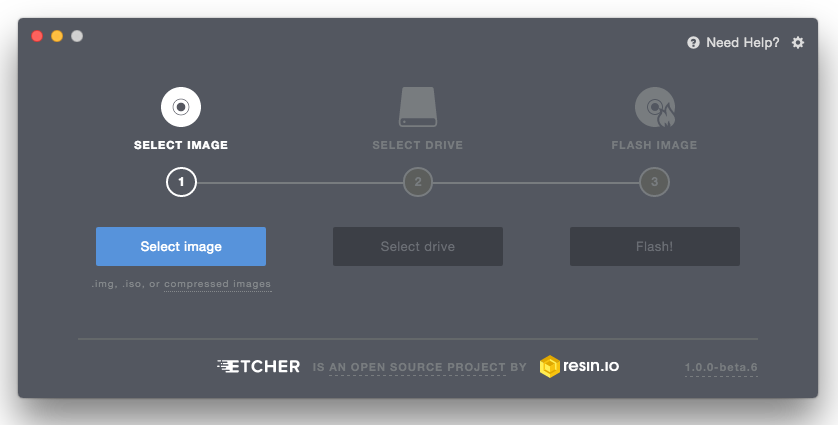
Click Select image and select your ISO file.
Click Select drive and select your USB stick.
How to make a bootable DVD
Optical discs are slow and burning to disc is prone to errors.
To prevent issues, burn at the lowest possible speed.
Burn the content of the ISO onto the DVD, not the ISO file itself. When finished, your DVD should contain directories such as boot and casper , it shouldn’t be an empty DVD containing an .iso file.
In Linux
Install and use xfburn .
In Windows
Right-click the ISO file and select Burn disk image .
To make sure the ISO was burned without any errors, select Verify disc after burning .
In Mac OS
Right-click the ISO file and select Burn Disk Image to Disc .
© Copyright 2017, Linux Mint Revision 11740971 .
Источник
Пошаговая установка
Сейчас каждый сможет установить Linux Mint или любой другой дистрибутив на компьютер, с уже установленной macOS, Windows или совсем на чистый носитель.
Вообще, OC Linux устанавливают по разным причинам. Например, на ваш очень старый компьютер невозможно установить новую версию Windows или macOS. Возможно, требуются уникальные программы, которые есть только на Linux. А скорее всего вам наскучила Windows (macOS). Хотя бывает и такое: вы купили компьютер, но на нём не была установлена OC и вы решили сэкономить на ОС, ведь все дистрибутивы Linux абсолютно бесплатны.
Данную OC установить совсем несложно. Без сомнений, существуют дистрибутивы типа Arch, которые сложно установить новичку. Но почти все новые дистрибутивы инсталлируются намного проще, а самое главное быстрее, чем его конкуренты Windows или macOS.
Перед тем как приступить к установке этой OC на свой рабочий компьютер: рекомендуется загрузить в облако все имеющиеся важные документы, фотографии и иные файлы, поскольку во время работы с распределением памяти под дистрибутив, вы можете случайно форматировать носитель и всё, что есть на ЖД, удалится без возможности восстановления. Но соблюдая нашу инструкцию, все будет хорошо. Также можно использовать Linux как вторую ОС.
1. Загрузка дистрибутива
Начать стоит с выбора дистрибутива. Здесь вам пригодятся наши публикации:
После выбора дистрибутива, окружения и разрядности, вам нужно его скачать. Но как сделать это?

Вы можете скачать русскую версию Линукс Минт непосредственно с нашего сайта, для этого выберите разрядность вашего процессора и требуемую версию ОС. Рекомендуем закачивать дистрибутив с помощью торрент-клиента, т.к. через торрент это сделать намного быстрее, чем скачивать напрямую с сервера.
2. Запись дистрибутива на USB или CD
Для записи вашей OC на CD носитель вам не понадобятся сторонние утилиты, вы можете воспользоваться стандартными утилитами, которые есть на Windows и на macOS. Нужно всего лишь нажать правой кнопкой мыши на скачанный файл формата ISO, после выбрать подходящую вкладку.

А вот для его записи на USB-носитель нужна утилита Rufus (для Windows) и UNetbootin (для macOS). Разобраться в них не составит труда.
3. Подготовка раздела диска
При установке OC на чистый ЖД, просто пропустите этот пункт.
Для Windows
Открываете меню пуск и пишете «Создание и форматирование разделов жёсткого диска». Открываете данную панель управления и выбираете раздел ЖД, от которого хотите отрезать место под OC. Нажимаете правой клавишей мыши по разделу и выбираете пункт «Сжать том». В большинстве случаев под Linux хватает 20 Gb, но если вы собрались устанавливать объёмные программы и утилиты, то ставьте больше.

Данный процесс будет выполняться длительное время, так что придётся подождать. После завершения сжатия тома появится новое неразмеченное пространство. Оно будет выделено чёрным цветом, ну вы заметите. Именно туда и будет устанавливаться ваш дистрибутив.
Для macOS
На macOS сделать это тоже несложно. Делается это через установленную по умолчанию «Дисковую утилиту». Нужно выбрать ваш диск нажать на значок «+» и создаём раздел.
4. Подготовка загрузчика
macOS
Начнём пожалуй с более сложной OC – это macOS. Как подготовить загрузчик на этой системе? Сделать это сложнее на яблочных устройствах, нежели на других, но справится каждый. Для начала отключите SIP. Первым делом нажимаете сочетание клавиш Cmd + R.
Должно открыться меню Recovery. Выбираете в нём «Терминал», затем вводите данную команду — csrutil disable. Перезагружаете устройство – SIP отключён. После этого вам необходимо будет скачать и установить программу rEFInd. Эта программа разрешит запускать на вашем устройстве macOS, Windows и Linux, ведь установленная по умолчанию программа Boot camp сможет запустить только Windows и macOS.
Распакуйте скачанную утилиту, после, снова открываете «терминал» и вводите команду «diskutil list». Ищете в списке, который появился, ваш EFI загрузчик (в основном это /dec/disk0s1). Далее вводим команду – mount /dec/disk0s1 с помощью перетаскивания файла install.sh (который находится в распакованной папки) в терминал, устанавливаете утилиту.
Windows
Если у вас установлена Windows 7 или более старая версия, то просто пропустите этот шаг.
Если же у вас версия Windows 8 или более новая версия, то у вас используется загрузчик UEFI, он вам не разрешит запустить никакую другую OC. Поэтому вы сейчас отправитесь исправлять это. Первым делом перезагружаете ваш PC и заходите в настройки BIOS, находите там функцию – Secure Boot и отключаете её, вот и всё готово. Осталось установить вашу новую OC.
5. Загрузка Linux с CD или USB
Для компьютеров с Windows
Для этого вам нужно перезагрузить ваш ПК, зайти в меню BUOS и запуститься с USB или CD носителя.
Для компьютеров от Apple
Нужно зажать клавишу Option и держать её длительное время.
6. Начало установки
После запуска с носителя вас встретит окно установки Linux. Почти все дистрибутивы используют одинаковую последовательность установки. Выберите язык системы, после нажмите «Установить». Следуйте действиям, как на скриншоте.


Примечание! Если у вас плохой интернет, то не стоит выбирать первый пункт, т.к. будут скачиваться все последние обновления и это займёт очень много времени при плохом интернет соединении.
7. Разметка диска
На этом шаге вам стоит быть более внимательным. Данный шаг делится на две части, в которых присутствует два вида установки (автоматический и ручной).
- Первая часть — тем, кто хочет установить Linux Mint в качестве основной OC.
- Вторая тем, кто хочет установить Linux и оставить основную OC.
Часть первая
Автоматическая установка
В этой части установщик сделает всё за вас (форматирует ЖД, создаст разделы необходимые OC и начнёт установку системы). Для этого необходимо выбрать «Стереть диск и установить Linux Mint».
Ручная установка
Выбирать только в случае, если захотели задавать размеры каждого раздела по отдельности. Для этого необходимо выбрать последнюю строчку «Другой вариант».

Здесь вы можете полностью распоряжаться своим ЖД: распределить место под каждый раздел, удалять разделы, создавать их и т.д.
Для установки дистрибутива вместо вашей OC необходимо нажать на раздел, в котором находится ваша старая OC Windows или macOS, удаляете его нажав на значок «-«.
После этого создаёте новые разделы, которые необходимы вам. Выставляете такие же настройки, как и на скриншотах, за исключением размеров, их вы выбираете сами. Также не забываем про SWAP – раздел, который необходим обладателям компьютеров с оперативной памятью до 8GB.


В списке файловых систем выбираете «Раздел подкачки», в остальном настройки, как и у раздела под OC.


После того, как вы нажмёте «Продолжить», а также подтвердите изменения, процесс установки начнётся.
Часть вторая
Автоматическая установка
Просто необходимо выбрать первый пункт и нажать кнопку продолжить, пойдёт процесс установки. Все нужные действия выполнятся в автономном режиме.
Ручная установка
Необходимо снова кликнуть на последний пункт «Другой вариант» и выбрать заранее подготовленное (не размеченное пространство на ЖД), точно такие же настройки, как и в первой части, но в точке монтирования нужно выбрать «/», за счёт этого вы сможете управлять файлами Linux в вашей основной OC Windows (macOS).
Нажимаете «Продолжить» и установка начинается, при запуске вашего PC вам будет предоставлена возможность выбирать OC, с которой будет запускаться компьютер.

8. Завершение установки
После завершения установки в окне вас попросят ввести город, в котором вы находитесь, для того, чтобы определить ваш часовой пояс. После вам необходимо будет ввести ваше имя, имя компьютера и придумать пароль. Обязательно запомните пароль, ведь он вам понадобится для входа в систему, работы в терминале и многом другом.

По завершению установки нужно будет вытащить установочный носитель и перезагрузить ваш компьютер. Кстати, не забудьте в настройках BIOS вернуть порядок загрузки носителей (если вы меняли порядок).
Что делать после перезагрузки?
После перезагрузки вы сможете делать все то же самое, что и раньше в Windows и macOS: работать, играть, сидеть в соц. сетях, смотреть фильмы и всё в этом духе. Обязательно обновитесь через терминал и посмотрите, что вам предлагает Магазин приложений, для того чтобы установить нужные вам программы.
Источник
Install Linux Mint 6 to a Flash Drive in Windows
Last updated: March 1, 2010
Create a Linux Mint 6 Persistent Flash Drive using Windows. The following tutorial covers how to install, boot and run Linux Mint from a USB device using Windows and our custom USB Installer script to create a portable Linux Mint Flash Drive. Linux Mint 6 Felicia is a remix of Ubuntu Linux 8.10. Originally launched as a variant of Ubuntu with integrated media codecs, Linux Mint has developed into an elegant Linux distribution. Linux Mint is currently maintained by Clement Lefebvre.
Note: The Linux Mint Persistent feature works just as it does in Ubuntu, allowing you to save and restore your changes.
Linux Mint 6 Felicia Screenshot:
Distribution Home Page: linuxmint.com
Minimum Flash Drive Capacity: 2GB
Persistent Feature: Yes
Linux Mint Flash Drive creation essentials:
- 2GB or Larger USB Flash Drive (Fat32 formatted)
- Linux Mint ISO
- Universal USB Installer
How to create a Linux Mint Flash Drive from Windows:
- Download the LinuxMint-6.iso
- Download and run the Universal USB Installer and follow the onscreen instructions.
- Reboot your PC and set your system BIOS or Boot Menu to boot from the USB device, save your changes and reboot booting from the USB memory stick.
Upon reboot, you should have a successful launch of USB Linux Mint (Portable Linux Mint) from your flash memory stick.
Источник
How to Install Linux Mint 20 [The Simplest Way Possible]
Undoubtedly, Linux Mint is one of the best Linux distributions for beginners. It is easy to use, doesn’t consume lots of system resource and has tons of software available.
There are various ways to install Linux Mint:
- Install Linux Mint in VirtualBox in Windows like a regular desktop application.
- Install Linux Mint in dual boot mode with Windows keeping both Windows and Linux Mint on the same computer.
- Replace all other operating systems and install Linux Mint as the only OS on your computer.
In this tutorial, I’ll show you how to install Linux Mint removing other operating systems from your computer.
Install Linux Mint by replacing Windows or any other operating system
I am using Linux Mint 20 Cinnamon edition. However, the steps work for other Mint versions and desktop variants like Xfce and MATE. The screenshot might look a little bit different but the steps remain the same.
- A USB of at least 4 GB in size. You may also use a DVD.
- Active internet connection for downloading Linux Mint ISO and live-USB making tool. Internet is not required for installing Linux Mint.
- This is optional but if you have important data on the system where you are going to install Linux Mint, you should copy the files on an external disk.
Minimum system requirements for Linux Mint 20 default Cinnamon edition:
- Minimum 1 GB RAM (2 GB recommended for a comfortable usage).
- Minimum 15 GB of disk space (20 GB recommended).
- Minimum 1024×768 resolution (on lower resolutions, press ALT to drag windows with the mouse if they don’t fit in the screen).
This method of installing Linux Mint formats your entire disk. That means any data present on the system will be wiped out.
For this reason, please save your data on an external USB disk so that you can copy it back after installing Mint.
Step 1: Download Linux Mint ISO
Go to Linux Mint website and download Linux Mint in ISO format. This file is used for creating the installation USB.
You’ll find three variants:
If you do not know about them, go with the default Cinnamon edition. When you click on that, you’ll find various mirror websites and torrent link to download the ISO file.
If you have a good internet connection for downloading 2 GB of file without any issue, use a mirror which is closer to your country of residence (for faster download).
If you do not have a good, consistent internet connection, opt for the torrent version (if you know what torrent is).
Download Linux Mint
Step 2: Create a live USB of Linux Mint
Now that you have downloaded the ISO, it is time for creating a live USB of Linux Mint.
You’ll need a dedicated software that creates a live USB. There are several such tools available for free. You can use Etcher which is available on Windows, Linux and macOS.
If you are using Windows, you can also use Rufus. In the example here, I have used Rufus.
Download Rufus and run the .exe file and you’ll see a screen like the below image.

You select the ISO. You may confuse over the partitioning scheme. Almost all the computers in last 7 years or so use GPT partitioning scheme. Older computers may use the MBR partitioning. You should check which partitioning scheme your system uses to be sure.
If you choose the incorrect partitioning scheme, you may not be able to Linux Mint. In that case, come back to this step and recreate the USB by choosing the other partitioning scheme.
Step 3: Boot from the live Linux Mint USB
Once you have successfully created the Linux Mint USB, it is time to use it for installing the awesome Linux Mint.
Plug in the live USB of Linux Mint and restart your system. At the boot screen when you see the logo of your computer manufacturer, press F2 or F10 or F12 to enter the BIOS settings.
In here, you should make sure that booting for USB or removable media is on the top of the boot order.
This screen may look different for different manufacturers. You’ll have to find this setting on your own or search the internet.
Make the changes, save and exit.
Step 4: Install Linux Mint
Now you should boot into the live Linux Mint environment. You’ll see a screen like this that gives you a couple of options. Go with the first option.
In a few seconds you’ll be inside the Linux Mint live environment. It may take more time if you have USB 2.
You’ll see a “Install Linux Mint” icon on the desktop. Click on it to start the installation procedure.
It will ask you to choose some basic configurations like language and keyboard layout. Choose the most appropriate ones for your system.
Avoid connecting to internet during installation
I strongly advise NOT connecting to internet while installing Linux Mint. This way the installation is quicker as it does not try downloading updates while installation.
Not connecting to the internet may also save you a few unpleasant surprises. I encountered a “‘grub-efi-amd64-signed’ package failed to install into /target” error and my installation failed. I plugged out the live USB and tried installing it again without connecting to the internet and the error didn’t appear this time.
The next screen is the most important part of Linux Mint installation. You are going to format the entire hard disk and install Linux Mint. Linux Mint will be the only operating system on your computer.
Again, this means that you’ll lose all the data on the disk. Please copy important files on an external disk.
In this method, Linux Mint handles everything on its own. It creates an ESP partition for EFI boot manager of about 500 MB and the rest of the disk is allocated to root partition. The root consists a swapfile for swap usage and your home directory. This is the easiest setup with no extra effort.

You’ll be warned that disk will be formatted. Hit continue and you’ll have to select timezone in the next. You may change it later as well.
After that, you’ll face a screen that asks you to set username and password. Use an easy to remember password because you’ll have to use it all the time.
Things are pretty straightforward from here. You just have to wait for like 5-10 minutes for the installation to complete.


Once the installation finishes, it will ask you to restart the system. Restart it.
When the system turns off, it also asks you to remove the live USB and press enter.
Well, that’s it. You’ll now boot into Linux Mint. Enter your password you had created earlier and you’ll enter Linux Mint to see a welcome screen like this:
Linux Mint Welcome Screen
Enjoy Linux Mint
Since you just installed it, do read our recommendation of things to do after installing Linux Mint 20.
I hope this tutorial helped you in installing Linux Mint 20 easily. If you face any issues or difficulties or if you have any confusion, feel free to leave a comment below.
Like what you read? Please share it with others.
Источник


