- Получаем информацию об оборудовании в Linux
- Информация о процессоре (CPU)
- Информация о PCI устройствах (информация о видео-карте)
- Информация об оперативной памяти (ОЗУ)
- Информация о жестких дисках
- Информация о USB устройствах и шинах USB
- Неконсольные программы
- Дополнительная информация
- 5 GUI Tools to See Hardware Information in Ubuntu/Linux
- 1. I-Nex
- 2. Hardinfo
- 3. Sysinfo
- 4. lshw-gtk (Hardware Lister)
- 5. KInfoCenter (KDE Info Center)
- Author: Jaber Al Nahian
- 16 Commands to Check Hardware Information on Linux
- Hardware information
- 1. lscpu
- 2. lshw — List Hardware
- 3. hwinfo — Hardware Information
- 4. lspci — List PCI
- 5. lsscsi — List scsi devices
- 6. lsusb — List usb buses and device details
- 7. Inxi
- 8. lsblk — List block devices
- 9. df — disk space of file systems
- 10. Pydf — Python df
- 11. fdisk
- 12. mount
- 13. free — Check RAM
- 14. dmidecode
- 15. /proc files
- 16. hdparm
- Summary
- 48 thoughts on “ 16 Commands to Check Hardware Information on Linux ”
Получаем информацию об оборудовании в Linux
Рассмотрим несколько полезных команд и утилит с помощью которых можно получить информацию об оборудовании в Linux. Такая потребность возникает, например, тогда, когда вам нужно установить драйвер для какого-нибудь устройства компьютера и вам нужно знать его точное название. Или, например, вы хотите получить информацию о занимаемой памяти или ресурсах компьютера.
Информация о процессоре (CPU)
Получить всю необходимую информацию о центральном процессоре в Linux можно выполнив в терминале команду:
Чтобы определить является ли ваш процессор 32-х или 64-битным нужно просмотреть флаги, которые указаны в выводе команды. Если среди флагов присутствует lm (long mode), это означает, что ваш процессор 64-битный. Например, при выполнении команды cat /proc/cpuinfo мы можем получить следующие флаги:
Информация о PCI устройствах (информация о видео-карте)
С помощью команды lspci можно вывести всю информацию о PCI устройствах:
Эту команду часто используют, чтобы получить информацию о видео-карте. Так как вывод команды lspci достаточно большой, то можно воспользоваться командой grep, чтобы задать условие поиска. Например, если мы знаем, что у нас видео-карта от Nvidia, тогда можно воспользоваться командой:
И в результате получить что-нибудь вроде:
Обратите внимание на то, что команда grep чувствительна к регистру символов и поэтому, если вы с первого раза не нашли то, что искали, то стоит попробовать другое написание, например, nvidia, NVIDIA или просто idia. Аналогично можно искать информацию в выводе любых других команд, добавляя к команде: «| grep строка-поиска.
Информацию о версии драйвера для видео-карт Nvidia в Linux можно получить выполнив:
Информация об оперативной памяти (ОЗУ)
Чтобы получить информацию об объеме, а также о количестве свободной и занятой оперативной памяти можно воспользоваться командой:
Информацию о виртуальной памяти можно получить командой vmstat:
Если вам нужна более детальная информация о процессах, занимающих оперативную память, о загруженности процессора (CPU), тогда можно использовать утилиты Top или htop. Утилита top как правило всегда присутствует в Linux. Для ее запуска просто выполните:
Информация о жестких дисках
Информация о разделах жесткого диска в Linux:
Информация о монтированных разделах, количество свободной и занятой памяти:
Есть еще одна полезная команда du, которая выводит информацию о размере каждого файла в текущей и во вложенных директориях. Если вы хотите получить информацию обо всех файлах в текущей директории выполните команду без параметров:
В качестве параметра можно задать имя файла, например, чтобы узнать размер файла abc.bin выполните:
Информация о USB устройствах и шинах USB
Для вывода информации о шинах USB и о подключенных USB устройствах используется команда lsusb:
Неконсольные программы
Рассмотрим несколько графических программ, которые помогут при работе с оборудованием.
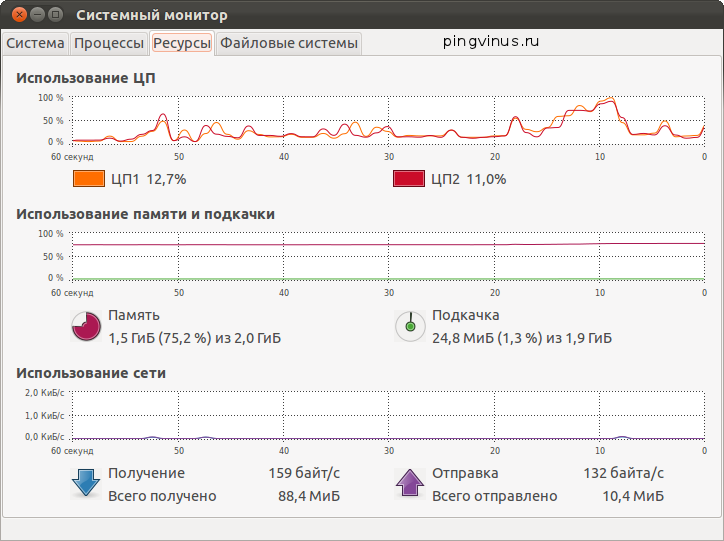
В среде рабочего стола Gnome есть графическая утилита System monitor (Системный монитор). Она выводит информацию об использовании процессора, о запущенных процессах (приложениях), информацию о жестких дисках, а также выводит графики, включая использование сети. Из командой строки ее можно запустить выполнив:
Для работы с жесткими можно воспользоваться программой GParted.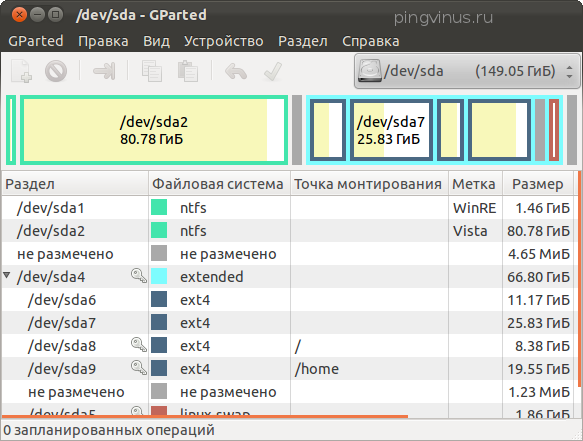
Дополнительная информация
Напоследок обязательно стоит упомянуть об очень важной команде lshw, которая выводит практически всю информацию о вашем компьютере. Команду lshw нужно запускать под пользователем root:
Чтобы вывести краткую информацию используется ключ -short:
Получить более подробную информацию о командах, описанных в статье, можно используя справочную систему Linux. Для этого в консоли нужно выполнить:
Например, чтобы получить всю информацию о команде du, выполните команду:
Источник
5 GUI Tools to See Hardware Information in Ubuntu/Linux
Here are 5 best graphical tools to check your Linux hardware information without using harsh commands.
Checking hardware (CPU, motherboard, process, etc.) information is one of the most common and important tasks we do in our computers. Viewing details of physical components of a computer lets us get idea about a computer’s configuration. It let’s us assume which physical system we are working with, as well as having idea how good a machine would perform and which operating systems and drivers are applicable for it. In one word, hardware info is an obvious part of the details a user should know about his/her system.

In Windows OS, the most general way to see hardware configuration is to right-click on My Computer icon and then clicking Properties from context menu. This provides a minimal information. For more detailed view, Windows Device Manger and System Information utilities can be used. As third party tools, Speccy and CPU-Z seem to be very popular, though the number of system/hardware information tool for Windows is endless.
As of Linux OS, most of the tools you get to see system information are command-line based. This means, once you install those tools, you need to type-in commands in Terminal to get output about installed hardware units. This is really a boring procedure and not convenient to anyone.
I have searched for programs that present hardware specifications in Linux system without requiring any command to input, and found a plenty of utilities. I have selected 5 best ones to show here that works out of the box. You may search for the following tools in your software store (if you have one in your Linux) for jump installation.
1. I-Nex
Probably the best CPU-Z alternative for Linux. I-Nex resembles CPU-Z’s UI. And you would probably like it.

I-Nex shows detailed information on your CPU, Graphics(GPU), Motherboard, Audio hardware and many more in very beautiful way. Major hardware units have their one tab. Every tab contains the device name/model, manufacturer, driver info, and other available data. The presentation provided here is very clear and easy to understand. It even lets you generate customizable report on the whole system. It lets you take screenshot too.
Along with hardware, in also shows useful details on your operating system, such as, Linux distro name, version, GCC version, X.Org version, etc. There’s also a tab for Kernel information.
To install I-Nex on Ubuntu/Mint or any derivatives, type the following commands one after another at each prompt in Terminal.
For Arch Linux, Fedora, openSUSE, Manjaro and other derivatives, here’s the official guide to install.
2. Hardinfo
HardInfo is a hardware analysis, system benchmark and report generator tool that can be found pre-installed in Linux Mint. It lists all hardware units vertically on left side of the program. You need to click on the name of a device to reveal details of that component. The Summary entry shows overview of your whole system in a short form.
![]()
Besides generating report in HTML, you can compare your system with other systems with its benchmarking tools from bottom.
To install Hardinfo, run the following commands into Terminal in Debian/Ubuntu/Mint and its derivatives.
On Fedora, use the following command:
3. Sysinfo
A lightweight program that shows your hardware information in simple way. Unlike above programs, it doesn’t show much information.
![]()
Use the following command to install in Ubuntu/Mint:
4. lshw-gtk (Hardware Lister)
![]()
This the graphical version the popular command-line hardware info tool lshw. Use Refresh from toolbar if you see blank window. Though it looks so simple, the information it provides are really extensive and informative. It also features export function with XML, HTML and plain text support. Use Save button to export your report.
Installation command for Ubuntu/Mint:
Then type lshw-gtk in Terminal to launch it.
For Fedora, use the following command:
Use lshw-gui command in Terminal to launch it.
5. KInfoCenter (KDE Info Center)
![]()
KInfoCenter is a part of KDE desktop environment. But it can be installed on other desktops too. This utility provides various information that are unique to your hardware. You get information on PCI, Network Interfaces, X Server, USB Devices, IO Ports, etc. along with main hardware units. If you have a Linux with KDE desktop, you may already have this installed.
Install KInfoCenter in Ubuntu/Mint using following command:
To install in Fedora, use following command:
On both OS, type kinfocenter in Terminal to launch it.
I personally like I-Nex. It’s sleek design and faster startup beats anything. Let us know which hardware info utility you are using.
![]()
Author: Jaber Al Nahian
Jaber is a Programmer and Tech Enthusiast Geek from Dhaka, Bangladesh. He is the founder and Chief-Editor of TechGainer. While he is away from his keyboard, either he’s fishing or messing with wildlife. In case, you can contact him at rijans[at]techgainer[dot]com.
Источник
16 Commands to Check Hardware Information on Linux
Hardware information
Like for every thing, there are plenty of commands to check information about the hardware of your linux system.
Some commands report only specific hardware components like cpu or memory while the rest cover multiple hardware units.
This post takes a quick look at some of the most commonly used commands to check information and configuration details about various hardware peripherals and devices.
The list includes lscpu, hwinfo, lshw, dmidecode, lspci etc.
1. lscpu
The lscpu command reports information about the cpu and processing units. It does not have any further options or functionality.
2. lshw — List Hardware
A general purpose utility, that reports detailed and brief information about multiple different hardware units such as cpu, memory, disk, usb controllers, network adapters etc. Lshw extracts the information from different /proc files.
Check out the following post to learn more about lshw
3. hwinfo — Hardware Information
Hwinfo is another general purpose hardware probing utility that can report detailed and brief information about multiple different hardware components, and more than what lshw can report.
4. lspci — List PCI
The lspci command lists out all the pci buses and details about the devices connected to them.
The vga adapter, graphics card, network adapter, usb ports, sata controllers, etc all fall under this category.
Filter out specific device information with grep.
5. lsscsi — List scsi devices
Lists out the scsi/sata devices like hard drives and optical drives.
6. lsusb — List usb buses and device details
This command shows the USB controllers and details about devices connected to them. By default brief information is printed. Use the verbose option «-v» to print detailed information about each usb port
On the above system, 1 usb port is being used by the mouse.
7. Inxi
Inxi is a 10K line mega bash script that fetches hardware details from multiple different sources and commands on the system, and generates a beautiful looking report that non technical users can read easily.

8. lsblk — List block devices
List out information all block devices, which are the hard drive partitions and other storage devices like optical drives and flash drives
9. df — disk space of file systems
Reports various partitions, their mount points and the used and available space on each.
10. Pydf — Python df
An improved df version written in python, that displays colored output that looks better than df
11. fdisk
Fdisk is a utility to modify partitions on hard drives, and can be used to list out the partition information as well.
12. mount
The mount is used to mount/unmount and view mounted file systems.
Again, use grep to filter out only those file systems that you want to see
13. free — Check RAM
Check the amount of used, free and total amount of RAM on system with the free command.
14. dmidecode
The dmidecode command is different from all other commands. It extracts hardware information by reading data from the SMBOIS data structures (also called DMI tables).
Check out the man page for more details.
15. /proc files
Many of the virtual files in the /proc directory contain information about hardware and configurations. Here are some of them
16. hdparm
The hdparm command gets information about sata devices like hard disks.
Summary
Each of the command has a slightly different method of extracting information, and you may need to try more than one of them, while looking for specific hardware details. However they are available across most linux distros, and can be easily installed from the default repositories.
On the desktop there are gui tools, for those who do not want to memorise and type commands. Hardinfo, I-nex are some of the popular ones that provide detailed information about multiple different hardware components.
A Tech Enthusiast, Blogger, Linux Fan and a Software Developer. Writes about Computer hardware, Linux and Open Source software and coding in Python, Php and Javascript. He can be reached at [email protected] .
48 thoughts on “ 16 Commands to Check Hardware Information on Linux ”
How i can check memory in CPU. Example OPT, Efuse
Thanks for this. I’m just getting going on a VPS and this helped me discover they’d not given me the extra 1Gb I ordered. Very well explained.
Super happy with
inxi -Fx
more accurate than some of the other utilities.. for instance hwinfo was inaccurate for my Lenovo
Thanks for the great post!
Thank you! Your descriptions were useful and well explained!
Источник


