- Linux mint live usb how to
- Requirements :
- Creating Linux Mint USB in Windows :
- Creating Linux Mint USB in Linux ( Ubuntu in this case ) :
- Creating Linux Mint USB in Mac :
- Create the bootable media
- How to make a bootable USB stick
- In Linux Mint
- In Windows, Mac OS, or other Linux distributions
- How to make a bootable DVD
- In Linux
- In Windows
- In Mac OS
- Linux Live CD USB — загрузочная флешка с Linux
- Загрузочная флешка с Puppy Linux. Puppy Linux Live CD/USB
- Как создать загрузочную флешку с Puppy Linux
- Загрузочная флешка c Linux Mint Wizard LiveCD — USB
- Как проверить загрузочную флешку с Puppy Linux 4.3.1 без перезагрузки
- Как создать загрузочный диск с Puppy Linux 4.3.1
- Загрузочная флешка c Linux Mint Wizard LiveCD — USB
- Где скачать Linux Mint Wizard LiveCD
- Какие программы есть на Linux Mint Wizard LiveCD
- Как сделать загрузочную флешку, загрузочный диск и др. с Linux Mint Wizard LiveCD
- Загрузочная флешка c Simply Linux Live Cd 7.0.5 (или след. версий)
- Где скачать Simply Linux Live CD
- Преимущества Simply Linux Live CD
- Как сделать загрузочную флешку, загрузочный диск и др. с Simply Linux Live CD
- Как добавить любой из Linux Live образов на мультизагрузочную флешку
- Как создать загрузочную флешку в ОС LINUX с Puppy Linux Live CD, Linux Mint Wizard LIVE CD или Simply Linux Live CD
- Загрузочная флешка с linux live CD. Выводы
- Create A Persistent Storage Live USB With Ubuntu, Linux Mint Or Debian (UEFI, >4GB Persistence Support)
- How to install and use mkusb to create a persistent storage live USB with Ubuntu, Linux Mint or Debian
- How to Install Linux Mint 20 [The Simplest Way Possible]
- Install Linux Mint by replacing Windows or any other operating system
- Step 1: Download Linux Mint ISO
- Step 2: Create a live USB of Linux Mint
- Step 3: Boot from the live Linux Mint USB
- Step 4: Install Linux Mint
- Enjoy Linux Mint
Linux mint live usb how to
By:   Alok Yadav   [ Email  / Twitter ] ON : 4 December, 2013 In: Tutorial 44 Comments
In this tutorial i will show you how to create bootable USB of Linux Mint ( 16 Petra , but it works for other versions also ) in Windows, Linux and Mac OSX . Linux Mint 16 Is released few days ago with many new features and shiny interface . you can see more about Linux Mint new features and download Link in my previous post .
Requirements :
- At Least 8 GB USB ThumbDrive ( USB pendrive )
- Linux Mint 16 ISO ( Download Link )
Creating Linux Mint USB in Windows :
- Download and install LILI USB CREATOR ( it’s a small utility to simplify Linux USB creation )
- open lili USB creator and choose USB target Device
- choose ISO image
- uncheck ( Enable Launching Linux LIve in windows ) Lili USB creator
Creating Linux Mint USB in Linux ( Ubuntu in this case ) :
- Place your ISO on Desktop
- open Unity Dash ( just press super or windows key )

- search USB and choose USB disk creator
- choose ISO image and target device
- wait until it finish copying
- remove your USB drive
- Reboot and choose USB as first boot device to boot into Linux Mint


Creating Linux Mint USB in Mac :
- Insert Your Flash Drive
- open disk utility and format your USB drive ( fat32 , MBR partition )
- Place your downloaded ISO on desktop
- Open Terminal ( Applications>>Utilities >> Terminal
- Convert Your ISO to IMG


( NOTE : Choose source img and target device carefully )


Now that flash drive ready to boot and install Linux mint , if you fount this useful keep share , For supporting us just like us on Facebook or plus one on google plus
Источник
Create the bootable media
The easiest way to install Linux Mint is with a USB stick.
If you cannot boot from USB, you can use a blank DVD.
How to make a bootable USB stick
In Linux Mint
Right-click the ISO file and select Make Bootable USB Stick , or launch Menu ‣ Accessories ‣ USB Image Writer .
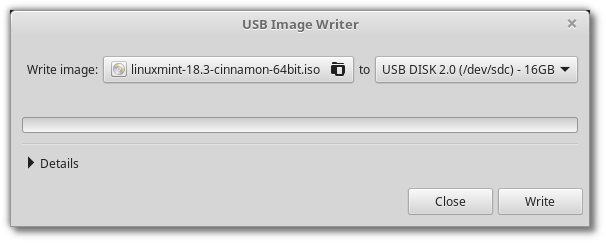
Select your USB device and click Write .
In Windows, Mac OS, or other Linux distributions
Download Etcher, install it and run it.
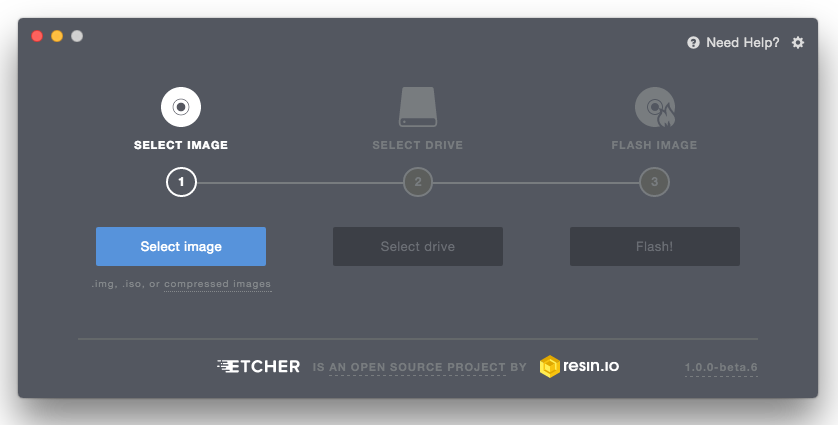
Click Select image and select your ISO file.
Click Select drive and select your USB stick.
How to make a bootable DVD
Optical discs are slow and burning to disc is prone to errors.
To prevent issues, burn at the lowest possible speed.
Burn the content of the ISO onto the DVD, not the ISO file itself. When finished, your DVD should contain directories such as boot and casper , it shouldn’t be an empty DVD containing an .iso file.
In Linux
Install and use xfburn .
In Windows
Right-click the ISO file and select Burn disk image .
To make sure the ISO was burned without any errors, select Verify disc after burning .
In Mac OS
Right-click the ISO file and select Burn Disk Image to Disc .
© Copyright 2017, Linux Mint Revision 11740971 .
Источник
Linux Live CD USB — загрузочная флешка с Linux
Хотите сделать себе загрузочную флешку (LIVE CD — НЕ УСТАНОВОЧНУЮ, А ГРУЗИТЬ LINUX С ФЛЕШКИ) (или загрузочный диск) с Linux, но не знаете как?
В этой статье, я расскажу как создать загрузочную флешку с Linux (загрузочный диск с Linux)
Загрузочная флешка с Puppy Linux. Puppy Linux Live CD/USB
Puppy Linux Live CD — очень популярная LIVE сборка, которую используют многие мастера своего дела.
Преимущества Puppy Linux Live CD/USB:
- Весит всего 100mb
- Кушает всего 128 mb оперативной памяти
- Запускается очень быстро
Как создать загрузочную флешку с Puppy Linux
Загрузочную флешку с Puppy Linux 4.3.1 можно создать с помощью программы Rufus
Первым делом, нужно запустить Rufus
После запуска Старт, загрузочная флешка с Puppy Linux через 1 минуту будет готова.
Загрузочная флешка c Linux Mint Wizard LiveCD — USB
Linux Mint Wizard LiveCD/USB — отличный Linux Live CD/USB с множеством утилит и программ на борту.
Какие программы есть на Linux Mint Wizard LiveCD
Загрузочную флешку с Puppy Linux будем делать в программе Rufus
Как проверить загрузочную флешку с Puppy Linux 4.3.1 без перезагрузки
Как проверить загрузочную флешку без перезагрузки
Готово!
 Загрузочная флешка с Puppy Linux 4.3.1
Как создать загрузочный диск с Puppy Linux 4.3.1
Для загрузки загрузочного CD-диска с Puppi Linux, вам нужно:
- Загрузить iso образ с Puppy Linux
- Записать iso образ на диск. Записать iso нужно правильно, не как файл, а как образ iso на диск. Подробнее
Загрузочная флешка c Linux Mint Wizard LiveCD — USB
Linux Mint Wizard LiveCD/USB — отличный Linux Live CD/USB с множеством утилит и программ на борту.
Где скачать Linux Mint Wizard LiveCD
Какие программы есть на Linux Mint Wizard LiveCD

Как сделать загрузочную флешку, загрузочный диск и др. с Linux Mint Wizard LiveCD
Загрузочный диск и флешка, делается точно также как и с Puppy Linux, только использовать надо iso образ с Linux Mint Wizard LiveCD
Загрузочная флешка c Simply Linux Live Cd 7.0.5 (или след. версий)
Simply Linux Live CD — лёгкая и простая в использовании операционная система
Где скачать Simply Linux Live CD
Загружать надо altlinux-7.X.X-simply-i586-live-dvd5.iso
Преимущества Simply Linux Live CD
- Многофункциональная рабочая среда Xfce
- ОС Simply Linux Live CD имеет на борту 30 приложений и русский интерфейс
Как сделать загрузочную флешку, загрузочный диск и др. с Simply Linux Live CD
Загрузочный диск и флешка, делается точно также как и с Puppy Linux, только использовать надо iso образ с Simply Linux Live CD
Как добавить любой из Linux Live образов на мультизагрузочную флешку
Для добавления любой из предложенных Linux на мультизагрузочную флешку, закиньте ISO в папку boot на флешке.
Переименуйте файл в linuxlivecd.iso.
Пропишите в файле menu.lst:
title Linux Live CD
find —set-root /boot/linuxlivecd.ISO
map —mem /boot/linuxlivecd.ISO (hd32)
map —hook
chainloader (hd32)
Как создать загрузочную флешку в ОС LINUX с Puppy Linux Live CD, Linux Mint Wizard LIVE CD или Simply Linux Live CD
Загрузочная флешка с linux (с любой из версий), создаётся с помощью программы Unebootin
Как создать загрузочный носитель в программе Unebootin в ОС Linux , описано тут
Загрузочная флешка с linux live CD. Выводы
Загрузочная флешка с linux — важный инструмент, который должен присутствовать у каждого. С помощью linux live cd, можно выполнить те задачи, которые нельзя выполнить с Windows live cd
Например: восстановление файлов (на Windows видно битые фото, а на Linux Live CD, можно скопировать нормальные)
А для чего нужна Вам загрузочная флешка с Linux?
Источник
Create A Persistent Storage Live USB With Ubuntu, Linux Mint Or Debian (UEFI, >4GB Persistence Support)
When you create a regular Linux live USB, you can install software, download files, make changes to the system, and so on, but all of these changes are lost after a reboot. A persistent live USB allows saving any changes you make to the live system, so the they are still present the next time you boot to it.
This article explains creating a persistent live USB with Ubuntu (and flavors like Kubuntu, Xubuntu, Ubuntu MATE, etc.), Linux Mint, Debian or elementary OS (it should work with any Debian or Ubuntu based Linux distribution), using mkusb. You’ll need to be running Ubuntu, Linux Mint or Debian to install mkusb (it seems you may be able to install mkusb on other Linux distributions, but there’s no list of dependencies to install manually, and it may or may not work).
mkusb can create persistent live drives that work in both UEFI and BIOS mode. The persistence storage partition created by mkusb uses casper-rw, so it can have a size of more than 4 GB, unlike some other similar tools.
This tool can not only create persistent storage live USB drives, but also regular bootable live USBs of Linux distributions, wipe a device, and more. The only downside of mkusb is its user interface, which uses Zenity and can be a bit confusing, but other than that the application works great.
A few related articles from Linux Uprising that might interest you:
How to install and use mkusb to create a persistent storage live USB with Ubuntu, Linux Mint or Debian
1. Install mkusb on Ubuntu, Linux Mint or Debian
In Ubuntu, Linux Mint, elementary OS and other Ubuntu-based Linux distributions or flavors, mkusb can be installed by using its official PPA:
For Debian, the mkusb developer recommends using the same Ubuntu PPA. That’s because mkusb is only a series of scripts which don’t depend on specific Ubuntu package versions, so it works on Debian (unlike most PPA repositories). Manually add the mkusb PPA and install this tool in Debian:
You may also install mkusb on other Linux distributions, but the installation may require installing some packages manually, etc. See the mkusb wiki page for how to do this.
2. Launch mkusb from the applications menu. When it starts, the application asks you if it should run the dus version of mkusb (a revamped interface of mkusb), or another version:
In this dialog press YES to continue with the «dus» version.
3. Next, you’ll see a mkusb window that asks to enter your password on top of a terminal window:
Enter your password and press OK to continue. Make sure you don’t close the terminal window, as that’s where mkusb runs the commands required to create a persistent storage, bootable live USB!
4. mkusb will now present a list of options:
Select the first one — Install (make a boot device) -, and press OK to continue.
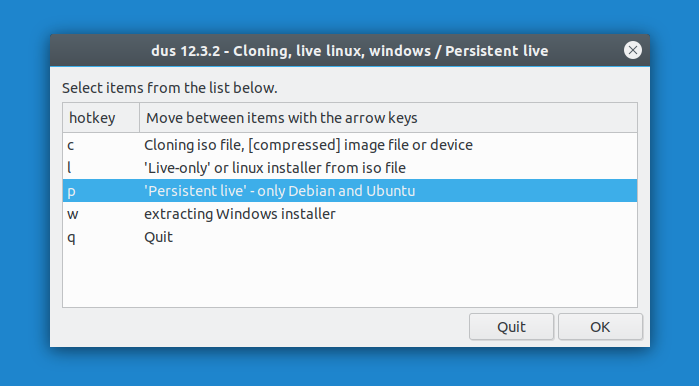
5. Next, another list of options is presented:
To create a persistent storage live USB, click on the third option — ‘Persistent live’ — only Debian and Ubuntu -, and click OK .
6. mkusb will now ask you to select an ISO or IMG file:
Select the Ubuntu (including Kubuntu, Xubuntu, Ubuntu MATE, Lubuntu, Ubuntu Budgie, etc.), Debian or Linux Mint (Cinnamon, MATE or Xfce) image from your filesystem, and click OK to continue.
7. For the next step, mkusb will present a list of storage devices. Make sure to select an USB or some other removable drive in this step, and not your HDD/SSD:
Double check that you’ve selected the correct target device (all data on the selected storage device will be lost!), and click OK to continue.
8. mkusb will now present some persistent live drive settings:
In this dialog you can enable upefi (comes from the package named usb-pack-efi , used by mkusb), in which Grub works in UEFI and BIOS mode. You can also enable the msdos option, which can help with some HP computers that can’t boot with Grub and GPT. Click OK when you’re done.
9. It’s now time to select the percentage of available space for persistence:
This is the space that will be available for the Linux distribution you’re going to install on the USB stick. Drag the slider to the desired persistence percentage and press the OK button. Don’t worry about the size of the persistence partition, mkusb doesn’t have the maximum 4 GB persistent storage limit present in some other bootable USB creators.
The remaining storage space on the USB drive will be used for a new usbdata partition that’s formatted as NTFS, which can be accessed from Linux, Windows and macOS — use this partition to store data on the USB drive that you want to access from other operating systems.
10. In this final step you’ll be presented with a confirmation screen:
If you’re sure you’ve selected the correct storage device and ISO file, you can now proceed to start creating the persistent live USB.
Select the line that says Go (Yes, I want to go ahead) and press the Go button at the bottom of the window. After this, mkusb will start creating the persistent storage Ubuntu, Linux Mint or Debian live USB.
Now boot the new live USB and select one of the Grub menu entries that says «persistence» (there will also be some non-persistence Grub menu items).
Источник
How to Install Linux Mint 20 [The Simplest Way Possible]
Undoubtedly, Linux Mint is one of the best Linux distributions for beginners. It is easy to use, doesn’t consume lots of system resource and has tons of software available.
There are various ways to install Linux Mint:
- Install Linux Mint in VirtualBox in Windows like a regular desktop application.
- Install Linux Mint in dual boot mode with Windows keeping both Windows and Linux Mint on the same computer.
- Replace all other operating systems and install Linux Mint as the only OS on your computer.
In this tutorial, I’ll show you how to install Linux Mint removing other operating systems from your computer.
Install Linux Mint by replacing Windows or any other operating system
I am using Linux Mint 20 Cinnamon edition. However, the steps work for other Mint versions and desktop variants like Xfce and MATE. The screenshot might look a little bit different but the steps remain the same.
- A USB of at least 4 GB in size. You may also use a DVD.
- Active internet connection for downloading Linux Mint ISO and live-USB making tool. Internet is not required for installing Linux Mint.
- This is optional but if you have important data on the system where you are going to install Linux Mint, you should copy the files on an external disk.
Minimum system requirements for Linux Mint 20 default Cinnamon edition:
- Minimum 1 GB RAM (2 GB recommended for a comfortable usage).
- Minimum 15 GB of disk space (20 GB recommended).
- Minimum 1024×768 resolution (on lower resolutions, press ALT to drag windows with the mouse if they don’t fit in the screen).
This method of installing Linux Mint formats your entire disk. That means any data present on the system will be wiped out.
For this reason, please save your data on an external USB disk so that you can copy it back after installing Mint.
Step 1: Download Linux Mint ISO
Go to Linux Mint website and download Linux Mint in ISO format. This file is used for creating the installation USB.
You’ll find three variants:
If you do not know about them, go with the default Cinnamon edition. When you click on that, you’ll find various mirror websites and torrent link to download the ISO file.
If you have a good internet connection for downloading 2 GB of file without any issue, use a mirror which is closer to your country of residence (for faster download).
If you do not have a good, consistent internet connection, opt for the torrent version (if you know what torrent is).
Download Linux Mint
Step 2: Create a live USB of Linux Mint
Now that you have downloaded the ISO, it is time for creating a live USB of Linux Mint.
You’ll need a dedicated software that creates a live USB. There are several such tools available for free. You can use Etcher which is available on Windows, Linux and macOS.
If you are using Windows, you can also use Rufus. In the example here, I have used Rufus.
Download Rufus and run the .exe file and you’ll see a screen like the below image.

You select the ISO. You may confuse over the partitioning scheme. Almost all the computers in last 7 years or so use GPT partitioning scheme. Older computers may use the MBR partitioning. You should check which partitioning scheme your system uses to be sure.
If you choose the incorrect partitioning scheme, you may not be able to Linux Mint. In that case, come back to this step and recreate the USB by choosing the other partitioning scheme.
Step 3: Boot from the live Linux Mint USB
Once you have successfully created the Linux Mint USB, it is time to use it for installing the awesome Linux Mint.
Plug in the live USB of Linux Mint and restart your system. At the boot screen when you see the logo of your computer manufacturer, press F2 or F10 or F12 to enter the BIOS settings.
In here, you should make sure that booting for USB or removable media is on the top of the boot order.
This screen may look different for different manufacturers. You’ll have to find this setting on your own or search the internet.
Make the changes, save and exit.
Step 4: Install Linux Mint
Now you should boot into the live Linux Mint environment. You’ll see a screen like this that gives you a couple of options. Go with the first option.
In a few seconds you’ll be inside the Linux Mint live environment. It may take more time if you have USB 2.
You’ll see a “Install Linux Mint” icon on the desktop. Click on it to start the installation procedure.
It will ask you to choose some basic configurations like language and keyboard layout. Choose the most appropriate ones for your system.
Avoid connecting to internet during installation
I strongly advise NOT connecting to internet while installing Linux Mint. This way the installation is quicker as it does not try downloading updates while installation.
Not connecting to the internet may also save you a few unpleasant surprises. I encountered a “‘grub-efi-amd64-signed’ package failed to install into /target” error and my installation failed. I plugged out the live USB and tried installing it again without connecting to the internet and the error didn’t appear this time.
The next screen is the most important part of Linux Mint installation. You are going to format the entire hard disk and install Linux Mint. Linux Mint will be the only operating system on your computer.
Again, this means that you’ll lose all the data on the disk. Please copy important files on an external disk.
In this method, Linux Mint handles everything on its own. It creates an ESP partition for EFI boot manager of about 500 MB and the rest of the disk is allocated to root partition. The root consists a swapfile for swap usage and your home directory. This is the easiest setup with no extra effort.

You’ll be warned that disk will be formatted. Hit continue and you’ll have to select timezone in the next. You may change it later as well.
After that, you’ll face a screen that asks you to set username and password. Use an easy to remember password because you’ll have to use it all the time.
Things are pretty straightforward from here. You just have to wait for like 5-10 minutes for the installation to complete.


Once the installation finishes, it will ask you to restart the system. Restart it.
When the system turns off, it also asks you to remove the live USB and press enter.
Well, that’s it. You’ll now boot into Linux Mint. Enter your password you had created earlier and you’ll enter Linux Mint to see a welcome screen like this:
Linux Mint Welcome Screen
Enjoy Linux Mint
Since you just installed it, do read our recommendation of things to do after installing Linux Mint 20.
I hope this tutorial helped you in installing Linux Mint 20 easily. If you face any issues or difficulties or if you have any confusion, feel free to leave a comment below.
Like what you read? Please share it with others.
Источник


