- Как смонтировать общий ресурс NFS в Linux
- Установка клиентских пакетов NFS
- Монтирование файловых систем NFS вручную
- Автоматическое монтирование файловых систем NFS с помощью /etc/fstab
- Размонтирование файловых систем NFS
- Выводы
- Easy NFS Share Setup In Ubuntu, Linux Mint Or Debian With Simple NFS GUI (Server And Client)
- Installing and using Simple NFS GUI to set up a NFS client or server
- Use Simple NFS GUI to set up a machine as a NFS client
- Use Simple NFS GUI to set up a machine as a NFS server
- How to Configure NFS Server and Client on Linux Mint 20
- Setting up NFS server
- Step 1: Install NFS Server
- Step 2: Create an Export Directory
- Step 3: Configure and Share the NFS Exports
- Step 4: Add a Firewall Rule for NFS Traffic
- Setting up NFS Client
- Step 1: Install NFS Client
- Step 2: Create Mount Points
- Step 3: Mount NFS Shares on the Client Manually
- Step 4: Mount the NFS shares at startup (automatically)
- Step 5: Test NFS Access
- Unmount NFS Share
Как смонтировать общий ресурс NFS в Linux
Сетевая файловая система (NFS) — это протокол распределенной файловой системы, который позволяет вам обмениваться удаленными каталогами по сети. С помощью NFS вы можете монтировать удаленные каталоги в своей системе и работать с удаленными файлами, как если бы они были локальными файлами.
В операционных системах Linux и UNIX вы можете использовать команду mount для монтирования общего каталога NFS в определенной точке монтирования в локальном дереве каталогов.
В этом руководстве мы покажем вам, как вручную и автоматически смонтировать общий ресурс NFS на машинах Linux.
Установка клиентских пакетов NFS
Чтобы смонтировать общий ресурс NFS в системе Linux, сначала необходимо установить клиентский пакет NFS. Название пакета отличается в разных дистрибутивах Linux.
Установка клиента NFS в Ubuntu и Debian:
Установка клиента NFS на CentOS и Fedora:
Монтирование файловых систем NFS вручную
Подключение удаленного общего ресурса NFS аналогично монтированию обычных файловых систем.
Чтобы смонтировать файловую систему NFS в заданной точке монтирования, используйте команду mount в следующей форме:
Выполните следующие действия, чтобы вручную смонтировать удаленный общий ресурс NFS в вашей системе Linux:
Сначала создайте каталог, который будет точкой монтирования для удаленного общего ресурса NFS:
Точка монтирования — это каталог на локальном компьютере, где должен быть смонтирован общий ресурс NFS.
Подключите общий ресурс NFS, выполнив следующую команду от имени пользователя root или пользователя с привилегиями sudo :
Где 10.10.0.10 — это IP-адрес сервера NFS, /backup — это каталог, который сервер экспортирует, а /var/backups — локальная точка монтирования.
В случае успеха вывод не производится.
Если вы хотите указать дополнительные параметры монтирования , используйте параметр -o . Несколько вариантов могут быть представлены в виде списка, разделенного запятыми. Чтобы получить список всех параметров монтирования, введите в терминале man mount .
Чтобы убедиться, что удаленный том NFS успешно смонтирован, используйте команду mount или df -h .
После монтирования общего ресурса точка монтирования становится корневым каталогом смонтированной файловой системы.
Когда вы монтируете общий ресурс вручную, подключение общего ресурса NFS не сохраняется после перезагрузки.
Автоматическое монтирование файловых систем NFS с помощью /etc/fstab
Как правило, вы хотите автоматически монтировать удаленный каталог NFS при загрузке системы.
Файл /etc/fstab содержит список записей, определяющих, где, как и какая файловая система будет монтироваться при запуске системы.
Чтобы автоматически монтировать общий ресурс NFS при запуске системы Linux, добавьте строку в файл /etc/fstab . Строка должна включать имя хоста или IP-адрес сервера NFS, экспортированный каталог и точку монтирования на локальном компьютере.
Используйте следующую процедуру для автоматического монтирования общего ресурса NFS в системах Linux:
Настройте точку монтирования для удаленного общего ресурса NFS:
Добавьте в файл следующую строку:
Где 10.10.0.10 — IP-адрес сервера NFS, /backup — это экспортированный каталог, а /var/backups — локальная точка монтирования.
Выполните команду mount в одной из следующих форм, чтобы смонтировать общий ресурс NFS:
Команда mount прочитает содержимое /etc/fstab и смонтирует общий ресурс.
В следующий раз, когда вы перезагрузите систему, общий ресурс NFS будет смонтирован автоматически.
Размонтирование файловых систем NFS
Команда umount отсоединяет (размонтирует) смонтированную файловую систему от дерева каталогов.
Чтобы отсоединить смонтированный общий ресурс NFS, используйте команду umount за которой следует либо каталог, в котором он был смонтирован, либо удаленный общий ресурс:
Если для монтирования NFS есть запись в fstab , удалите ее.
Команда umount не сможет отсоединить общий ресурс, когда смонтированный том используется. Чтобы узнать, какие процессы обращаются к общему ресурсу NFS, используйте команду fuser :
Как только вы найдете процессы, вы можете остановить их с помощью команды kill и отключить общий ресурс NFS.
Если у вас все еще есть проблемы с —lazy ресурса, используйте параметр -l ( —lazy ), который позволяет вам отключать загруженную файловую систему, как только она больше не занята.
Если удаленная система NFS недоступна, используйте параметр -f ( —force ) для принудительного размонтирования.
Как правило, не рекомендуется использовать опцию принудительного выполнения, так как это может повредить данные в файловой системе.
Выводы
Мы показали вам, как подключать и отключать удаленный общий ресурс NFS. Те же команды применимы для любого дистрибутива Linux, включая Ubuntu, CentOS, RHEL, Debian и Linux Mint.
Не стесняйтесь оставлять комментарии, если у вас есть вопросы.
Источник
Easy NFS Share Setup In Ubuntu, Linux Mint Or Debian With Simple NFS GUI (Server And Client)
NFS (Network File System) is a distributed file system protocol that allows sharing directories and files with others over a shared network. Using it allows access to files on remote hosts as if they were local files.
Setting up a NFS mount on Ubuntu or Linux Mint can be quite a tedious task. Enter Simple NFS GUI. This is a GUI tool to easily set up a machine as a NFS server or client that should work on Ubuntu, Linux Mint and Debian.
Simple NFS GUI takes care of the whole NFS share configuration process. When setting up a NFS server, the tool automatically sets up the /etc/exports configuration, and secures the server via /etc/hosts.deny and /etc/hosts.allow . For setting up a NFS client, the application automatically creates a directory for the mount point, as well as add the NFS mount to the /etc/fstab file with the users option, so it can be mounted by non-root users. The application also installs the required NFS packages for both server and client.
I should note that while Simple NFS GUI automatically adds the network file system mount in /etc/fstab , it sets it so the NFS is not mounted until it’s accessed. You can change the NFS line created by Simple NFS GUI from /etc/fstab and replace noauto with auto to automatically mount it at boot time, but this may cause the boot process to stall.
If you need to create multiple NFS shares, run the Simple NFS GUI setup process multiple times, specifying a different NFS share folder each time.
Installing and using Simple NFS GUI to set up a NFS client or server
1. Simple NFS GUI requires Gambas 3 — adding a PPA on Ubuntu and Linux Mint is required.
Ubuntu, Linux Mint and flavors / derivatives: Simple NFS GUI requires Gambas 3. I’m not sure why but Gambas 3 is not available in Ubuntu or Linux Mint, while it is available in Debian (the version in Debian jessie is too old though, but newer Debian versions all have the required Gambas 3 version). The Gambas developers are maintaining a PPA to allow installing the latest Gambas 3 in Ubuntu, Linux Mint, as well as Ubuntu flavors like Lubuntu, Kubuntu, Xubuntu, Ubuntu MATE, and so on. Add the PPA and update the software sources:
2. Download and install Simple NFS GUI
Visit this page, scroll down to the bottom and click the blue Download Now button. Next, install the downloaded DEB package. In Ubuntu, the Gambas 3 dependencies will be automatically pulled from the Gambas 3 PPA which should be added on your system as explained above.
3. Starting the Simple NFS GUI application
Don’t run Simple NFS GUI from your applications menu as it won’t work. That’s because the application needs to be started as root, and its application menu entry runs it without admin privileges.
If your system still has gksu (Ubuntu 16.04 and older, Linux Mint 18.x and older, Debian stretch or sid — debports), you can run Simple NFS GUI by using this command:
For Ubuntu 18.04 and newer, Linux Mint 19 and newer, or Debian buster, which don’t have gksu , you’ll need to run the application with sudo , like this:
Now you can use Simple NFS GUI to set up a machine as a NFS client or server.
Use Simple NFS GUI to set up a machine as a NFS client
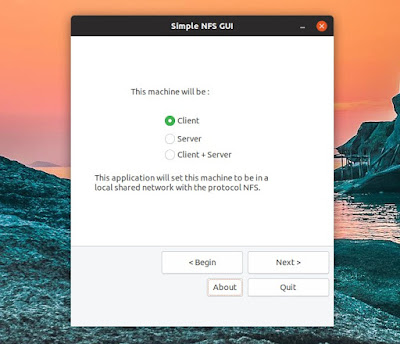
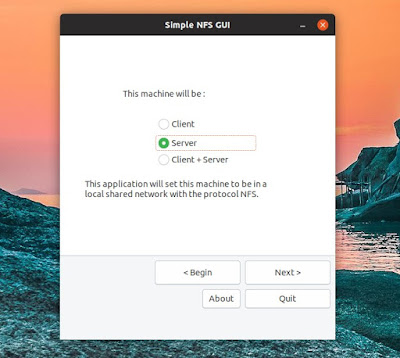
To setup a machine as a network file system (NFS) client using Simple NFS GUI, start the application, select Client and click Next :
On the next screen, click the . button under Select server to select the server IP address :
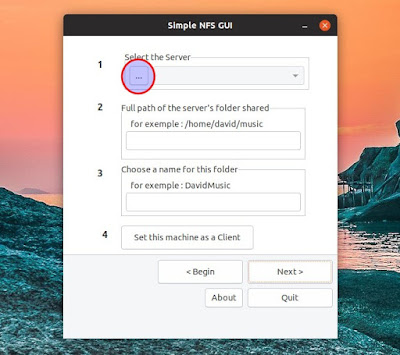
It may take a while until the IP list is populated, because a package may be need to be installed on your system to detect the IPs, and the IP detection may take a bit to run as well.
After the server list is populated, select the NFS share server IP from the dropdown. You’ll also need to enter the full path of the server’s shared NFS folder, and enter a name for this folder (the name needs to only contain letters).
Here how this should look:
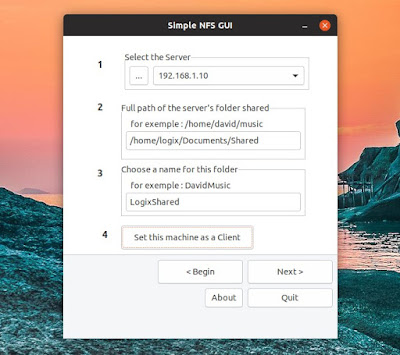
Once you’re done, click the Set this machine as a Client button. Simple NFS GUI will ask you to recheck the data — if everything is ok, press Yes and the setup process is completed.
(Rerun the procedure if you want to add multiple folders.)
You’ll now need to reboot your system. The NFS share should show up in your file manager, but it won’t be mounted by default. Click it and it will be mounted as long as the remote NFS share server can be accessed.
Use Simple NFS GUI to set up a machine as a NFS server
Choose Server from the initial Simple NFS GUI screen and click Next :
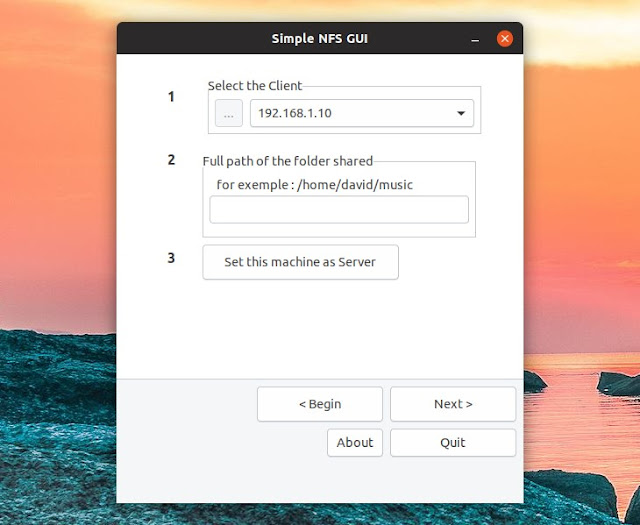
On the second screen, click the . button under Select the client to select the NFS client IP address. Like I mentioned in the client section above as well, it may take a while until the IP list is populated, because a package may be need to be installed on your system to detect the IPs, and the IP detection may take a bit to run as well.
Once the client IP list is populated, select a client IP from the dropdown. You’ll also need to enter the full path of the shared NFS folder. This is how it should look after entering all the required information:
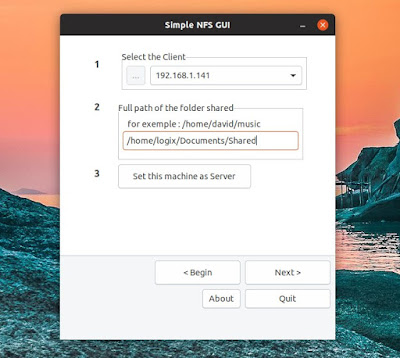
Next, click the Set this machine as Server button. Simple NFS GUI will ask you to recheck the client IP and the server’s folder path. If everything is ok, click Yes .
(If you want to allow multiple clients to access your NFS server, rerun this procedure for each client.)
There’s only one step left: reboot your computer.
Источник
How to Configure NFS Server and Client on Linux Mint 20
NFS (Network File System) works in the form of a client-server model where the machine sharing the directories is known as the NFS server whereas the machine accessing those directories is known as the NFS client. In our previous post, we shared with you how to configure the NFS client and server on the Debian system. This post will be about how to configure the NFS server and client on Linux Mint 20.
Note:
For the demonstration, we will be using the two machines with the following details:
NFS Server (Linux Mint 20)
NFS Client (Linux Mint 20)
Setting up NFS server
Step 1: Install NFS Server
On the machine to be setup as an NFS server, you will need to install nfs-kernel-server. First, update the local repository index:
Enter the password for sudo.
Then install nfs-kernel-server package as follows:
After running the above command, the system will prompt with the y/n option. Hit y to continue the installation.
After the installation is completed, you can verify it by running the following command in Terminal:
If you see the below similar output, it shows the NFS server has been installed successfully. 
Step 2: Create an Export Directory
On the server machine, create an export directory you want to share with the clients. Let’s say we want to export two directories /var/nfs–share and /var/nfs-share1. First, we will have to create these directories. Run the following commands with sudo to do so:

As these directories were created with sudo, therefore the root user currently owns them. You can verify it by running the ls commands as follows:
From our two export directories (/var/ nfs-share and /var/ nfs-share1), we will change the ownership of one of the directory /var/ nfs-share to nobody:nogroup. We will not change the ownership of the second directory; it will remain owned by the root user.
Run the following command to change the ownership of /var/ nfs-share directory from root to nobody:nogroup:
You can confirm the new owner through the following command:
The following output confirms that the /var/ nfs-share is now owned by nobody:nogroup.

Step 3: Configure and Share the NFS Exports
Next, we will configure NFS for the sharing of the export directories. The NFS configuration file is /etc/exports which determine which clients will have access to the exported directories.
In the /etc/exports file, add the configuration lines using the following syntax:
- export_directory is the directory you want to share.
- client is the IP address or the subnet of the client that wants to access the shared directories. To find the IP address of a machine, you can visit our post on How to Find the IP address.
- options specify how the resources should be shared.
These configuration lines basically specify the directories we are going to export and who can access them.
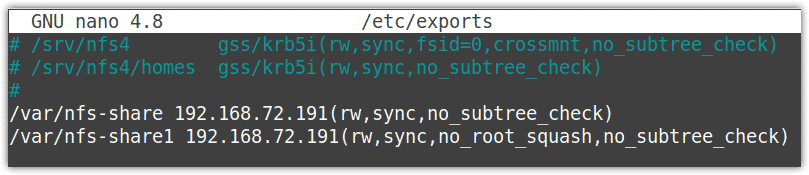
In order to share our NFS export directories (/var/ nfs-share and /var/ nfs-share1) to client IP addres 192.168.72.191, we will add following lines in the configuration file /etc/exports.
Our configuration lines specify the directories (nfs-share and nfs-share1) we want to export to the client 192.168.72.191 with read-write, sync, and no_subtree_check options. In the second entry, you can find the no_root_squash option which gives the client root permission on the server. You can visit more information about the options on the exports man page.
Save and close the file.
Now you will have to share the exports configured in the /etc/exports. You can do so using the following command in Terminal:
The following output shows that the NFS server is exporting the shared directories to the clients.

Alternatively, you can also export the shares by restarting the NFS service:
You can also check the NFS service status to ensure if it is actively running. Here is the command to do so:
The following output indicates the NFS server is running fine without any issues.

Step 4: Add a Firewall Rule for NFS Traffic
First, check if a firewall is enabled on your server by running the following command in Terminal:
If you see the active status in output, it means the firewall is enabled. Therefore, now you will have to add a rule in the firewall for NFS traffic.
Using the following syntax, add a rule in the firewall to allow clients to NFS port 2049.
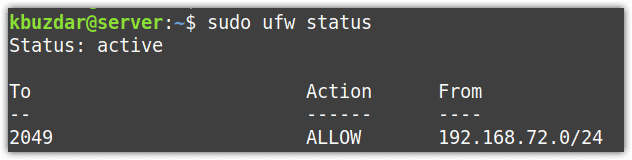
For example, you can run the following command to allow client subnet 192.168.72.0/24 access to NFS server port 2049:
Now to check if the firewall rule has been added successfully, run the following command:
The following output shows the rule has been added which allows the connection from 192.168.72.0/24 to port 2049.
Setting up NFS Client
Step 1: Install NFS Client
On the machine to be setup as an NFS client, you will need to install nfs-common package on it. You can install it as follows:
First, update the local repository index:
Enter the password for sudo.
Then install nfs-common package:
After running the above command, the shell will prompt with the y/n choice. Press y to continue the procedure.
After the installation of client package is completed, you can verify it as follows:
If you see the below similar output, it shows the NFS client has been installed successfully.

Step 2: Create Mount Points
To mount the NFS shares on your client machine, you will first have to create the mount points. We will be creating two directories for our mount points:
Step 3: Mount NFS Shares on the Client Manually
Now that we have the mount points, we can mount the NFS shares exported from the NFS server on the client. Use the following syntax to mount the NFS shares:
In the above command syntax:
- NFS_server: Enter IP address of NFS server
- NFS_export: Enter NFS export directory shared by the NFS server
- client_mountpoint: Enter the mount point of the client where you want to mount the NFS export directory.
We have run the following commands to mount the NFS shares:
The above commands mount the shares from:
- /var/nfs-share directory on the NFS server (192.168.72.170) to the client’s local mount point /media/nfs-share
- /var/nfs-share1 directory on the NFS server (192.168.72.170) to the client’s local mount point /media/nfs-share1.

Now run this command to verify if the mounting has been successful:
The output of the df command is as follows which shows the NFS mounts at the bottom.
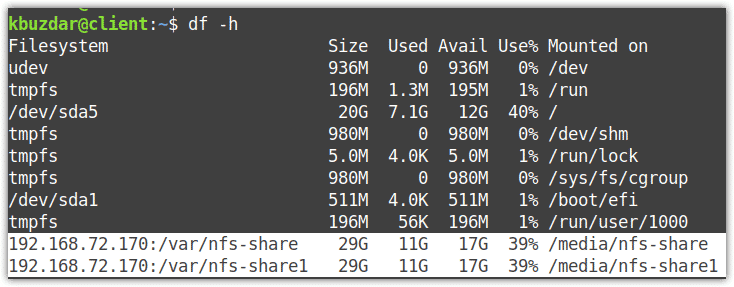
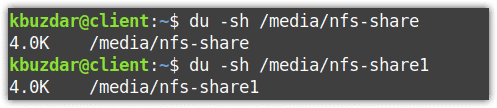
Using the below command, you can also determine how much space is actually used by each mount point.
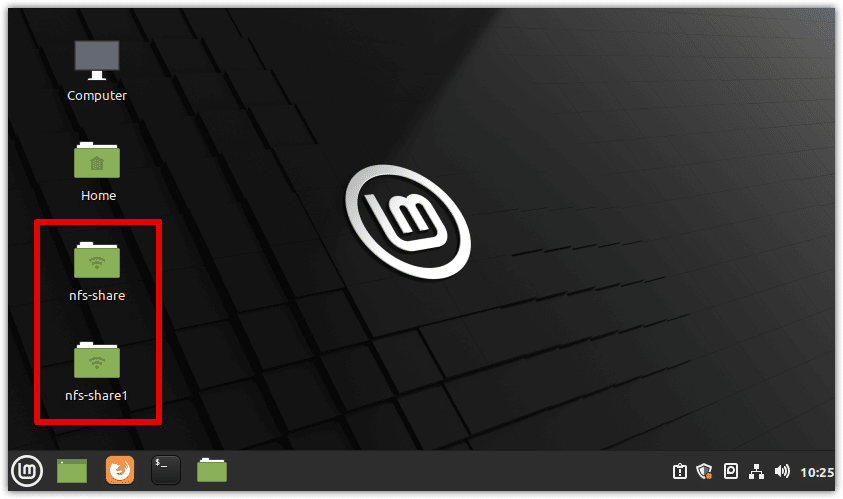
As we have created the mount points under the /media directory, the system will create one link to that mount point in the left panel of File Manager. Therefore, you can access the shared directories from your File Manager.
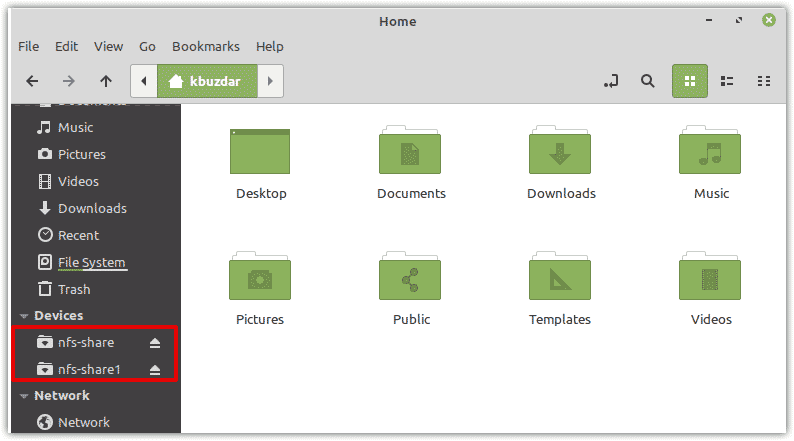
You will also find one link to mount point on the Desktop.
Step 4: Mount the NFS shares at startup (automatically)
In the previous step, we have seen how to mount the NFS shares on the client manually. But when you restart the system, they get unmounted. Therefore, after restarting the system, you will have to again mount it. To avoid this manual procedure, again and again, you can make the mount permanent on your system by configuring it in the /etc/fstab file. This configuration will make the NFS shares to automatically mount at startup.
Open the /etc/fstab file using the Nano editor as follows:
In the file, add entries for your shares that you want to mount at startup:
Then save and close the file.
Now after every restart, the NFS shares will be automatically mounted at their specified mount points.
Step 5: Test NFS Access
To test the NFS access, create a new file in each shared directory in your client machine. First, create a sample.txt file as sudo in the /media/nfs-share:
Then create a second file sample1.txt as sudo in the /media/nfs-share1:
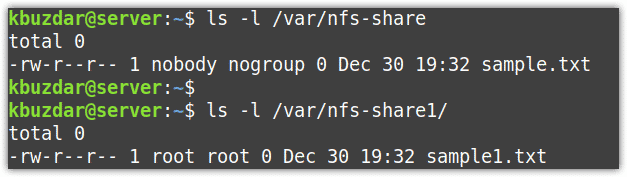
Now check the ownership of both files:

You will see the ownership of the sample.txt file is nobody user and nogroup group. Even though this file was created as sudo but the NFS server has now translated its ownership to the server’s nobody:nogroup. This shows the root user on the NFS client cannot carry the administrative jobs on the NFS share.
The ownership of the other file sample1.txt is owned by the root user and root group. It is due to the no_root_squash option that we configured in the /etc/exports file. It enables the root user on the NFS client to function as root and performs administrative jobs.
Now, also check if you can access both files from the NFS server.
Unmount NFS Share
In case, you no longer want the NFS shares, you can easily unmount them from your machine. To unmount the NFS shares, use the following syntax:
In our example, it would be:
This is how you can setup the NFS server and client on Mint. In this post, you have learned how to install the NFS server and client, configure and share NFS export directories, and mount/unmount the NFS shares on the client.

Ummara Mushtaq is a Telecommunication engineer with two years of experience in server support and networking. She writes technical articles based on Linux system administration for LinuxWays.
Источник


