- Как настроить сервер NFS и смонтировать общие ресурсы NFS в Linux
- Установка пакетов
- Создание общего каталога на сервере
- Настройка NFS в Ubuntu
- Немного теории
- Установка компонентов NFS
- Настройка сервера NFS в Ubuntu
- Подключение NFS
- Выводы
- How to setup NFS server in Linux Mint (Ubuntu based)?
- How to Configure NFS Server and Client on Linux Mint 20
- Setting up NFS server
- Step 1: Install NFS Server
- Step 2: Create an Export Directory
- Step 3: Configure and Share the NFS Exports
- Step 4: Add a Firewall Rule for NFS Traffic
- Setting up NFS Client
- Step 1: Install NFS Client
- Step 2: Create Mount Points
- Step 3: Mount NFS Shares on the Client Manually
- Step 4: Mount the NFS shares at startup (automatically)
- Step 5: Test NFS Access
- Unmount NFS Share
Как настроить сервер NFS и смонтировать общие ресурсы NFS в Linux
Сетевая файловая система (NFS) – это популярный протокол распределенной файловой системы, который позволяет пользователям монтировать удаленные каталоги на своем компьютере. NFS довольно хорошо работает c каталогами, к которым пользователям требуется частый доступ. Практически во всех версиях Linux команды будут одинаковые. Мы рассмотрим как монтировать общий ресурс NFS на примере сервера Ubuntu 18.04.
Пусть компьютеры будут иметь следующие адреса:
Сервер: 192.168.1.5
Клиент: 192.168.1.100
Требуется подключить существующую папку /home и специально созданную папку /var/nfs с сервера к клиенту.
Установка пакетов
Прежде всего, требуется установить необходимые компоненты как на сервере, так и на клиентских компьютерах. На сервере вам потребуется установить пакет nfs-kernel-server , который позволит использовать совместный доступ к вашим каталогам.
На клиентском компьютере вам потребуется установить пакет nfs-common.
Создание общего каталога на сервере
Мы будем монтировать специально созданный на сервере каталог на клиентский компьютер. Создадим каталог nfs.
Теперь отредактируем файл, отвечающий за совместное использование ресурсов NFS
Здесь нужно создать строку для каждого из каталогов, которые должны быть общими и указать с какими компьютерами мы разделяем ресурсы. В нашем примере IP-адрес клиента – 192.168.1.100, поэтому строки должны выглядеть примерно так:
В случае если нужно раздать каталог на все компьютеры подсети вместо 192.168.1.100 нужно указать 192.168.1.0/24
Давайте разберем, что здесь написано.
rw: эта опция позволяет клиентскому компьютеру как читать, так и записывать в данный каталог.
sync: заставляет NFS записывать изменения на диск перед ответом, что приводит к более стабильной и согласованной среде. Это связано прежде всего с тем, что ответ повторяет фактическое состояние удаленного тома.
no_subtree_check: эта опция предотвращает проверку поддеревьев. Сервер при каждом запросе проверяет, действительно ли файл все еще доступен в экспортируемом дереве. Отключение проверки уменьшает безопасность, но увеличивает скорость передачи данных.
no_root_squash: по умолчанию NFS переводит запросы от пользователя root на клиентском компьютере в непривилегированного на сервере. Это параметр безопасности который не позволяет учетной записи root на клиенте использовать файловую систему сервера в качестве root.
После того, как необходимые изменения внесены и сохранены, выполним команду:
и запустим службу NFS
Данная команда сделает ваши ресурсы доступными для клиентов, которых вы настроили. Теперь перейдем к следующему шагу.
Создание точек монтирования и монтирование удаленных общих ресурсов на клиентском компьютере
Сперва создадим точки монтирования удаленных ресурсов.
Автоматическое монтирование производится через fstab
Допишем в конец файла
Если вам больше не требуется монтировать удаленный каталог в вашей системе, вы можете легко размонтировать его используя следующие команды:
NFS предлагает простой и быстрый механизм доступа к удаленным системам по сети. Однако протокол является не зашифрованным. Если вы намерены использовать это в производственной среде, рекомендуется рассмотреть возможность запуска NFS через SSH или VPN-соединение.
Источник
Настройка NFS в Ubuntu
Сетевая файловая система NFS или Network File System, это популярный протокол сетевой файловой системы, который позволяет пользователям подключать удаленные сетевые каталоги на своей машине и передавать файлы между серверами. Вы можете использовать дисковое пространство на другой машине для своих файлов и работать с файлами, расположенными на других серверах. По сути, это альтернатива общего доступа Windows для Linux, в отличие от Samba реализована на уровне ядра и работает более стабильно.
В этой статье будет рассмотрена установка NFS в Ubuntu. Мы разберем установку всех необходимых компонентов, настройку общей папки, а также подключение сетевых папок.
Немного теории
Как уже было сказано, NFS, это сетевая файловая система. Для работы необходим сервер, на котором будет размещена общая папка и клиенты, которые могут монтировать сетевую папку как обычный диск в системе. В отличие от других протоколов NFS предоставляет прозрачный доступ к удаленным файлам. Программы будут видеть файлы как в обычной файловой системе и работать с ними как с локальными файлами, nfs возвращает только запрашиваемую часть файла, вместо файла целиком, поэтому эта файловая система будет отлично работать в системах с быстрым интернетом или в локальной сети.
Установка компонентов NFS
Перед тем как мы сможем работать с NFS, нам придется установить несколько программ. На машину, которая будет сервером нужно установить пакет nfs-kernel-server, с помощью которого будет выполнено открытие шары nfs в ubuntu 16.04. Для этого выполните:
sudo apt install nfs-kernel-server
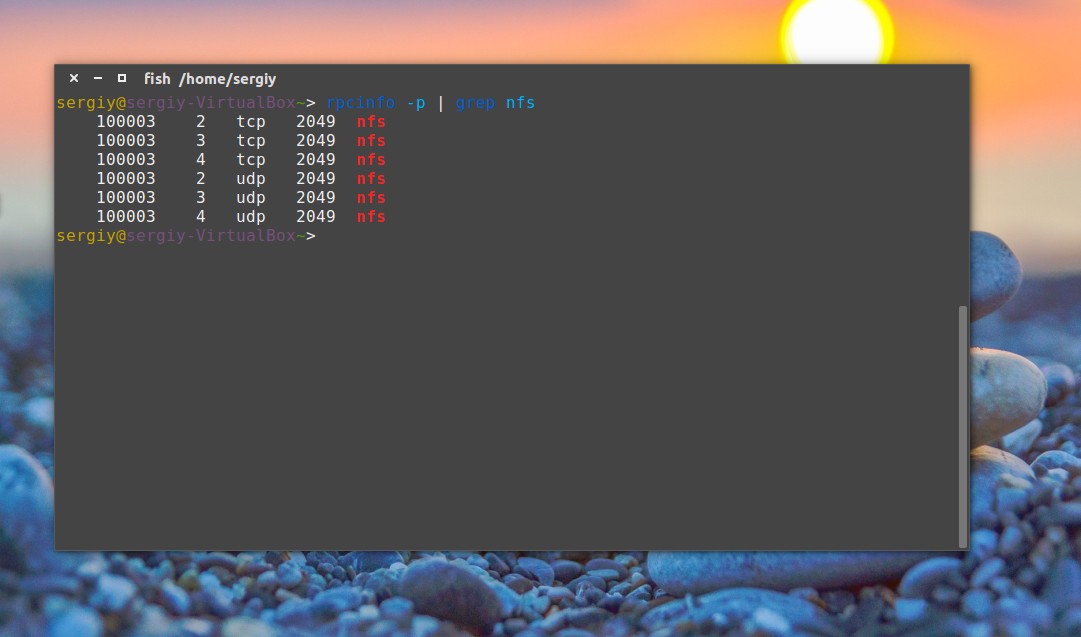
Теперь давайте проверим правильно ли установился сервер. Сервис NFS слушает соединения как для TCP, так и для UDP на порту 2049. Посмотреть действительно ли сейчас используются эти порты можно командой:
rpcinfo -p | grep nfs
Также важно проверить поддерживается ли NFS на уровне ядра:
cat /proc/filesystems | grep nfs
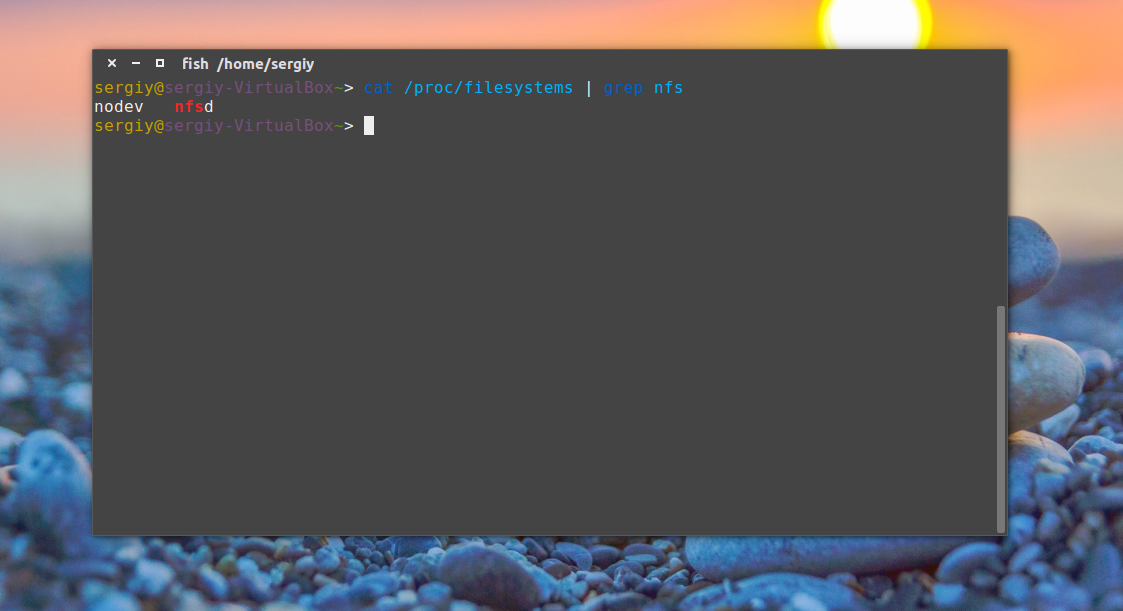
Видим, что работает, но если нет, нужно вручную загрузить модуль ядра nfs:
Давайте еще добавим NFS в автозагрузку:
sudo systemctl enable nfs-server
На клиентском компьютере вам нужно установить пакет nfs-common, чтобы иметь возможность работать с этой файловой системой. Вам необязательно устанавливать компоненты сервера, достаточно будет только этого пакета:
sudo apt install nfs-common
Вот и все, дальше настройка NFS в Ubuntu.
Настройка сервера NFS в Ubuntu
Мы можем открыть NFS доступ к любой папке, но давайте создадим для этих целей новую:
sudo mkdir /var/nfs
Дальше нас интересует настройка ubuntu nfs server. Все общие папки и другие настройки nfs находятся в файле /etc/exports. Синтаксис записи папки такой:
адрес_папки клиент (опции)
Адрес папки — это та папка, которую нужно сделать доступной по сети. Клиент — ip адрес или адрес сети, из которой могут получить доступ к этой папке. А вот с опциями немного сложнее. Рассмотрим некоторые из них:
- rw — разрешить чтение и запись в этой папке;
- ro — разрешить только чтение;
- sync — отвечать на следующие запросы только тогда, когда данные будут сохранены на диск (по умолчанию);
- async — не блокировать подключения пока данные записываются на диск;
- secure — использовать для соединения только порты ниже 1024;
- insecure — использовать любые порты;
- nohide — не скрывать поддиректории при, открытии доступа к нескольким директориям;
- root_squash — подменять запросы от root на анонимные, используется по умолчанию;
- no_root_squash — не подменять запросы от root на анонимные;
- all_squash — превращать все запросы в анонимные;
- subtree_check — проверять не пытается ли пользователь выйти за пределы экспортированной папки;
- no_subtree_check — отключить проверку обращения к экспортированной папке, улучшает производительность, но снижает безопасность, можно использовать когда экспортируется раздел диска;
- anonuid и anongid — указывает uid и gid для анонимного пользователя.
Например, для нашей папки, если вы хотите разрешить к ней подключаться только с определённого IP адреса, эта строка может выглядеть вот так:
sudo vi /etc/exports
Можно разрешить только нужную подсеть, например:
Для того чтобы разрешить все адреса используйте подсеть 0.0.0.0/0 или символ *.
Открытие шары NFS в Ubuntu почти завершено. Осталось разобраться с правами. Кроме ограничений IP адреса работает обычная система полномочий UNIX, поэтому если вы хотите чтобы определённый пользователь мог получить доступ к папке, то на сервере должен существовать пользователь с таким же UID и эта папка должна принадлежать ему или группе в которой он состоит.
Кроме того, обратите внимание на то, что все подключения от имени пользователя root считаются по умолчанию анонимными (nfsnobody), чтобы это отключить добавьте опцию монтирования no_root_squash, но это не безопасно, потому что любой root пользователь сможет получить доступ на запись ко всем файлам. Теперь попытаемся настроем клиента и попытаемся ее примонтировать.
Для того чтобы все пользователи могли получить доступ ко всем файлам можно создать пользователя с UID 1001 и попросить NFS все запросы считать запросами от анонимного пользователя, а анонимному пользователю присвоить UID 1001. Это делается такими опциями:
Когда все будет настроено, останется только обновить таблицу экспорта NFS:
sudo exportfs -a
Если на вашем сервере используется брандмауэр, то следует открыть порты 111 и 2049:
sudo ufw allow 111
sudo ufw allow 2049
Подключение NFS
Мы не будем подробно останавливаться на этом вопросе в сегодняшней статье. Это довольно большая тема, заслуживающая отдельной статьи. Но пару слов я все же скажу. Чтобы подключить сетевую папку вам не нужен никакой nfs клиент ubuntu, достаточно использовать команду mount:
sudo mount 127.0.0.1:/var/nfs/ /mnt/
Теперь вы можете попытаться создать файл в подключенной директории:
Также мы посмотрите подключенные файловые системы с помощью df:
127.0.0.1:/var/nfs 30G 6,7G 22G 24% /mnt
Чтобы отключить эту файловую систему достаточно использовать стандартный umount:
sudo umount /mnt/
Выводы
В этой статье была рассмотрена настройка NFS в Ubuntu 20.04, как видите, все делается очень просто и прозрачно. Подключение NFS шары выполняется в несколько кликов, с помощью стандартных команд, а открытие шары NFS ненамного сложнее подключения. Если у вас остались вопросы, пишите в комментариях!
Источник
How to setup NFS server in Linux Mint (Ubuntu based)?
One of my NFS server running on Fedora was overloaded and I had to set up a new one. This time, I choose Linux Mint.
Setting up NFS server on Linux Mint was a breeze. Since the method we followed may be useful to other developers, I thought of sharing them here.
What is Linux Mint?
Linux Mint is a Ubuntu based Linux OS with growing popularity. Since its Ubuntu based, it inherits all the traits of Ubuntu release and add few additional functionality.
I have been using Linux Mint for about three years now starting from Linux Mint 5 till the latest Linux Mint 9. I am a great fan of this OS.
What is NFS?
The Network File System (NFS) protocol was developed by Sun Microsystems in 1984. NFS builds over Open Network Computing Remote Procedure Call, commonly called SUN ONC.
Step 1: Install NFS server and other dependent applications
Open a terminal on the Linux Mint desktop and issue the below command.
This will install three packages the are essential for clutter free operation of NFS.
Step 2: Configure the NFS server
NFS exports from a server are controlled by the file /etc/exports . Each line begins with the absolute path of a directory to be exported, followed by a space-separated list of allowed clients.
For example: To export the /var/nfs directory so that it can be accessed by any client, please insert the below line in the file – /etc/exports .
Note: Allowing any client to access your box can be potentially harmful. Please reconsider your decision before doing so.
To allow access to machines with a particular set of IP addresses, please insert the below line in /etc/exports .
Other options that can specified along with the IP address include:
ro:
The directory is shared read only; the client machine will not be able to write it. This is the default.
rw:
The client machine will have read and write access to the directory.
no_root_squash:
If no_root_squash is specified, then root on the client machine will have the same level of access to the files on the system as root on the server. This can have serious security implications. You should not specify this option without a good reason.
no_subtree_check:
If only part of a volume is exported, a routine called subtree checking verifies that a file that is requested from the client is in the appropriate part of the volume. If the entire volume is exported, disabling this check will speed up transfers.
sync
By default, all but the most recent version (version 1.11) of the exportfs command will use async behavior, telling a client machine that a file write is complete – that is, has been written to stable storage – when NFS has finished handing the write over to the file system. This behavior may cause data corruption if the server reboots, and the sync option prevents this.
Источник
How to Configure NFS Server and Client on Linux Mint 20
NFS (Network File System) works in the form of a client-server model where the machine sharing the directories is known as the NFS server whereas the machine accessing those directories is known as the NFS client. In our previous post, we shared with you how to configure the NFS client and server on the Debian system. This post will be about how to configure the NFS server and client on Linux Mint 20.
Note:
For the demonstration, we will be using the two machines with the following details:
NFS Server (Linux Mint 20)
NFS Client (Linux Mint 20)
Setting up NFS server
Step 1: Install NFS Server
On the machine to be setup as an NFS server, you will need to install nfs-kernel-server. First, update the local repository index:
Enter the password for sudo.
Then install nfs-kernel-server package as follows:
After running the above command, the system will prompt with the y/n option. Hit y to continue the installation.
After the installation is completed, you can verify it by running the following command in Terminal:
If you see the below similar output, it shows the NFS server has been installed successfully. 
Step 2: Create an Export Directory
On the server machine, create an export directory you want to share with the clients. Let’s say we want to export two directories /var/nfs–share and /var/nfs-share1. First, we will have to create these directories. Run the following commands with sudo to do so:

As these directories were created with sudo, therefore the root user currently owns them. You can verify it by running the ls commands as follows:
From our two export directories (/var/ nfs-share and /var/ nfs-share1), we will change the ownership of one of the directory /var/ nfs-share to nobody:nogroup. We will not change the ownership of the second directory; it will remain owned by the root user.
Run the following command to change the ownership of /var/ nfs-share directory from root to nobody:nogroup:
You can confirm the new owner through the following command:
The following output confirms that the /var/ nfs-share is now owned by nobody:nogroup.

Step 3: Configure and Share the NFS Exports
Next, we will configure NFS for the sharing of the export directories. The NFS configuration file is /etc/exports which determine which clients will have access to the exported directories.
In the /etc/exports file, add the configuration lines using the following syntax:
- export_directory is the directory you want to share.
- client is the IP address or the subnet of the client that wants to access the shared directories. To find the IP address of a machine, you can visit our post on How to Find the IP address.
- options specify how the resources should be shared.
These configuration lines basically specify the directories we are going to export and who can access them.
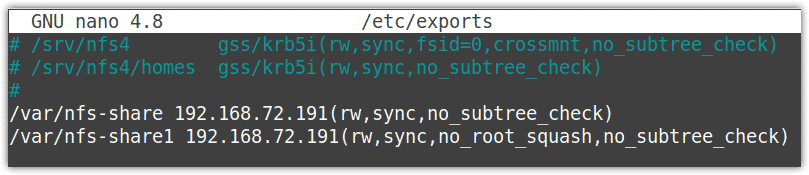
In order to share our NFS export directories (/var/ nfs-share and /var/ nfs-share1) to client IP addres 192.168.72.191, we will add following lines in the configuration file /etc/exports.
Our configuration lines specify the directories (nfs-share and nfs-share1) we want to export to the client 192.168.72.191 with read-write, sync, and no_subtree_check options. In the second entry, you can find the no_root_squash option which gives the client root permission on the server. You can visit more information about the options on the exports man page.
Save and close the file.
Now you will have to share the exports configured in the /etc/exports. You can do so using the following command in Terminal:
The following output shows that the NFS server is exporting the shared directories to the clients.

Alternatively, you can also export the shares by restarting the NFS service:
You can also check the NFS service status to ensure if it is actively running. Here is the command to do so:
The following output indicates the NFS server is running fine without any issues.

Step 4: Add a Firewall Rule for NFS Traffic
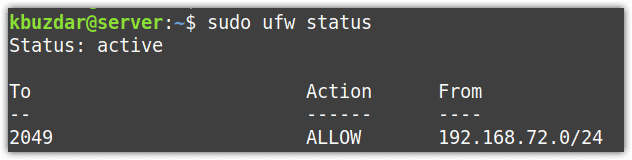
First, check if a firewall is enabled on your server by running the following command in Terminal:
If you see the active status in output, it means the firewall is enabled. Therefore, now you will have to add a rule in the firewall for NFS traffic.
Using the following syntax, add a rule in the firewall to allow clients to NFS port 2049.
For example, you can run the following command to allow client subnet 192.168.72.0/24 access to NFS server port 2049:
Now to check if the firewall rule has been added successfully, run the following command:
The following output shows the rule has been added which allows the connection from 192.168.72.0/24 to port 2049.
Setting up NFS Client
Step 1: Install NFS Client
On the machine to be setup as an NFS client, you will need to install nfs-common package on it. You can install it as follows:
First, update the local repository index:
Enter the password for sudo.
Then install nfs-common package:
After running the above command, the shell will prompt with the y/n choice. Press y to continue the procedure.
After the installation of client package is completed, you can verify it as follows:
If you see the below similar output, it shows the NFS client has been installed successfully.

Step 2: Create Mount Points
To mount the NFS shares on your client machine, you will first have to create the mount points. We will be creating two directories for our mount points:
Step 3: Mount NFS Shares on the Client Manually
Now that we have the mount points, we can mount the NFS shares exported from the NFS server on the client. Use the following syntax to mount the NFS shares:
In the above command syntax:
- NFS_server: Enter IP address of NFS server
- NFS_export: Enter NFS export directory shared by the NFS server
- client_mountpoint: Enter the mount point of the client where you want to mount the NFS export directory.
We have run the following commands to mount the NFS shares:
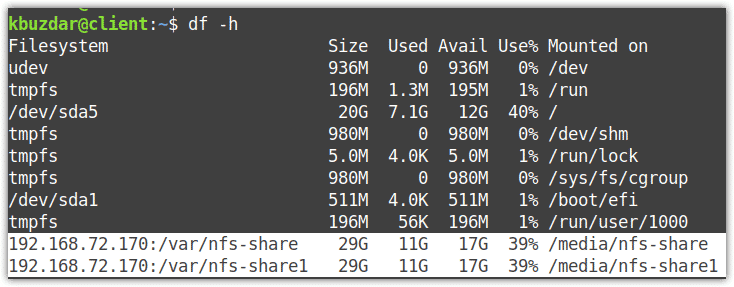
The above commands mount the shares from:
- /var/nfs-share directory on the NFS server (192.168.72.170) to the client’s local mount point /media/nfs-share
- /var/nfs-share1 directory on the NFS server (192.168.72.170) to the client’s local mount point /media/nfs-share1.

Now run this command to verify if the mounting has been successful:
The output of the df command is as follows which shows the NFS mounts at the bottom.
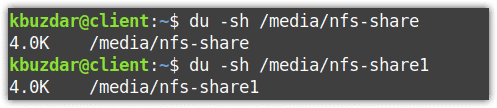
Using the below command, you can also determine how much space is actually used by each mount point.
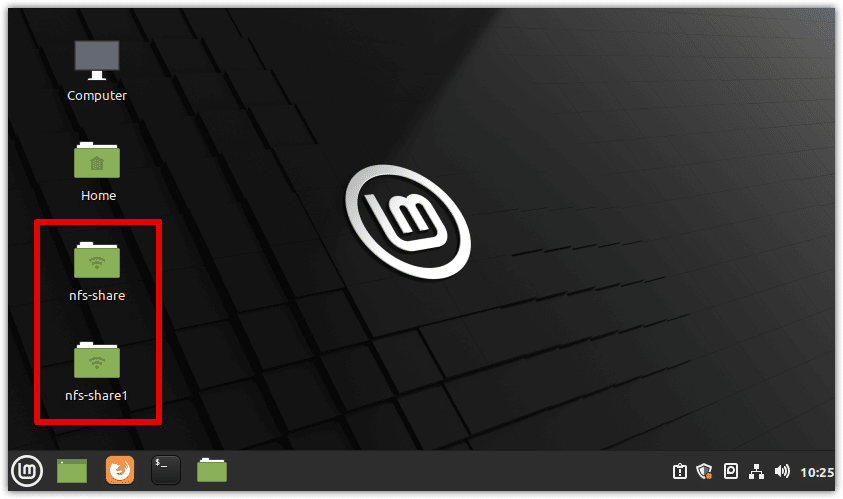
As we have created the mount points under the /media directory, the system will create one link to that mount point in the left panel of File Manager. Therefore, you can access the shared directories from your File Manager.
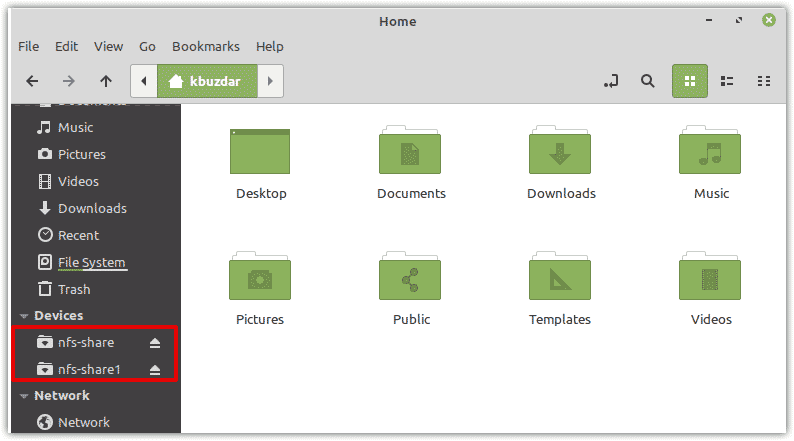
You will also find one link to mount point on the Desktop.
Step 4: Mount the NFS shares at startup (automatically)
In the previous step, we have seen how to mount the NFS shares on the client manually. But when you restart the system, they get unmounted. Therefore, after restarting the system, you will have to again mount it. To avoid this manual procedure, again and again, you can make the mount permanent on your system by configuring it in the /etc/fstab file. This configuration will make the NFS shares to automatically mount at startup.
Open the /etc/fstab file using the Nano editor as follows:
In the file, add entries for your shares that you want to mount at startup:
Then save and close the file.
Now after every restart, the NFS shares will be automatically mounted at their specified mount points.
Step 5: Test NFS Access
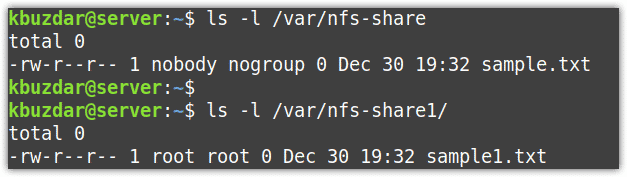
To test the NFS access, create a new file in each shared directory in your client machine. First, create a sample.txt file as sudo in the /media/nfs-share:
Then create a second file sample1.txt as sudo in the /media/nfs-share1:
Now check the ownership of both files:

You will see the ownership of the sample.txt file is nobody user and nogroup group. Even though this file was created as sudo but the NFS server has now translated its ownership to the server’s nobody:nogroup. This shows the root user on the NFS client cannot carry the administrative jobs on the NFS share.
The ownership of the other file sample1.txt is owned by the root user and root group. It is due to the no_root_squash option that we configured in the /etc/exports file. It enables the root user on the NFS client to function as root and performs administrative jobs.
Now, also check if you can access both files from the NFS server.
Unmount NFS Share
In case, you no longer want the NFS shares, you can easily unmount them from your machine. To unmount the NFS shares, use the following syntax:
In our example, it would be:
This is how you can setup the NFS server and client on Mint. In this post, you have learned how to install the NFS server and client, configure and share NFS export directories, and mount/unmount the NFS shares on the client.

Ummara Mushtaq is a Telecommunication engineer with two years of experience in server support and networking. She writes technical articles based on Linux system administration for LinuxWays.
Источник


